With snow on the ground and sub-freezing temperatures in much of the country, we hope our readers are staying warn indoors with family members this Christmas week. To provide a bit of entertainment here are two videos that combine a holiday theme with the shooting sports.
In this fun video, YouTube host 22plinkster plays a holiday tune on steel plates. Using a Henry Golden Boy .22 LR lever gun, 22plinkster performs a plate-by-plate musical rendition of Jingle Bells. To hit each tuned plate in the right order takes considerable skill and concentration. But we thank 22plinkster for offering this special holiday shooting range concert.
Here we have 22plinkster once again. He wanted to see how many Christmas ornaments could be penetrated by one .22 LR round. To answer that burning question, he lined up 40 plastic Xmas bulbs in a row and then fired a single round of CCI .22 LR Velocitor ammo through the bunch, using his Henry Golden Boy lever action rifle. Did the bullet penetrate a dozen ornaments? Two dozen? What do you think? Watch the video to find out the surprising answer.
Every serious hand-loader benefits from a precise, repeatable, and efficient powder dispensing system. There are many electronic powder dispensers on the market, starting at about $195 for a Frankford Arsenal Intellidropper and $240 for a Lyman Gen6. At the high end, the ultimate powder weighing/dispensing system would be an Auto-Trickler V4 mated to an top-tier electronic Force Restoration scale. Such a system can run $1200 or more, depending on scale cost.
In today’s Saturday video showcase we feature eight videos about electronic powder dispensers, as well as Auto-Trickler systems (both V3 and V4). If you are in the market for a new powder scale/dispenser system, we recommend you watch these videos. You may be surprised by some of the findings, and you will certainly learn more about these machines — their pros and cons. That knowledge can help you decide what electronic powder dispenser best deserves your hard-earned dollars.
Five Powder Dispenser Comparison Test (All Units Purchased)
If you are in the market for a sub-$500 electronic powder dispenser, definitely watch this review. This Backfire comparison test is notable because the tester spent his own money to purchase all five powder dispensers being reviewed. That means Backfire could tell the full truth, both good and bad, about the machines. In fact, Backfire bought TWO ChargeMaster Lites because one failed (See 14:12 time-mark). The reviewer liked the RCBS ChargeMaster Supreme, but his top choice overall was the Hornady Auto Charge Pro. He favored the overall design, and really liked the way the dispensing speeds could be easily set faster or slower. Here are highlights from the video review:
00:08 Speed Test
03:09 Accuracy Test
07:57 Frankford Arsenal Intellidropper
09:08 Lyman Gen 6
10:44 RCBS Chargemaster Supreme
12:03 Hornady Auto Charge Pro
14:12 RCBS Chargemaster Lite
14:41 Conclusions
AutoTrickler V3 vs. Hornady Auto Charge Pro
In the Backfire comparison video above, the Hornady Auto Charge Pro powder dispenser earned top marks among sub-$500 units. Here the Auto Charge takes on some tougher competition — an ultra-precise Force Restoration scale fitted with an Auto-Trickler V3, a system that cost upwards of $1150.00 U.S. Dollars. The Australian duo running the comparison found the Auto-Trickler system was more accurate and consistent. Notably, with a dispense speed of just 14 seconds. the Auto-Trickler V3 system was significantly faster than the Hornady machine. The Auto-Tricker V3 has been superseded by the new Auto-Trickler V4 which retails for $490.00 USD. Add $630 or more for a good Force Restoration scale such as the A&D FX-120i.
RCBS New ChargeMaster Supreme and Other ChargeMasters
In this well-made video, Gavin Gear of UltimateReloader.com does a detailed review of the new-generation RCBS ChargeMaster Supreme. He puts it through his paces, verifying its accuracy and repeatability. He shows how the unit can be programmed. At the 17:20 time-mark, Gavin employs an A&D FX-120i Force Restoration scale to check the ChargeMaster Supreme’s charge-weighing precision. The results were good.
Frankford Arsenal Intellidropper vs. RCBS ChargeMaster Link
The Frankford Arsenal Intellidropper, now just $194.49 on Amazon, was very innovative when first released, offering remote Bluetooth access and a wide range of programmable features. The downloadable App stores your load data and has preloaded bullet and powder databases. This video compares the Intellidropper with another Bluetooth-enabled modern powder dispenser, the RCBS Chargemaster Link. A free RCBS App allows you to control settings remotely.
Hornady Auto Charge Pro Review by Ultimate Reloader
As the $359 Hornady Auto Charge Pro dispenser was top-rated in the Backfire comparison at the start of this article, we thought we’d include a detailed review from Gavin Gear of UltimateReloader.com. If you are thinking of buying a Hornady Auto Charge Pro, definitely watch this video, as it is the most thorough Auto Charge Pro review on the web and Gavin is by far the most articulate tester. SEE FULL TEST.
AutoTrickler V4 and Force Restoration Scale
The AutoTrickler V4, paired with a quality Force Restoration scale, is the “Rolls Royce” of electronic powder dispensing systems, offering unrivaled charge-weight accuracy, great repeatability, and ultra-fast dispensing speeds. If you have the budget — $490 for the V4 plus $625+ for scale — the AutoTrickler V4 is a superb system that lets you load extremely accurate, consistent ammo. This detailed F-Class John video shows how to set up the system properly and control the dispensing and trickling functions.
RCBS MatchMaster vs. AutoTrickler V3 with A&D FX-120i Scale
This video is interesting because it compares the most advanced and expensive mass-market electronic dispenser, the $899 RCBS MatchMaster, with an AutoTrickler V3 mated to an ultra-precise Force Restoration scale. The AutoTrickler V3 + scale system offers wicked fast dispensing while delivering near-single-kernel precision and great repeatability. The MatchMaster has some interesting features, including dual dispensing tubes and a special slower, “Match Mode” dispensing function which provides enhanced precision.
BONUS Video: RCBS ChargeMaster Dispenser vs. Four Scales
This video answers the question “How does a common powder dispenser’s weighing accuracy compare to stand-alone scales?” Here the tester compares the weighing precision of an early-model RCBS ChargeMaster with four dedicated scales: A&D FX-120i (Force Restoration), Hornady G2-1500, Hornady GS-1500 (Gen 1), and a WAOAW milligram scale. These scales range significantly in price, with the FX-120i Force Restoration the most expensive by far. The features/prices of the four scales are listed at 4:41 time-mark. Accuracy/repeatability comparison testing with test weights starts at 10:12 time-mark.
Christmas Day is this upcoming Wednesday, just five days away. We know many of our readers and Forum members will be traveling to spend the holidays with friends and families. If you will be transporting any firearms when traveling by air over the holidays you need to know the rules.
If you will be flying with firearms this holiday season, you should read this article. You need to familiarize yourself with current Federal Regulations on gun transport before you get anywhere near an airport. Thankfully, the Transportation Security Administration (TSA) has a web page that states the important requirements for airline passengers traveling with firearms and/or ammunition.
You’ll want to visit the TSA Firearms and Ammunition webpage, and read it start to finish. In addition, before your trip, you should check the regulations of the airline(s) with which you will fly. Some airlines have special requirements, such as weight restrictions.
Here are the TSA’s key guidelines for travel with firearms:
TSA FIREARM Guidelines
1. When traveling, comply with the laws concerning possession of firearms as they vary by local, state and international governments.
2. If you are traveling internationally with a firearm in checked baggage, please check the U.S. Customs and Border Protection website for information and requirements prior to travel.
3. Declare each firearm each time you present it for transport as checked baggage. Ask your airline about limitations or fees that may apply.
4. Firearms must be unloaded and locked in a hard-sided container and transported as checked baggage only. As defined by 49 CFR 1540.5, a loaded firearm has a live round of ammunition, or any component thereof, in the chamber or cylinder or in a magazine inserted in the firearm. Only the passenger should retain the key or combination to the lock unless TSA personnel request the key to open the firearm container to ensure compliance with TSA regulations. You may use any brand or type of lock to secure your firearm case, including TSA-recognized locks.
5. Bringing an unloaded firearm with accessible ammunition to the security checkpoint carries the same civil penalty/fine as bringing a loaded firearm to the checkpoint. You may find information on civil penalties at the Civil Enforcement page.
6. Firearm parts, including magazines, clips, bolts and firing pins, are prohibited in carry-on baggage, but may be transported in checked baggage.
7. Replica firearms, including firearm replicas that are toys, may be transported in checked baggage only.
8. Rifle scopes are permitted in carry-on and checked baggage.
TSA Ammunition Guidelines
1. Ammunition is prohibited in carry-on baggage, but may be transported in checked baggage.
2. Firearm magazines and ammunition clips, whether loaded or empty, must be securely boxed or included within a hard-sided case containing an unloaded firearm. Read the requirements governing the transport of ammunition in checked baggage as defined by 49 CFR 175.10 (a)(8).
3. Small arms ammunition (up to .75 caliber and shotgun shells of any gauge) must be packaged in a fiber (such as cardboard), wood, plastic, or metal box specifically designed to carry ammunition and declared to your airline.
4. Ammunition may be transported in the same hard-sided, locked case as a firearm if it has been packed as described above. You cannot use firearm magazines or clips for packing ammunition unless they completely enclose the ammunition. Firearm magazines and ammunition clips, whether loaded or empty, must be boxed or included within a hard-sided, locked case.
5. Please check with your airline for quantity limits for ammunition.
More Airline Travel Tips from Tom McHale
A while back, Tom McHale wrote an excellent article for the Beretta Blog, entitled Ten Things You Need to Know about Flying with Guns. Here are two of Tom McHale’s Travel Tips from that article:
Weigh your gun case and ammunition
Most airlines will allow up to 11 pounds of ammunition. And, like any luggage, you will be charged more for any baggage weighing more than 50 pounds. This sounds like a lot, but when traveling to the Crimson Trace Midnight 3 Gun competition last year, my case with shotgun, rifle, pistol and ammunition tipped the scale past the 50 pound mark.
Pack ammo in the same locking case
This is another area that’s misunderstood and full of internet myth. Your ammo just needs to be stored in some type of safe container and not loose. Technically, you can keep ammunition in magazines, but I wouldn’t recommend it. It meets the letter of the law storage requirement, but too many airline and TSA agents will give you grief. Use a plastic ammo box or original cardboard packaging and you’ll be fine carrying that in the same lockable case as your gun.
*Please see, United States Code, Title 18, Part 1, Chapter 44 for information about firearm definitions.
Christmas is just 5 days away. If you are looking for a great gift for a shooting buddy, books have always been popular holiday gifts. Here are some recommended titles that should please the serious shooters and firearms enthusiasts on your shopping list. For shooting clubs, books also make great end-of-season member awards. Most of us would rather have a useful book than one more piece of wood to toss in a box in the closet. Check out these ten titles — for yourself or your shooting buddies.
Here Are TEN Great BOOKS Recommended for Serious Shooters:
If you’re a serious long-range shooter, consider adding this book to your library. Relying on extensive ballistics testing, Modern Advancements, Volume II is a great successor to Volume I that contains some fascinating research results. UK gun writer Laurie Holland notes: “Volume II of the Modern Advancements series is as fascinating as Volume I and if anything even more valuable given a series of ‘mythbusters’ tests including: case fill-ratio, primer flash-hole uniforming, neck tension, annealing, and much more. The work also addresses that perennial discussion of a bullet ‘going to sleep’ and shooting smaller groups (in MOA) at longer distances than 100 yards.” The amount of testing done for this Volume II work, with a staggering amount of rounds sent downrange, makes this book unique among shooting resources. There is a ton of “hard science” in this book — not just opinions.
Nancy Tompkins is one of the greatest long-range shooters in American history. She has won five National Long-range Championships. Tompkins’ treatise is a must-read for serious Palma, F-Class, and High Power shooters. The revised Second edition includes F-Class equipment and techniques, and newly updated information. Color pictures. Topics include Mental & Physical training, Reading Wind & Mirage Shooting Fundamentals, International Competition, and Loading for Long Range. Nancy Tompkins is a 4-time winner of the National Long Range Championships, and has won countless other major events. Nancy has been on six Palma Teams (as both a shooter and a coach).
The lastest edition of The Wind Book was released in 2020. The updates make this very helpful 144-page book even better. The Wind Book for Rifle Shooters by Linda Miller and Keith Cunningham, first published in 2007, is a very informative resource. But you don’t have to take our word for it. If you click this link, you can read book excerpts on Amazon.com. This lets you preview the first few chapters, and see some illustrations. Other books cover wind reading in a broader discussion of ballistics or long-range shooting. But the Miller & Cunningham book is ALL about wind reading from cover to cover, and that is its strength. The book focuses on real world skills that can help you accurately gauge wind angle, wind velocity, and wind cycles. Readers have praised the book, earning it 93% 4- and 5-star reviews on Amazon.
Ryan Cleckner is noted for his ability to explain complex topics in an easy-to-comprehend manner. Now Cleckner has authored a book, the Long Range Shooting Handbook, which expands on the topics covered in Cleckner’s popular NSSF video series. The Long Range Shooting Handbook is divided into three main categories: What It Is/How It Works, Fundamentals, and How to Use It. “What It Is/How It Works” covers equipment, terminology, and basic principles. “Fundamentals” covers the theory of long range shooting. “How to Use It” gives practical advice on implementing what you’ve learned, so you can progress as a skilled, long range shooter. You can view Sample Chapters from Ryan’s Book on Amazon.com.
Visualization is a process of mental preparation that is done before you get to the range. Many of the greatest shooting champions have used this technique to get ready for big matches, and to optimize their performance during record fire. If you want to enhance your “mental game” through pre-match visualization, we strongly recommend Lanny Bassham’s book, With Winning in Mind. As a competitive smallbore 3P shooter, Bassham developed a mental management system. Using this system, Lanny Bassham won 22 world individual and team titles, set four world records, and captured an Olympic Gold Medal in Montreal in 1976. His techniques have been embraced by professional and Olympic athletes in many sports. With Winning in Mind covers a complete system of “mental management” techniques used by Olympians and elite champions.
Thinking of getting started in the Practical/Tactical shooting game? Looking for ways to be more stable when shooting from unconventional positions? Then you may want to read Marcus Blanchard’s Practical Shooter’s Guide (A How-To Approach for Unconventional Firing Positions and Training). Unlike almost every “how to shoot” book on the market, Blanchard’s work focuses on the shooting skills and positions you need to succeed in PRS matches and similar tactical competitions. Blanchard provides clear advice on shooting from barricades, from roof-tops, from steep angles. Blanchard says you need to train for these types of challenges: “I believe the largest factor in the improvement of the average shooter isn’t necessarily the gear; it’s the way the shooter approaches obstacles and how they properly train for them.”
The Rifle Shooter by G. David Tubb, $34.95 (Softcover) — $10.00 on Sale
This book by 11-time National High Power Champion David Tubb focuses on position shooting and High Power disciplines. Section One covers fundamentals: position points, natural point of aim, breathing, triggering mechanics and follow-through, sling selection and use, getting started, getting better, avoiding obstacles. Section Two covers mechanics of offhand, sitting, and prone positions. Section Three covers shooting skills, including wind reading and mental preparation. Section Four covers the technical side of shooting, with extensive discussions of rifle design, load development, reloading barrel maintenance, and rifle fitting. We consider this book a “must-read” for any sling shooter, and there is plenty of good advice for F-Class shooters too.
Another fine book for PRS/NRL shooting is Precision Rifle Marksmanship: The Fundamentals by Frank Galli, founder of SnipersHide.com. Former USMC scout-sniper Frank Galli explains techniques will benefit any PRS/NRL competitor. Along with position shooting tips, Galli offers great wind-reading advice. Published in 2020, Galli’s treatise is four years newer than Blanchard’s book, so it includes more of the latest gear and equipment. Galli’s book covers the fundamentals of precision marksmanship with easy-to-understand methodology. The book follows the same instruction process Galli uses in his live marksmanship classes. Published in 2020, this well-illustrated, 272-page book covers the latest equipment (scopes, LRFs, chassis systems, magazines, bags, bipods, tripods) favored by tactical competitors in PRS/NRL type matches.
Tony Boyer, the most successful shooter in the history of short-range benchrest competition, shares match-winning tips in this 323-page book. The book covers all aspect of the benchrest discipline: loading, windflags, rest set-up, addressing the rifle, and match strategies. This is a high-quality publication, filled with valuable insights. Every serious benchrest shooter should read Tony’s book. Boyer has dominated registered benchrest in a fashion that will never be duplicated, having amassed 142 U.S. Benchrest Hall of Fame points. The next closest shooter, Allie Euber, has 47 Hall of Fame points. This handsome, full-color book is 323 pages long, with color photos or color illustrations on nearly every page.
Cartridges of the World (17th Edition, 2022), belongs in every serious gun guy’s library. This massive 704-page reference contains illustrations and basic load data for over 1500 cartridges. If you load for a wide variety of cartridges, or are a cartridge collector, this book is a “must-have” resource. The latest edition includes dozens of new cartridges and boasts 1500+ photos. The 17th Edition of Cartridges of the World includes cartridge specs, plus tech articles on Cartridge identification, SAAMI guidelines, wildcatting, and new cartridge design trends. In scope and level of detail, Cartridges of the World is the most complete cartridge reference guide in print. Cartridges of the World now includes a full-color section with feature articles.
Winter solstice is tomorrow, Saturday, December 21, 2024. We’re seeing some very cold temperatures throughout many northerly states, with snow on the ground. For American firearms fans in those colder climes, indoor training is the only realistic option this time of year. Snow is falling now in many Northern states, and a pretty big storm is coming soon to the Northeast.
Accuweather notes: “A storm traveling all the way from western Canada and a new storm brewing along the Atlantic coast will … bring areas of accumulating snow and slippery travel from Friday to early Saturday to the northeastern United States. Some of the worst conditions may occur during a busy [Christmas] travel time.” CLICK HERE for Accuweather Weather Report.
This article explains some key points to remember when shooting at indoor ranges. Always remember — safety first. Be especially careful to follow ALL the rules of safe gun handling. And even before you get to the range, make sure your guns are transported safely and in compliance with all local laws. In some states firearm(s) and ammunition must be kept in separate containers during transport.
This Video Covers Basic Gun Range Safety Rules and Etiquette
FIVE IMPORTANT SAFETY PROCEDURES for Indoor Ranges
1. Follow the Three Fundamental Rules for Safe Gun Handling
ALWAYS keep the gun pointed in a safe direction. ALWAYS keep your finger off the trigger until ready to shoot. ALWAYS keep the gun unloaded until ready to use.
2. Follow ALL Range Officer Instructions
ROs are the first and final authority on any range and their decisions are generally final. Arguing with a Range Officer may just get you thrown out.
3. Don’t Bother Others or Touch Their Guns
Respect other shooters’ privacy unless a safety issue arises. Do NOT engage other shooters to correct a perceived safety violation unless absolutely necessary – inform the RO instead. NEVER handle or touch another shooter’s firearm without their permission!
4. Know Your Range’s Rules
Review and understand any and all range rules and requirements/expectations. For example, what is the range’s maximum rate of fire? Are you allowed to collect your brass?
5. Know What To Do During a Cease Fire
IMMEDIATELY set down your firearm, pointed downrange, and STEP AWAY from the shooting booth (or bench). Range Officers do not want shooters trying to “secure/unload” their firearms in a cease fire situation — they want the shooters separated from their guns instantly.
BAD RANGE BEHAVIOR — Five Things NOT to Do at the Range
Here are the five worst behaviors we’ve seen at indoor ranges. These behaviors are both dangerous and inconsiderate. Any one of these behaviors can get you permanently banned from an indoor range.
1. Sweeping other individuals after loading a weapon behind the firing line is very bad. All your weapons should be empty until you reach your shooting station.
2. Turning the handgun sideways while trying to clear a malfunction or insert/remove a magazine. This will point the muzzle at a fellow shooter. Or, after shooting a gun, the shooter fails to clear the weapon and then places the gun somewhere near the shooting station with the muzzle in an unsafe position.
3. Reacting unpredictably when firing a high recoil handgun. We’ve seen people take a second shot by accident with the muzzle way off target.
4. Not obeying range commands — in particular continuing to shoot during called cease-fires.
5. Poorly aimed shooting that hits target frames or carriers, causing ricochets.
Double-Up on Hearing Protection When Shooting Indoors
When shooting indoors we recommend quality muffs with earplugs underneath, offering double protection. When inside an enclosed range, with other shooters blasting away right next to you, you really need effective hearing protection. But you also need to hear range commands and be able to communicate. That’s why we recommend electronic muffs with plugs underneath.
For indoor rifle and pistol shooting you want maximum sound protection. We recommend Howard Leight Impact Pro Muffs. These offer an impressive 30 dB Noise Reduction Rating (NRR). In addition, these muffs offer Headphone Functionality so you can connect to your smartphone, MP3 player, or other audio device. These muffs are now $98.19 on Amazon and $80.97 at Sportsman’s Warehouse. For extra protection (3 to 4 decibels Noise Reduction), you can run foam earplugs under the muffs.
In June 2020, Hornady introduced the 6mm ARC, a new SAAMI cartridge optimized for AR-platform rifles*. The new 6mm ARC is basically a 6.5 Grendel necked down to 6mm, with the shoulder moved back around .030″. That pushed-back shoulder does reduce case capacity (and velocity), but we assume Hornady did that to create a shorter, proprietary chamber so people could not simply neck-down Lapua 6.5 Grendel brass, as has been done for years with Robert Whitley’s outstanding 6mm AR wildcat.
What Is the 6mm ARC Cartridge? The 6mm ARC cartridge is a new SAAMI-spec cartridge based on the 6.5 Grendel case necked down for 6mm bullets, with the shoulder moved back 0.030. Yes it is designed to run in AR15-platform rifles. You’ll need a new barrel, bolt, and mags. If you already have an AR chambered in 6.5 Grendel, the ONLY thing you need to change is the barrel. Everything else — bolt, magazines, gas system – is compatible with 6mm ARC.
▶ Official SAAMI Cartridge (not wildcat)
▶ Fits standard AR15-platform rifles
▶ Fits Short/Mini action bolt rifles
▶ Efficient short, fat case design
▶ 30-degree case shoulder
What Do I Need To Shoot the 6mm ARC?
Faxon and Ballistic Advantage are already producing barrels, with more manufacturers sure to follow. All the other required components are already on the market for 6.5 Grendel rifles. Aero Precision already offers complete 6mm ARC uppers.
If you’re converting a standard 5.56×45 mm (.223 Rem) AR15 upper to shoot 6mm ARC, you’ll need a 6mm barrel, a Type II 6.5 Grendel bolt carrier group, and new magazines. Some folks have suggested standard AR mags will work, but trust us, you want the magazines that have been designed for 6.5 Grendel. Most of the hardware you need is available at Brownells.
* While 6-6.5 Grendel shooters are known to run stout pressures, the new 6mm ARC cartridge has a relatively moderate Maximum Average Pressure (MAP) rating of 52,000 psi according to the official SAAMI specifications. For a variety of reasons, is wise to keep pressures in a semi-auto rifle moderate. Don’t chase the velocities you might get in a bolt-action gun.
NSSF, the Firearm Industry Trade Association, has launched a big auction with over 30 items up for bid — from one-of-a-kind firearms to exclusive hunting and shooting experiences. Running through January 24, 2025 at NSSF.org/auction, this Celebration of Freedom Auction features more than 30 items ranging from a 7-day dream safari in Africa to collectible firearms from respected gunmakers including Smith & Wesson, Colt, Browning, SIG Sauer, and Ruger. Place BIDS at NSSF.org/auction.
Anyone can bid on more than 30 bucket list items within the auction. Bids are open now through the final day of SHOT Show on January 24. All proceeds from the auction will support future NSSF #GUNVOTE voter registration, education, and get-out-the-vote campaigns aimed at protecting gun rights.
Below are a partial sample of the products being auctioned. There are over 30 items up for auction, including packages of multiple products.
NOTE: Many of these auction items have high level starting bids set in place. For example the Ultimate Outback Elk Hunt has a $12,500 starting bid, and a Leupold Premium Optics Package has a $2500 starting bid. However, there ARE some affordable firearms up to bid such as a Ruger 10/22 Target and a nice Colt CBX precision rifle paired with Colt 44 magnum revolver (current bid $1800.00 for both).
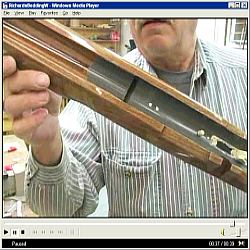
Richard Franklin’s Step-by-Step Guide to Pillar Bedding
The Art of Stress-Free Stock Bedding
by Richard Franklin
Richard Franklin prepared this article for our readers. Richard tells us: “I’m happy to do pillar-bedding work, but this is a job which many shooters can do themselves, with some practice and the right components. I do suggest you practice first on an old ‘beater stock’. When done right, you end up with a perfect fit of receiver to action, with no twisting, stretching, or compression forces being applied to the receiver through mis-alignment. That’s what I mean by ‘stress-free’.”
This article covers all the steps in the process. This bedding operation was shown in detail in a 200-minute DVD, “Stress-Free Pillar Bedding”, in which Richard showed the entire job — from start to finish — and offered many tips to help achieve perfect results. In this article Richard explains how to properly relieve the bedding area, how to make pillars, how to set up the barreled action, and how to test your work to ensure it is truly “stress-free”. In the DVD, Richard does a complete pillar bedding job on both a finished custom stock and a Remington stock.
[Editor’s Note: This article was first published a decade ago. So, some of the listed bedding materials may have been enhanced slightly, or the product names may have changed. But the procedures described by Richard are still valid and still achieve great results.]
Before You Begin — Some Comments About Inletting
Richard told us: “You can’t do a great bedding job unless you start with really good inletting. Unfortunately, many ‘inletted stocks’ really require quite a lot of work to get the inletting right. You cannot inlet a stock 100% correctly just using a stock duplicator. That’s one reason I do bedding jobs only on the stocks I make. If the inletting isn’t right, you can have a myriad of problems–such as the holes for the action bolts being in the wrong place, or the stock not having enough clearance for the barrel or the trigger hanger. So, BEFORE you start your bedding job, make sure the inletting is really right. Don’t assume the inletting is really complete (and correct) just because the manufacturer claims that to be the case. This applies to both wood and fiberglass stocks.”
Pillars For Bedding
The BAT action featured in this article has three pillars, with the middle pillar sitting under the front of the trigger guard, and the third pillar at the rear of the guard. More typical installations will use two pillars. For either system, the installation procedures are the same.
In Photo 1, you will see part A, the bottom part of the front pillar which we call the “escutcheon”. Part B, which is a 1/4″ X 28 action bolt that is slightly longer than part C which is the top part of the front pillar. The two parts of the front pillar were machined as one piece and then the escutcheon was cut off just below the shoulder that is inside. This shoulder is for the head of the action bolt to tighten up against. I’ve found that a two-piece pillar has many advantages, particularly for hunting stocks where the underside of the stock is angled (i.e. not parallel with bore axis). I make the pillars I use, machining them from cut-off stainless barrel stubs.
Part D is a 1/4″ X 28 hex-head bolt with the head turned down to 1/4″ which permits the insertion of a hex-head driver to tighten and remove the bolt. This headless bolt will be inserted in the rear tang hole of the action and part E, the rear pillar will be placed on it.
STEP ONE — Getting Started
Photo 2 shows tape on recoil lug, pillars bolted in place and putty in voids. Release agent is polished to a very thin layer. The top half of the front pillar (part C) is placed on the action receiver ring and the bolt (part B) is inserted thru the pillar and tightened against the action. This bolt must have a tapered head on the underside so that, when it is tightened, it will center the top half of the front pillar around the action bolt hole. (This is also true for the middle pillar if the action has a middle bolt.)
PHOTO 2
The headless bolt is inserted into the rear tang hole of the action and the rear pillar is slipped down on it. You will notice in Photo 3, below, that the pillars have the hole drilled oversize so that a 1/4″ bolt has a little space around it. (I like to drill the pillars with a .260″ bit inside.)
The above scenario is the placement of the pillars prior to applying the bedding compound, which I call “Mud”. Devcon 10110 is my bedding compound of choice (and the only product I use) as the mud must set up as hard as concrete and most other epoxies will not do this. Also Devcon shrinks very little if at all. My comments on other bedding compounds are in the sidebar below.
STEP TWO — Relieving the Stock Before Bedding Relieving the right amount of wood in the area to be bedded–not too much, not too little–is very important to achieving the best results. You need to create some space for the mud to fill around the action, but you don’t want to alter the inletting too much.
PHOTO 3
Photo 3 shows the wood removed from the inside of the stock bedding area. Remove enough wood everywhere except along the top sides of the stock to allow at least 1/8″ to 3/16″ of room for the mud. Remove 1/4″ of wood behind the recoil lug. I like about .012″ clearance on the top inside edges.
NOTE: Leave a small area of original wood just behind the rear tang bolt hole as this wood will determine the elevation of the bedded action in the stock.
Photo 4 shows the tang area of the stock. Note the elevation wood left at tang. Be sure to leave some original wood for the action tang to sit on. This is very important.
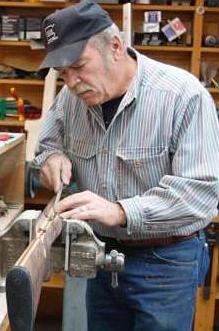
STEP THREE — Wrapping Tape on the Barrel Photo 5 shows the barreled action in the vise. It also shows black electrical tape wrapped around the barrel just behind the front of the stock forearm. Wrap enough tape to hold the front of the barreled action at the proper elevation in the stock.
The idea is that the barreled action does not touch anything except the bit of original “elevation” wood left at the rear tang (behind the pillar) and the forearm resting on the electrical tape. This is very important to obtain 100% stress-free bedding. You want the bore of the barrel to be parallel with the top edge of the stock so wrap just the right amount of tape to ensure this. The tape also centers the barrel in the fore-arm. Done right, the barreled action will be contacting just at two points (tape in front, tang in rear) and the barrel’s bore will be parallel with the top of the fore-arm’s sidewalls.
Comments on Alternative Components and Methods
Bedding Compounds
There are at least a dozen popular products used for rifle bedding. At one time or another, Richard has tried most of them. Devcon 10110 “Plastic Steel® Putty” is the only compound he currently uses and the only product he endorses whole-heartedly. “The Devcon 10110 is expensive, but it is the best bedding product I’ve found. First, it sets up extremely hard. That is very important to the performance and longevity of the bedding job. You want it to get it as hard as concrete. You need it really hard so when you tension the action screws it doesn’t squish down or migrate. Some of the brown stuff other folks use is way too soft. Marine Tex is also too soft. Many products will shrink. Any compound that shrinks is useless in my book. Devcon has absolutely near-zero shrinkage. Acra-Glass I keep in my shop, as it is useful for stock repairs. However I would never bed with Acra-Glass.
Devcon also has just the right consistency — about that of peanut butter. So, it is easy to apply but not runny. It stays in place when I turn the stock upside-down. Devcon is also relatively forgiving to mix–the proportions of the two elements are not super-critical like some other products. I know Marine-Tex can give real problems if you don’t use just the right amount of catalyst. Overall, Devcon does everything you need it to do, and does it exceptionally well. Some other smiths think it’s too expensive–and yes I’ll use $10-$15 worth of Devcon in doing a typical bedding job. But I think the customer deserves the best possible, longest-lasting bedding, and that means Devcon. Among the products I’ve used, Bisonite is my second choice, but I think Devcon will last longer.”
Release Compounds
Richard tells us: “People use all sorts of release compounds and I’ve tried many. I strongly prefer Kiwi shoe polish (neutral color). With the Kiwi, I’ve never had an action stick in the stock. It goes on easy, and you can use a paper towel to polish it very thin and that’s a big benefit. If you have a thin layer of release compound the finished bedding is that much closer to the exact dimensions of the action. I’ve heard of guys using PAM spray. I don’t trust that stuff. The Brownells release compound goes on too thick. Car wax is not a great choice either because it can separate and it gets dusty as it dries. Go with the Kiwi stuff–a little can will last for years. But be sure to use the clear (neutral) kind so you don’t stain your stock or action.”
Clamping and Tension Materials
Read a few articles on pillar bedding and you’ll see many different systems for holding the barreled action to the stock when the bedding compound cures. We’ve seen surgical tubing used, or strips of bicycle inner tube. Some writers have even advocated using mechanical clamps (a bad idea). Richard has tried various tensioning set-ups over the years, and electrical tape is his strong recommendation: “First, let me say it’s crazy to use a C-Clamp or something like that. The clamp will cause a point-load where it attaches and that is just the opposite of what you want.”
Richard has tried many materials: “Surgical tubing I’ve found to be cumbersome to use, and it tends to loosen up during the curing time. Same thing with strips of inner tube. That’s bad news because any loosening or stretching will allow the action to shift. It’s absolutely critical that the action not move one bit while the bedding cures. Once you’ve bedded the action if it dries the wrong way you’ve screwed everything up. Using the electrical tape that isn’t an issue. The tape goes on very tight, doesn’t stretch (if you use enough turns) and I have no fears that the action will shift while curing. Just follow my advice and put a strip of paper towel under the electrical tape so you don’t mar the finish of the barrel or stock.”
Contoured vs. Straight (Flat-top) Pillars
Many factory rifles come with contoured (radiused) pillars, and many gunsmiths prefer to use these. The idea is that the contour provides a better fit with the bottom of round actions. Richard has tried contoured pillars and doesn’t recommend them. He explains: “Most of the contoured pillars don’t really match the contour of the action anyway. And every action is slightly different. Even some of the most favored custom actions aren’t exactly the same from one unit to another. What happens when the contour or curve of the pillar is too narrow is that the action touches just the extended top edges of the pillar (left and right of center). That is not as solid as when the action contacts the center of the pillar where the action screw runs. (And those sharp sides of curved pillars tend to point-load and dig into your action.) Also I feel you get a better match of the Devcon to the action with flat-top pillars. What you want is the bedding compound to cradle the action all the way around. I’ve found this works best with flat-top pillars and a very strong, hard compound like Devcon that doesn’t squish down or shrink.”
STEP FOUR–Applying Release Agent and Plumbers Putty
Failure to apply release agent (and putty) properly is a recipe for disaster. One of the most common mistakes novices make when doing bedding jobs is locking in the action. This happens by not covering enough of the action with release agent, not taping off the lug correctly, and not adding putty to plug any slots or spaces into which the mud can migrate. Remember, you are doing a bedding job, not a glue-in job! When you’ve completed the process, you want to be able to pop the action loose without difficulty.
PHOTO 6 — Showing putty and release agent before polishing, tape on lug.
First, remove the trigger, bolt release and spring, and anything else from the bottom of the action. Then, clean the action and recoil lug area with brake cleaner or parts degreaser. Apply plumbers’ putty to any hole or crevice that you don’t want the mud to get into. Wrap two layers of masking tape on the outside edges of the lug and trim with a razor blade. Do not apply tape to the front or back of the lug. (Apply tape to the front of the lug only if you do not have a way to remove the hardened mud). Let this tape go right around to the top of the action. Wipe the putty smooth with the brake parts cleaner. I highly recommend neutral Kiwi shoe polish as release agent. Apply liberally to the entire action using a Q-tip to get in around the lug (including front and rear of lug), bolt handle slot and loading port edges. Let the shoe polish dry for 10 minutes and then use a paper towel and buff and polish the release agent as thin as possible. You want any release agent to be as thin as possible so as to let the action set as close as possible to your bedding. You also want to apply release agent to the rear (headless) bolt.
STEP FIVE — Installing the Pillars
Now is the time to place the pillars. Screw the top half of the front pillar and middle pillar (if the action has a middle bolt) to the action with the tapered head bolt. Screw in the headless bolt and slip the pillar down around it. Apply release agent to the area of the guard around the rear bolt hole (and to the rear headless bolt). Apply top and bottom and from the inside out. We don’t want the guard stuck to the bedding. (This guard sits on the bolt head that is secures the middle pillar to the action. We need the guard in place to align the action in the stock.)
Install the trigger guard back in place on the stock as the guard is used to align the barreled action in the stock. Now is the time to make a trial run to ensure that everything fits properly. Slip the upside-down stock down over the pillars with the headless bolt coming up through the rear bolt hole in the guard. See Photo 7. Ensure that the stock is resting on two spots only–the tape you’ve wrapped around the barrel, and the little bit of wood you left behind the tang bolt. Ensure there is room everywhere around the action to accept the mud. The barreled action cannot be touching anywhere except the tape and the tang. Not even on the top edges of the stock.
STEP SIX — Applying the Mud
Mix up a generous portion of the Devcon 10110 Mud and apply to the pillars as shown in Photo 8. Do not get mud on top of the bolt head and front pillar(s). Do apply a little mud on top of the rear pillar and if a little gets on the headless bolt that is OK as you should have applied release agent to this bolt. This will properly bed the guard to the rear pillar. The front bolt that holds the front pillar need not have release agent applied to it. Note, as shown in Photo 8, each pillar has a bolt inserted.
PHOTO 8 — Showing mud on the pillars.
You cannot use too much mud as the hydraulic action of pressing the stock down on the barreled action is going to squeeze the mud everywhere it need to go and the excess will be forced out (falling on the floor for you to step in).
PHOTO 9 — Showing mud applied to stock.
Now apply the mud very generously to the stock as shown in Photo 9 above. If I am not bedding any portion of the barrel shank I will only apply a little mud behind the recoil lug area.
STEP SEVEN — Assembly and Compression
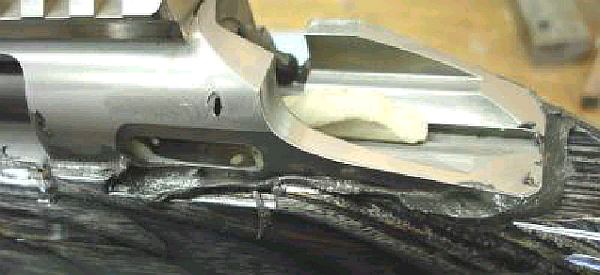
Now slip the upside-down stock down over the pillars as you did in the trial run. Ensure the stock is bottomed-out on the tape at the front end. Squeeze slowly, pressing the rear of the stock down and squeeze out the excess mud. After pressing the stock down, the action area should appear as in Photo 10. During the compression stage, stop a few times and use Q-tips to clean off the excess mud that is squeezing out between action and stock.
PHOTO 10 — Rifle right side up, with the mud squeezed out.
Cut a piece of paper towel about two inches wide by the length of the towel. Lay this on the stock 1.5″ in front of the action. Wrap black electrical tape around the stock and barrel, running the tape over the strip of paper towel. (The towel is to protect the stock finish.) Squeeze the stock and action together while taking wraps with the tape. If you have a skinny, pencil-thin barrel don’t apply too much pressure with the tape as the weak barrel can be curved slightly. That can cause the barrel to touch the stock when everything is done (not good). If you have a big, fat barrel don’t worry about deflection. With a heavy contour tube, whatever bend you put in the barrel will spring back when the tape is removed.
STEP EIGHT — Mud Removal and Curing Time
Using Q-tips, clean up very thoroughly around the front pillar and the bolt head. You need to be able to unscrew the bolt to separate the stock from the rifle and you do not want the bedding protruding above the pillar. (The escutcheon still has to have room to fit in there without touching the end of the pillar.) Before turning the rifle right-side-up, reach under with a few Q-tips and clean off the mud hanging there as it may get inside the action.
Turn the rifle right side up in the vise and, using lots of Q-tips, clean all of the mud off of everything. Remove the excess mud every place you can see it. Use a paper towel to wipe the stock as there could be some invisible mud hiding somewhere on the stock or action. After using Q-tips, I sometimes use Butch’s Bore Shine solvent. It does a good job of removing the mud residue (other solvents with ammonia would work well also).
When you’ve cleaned off all the excess mud. It’s time to let the bedding cure. Lie the rifle upside down with the weight on the rear of the action and about where the tape is on the barrel. Let the gun sit for about 8 to 10 hours or overnight. IMPORTANT, you should remove ALL the excess mud around the action before you let the rifle cure for this time period. Photo 11 shows the rifle upside down, but you want to have the excess mud cleaned off before curing.
PHOTO 11 — Position for curing the mud–but excess should be removed first.
IMPORTANT: Avoiding Mechanical Lock During Bedding
One major problem that can arise when novices bed their own stocks is mechanical lock. This occurs when some part of the action or barrel is trapped below the bedding. Effectively, the barreled action becomes anchored in the stock and can be very difficult to remove. Richard says avoiding mechanical lock is not that difficult, but you must be careful: “Locks usually occur because the bedding is applied too far up. Never, and I repeat, never, bed above the centerline of the action (bore axis), or the widest point of the action (whichever is lower). You need to leave the edge of the bedding at least 1/16″ below the centerline of the action and centerline of the bore axis. I normally leave about 1/8th of vertical clearance. If the widest point of the action is BELOW the bore axis, you have to keep the bedding below that. The other thing to watch out for are projections and holes in the sides of the action. All holes must be filled with plumbers’ putty. All projections–anything that sticks out–need to be removed. If some little part or fixture sticks out, even if you tape it over, and it is below the top of the bedding, it can lock the action in.”
STEP NINE — Popping the Barreled Action Loose
After the required curing time, you need to remove the barreled action to check the beading and fit the pillar escutcheons. If you cleaned away all the excess mud and there are no mechanical locks in the bedding, it should not be difficult to pop the stock loose. You can see how this is done in the short Video Clip from my DVD (Right-Click and “Save As” to download). Here is the procedure.
After the mud has set up and hardened, clamp the barrel in a vise with the gun upside down. The vise should camp just ahead of the forearm. Remove the bolt in the front pillar (and middle pillar) and the headless bolt. Remove the trigger guard.
With the left hand, apply upward pressure to the forearm and then with the right hand slap upward on the forearm. You will hear a crack like you might have busted the stock. Not to worry, that is just the bedding popping free. Now wiggle the stock up off the recoil lug as it is the only thing holding the stock down. [Editors Note: Here’s an older video clip that shows Richard “popping” the stock loose from the barreled action. CLICK HERE to download a 6 Meg Windows media file, or click these links for MPEG (2.3 megs), and Real Media (2.3 megs) versions.]
Remove the tape from the barrel and recoil lug and clean up the putty. Wipe the action down with brake parts cleaner. On the stock, remove the squeezed mud that went into the trigger and bolt release area. Relieve the lug area on both sides and the front. Lay the stock back on the barreled action. Be sure to check under the trigger guard to see if any cleanup of mud is required there. Then re-install the guard and insert the rear action bolt just snug (not tight).
STEP TEN — Installing the Pillar Escutcheons
Pillar escutcheons are a nice extra feature I add to my custom rifles. These are stainless, made from barrel stubs. The two-part front pillar is originally machined as one piece. I believe front pillars with the escutcheons (or outer ring) offer advantages over conventional pillars in terms of strength and alignment.
Before you actually install the escutcheons, you need to do some fit testing. Have a trial run at setting the front bolt to the proper length by placing the escutcheon in the hole and screwing in the bolt. Loosen off the back bolt to see if the bolt that is thru the escutcheon is holding the stock firmly in place. Retighten the rear bolt a wee bit.
Apply release agent to the front bolt, being careful to not get it on the escutcheon. Insert an Allen wrench into the head of the bolt so you can hold it easily. Slip the escutcheon over the bolt. Apply mud to the escutcheon and around the bolt. Photo 12 shows how much mud to put on the escutcheon. You want enough so when you tighten the bolt it will force the mud everywhere it needs to go, even though a bit will be squeezed in around the bolt. Photo 13 shows how the escutcheon should look installed, with the bolt tightened. Photo 14 (below right) shows the escutcheon after the mud has been removed–be sure to remove the excess while the Devcon is still soft.
PHOTOS 13 and 14 — Showing escutcheon before (left) and after mud clean-up (right).
Clean up the excess mud with Q-tips and paper towels. You need to do this before the mud hardens. I used Butch’s Bore Shine as a solvent, once I have removed the excess mud with Q-tips and towels. When the escutcheons are cleaned up, you’ve finished working with the mud. Now let the stock lay for another 8 hours or so to allow the escutcheons to become.
After the mud has hardened around the escutcheon clamp the rifle back in the vise. Remove the back tang bolt first then the front bolt that is through the escutcheon. The bolt will be tight in the hole and sometimes may need to be punched out with a punch unless it has threads right to the head in which case it will screw out. Go in the hole with a .260” bit and clean the mud out of the front pillar. Let the bedding harden for a day or two and then torque the bolts with about 35 inch-lbs of torque on the front bolt and maybe 25 on the tang bolt.
The finished result is an even coat of Devcon with no voids, air pockets, fissures, and perfect stress-free support for the action, as shown in Photo 15.
Wouldn’t it be great if you could put up one BIG target that would handle a myriad of important tasks at the range: Zeroing, Load Development, Click Value Verification, and Click Tracking Repeatability Tests. Well the team at Box to Bench Precision (B2B) has developed what may be the most versatile (and biggest) precision targets ever developed. With precise grid geometry, and razor-sharp printing, B2B’s targets are probably the most advanced shooting targets ever created.
B2B’s 100 Yard Long Range Load Development and Scope Tracking Target will perform many functions. This big, 30″ x 23.5″ target has specific aiming points for various tasks. In the upper left, there are 11 small orange circles for precision load testing. Over on the upper right are 7 more small, orange circles for doing a Seating Depth Comparison test.
The bottom half of the target has larger black-on-white circles that serve multiple functions. Use the corner circles to do a “Box Test” to confirm scope tracking. On the bottom row is one B/W circle to confirm zero and another to use for velocity testing. There’s another great feature on this target — running up the center of the target is a tall line that shows elevation in both MILs and MOA. That helps you confirm the TRUE click values of your optic. You’d be surprised how many scopes are slightly off — not exactly 1/4 MOA, 1/8 MOA, or 1/10 Mil as advertised. That’s why Long Range shooters absolutely need to verify their click values.
Click Tracking Grid Target
Need to test the click tracking of your optics? B2B developed an advanced target just for that task. The MOA Grid Target (shown below) provides a highly precise grid for testing elevation and windage clicks. The unique grid design has small tics denoting 1/4 MOA, 1/2 MOA, and 3/4 MOA. 1 MOA is marked with a “+” and the 5, 10, 15, 20, & 25 MOA elevation lines are bolded for better visibility. There are aiming points at 5 MOA intervals over the full grid.
Buyers Praise the B2B Targets
The B2B Targets are printed on high-quality, tear-resistant card stock. We can attest the printing is very precise — with accurate elevation and windage values. These aren’t your ordinary targets — they are LARGE — nearly three feet tall. Verified buyers praise these targets, one noting how the B2B target revealed his scope was not tracking properly:
“Thank you for talking to me about the MIL and MOA markers on your targets. They are very accurate. While using the Long Range 100-Yard Load Development/Scope Tracking target and my new scope, it helped me realize that my scope wasn’t tracking correctly (both turrets). So, I sent the scope to the manufacturer. When it came back, and using your target as my known constant… the scope is now ‘spot-on’ accurate. These targets are a great tool to gain a better understanding of your rifle, scope, turrets etc., all on one sheet.” — Stan
“Almost too nice to put holes in. I was in the printing industry for 35 years and these are really well done. Quality paper and precise printing, should be able to see bullet holes easily with these!” — Dan
Gun-maker Bear Creek Arsenal has a good article on its website about rifling barrels. The article explains four common methods of rifling the interior of barrels: Cut Rifling, Broach Rifling, Button Rifling, and Hammer Forging. In addition, the article describes a new (and somewhat radical) method, Cation Rifling, which employs acid to etch rifling. READ Full Article.
The main focus of the article is on Cold Hammer Forging of barrels. This requires massive, expensive tooling, but the results can be very consistent. Many top gun-makers, such as FN, HK, and Ruger, have used the hammer forging process. And now Bear Creek Arsenal also offers hammer-forged barrels. Bear Creek recently acquired two state-of-the-art cold hammer forging machines. With hammer forging, a chamber can be formed and barrel contour shaped at the same time. This process produces some of the most consistent barrels available today. Here is a summary of how Cold Hammer Forging works:
Cold Hammer Forging — Machinery and Process
A cold hammer-forged barrel starts life… as a short and fat blank with a polished hole running through the center. A hardened mandrel of proper width (caliber) and rifling pattern — again reversed/inverted — is placed into the smooth bore. The pair go into a forging machine that compresses the steel against the mandrel, hammering it into final shape. The barely detectable external spiral patterns that remain on some barrels are imprints from those hammers at work. Some companies polish them out, however.
Cold hammer forging machinery is very expensive, representing a significant investment for companies. However, when the hammer forging process is done and the mandrel removed, the resulting barrel is the proper length and profile with rifling that is consistent and butter smooth. No lapping is required — a time and expense saver — although a stress-relief step often follows.
The process takes place at room temperature, despite the misleading “cold” terminology. There is a hot hammer forging process, but the equipment is even more expensive and the slight improvement in grain consistency hasn’t proven advantageous enough for a return on that investment. Performance is impressive and consistent.
One of the biggest advantages of a cold hammer forged barrel is longevity. They… survive abuse and last longer. The manufacturing process adds those enviable virtues with each strike of those hammers — strengthening the metal in a work-hardening process employed by blacksmiths for centuries.
Comparing Popular Rifling Methods
What rifling process should you choose? If long-distance is your passion and you home brew custom cartridges to print tiny groups in the next zip code, cut rifling is the optimum choice. Button rifling is a solid second choice, but not always the Holy Grail long-distance shooters dream about. Cold hammer forged barrels, however, last longer and [offer great performance for the price.]


 by Richard Franklin
 Pillars For Bedding
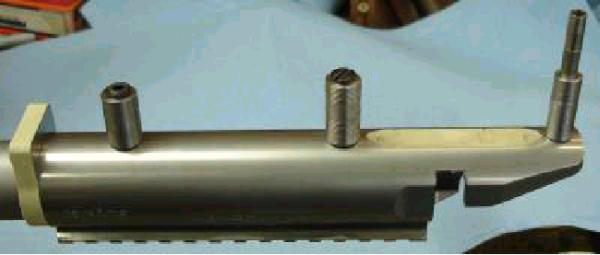

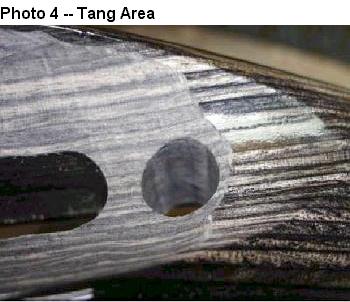 Photo 3 shows the wood removed from the inside of the stock bedding area. Remove enough wood everywhere except along the top sides of the stock to allow at least 1/8″ to 3/16″ of room for the mud. Remove 1/4″ of wood behind the recoil lug. I like about .012″ clearance on the top inside edges.
  The idea is that the barreled action does not touch anything except the bit of original “elevation” wood left at the rear tang (behind the pillar) and the forearm resting on the electrical tape. This is very important to obtain 100% stress-free bedding. You want the bore of the barrel to be parallel with the top edge of the stock so wrap just the right amount of tape to ensure this. The tape also centers the barrel in the fore-arm. Done right, the barreled action will be contacting just at two points (tape in front, tang in rear) and the barrel’s bore will be parallel with the top of the fore-arm’s sidewalls.
 Bedding Compounds
 Contoured vs. Straight (Flat-top) Pillars
 Install the trigger guard back in place on the stock as the guard is used to align the barreled action in the stock. Now is the time to make a trial run to ensure that everything fits properly. Slip the upside-down stock down over the pillars with the headless bolt coming up through the rear bolt hole in the guard. See Photo 7. Ensure that the stock is resting on two spots only–the tape you’ve wrapped around the barrel, and the little bit of wood you left behind the tang bolt. Ensure there is room everywhere around the action to accept the mud. The barreled action cannot be touching anywhere except the tape and the tang. Not even on the top edges of the stock.


 Before you actually install the escutcheons, you need to do some fit testing. Have a trial run at setting the front bolt to the proper length by placing the escutcheon in the hole and screwing in the bolt. Loosen off the back bolt to see if the bolt that is thru the escutcheon is holding the stock firmly in place. Retighten the rear bolt a wee bit.


