The anvil is the tripod-shaped thin metal piece protruding above the bottom of the primer cup. Getting the primer sitting fully flush on the bottom of the case primer pocket, without crunching it too much, requires some keen feel for the progress of primer seating.
Sadly, Glen Zediker passed away in October 2020. However, his insights live on through his written works. This feature is based on Glen’s popular reloading books and his articles for the Midsouth Blog.
In two informative Midsouth Blog articles, Glen Zediker offered helpful advice on priming. First he examines what happens to the primer itself as it is seated in the cup. Glen explains why some “crush” is important, and why you never want to leave a high primer. Glen also reviews a variety of priming tools, including his favorite — the Forster Co-Ax Bench Primer Seater. Then he offers some key safety tips. Glen provides some “rock-solid” advice about the priming operation. These reloading tips came from Glen Zediker’s popular book, Top-Grade Ammo.
Priming Precision vs. Speed
Glen writes: “The better priming tools have less leverage. That is so we can feel the progress of that relatively very small span of depth between start and finish. There is also a balance between precision and speed in tool choices, as there so often is.”
Benchtop Priming Tools — The Forster Co-Ax
Glen thinks that the best choice among priming options, considering both “feel” and productivity, may be the benchtop stand-alone priming stations: “They are faster than hand tools, and can be had with more or less leverage engineered into them. I like the one shown below the best because its feeding is reliable and its feel is more than good enough to do a ‘perfect’ primer seat. It’s the best balance I’ve found between speed and precision.”
Load Tuning and Primers
Glen cautions that you should always reduce your load when you switch to a new, not-yet-tested primer type: “The primer is, in my experience, the greatest variable that can change the performance of a load combination, which is mostly to say ‘pressure’. Never (never ever) switch primer brands without backing off the propellant charge and proving to yourself how far to take it back up, or to even back it off more. I back off one full grain of propellant [when I] try a different primer brand.”
Priming Safety Tips by Zediker
1. Get a good primer “flip” tray for use in filling the feeding magazine tubes associated with some systems. Make double-damn sure each primer is fed right side up (or down, depending on your perspective). A common cause of unintentional detonation is attempting to overfill a stuffed feeding tube magazine, so count and watch your progress.
2. Don’t attempt to seat a high primer more deeply on a finished round. The pressure needed to overcome the inertia to re-initiate movement may be enough to detonate it.
3. Don’t punch out a live primer! That can result in an impressive fright. To kill a primer, squirt or spray a little light oil into its open end. That renders the compound inert.
4. Keep the priming tool cup clean. That’s the little piece that the primer sits down into. Any little shard of brass can become a firing pin! It’s happened!
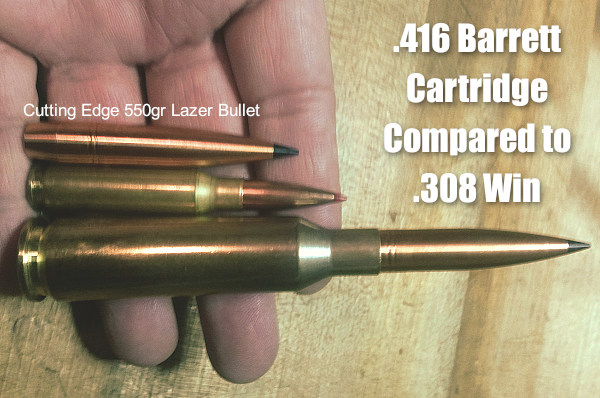
In the ELR game, particularly the King of 2 Miles (KO2M), it’s “go big or go home”. The top shooters run large-capacity cartridges that push large-caliber, ultra-high BC bullets at very high velocities. Bullets launched by cartridges such as the .416 Barrett can sustain supersonic velocities at Extreme Long Ranges — and that’s what it takes to win. The .416 Barrett can launch a 550-grain solid bullet at 3000+ FPS.
Photo from ELR Competitor Corbin Shell.
2018 and 2019 Kings of 2 Miles Loaded on RCBS Presses
So how do you load jumbo cartridges such as the .416 Barrett? It takes a big, heavy, super-strong reloading press. We’ve learned that two recent King of 2 Miles champions, Paul Phillips (2019) and Robert Brantley (2018) both loaded their KO2M ammo on RCBS AmmoMaster .50 BMG presses. Phillips loaded .416 Barrett ammo, while Brantley loaded a similar .416 MCS cartridge.
In 2018, Robert Brantley topped the field using his custom .416 MCS cartridge. Then in 2019, Paul Phillips won the K02M competition shooting a .416 Barrett, with Brantley a close second. Both Phillips and Brantley use the RCBS AmmoMaster .50 BMG single stage press kit and RCBS .416 Barrett dies to hand-load for extreme long-range. “My ammo has been much more consistent after switching to the RCBS press and dies,” remarked Phillips, who runs the Global Precision Group. Brantley said he uses RCBS products for most of his reloading needs — from the dies and AmmoMaster, to the ChargeMaster and Brass Boss. His custom .416 MCS loads launch a 550-grain bullet more than 3,100 fps.
Loading with RCBS AmmoMaster .50 BMG Press
This video shows reloading with the RCBS AmmoMaster .50 BMG press. While this video shows .50 BMG cases being loaded, the principles are the same for loading the .416 Barrett cartridge or other big rounds. Big cases need big presses!
What’s a “Wallet Group”? It’s a singularly spectacular proof target that entitles its bearer to bragging rights. The wallet group may or may not have been shot in competition, and, by definition, it may not be repeatable. But it exists as incontrovertible proof that, at least once, the stars aligned, and the wind gods smiled on the shooter.
Five Shots in 0.178 MOA at 1000 Yards
A few years ago, Forum member and F-Class shooter Gary Wood was testing his 6.5-284 rifle at the 1000-yard range in Coalinga, California, getting ready for an upcoming long range match. In practice, Gary nailed a witnessed 1.859″ five-shot group, with four of the five shots well under an inch. Use this as proof to win those club-house arguments about whether it is possible to shoot “in the ones” at 1000 yards. Gary’s group worked out to 0.178 MOA!
Gary reports: “I was load testing with 5-shot groups. Each group was shot on a new F-Class center and pulled by Ret. Master Chief Jerry Pullens and spotted by an other long-range shooter. The second 5-shot load group looked really small … by our reckoning four out of five shots measured under an inch. I was amazed. What’s more, when I shot the group, the 4th shot blew the spindle out of the 3rd shot. My spotter saw that in his scope and Jerry Pullens told me about it afterwards”.
As measured with the OnTarget Software, using a scan of the target, Gary plotted the group size at 1.859″ total for five shots, or 0.178 MOA. Gary noted: “I had everyone sign the target which I saved and photographed.” Yes, Gary, this may be the wallet group to end all wallet groups. You should have that target framed.
Gary’s Load and 6.5-284 Rifle Specs
Gary was running a stout load of Hodgdon H4350 and CCI BR-2 primers, pushing moly-coated 142gr Sierra MKs, in Lapua 6.5-284 brass. The rifle features an F-Class, single-shot Surgeon action with a Bartlein 5R barrel chambered with a no-turn neck. Gary says “The barrel only has 70 rounds through it… yep, I think it will shoot.” Gary did all of the gunsmithing and barrel work himself.
Did Gary have any special reloading tricks? Apparently not: “Other than weighing the cases and the powder very carefully, there really were no magical reloading secrets used. The Sierra 142s were moly-coated straight from the box of 500, but they were not weighed or checked for bearing surface. The powder was dropped with a RCBS ChargeMaster then checked with an Acculab scale (to under a tenth). The Lapua cases were not neck-turned, but I did weight-sort them. The five cases for the small group weighed: 195.05, 195.03, 195.03, 195.03, 195.01.”
At the request of our readers, we provide select “Deals of the Week”. Every Sunday afternoon or Monday morning we offer our Best Bargain selections. Here are some of the best deals on firearms, hardware, reloading components, optics, and shooting accessories. Be aware that sale prices are subject to change, and once clearance inventory is sold, it’s gone for good. You snooze you lose.
NOTE: All listed products are for sale to persons 18 years of age or older. No products are intended for use by minors.
Palmetto State Armory — St. Patrick’s Day Sale
⏺️ » Big savings on hundreds of firearms, optics, ammo packs and more
Palmetto State Armory is running a big St. Patrick’s Day Sale this week. Hundreds of items are deeply discounted. There are truly amazing deals such as Savage Stevens 320 12ga Shotgun for just $169.99! You read that right, get a brand new pump shotgun for under $170.00. There are big discounts on pistols too — for example the Ruger LCP Max Compact .380 ACP carry pistol is now just $199.99, $200 off the $399.99 regular price. And there are many excellent optics on sale this week as well.
MidwayUSA — March Markdown Sale, Discounts up to 66%
⏺️ » Major sale on gear, bullets, primers, ammo and more
This month MidwayUSA is offering big savings on a huge range of products including scopes, reloading tools, gun vises, rifle rests, powder dispensers, camping gear, and reloading components (powder, primers, brass, bullets). Quality hunting ammunition is also on sale. The March Madness Markdown sale offers huge discounts on nearly 1400 products.
Before you load that new cartridge brass for the first time, run an expander mandrel down the case necks. This will iron out dents and provide more uniform neck tension. Chose a mandrel diameter that provides appropriate neck tension.
Lapua brass is so good that you’ll be tempted to just load and shoot, if you have a “no-turn” chamber. However, some minimal case prep will ensure more uniform neck tension. Keeping your neck tension very uniform allows more consistent bullet seating. That, in turn, usually yields better accuracy, and lower Extreme Spread and Standard Deviation (ES/SD). Lapua brass, particularly 6mmBR, 6.5×47, 6.5 Creedmoor, and .308 Win comes from the factory with tighter-than-optimal necks.
Before you seat bullets, at a minimum, you should inside chamfer the case mouths, after running an expander mandrel down the necks. The expander mandrels from both Sinclair Int’l (Brownells, $14.99 stainless, $24.99 Titanium Nitride coated) and K&M will both leave the necks with enough neck tension (more than .001″) so you can then seat bullets without another operation. We suggest putting a bit of lube on the mandrel before running it down the necks — but remove any lube that gets inside the necks before seating bullets. If you do a lot of loading you may benefit from a Titanium Nitride-coated mandrel.
Both Sinclair and K&M Tools make a die body specifically to hold expander mandrels. The $49.99 Sinclair version fits caliber-specific expander mandrels which measure approximately .001″ less than bullet diameter for each caliber. This is an updated “Gen II” design that completely captures the mandrel within the die so the mandrel cannot pull out. It also has an O-ring in the die cap that allows the mandrel to self-center within the case neck. Brownells offers two sizes of Sinclair die bodies for expander mandrels: .17 -.338 caliber (#749011715 $49.99); and .357 – .50 caliber (#749008843, $49.99). All Generation II dies are machined from stainless steel and the standard diameter 7/8-14 dies include the Sinclair Stainless Steel Split Lock Ring.
Once you run the expander mandrel down the necks of Lapua brass, after you account for brass spring-back, you’ll have about .002″ neck tension*. This will make the process of seating bullets go much more smoothly, and you will also iron out any dents in the case mouths. Once the case mouths are all expanded, and uniformly round, then do your inside neck chamfering/deburring. The same expander mandrels can be used to “neck-up” smaller diameter brass, or prepare brass for neck-turning.
Forum member Mike Crawford adds: “These expanders can also reduce runout from offset seating. Prior to bullet seating, expand the sized necks to force thickness variance outward. With the Sinclair system, the necks will springback fine, and will not be pulled out of center. This leaves plenty of tension, and bullets seated more centered. I do this, even with turned necks, to get improved seating.”
Mandrels vs. Expander Balls on Decapping Rods
If you haven’t acquired an appropriate expander mandrel for your brass, but you DO have a full-length sizing die with an expander ball, this will also function to “iron out” the necks and reduce tension. However, using a die with an expander ball will work the necks more — since you first size them down, then the ball expands them up again. Typically (but not always), run-out is worse when using an expander ball vs. an expander mandrel.
* This .002″ tension is what we have observed with Lapua 6mmBR, 6.5×47, 6.5 Creedmoor, and .308 Win brass. This might vary with much smaller or larger cases, and of course a different brand of brass might yield different results. If you get too little tension with your current mandrel, you can get a smaller-diameter mandrel from 21st Century Innovation, with stainless, Black Nitride, or Titanium nitride versions. The Nitride models have less friction.
Many shooters these days clean their cartridge brass ultrasonically, or wet-tumble their cases with stainless media (above). Both methods get brass clean and shiny, inside and out. However, when those wet-cleaning processes are completed, you’re left with a pile of soaking wet brass. How do you dry your brass quickly and efficiently, without unsightly water spots? Read on for some great answers…
In our Shooters’ Forum, Member Terry asked: “How do you dry your brass after Ultrasonic cleaning?” In a Reloading Forum Thread, many smart suggestions were posted. A dozen fellow members outlined a variety of effective case-drying procedures, which work equally well for both wet-tumbled brass and ultrasonically-cleaned cases. Here are the Top 10 brass-drying suggestions from our Forum members.
TOP TEN Ways to Dry Cartridge Brass After Wet Cleaning
1. Food Dehydrator — Shake the brass in towel to get the bulk of water off. Next leave in the food dehydrator for 45 minutes or until there are no signs of moisture inside the cases. — Lawrence97
2. Lyman 5-Level Case Dryer — Rinse off cleaning solution(s), then load brass by type into racks in Lyman Cyclone Case Dryer. This is easier to load/unload than food dehydrators and holds more cases.
3. Hot Water + Compressed Air — Rinse all your cases as a batch using scalding hot water from the kitchen sink. Hot water evaporates off of brass very very quickly. Then hit them with compressed air. Takes 10 minutes. Simple. — SG4247
4. Oven Dry in Pre-Heated Oven — After pre-heating to 200° or so, turn off oven and put brass inside on a tray. Most important! Tell your wife what you are doing so she doesn’t crank it up to 425 to heat pizza! — MClark
NOTE: Many other members suggested oven drying at 150-200°. We recommend turning OFF the oven so you don’t cook your brass if you forget to remove the cases.
5. Towel Dry then Warm with Heat Gun — Roll brass in a towel until no more water shakes out. Lay out on cardboard box top and blow off with Harbor Freight heat gun. $9.99 on coupon. Two minutes of heated air and about half hour of wait and they are good to go. This is with primers removed. — Shaggy357
6. Compressed Air, then Sun Dry Outside – I rinse the brass, then blow them out with compressed air. Then, dependent on the time of year, lay them on a towel in the sun. — HogPatrol
7. Dishwasher on Dry Cycle – In the winter, I drop my wet brass cases neck-down on the rack pegs in the dishwasher, then turn on the dry cycle. In the summer…well, I’m in Texas. They go to the porch for a bit. — Toolbreaker
8. Alcohol Rinse then Air or Oven Dry — Rinse in 90% Isopropyl alcohol and either let air dry or stick in 175° oven for half an hour. Alternatively, use a dehydrator. — Zipollini
9. Slow Air-Dry in Loading Blocks — I have a reloading block with holes drilled in it. I simply load the block up and let it air-dry in the cupboard for a couple of days. — JCS
10. Wipe with Towel Then Anneal Normally — This thread is stirring my OCD side. Seems complicated for just drying — my brass dries just fine when I anneal it. This entire process can’t take an hour per batch. When finished, the brass is cleaned, annealed, and ready to size. — CHLuke
Deprime, then tumble brass with stainless media, water, Lemishine, and dish detergent.
Shake them easily in a strainer to knock out most media then grab 4-5 pieces, shake them over the bucket for the last of the media then inside a towel.
Finally blow out the primer pockets and wipe with a towel, load in the Annealeez.
Here is a clever DIY tool we learned about from Frank Shuster, a Forum member, who, sadly, passed away in 2015. Frank was a very knowledgeable shooter who was always willing to help others. Here is one of Frank’s smart inventions. He devised a way to measure the length of a rifle’s chamber using a fired cartridge case. Frank’s system works by cutting a “collar” from part of the case neck. This then slips over a bullet seated in a case loaded without powder or primer. As you chamber the dummy round, the collar will move back to indicate the full length of the chamber. (Make sure the bullet is seated well off the lands so the dummy round can chamber fully.)
The pictured gauge can be home made (for free) with components you already have on hand. Frank explained: “I used a Dremel cut-off wheel to cut the front half of the case neck off. A jewelers needle file to de-burr both rough-cut edges. The cut-off surface does not need to be perfectly square, because you are using the original straight mouth to make contact at the front of the chamber. Seat any old bullet to the approximate normal seating length. Next apply a tiny drop of oil on the ogive of the bullet, and slide the ‘collar’ over the bullet. Then chamber the dummy round and close the bolt. Extract the round slowly and carefully and take the measurement with calipers (see top photo).”
Frank’s DIY chamber length gauge works well. In a related Shooters’ Forum thread, Frank posted: “I’ve compared length dimensions doing it this way and with the chamber length shown on my chambering reamer drawings, and the Sinclair gauge, and they are all within .001″ or so.”
Commercial Chamber Length Gauges May Not Work with Custom Chambers
Frank did use Sinclair chamber-length gauges for some applications. These bullet-shaped gauges slip into a cartridge, but “it’s inconvenient to order that little gauge only… without spending $6 shipping for a $7 item.” Moreover, the Sinclair gauges may not fit a custom chamber with a tighter neck dimension because the diameter of the ring at the end is too large.
As an alternative to commercial gauges, the collar-type, homemade gauge will function properly in a custom chamber. The homemade gauge will work with smaller-than-standard chamber neck dimensions, as long as you use a piece of appropriately-turned fired brass that fits your chamber.
Creedmoor Sports is a leading vendor of products for competitive shooters and serious hand-loaders. Along with great gear, Creedmoor Sports provides informative content for its customers. The Creedmoor InfoZone provides Reloading Tips, Gear Reviews, Shooting News, and basic gunsmithing information.
Bill Gravatt, President of Creedmoor Sports, is an expert on reloading processes and gear. He developed many of the popular tools marketed by Sinclair Int’l, and he brings that expertise to Creedmoor Sports. Bill hosts a series of “how-to” videos produced for the Creedmoor InfoZone.
In this video, Bill Gravatt demonstrates several methods to clean your cases. Bill tells us: “Powder residue should be removed before you insert your cases into your reloading dies. There are several ways to clean your cases. Many shooters use a combination of various methods…”
1. Manual Cleaning — You can use 0000 Steel wool for the outside of the case and a Case Neck brush for the inside. A paper towel can remove any remaining residue. This is a handy way to clean if you load at the range.
2. Vibratory Tumbling — This traditional method works well, particularly for pistol brass. Experiment with both Corn Cob and Walnut media. You can get a brighter shine by putting a small amount of liquid brass polish in the media.
3. Wet Tumbling with Stainless Media — This process can get your brass clean inside and out. Do check to ensure no pins are stuck in the flash-holes. Watch for peening of case mouths that can occur over time.
4. Ultrasonic Cleaning — Ultrasonic cleaning works great for small parts as well as brass. The ultrasonic process removes all carbon and traces of lube, which can leave the inside of case necks too dry. To smooth bullet seating, try putting a tablespoon of Ballistol in the cleaning solution.
Cleaning Reloading Dies
Cleaning your reloading dies is something that many hand-loaders neglect. In this 60-second Tech Tip, Bill Gravatt provides some smart advice on cleaning your dies. Bill notes: “After heavy use, case lube and carbon can build up in your reloading dies. It’s important to keep them clean. Also, with new dies, give them a good cleaning before first use, because they ship with a corrosion inhibitor.”
1. Step 1 — Prior to cleaning, disassemble the die and spray it with a good degreaser. Do this with brand new dies too.
2. Step 2 – Take a patch and run it in the die to remove old lube and gunk. Don’t forget the decapping assembly and other internal parts.
3. Step 3 — After cleaning the die, but before reassembly, spray the die with a good corrosion inhibitor, such as Corrosion-X or Starrett M1.
There’s a nice article in the Western Powders Blog that any varminter will enjoy. In this hare-raising tale, gunwriter Jim Waddell explains how he used a self-loading Savage A17 rifle to take care of a serious jack rabbit problem on a rancho in California. “[My friends] purchased a huge amount of acreage that had some existing alfalfa fields and [surrounding sagebrush]. Sagebrush is home to jack rabbits. Lots of jack rabbits. The previous owner of this property didn’t do any varmint or predator control[.] The ink wasn’t dry on the escrow papers before [my friends] started asking for help shooting rabbits. A problem in taking these critters is it has to be done at night when they come out to feed as they lay low in the bush during the daylight hours.”
Savage A17 Comes to the Rescue
Initially Waddell and some friends took on the jack rabbit hordes using Ruger 10/22s and a .44 Magnum Marlin lever gun. Neither option was ideal. The .44 Magnum just couldn’t keep up the desired shooting pace (it took too long to reload) ant the .22 LRs were too anemic. So Waddell decided to give the more potent 17 HMR a try. He acquired a Savage A17 and went back for a second bunny-busting session. He came away convinced that the 17 HMR cartridge in the semi-auto Savage works great for small varmint control.
NOTE: This is in an older internet archive so it may take a minute or so to load.
Waddell writes: “I wanted more than a .22 after seeing the problems my pals had with their [10/22] bullets not anchoring the rabbits. Armed with my new Savage A17 it was time to head back to the alfalfa fields. This time my hunting partner was Dan, my son-in-law from Seattle. We hunted for four nights. Each night was either raining, windy or both. My question about whether or not rabbits would be out in the weather was answered immediately. They were everywhere. As miserable as the weather was, we got all the shooting we wanted and that Savage rifle was up to the task. We got so many rabbits it was impossible to count.” CLICK HERE for the full account of Waddell’s jack rabbit adventures on the California rancho. It’s worth a read. Here is a sample:
Wabbits, Wabbits Everywhere — Even Running Right at You
I couldn’t believe my eyes when I saw a sea of rabbits as far as the lights would shine and when the light beams hit the bunnies, they became confused and as often as not, would run right at the lights so a good percentage of our shots were literally in spitting distance. It was also a new experience shooting at targets that are running TOWARD you. Most of us who’ve done much hunting for game or varmints have experienced moving targets but how many of those targets are coming at you?
Sources for Best Deals on 17 HMR Ammunition
With 17 HMR ammunition it definitely pays to shop around. This spring (March 2026) we’ve found a 50-count box of 17 HMR ammo as low as $10.10 and as high as $19.99. A typical price currently is about $13.99-$16.99, as you’ll see at Midsouth. You can check multiple vendors’ 17 HMR ammo prices at once on the AmmoSeek.com and BulkCheapAmmo.com websites. Here are some of the best deals we found on 3/10/2026 on BulkCheapammo.com starting at $10.10 per 50-rd box:
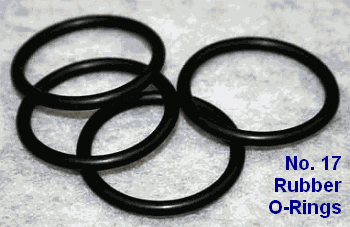
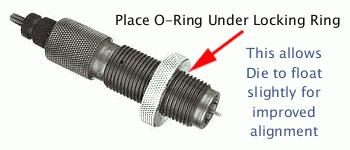
Here’s an inexpensive procedure that can help you load straighter ammo, with slightly better measured concentricity (i.e. less run-out) on the case necks and bullets. Simply use a Rubber O-Ring on the underside of the die locking ring. This allows the die to self-align itself (slightly) to the case that is being sized. Without the O-Ring, if the flat surface on the top of your press is not perfectly square with the thread axis, your die can end up slightly off-angle. This happens when the bottom of the locking ring butts up tight against the top of the press. The O-Ring allows the die to float slightly, and that may, in turn, reduce the amount of run-out induced during case sizing.
Top prone shooter GSArizona, who sadly passed in 2022, tried this trick and said it works: “Go to your local hardware store and get a #17 O-Ring (that’s the designation at Ace Hardware, don’t know if its universal). Slip the O-Ring on the die and re-adjust the lock ring so that the O-Ring is slightly compressed when the die is at the correct height. Size and measure a few more cases. You will probably see a slight improvement in neck concentricity as the die can now float a bit as the case enters and leaves it. This isn’t going to be a dramatic improvement, but it’s a positive one.”
We want to stress that adding O-Rings to sizing dies may help some reloaders, but we don’t offer this as a panacea. Try it — if using the O-Ring reduces measured runout that’s great. If it doesn’t, you’ve only spent a few pennies to experiment.
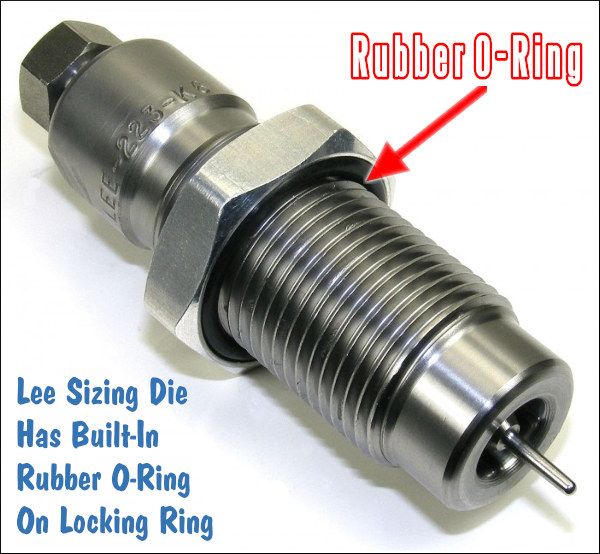
Lee Precision makes die lock rings with built-in O-Rings. Lee’s distinctive lock ring design allows the same kind of self-alignment, which is good. However, Lee lock rings don’t clamp in place on the die threads, so they can move when you insert or remove the dies — and that can throw off your die setting slightly. By using an O-Ring under a conventional die lock ring (that can be locked in place), you get the advantages of the Lee design, without the risk of the lock ring moving.


 In two informative Midsouth Blog articles, Glen Zediker offered helpful advice on priming. First he examines what happens to the primer itself as it is seated in the cup. Glen explains why some “crush” is important, and why you never want to leave a high primer. Glen also reviews a variety of priming tools, including his favorite — the Forster Co-Ax Bench Primer Seater. Then he offers some key safety tips. Glen provides some “rock-solid” advice about the priming operation. These reloading tips came from Glen Zediker’s popular book, Top-Grade Ammo.


 Both Sinclair and K&M Tools make a die body specifically to hold expander mandrels. The $49.99

 5. Towel Dry then Warm with Heat Gun — Roll brass in a towel until no more water shakes out. Lay out on cardboard box top and blow off with Harbor Freight heat gun. $9.99 on coupon. Two minutes of heated air and about half hour of wait and they are good to go. This is with primers removed. — Shaggy357


 Commercial Chamber Length Gauges May Not Work with Custom Chambers