We like Lyman’s Electronic Digital Trigger Pull Gauge, which is faster and more precise than the previous model. The latest Lyman Pull Gauge measures trigger pull weights from 1 ounce to 12 pounds with resolution of 0.1 ounces (2.8 grams). It features an adjustable, 4-position rod which retracts into the gauge body. We think that anyone running match triggers below 2.5 pounds pull weight should have a gauge like this. Among the pull gauges on the market, we think the Lyman unit offers great performance for the price. This gauge has a $69.95 MSRP, but it’s now $54.99 at Midsouth and $56.06 on Amazon.
Features: More Precise Strain Gauge | Improved Grip Shape | Adjustable Rod Lengths
Lyman’s Electronic Digital Trigger Pull Gauge is designed to be the fastest and most accurate trigger pull gauge available. State-of-the-art strain gauge technology allows for repeatable accuracy of 1/10 ounce (2.8 grams). The gauge features a large, easy-to-read LCD display and you can switch from ounces to grams with the push of a button. The gauge can also deliver a pull weight average of the last 10 readings. That’s very helpful, particularly when working with factory triggers that may not be very consistent.
The Lyman Trigger Pull Gauge features a solid, collapsible rod with four locking positions. Being able to adjust length makes it easier to use the gauge with a wide variety of firearms — pistols, rifles, and shotguns. The locking feature prevents the rod from flexing when applying pressure to the trigger. When not in use, the rod conveniently collapses into the gauge body, making the whole unit more compact. The new Trigger Pull Gauge comes in an internally-padded plastic case that can be easily stored in a drawer or on your work bench.
They say that a man can never have too much money or too much time. Darrell Jones would add that a man can never have too many BR-based rifles. Darrell had a fleet of BRs, in 22 BR, 6mm BR, 6.5 BR, 7 BR, and 30 BR. But he was intrigued by the potential of a rifle in the .257 caliber. Could it shoot as well as a 6mm BR? Could it challenge the more popular calibers in the highly competitive 600-yard benchrest game? Through careful research and component selection, Darrell created a 25 BR rifle that proves the viability of the 25 BR as a competition round. Pushing 115gr high-BC Berger bullets at 2837 fps, Darrell’s 25 BR “Peppermint” won first place in its very first match.
The Barely Bigger BR — Exploring the .25 Caliber Option
Rifle Report by Darrell Jones
I decided to build a 25 BR after several weeks of deliberation and ruling out a .257 Ackley Improved. Part of my dilemma was that I wanted to shoot F-Class competition at 600 yards, and I was unsure about the accuracy potential of the 25 BR. However, I currently have several BRs chambered in 22 BR, 6BR, 6.5 BR, 7 BR, and 30 BR and they all shoot exceptionally well at 600 yards. This lead me to believe a 25 BR should deliver fine accuracy, just like its other BR siblings. Why wouldn’t a 25 BR shoot accurately provided that I built it with the right components? The feasibility saga began. I began searching diligently for custom 25-caliber bullets. Unfortunately, there are not many 25-caliber custom bullet makers. I actually found only two custom bulletsmiths who produce the 25s. I did look at Fowlers and then looked at Bergers. Both Jeff Fowler and Berger made 110-grain flat-base bullets when I was looking. [Editor — this 110gr bullet is no longer listed by Berger]. The Berger 110gr FB bullets (.414 ballistic coefficient) shot very well out of my 12-twist 25-06 Ackley. However, I wanted to shoot a heavier bullet if possible. Berger makes a 25-caliber 115gr VLD boat-tail with a high ballistic coefficient. This needs a 10-twist barrel.
Panda Action, McMillan Stock, Weaver T-36
As you can see, I went with a Panda polished action and a weighted McMillan BR stock painted metallic silver with red candy cane stripes thus the name “Peppermint”. This gun actually does double duty now as a 25 BR and 6 PPC switch barrel. When I want to run the gun as a 6 PPC for short range, I simply screw on the PPC barrel, then swap in a bolt (fitting the PPC bolt face) from another Panda action I own. That’s one advantage of owning custom Kelbly actions! Don’t even think about exchanging bolts between factory guns. Kelbly rings and a Weaver T-36 fixed-power scope handle the optical duties while a Jewell trigger set at one ounce takes care of the firing mechanism.
Chambering for the .25 Caliber BR Wildcat
I wanted a chamber that would let me shoot both the 110s and the 115s. I took some time surfing the net looking for rental reamers that had suitable throat dimensions. I found that Elk Ridge Reamer Rentals had a 25 BR pilot reamer available. I called and Elk Ridge faxed me a reamer diagram that indicated it was designed to tight SAMMI specs. I asked how often was the reamer used and was told “not very often”.
I did want a minimum no-turn neck optimized for Lapua brass. The drawing indicated that the reamer would cut a .281″ neck and a throat of 1.0315″. This was very close to ideal, though I did have to turn two thousandths off the necks of Lapua 6BR brass after I necked it up. I resized using a .277″ bushing and the loaded rounds came out to be .279″. Realizing that this was in the ball park, I decided to go with the Elk Ridge Reamer and build a 25 BR that could shoot 110gr or 115gr bullets. Now the question was where to get a match-grade 25-caliber barrel. I called quite a few of the custom barrel-makers, including BlackStar Barrels in Texas (no longer operating). I have had wonderful success with the BlackStar barrel on my 6BR “Chantilly” — it delivered great accuracy and impressive velocities. Since the 25 BR was so similar, I went with another BlackStar. I ordered a 10-twist, 6-groove, 1.250″-diameter straight-contour tube.
After chambering, the barrel finished at 1.245″ diameter and 27.5″ inches with an 11° crown. I actually had the throat lengthened to accept both Berger 110gr and 115gr bullets. The bases of the FB 110-grainers sit flush with the neck-shoulder junction, when they are seated .010″ into the lands. With the longer 115gr VLDs, the bottom of the bearing surface (i.e. start of boat-tail) is just about even with the neck-shoulder junction.
Accurate Load Development
The barrel broke in easily with just 10 shots, using a “shoot one and clean” process. The load I started with was 31.5 grains of Varget with CCI 450 primers. The Berger 110s and Berger 115s had the same Point of Impact (POI) at 100 yards. However, the 115s impacted two inches higher at 600 yards with the same load. That shows the benefits of a higher BC. Pushed by the CCI 450s and 31.5 grains of Varget, the 115-grainers were running about 2837 FPS. I boosted the load up to 32.0 grains but I noticed primer cratering, so I backed off, settling on 31.5 grains for the 115gr Berger VLD.
Peppermint Wins at 600 Yards
For her debut in competition, I took “Peppermint” to our local 600 yard F-class match. Shooting the Berger 115s with 31.5 grains Varget, she won with a perfect score of 200 with 14 Xs. At my club, we use a SR3 target. The X-Ring measures 3″ in diameter and the 10-Ring measures 7″. At the match there were some very good shooters with top-flight custom rifles in accurate calibers such as 6.5-284 and 22 Dasher. I was very fortunate to come out on top, but I give the credit to Peppermint’s good bench manners and outstanding accuracy.
As you can see from the target, “Peppermint” is a very accurate rifle that has proven herself in competition. It takes a good gun to finish “on top” in her very first match. So far, I’m very happy with the project, and more than satisfied with the accuracy of the 25 BR. This is definitely a worthy cartridge for Egg Shoots, 500m varmint matches, and the 600-yard F-Class game.
BR-Based Cartridge Comparison
CALIBER
22 BR
6mm BR
25 BR
6.5 BR
7 BR
30 BR
Bullet
80gr SMK
107gr SMK
115gr Berger
107gr SMK
130gr SMK
118gr BIB
BC
.420
.527
.522
.420
.391
na
Load Grains
31.0 H4350
30.0 Varget
31.5 Varget
32.0 Varget
34.0 AA2460
34.0 H4198
Barrel Length
27″
27″
27.5″
27.5″
28″
24″
Velocity
3100 fps
2880 fps
2837 fps
2851 fps
2719 fps
2970 fps
Comparing the BR-Based Variants
Now that I have several calibers in the BR cartridge family, (22 BR, 6mm BR, 6.5 BR, 7 BR, and a 30 BR), it is my humble opinion that they each have their own place. A varmint hunter’s dream, the 22 BR can push a bullet faster and more accurately than the 22-250. With an 8-Twist barrel, the 22 BR can send an 80gr SMK to 600 yards with extreme accuracy.
The 6 BR can do it all. The 6mm caliber offers a wide variety of quality bullets suitable for any shooting situation. All the major custom barrel makers produce outstanding 6mm barrels in a full range of twists. Moreover, since the 6 BR cartridge is so popular, there is a great store of knowledge about reloading for the 6 BR. It is easy to find a load that will shoot superbly in any bullet weight.
The 25 BR has proved to be easily tuneable, proficient and not fickle. You can obtain extreme accuracy without great effort in load development. The 115gr Berger offers a good high-BC projectile for this caliber, making the 25 BR a viable alternative to the 6 BR. As I’ve shown, it is competitive with a 6 BR in head to head competition.
Compared to the 25 BR, the 6.5 BR has a small edge in ballistics. However, there are not many light bullet choices available, especially from custom makers. The 123gr Lapua Scenar is an excellent bullet with a .547 stated BC, but it may be a bit heavy for the case capacity.
The 7 BR was designed for silhouette shooting, and it excels at that task. The 7 BR can push a 130 grain bullet fast enough to knock over the steel silhouettes at 500 meters with real consistency.
The 30 BR is nothing less than outstanding. The 30 BR is now the dominant cartridge on the benchrest Score-shooting circuit. It is also highly accurate for group shooting at 200 yards and very capable of winning a 600-yard F-Class match. Barrel life of over 6,000 rounds is realistic.
I like all the “flavors” of BR derived from the 6mm BR Norma case. However, if I could only have one BR in my safe, give me my 8-Twist, 6 BR “Chantilly” and I will be a happy camper. The final point I would make is if a cartridge is stamped BR on the case, it will shoot extremely accurately if you can.
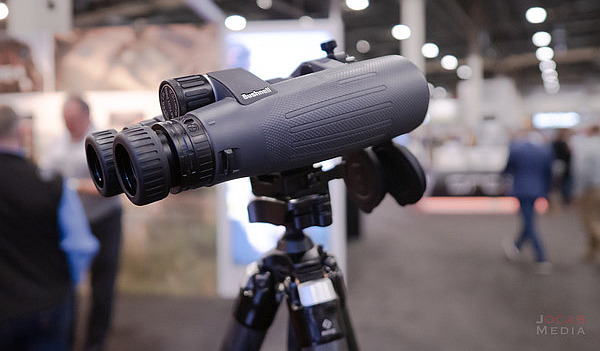
Bushnell offers Match Pro ED 15×56 Binoculars designed for PRS/NRL competition. These 15X Match Pro ED binoculars have a unique box-style MilRad reticle for ranging and determining shot locations. These new-for-2023 Match Pro ED Binoculars combine high-magnification binocular lenses with an MRAD-based reticle for ranging, target sizing, and shot correction. The benefit is that this 15X binocular optic could replace a bigger, heavier reticle-equipped spotting scope. This Match Pro ED Binocular can be quickly mounted on a tripod for enhanced stability. We recommend that because it is pretty hard to hold a 15X optic very steady with hands alone.
The Match Pro ED’s offset SHOT-CALL reticle, located in the right barrel, has a dedicated focus adjustment and can be rotated for leveling after IPD (interpupillary distance) adjustment (i.e. how far the eyepieces are spread apart). Users can secure their preferred IPD with the included BRIDGESET stabilizer, which ensures the binocular is set for quick use and is stable when mounted on a tripod. Claimed light transmission is 92%. Suggested MSRP for the Match Pro ED 15×56 binoculars is $699.99.
Our friend Jonathan Ocab reviewed the new Match Pro ED 15x56mm binoculars: “Bushnell Optics showed off their new Match Pro ED 15×56 binocular, which is based off of their Forge binocular design. The Forge 15×56 has a good reputation as a budget-friendly binocular with good performance at its price range. The Match Pro ED 15×56 is a hefty binocular with a magnesium chassis coming in at 51 ounces with what is dubbed the SHOT-CALL MRAD reticle. The reticle [rotates in the right barrel] so that it can be leveled for the user’s eyes after the barrels are adjusted to the pupil distance.”
Jonathan added: “My initial impressions of this binocular are positive. It is definitely a bigger, heavier binocular and is not going to be one for field use. This is definitely the type of binocular one would employ on the range at NRL/PRS matches to spot for a shooter.” CLICK HERE for full SHOT Show 2023 Optics report by Jonathan Ocab.
In this video, top PRS shooter Robert Brantley explains the features of the Match Pro ED 15X binoculars. He says these can replace a spotting scope, and he says the Shot-Call Reticle works very well for both ranging and calling hit locations.
Recoil Web also did a review of these new 15×56 binoculars stating: “The new Bushnell Match Pro ED 15×56 binoculars [offering] is a big deal, but maybe just to a niche crowd. For a long time, spotting scopes have often come with a MIL or MOA reticle in the eyepiece so one could spot shots at long range and call corrections or for use in ranging a target if a laser rangefinder wasn’t available. With a reticle in the right barrel, you get a MIL grid for ranging and shot correction like a spotting scope but the [wide] field of view and outstanding glass of the binoculars.”
One of our Forum members complained that he wasn’t able to set his primers flush to the rim. He tried a variety of primer tools, yet no matter what he used, the primers still didn’t seat deep enough. He measured his primers, and they were the right thickness, but it seemed like his primer pockets just weren’t deep enough. He was mystified as to the cause of the problem.
Well, our friend Boyd Allen diagnosed the problem. It was the decapping rod. If the rod is adjusted too low (screwed in too far), the base of the full-diameter rod shaft (just above the pin) will contact the inside of the case. That shaft is steel whereas your case is brass, a softer, weaker metal. So, when you run the case up into the die, the shaft can actually stretch the base of the primer pocket outward. Most presses have enough leverage to do this. If you bell the base of the primer pocket outwards, you’ve essentially ruined your case, and there is no way a primer can seat correctly.
The fix is simple. Just make sure to adjust the decapping rod so that the base of the rod shaft does NOT bottom out on the inside of the case. The pin only needs to extend through the flash hole far enough to knock the primer out. The photo shows a Lyman Universal decapping die. But the same thing can happen with any die that has a decapping rod, such as bushing neck-sizing dies, and full-length sizing dies.
Whenever you use a die with a decapping pin for the first time, OR when you move the die to a different press, make sure to check the decapping rod length. And it’s a good idea, with full-length sizing dies, to always re-check the height setting when changing presses.
There are a variety of decapping dies currently on the market, with models available from LEE, Lyman, Hornady, RCBS, Redding, and Sinclair Int’l.
LEE Universal Decapping Die Costs Just $11.49
Speaking of decapping tools, Midsouth Shooters Supply sells the LEE Universal Decapping Die for just $11.49 (item 006-90292), a very good deal. There are many situations when you may want to remove primers from fired brass as a separate operation (prior to case sizing). For example, if your rifle brass is dirty, you may want to de-cap before sizing. Or, if you load on a progressive press, things will run much more smoothly if you decap you brass first, in a separate operation.
Decapping Dies for Cases with Smaller Flashholes
TAKE NOTE: Some Euro Small Flash Holes are spec’d at 1.5mm or 0.059″, and max out at about .062″, so these need a smaller die pin.
The low-cost LEE Universal Decapping Die will work with cartridges from 17 Fireball all the way up to big Magnums. However, NOTE that the decapping pin supplied with this Lee die is TOO LARGE for LAPUA 220 Russian, 6mmBR, 6.5×47, 6.5 Creedmoor, .308 Win (Palma) and Norma 6 PPC flash holes. Because the pin diameter is too large for these brass types, you must either turn down the pin, or decap with a different tool for cases with .059-.062″ flash-holes.
Sinclair Int’l offers a Stainless Decapping Die that comes with BOTH .080 and .060 Pins. The $46.99 die ships with three decapping pins for standard .080″ flash holes, and two pins for .060″ flash holes.
Redding makes a Universal Decapping Die with an optional smaller-diameter decapping rod for the smaller .059-.062″ flash holes found on the BR and PPC cases. The use of this die is explained in the video below:
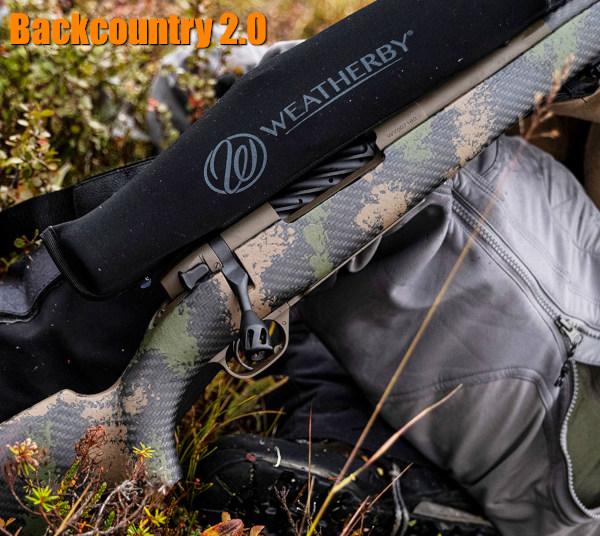
Hunting season is here. Around the country, game hunters are getting prepared for fall deer hunts. For hunters making long treks in the back-country, reducing carry weight is a big deal. That’s why we’ve seen a trend among rifle-makers to introduce rifles that weigh significantly less. This is accomplished through use of carbon fiber stocks, carbon-wrapped or fluted barrels, and even titanium actions. Today’s showcased Weatherby rifles feature these lightweight components. As a result, the Weatherby Backcountry 2.0 Ti (Titanium) model comes in at just 4.7 pounds before optics. That’s mighty light for a hunting rifle.
Weatherby Backcountry 2.0 Ti with titanium action, fluted barrel, and carbon-fiber stock, 4.7 pounds.
Light-Weight, Carbon-Stock Backcountry 2.0 from Weatherby
Here is good news for backcountry hunters. Weatherby’s Backcountry 2.0 carbon-stocked hunting rifles weigh well under 6 pounds before optics. There is even one titanium action model series that weighs just 4.7 pounds. The 2.0 series now offers both standard steel receivers or even lighter titanium receivers. And Backcountry 2.0 Carbon models are equipped with a new carbon fiber stock that is the lightest in the industry — weight is a mere 20 ounces for standard actions. For further weight savings, some models feature a tensioned carbon fiber-wrapped barrel. But all that high-tech doesn’t come cheap — MSRP for the Titanium action, carbon-wrapped barrel model is $3849.00!
Ultralight Carbon Stock — Weatherby’s new Blacktooth stock features a Carbon Link™ bedding system which engages the recoil lug and distributes recoil throughout the stock without the weight of a traditional aluminum bedding block. This makes the overall stock lighter and stiffer.
The Backcountry 2.0 Ti Carbon combines a tensioned carbon fiber barrel with the ultra-lightweight Titanium Weatherby Mark V action. This barrel system has shown excellent accuracy, making it a good choice for a long-range hunter. Registering a very low 5.3 lb starting weight, the Backcountry 2.0 Ti Carbon combines a titanium action with the Peak 44 Blacktooth stock — which Weatherby claims is the “lightest production carbon fiber stock on the market.”
Along with the new ultra-light elements, these Weatherbys have premium Mark V features: 54-degree bolt lift for fast cycling, fluted bolts, TriggerTech triggers, and Cerakote finish on metal parts. All the Backcountry 2.0 series rifles have a sub-MOA accuracy guarantee. CLICK HERE for Weatherby Backcountry 2.0 Field Test by Peterson’s Hunting.
Light is Right — Weatherby’s Backcountry 2.0 rifles weigh as little as 4.7 pounds (before optics).
Weights for Backcountry 2.0 Models range with chamberings:
Weight Saving Secrets — How Weatherby Achieved Such Light Weights GunsAmerica Digest reports: “A huge amount of the weight savings comes thanks to the updated carbon fiber Blacktooth stock by Peak 44. This stock uses what they call their Rock Solid Carbon Link bedding system which eliminates the need for a metallic bedding block. The Blacktooth stock weighs less than 20 ounces. The Backcountry 2.0 [series adds] both a carbon fiber stock and either fluted #1 MOD-profile or #2 MOD-profile carbon steel barrels or #4 MOD-profile BSF carbon fiber-tensioned barrel to achieve these light weights.” READ GunsAmerica Review.
To mitigate recoil Weatherby developed its new 3DHEX recoil pad — the gun industry’s first production 3D-printed pad. The 3DHEX’s three-dimensional honeycombed design extends the duration of the recoil pulse — taking away the sharp kick. Weatherby explains: “With the same amount of recoil spread out over a much greater time period, felt recoil is greatly reduced[.]” Backcountry 2.0 rifle recoil is also reduced by factory-fitted Accubrakes, contoured to match barrel profile.
Field Test of Titanium Action Weatherby Backcountry in 6.5-300 Whby Magnum
In this video, Hunter Todd Helms reviews Weatherby’s Backcountry T1 rifle in 6.5-300 Weatherby Magnum. This rifle is meant for fast and light travel in the backcountry. A fluted barrel, titanium action, and carbon fiber stock minimize weight. Todd says the 3DHEX recoil pad really does tame the magnum kick. This model also features a new streamlined muzzle brake.
Preparations Before The Hunt
1. Map Your Hunt and Notify Others — Before your hunt, make a plan and notify friends and family members about WHERE you are going and your intended return date and time. Print out a Google Satellite map and locate landmarks and trailheads. Mark where you plan to park your vehicle and give a copy of this map to friend and/or family members. A hunter may injure himself by falling off a rock, or tumbling in a creek-bed. After that kind of injury the hunter may be confused or unable to walk. If you get stranded in the wilderness, you want trusted persons to know where you are. So, before you leave on a trip, provide a map to a friend or family member. Show them where you will leave your vehicle, and where you expect to be every day of your hunting adventure.
2. Licenses and Permits — Make sure you have a valid hunting licenses and all the necessary tags. Begin this process with ample time before your intended hunt(s). The NSSF adds: “If you are crossing state or national borders, find out about any special considerations you must take care of. Border crossings can mean knowing about firearm transport laws or Chronic Wasting Disease-related regulations.”
3. Work on Your Fitness — On a multi-day hunt you may be trekking many miles. You need to be in good shape. If you are out of shape you may be putting yourself in a precarious situation, particularly if you underestimate the terrain difficulty. As the NSSF says: “Not being able to handle the conditions lessens your chances of success, can turn a great experience into an agonizing one and can endanger your health.”
4. Do Your Homework — Study the area you will be hunting. Talk to other hunters. Look at satellite photos. Get a real sense of the walking and terrain challenges. For a multi-day hunt, MAKE a PLAN. The NSSF states: “Eliminate surprises. Learn as much about where you will be staying, the area you will be hunting, what the weather might be like and what you need to bring[.]”
5. Rifle and Ammo — Make sure your rifle is sighted-in and your ammo is tested. Sight-in your rifle with the ammo you plan to use on your hunt. CLICK HERE for 4-Shot Sight-in Method. After sighting-in from the bench, confirm your zero by shooting from typical hunting positions (kneeling and with forearm supported on a rock or post).
6. Communications and GPS — Bring a GPS if you are in a wilderness area far from civilization. It’s a good idea to bring a cell phone, but you may not have coverage if you’re quite a distance from populated areas. A smart-phone also doubles as a digital camera to record your trophies. For navigation and safety, consider getting Garmin inReach Explorer+. This high-tech handheld unit features interactive SOS, connecting you to the GEOS 24/7 search-and-rescue monitoring center. They also allow you to send and receive text messages, no matter where you are, via advanced inReach satellite technology. Yes you can communicate even if you are miles from the nearest cell tower.
Visit WhereToHunt.org
There’s a great online resource for hunters that will help you find game locations in your state and ensure you have all the proper permits and game tags. WheretoHunt.org features an interactive map of the country. For all 50 states, the NSSF has compiled information about hunting license and permits, where to hunt, hunter education classes, laws and regulations and more. For each state you’ll also find a link for required applications and license forms.
If you are considering purchasing a progressive reloading press — you’ve struck gold. Today’s Saturday at the Movies article showcases the most comprehensive video ever created about progressive presses. Hosted by Gavin Gear of UltimateReloader.com, this remarkable 79-minute video covers a dozen presses from six leading manufacturers: Dillon, Frankford Arsenal, Hornady, Lee, Mark 7 (Lyman), and RCBS.
Set aside plenty of time, because there is a wealth of information — the “mother lode” of progressive press coverage. Along with the big comparison video, Gavin has prepared a detailed, 17-page online article which covers all of the presses in the shootout. This 17-page article also includes many product-specific videos. We link to five of these videos below.
12 Progressive Presses are compared in this comprehensive video:
Here it is! Ultimate Reloader’s long-awaited Progressive Press Shootout. This online article and accompanying video represent the most exhaustive and most in-depth look at progressive press reloading equipment. The Ultimate Reloader Progressive Shootout covers a dozen different progressives from Dillon, Frankford Arsenal, Hornady, Mark 7 (Lyman), and RCBS. Reviewer Gavin Gear demonstrates how each press works and provides data on costs, output rates, capabilities, and accessories so that potential buyers can make informed purchasing decisions.
MORE INFO — Progressive Press Shootout Online Article
To accompany the remarkable 79-minute Progressive Press Shootout Video, Gavin Gear has posted a ton of information on his UltimateReloader.com website. A lengthy online article provides detailed information on the particular presses, press mounts, and lighting, as well as general details such as cost of ownership. We provide links to particular topics below. This is a GREAT RESOURCE — it’s like getting an entire chapter of a technical book all for FREE!
Below we provide links to each product-specific online page, along with the corresponding time-link to the related segment of the 79-minute Progressive Shootout video.
NOTE: Along with the presses featured in these six videos, the Ultimate Reloader Progressive Press Comparison video covers six other presses (12 total), in a comprehensive 1 hour 19 minute video linked at the top of this article.
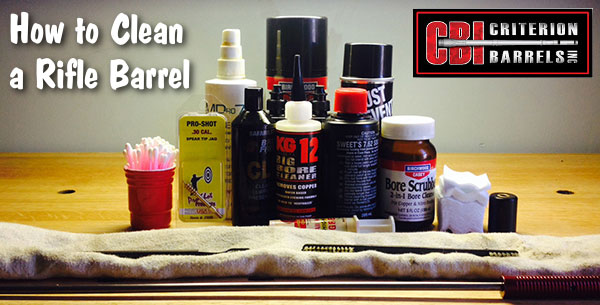
This article comes from the Criterion Barrels website. It provides good, conservative advice about barrel cleaning. Understand that cleaning methods may need to be adapted to fit the amount and type of fouling (and the particular barrel). In general, we do try to minimize brushing, and we follow the procedures Criterion recommends respecting the crown/muzzle. We have also had very good success using wet patches followed by Wipe-Out bore foam. Along with the practices outlined by Criterion below, you may want to try Wipe-Out foam. Just be sure to use a fitted cleaning rod bore guide, to keep foam out of the action recesses and trigger assembly.
The above video shows how to apply Wipe-Out or other bore-cleaning foam. We use a slightly different method. First, we use 3-4 wet patches to remove loose carbon fouling. Then we apply the foam as shown, but usually from the muzzle end (with bore guide in chamber). Here’s the important point — after 20-30 minutes, once the bubbles have dissipated, we apply the foam a second time, getting more of the active ingredients into the barrel. We then patch out, as shown, after 3-4 hours.
What is the Best Way to Clean a Rifle Barrel?
We are asked this question quite frequently alongside requests for recommended break-in procedures. Improper barrel cleaning methods can damage or destroy a barrel, leading to diminished accuracy or even cause a catastrophic failure. When it comes to barrel maintenance, there are a number of useful techniques that we have not listed. Some techniques may work better with different barrel types. This series of recommendations is designed to incorporate a number of methods that the Criterion Barrels staff has used successfully both in the shop and on their personal rifles. Please feel free to to list your own recommendations in the below comments section.
We recommend the use of the following components during rifle cleaning:
• Cloth patches (sized for the appropriate caliber)
• Brass jag sized properly for your bore [Aluminum and Nylon Jags also work]
• One-piece coated cleaning rod
• General bore cleaner/solvent (Example: Hoppes #9)
• Copper solvent of your choosing (Example: Sweets/KG 12)
• Fitted cleaning rod bore guide
• Plastic AP brush or toothbrush
• Q-Tips
• Plastic dental picks
• CLP or rust preventative type cleaner
There are a number of schools of thought relating to the frequency in which a barrel should be cleaned. At minimum we recommend cleaning a barrel after each shooting session to remove condensation, copper, and carbon build-up. Condensation is the greatest immediate threat, as it can cause the barrel to rust while the rifle sits in storage. Copper and carbon build-up may negatively impact future barrel performance, increasing the possibility of a failure in feed or function. Fouling should be removed whenever possible.
The below tips will help limit the wear of different parts of your barrel during routine maintenance, helping extend the life of the barrel and improving its performance.
The Lands and Grooves
This portion of the barrel may experience reduced efficiency due to copper fouling and cleaning rod damage. If copper fouling takes place during the initial break-in of the rifle, make sure to check our barrel break-in article.
For regular maintenance we suggest using a single piece coated cleaning rod rather than the traditional segmented rod or bore snake. While segmented rods and bore snakes may be convenient for field use, the corners between the segments may bow out and catch on the lands, scraping along the length of the rifling. Residual grit and particles from expended cartridges may also get caught between segments, resulting in an abrasive surface working its way down the length of the barrel. Most bore snakes will remove significant amounts of carbon fouling, but may fall short in the removal residual carbon buildup and copper fouling during deep cleaning. Good rods can be sourced from multiple manufacturers, but we have found good results using both Pro-Shot and Dewey brand products.
General cleaning requires the use of patches rather than nylon or brass bore brushes. Brass brushes may be required when aggressive cleaning is required, but can lead to unnecessary wear on the barrel if used frequently. This is not due to the nature of the soft brushes themselves, but from the abrasive particles of grit that become embedded in the material that is being run repeatedly through the bore. We recommend the use of bore guides when cleaning from both the muzzle and breech. These bore guides will help serve to protect the crown and throat from cleaning rod damage.
If significant resistance develops while running the cleaning rod through the bore, no attempt should be made to force it in further. Back the rod out and inspect the barrel to determine the cause of the resistance. The jag may be pushing between a bore obstruction and the rifling, digging a divot into the barrel before pushing the obstruction back through the muzzle. One way to minimize the risk of a stuck rod is by utilizing a slightly smaller patch during the initial push.
The process of cleaning the length of the rifling is relatively straightforward:
1. Check to make sure the rifle is safely unloaded.
2. Carry out any necessary disassembly procedures prior to cleaning.
3. Remove bolt (if possible) and insert fitted cleaning rod bore guide in action.
4. Soak a patch in bore solvent (similar to Hoppes #9).
5. Center and affix the patch on the brass jag, inserting it into the chamber end of the barrel. A misaligned patch may cause the jag to damage the lands of the rifling, so make sure the patch is centered on the jag. [Note, an aluminum or nylon jag will not show a “false positive”.]
6. Run the patch the full length of the barrel, retracting it upon reaching the end of the muzzle.
7. Let the solvent sit for a minute.
8. Continue to run patches through the bore until carbon residue is minimized.
9. Run a dry patch through the bore to ensure carbon residue has been removed.
10. Soak a patch in copper solvent (Sweet’s or KG-12).
11. Run the patch through the bore, leaving it to sit for 3-5 minutes (do not let solvent sit for more than 15 minutes.*)
12. Repeat this process until no blue residue remains on the patches.
13. Run a patch of Hoppes #9 and a dry patch through the bore to neutralize the copper solvent.
14. Inspect the barrel prior to reassembling the rifle, verifying that no bore obstructions remain.
*Please note that some ammonia-based copper solvents may prove to be corrosive if left sitting in the barrel for an extended period of time. It is essential that these solvents be removed within 15 minutes to avoid ruining the bore.
The Crown
The crown is the portion of the barrel where the bullet loses contact with the lands and grooves and proceeds to exit the firearm. The area most critical to accuracy potential is the angle where the bullet last touches the bore of the barrel.
Avoid damage to this area by using a plastic toothbrush and CLP type cleaner to scrub the crown from the exterior of the barrel. Even the most minimal variation in wear to the crown will negatively impact barrel performance, so be careful to avoid nicking or wearing away this part of the barrel.
The Magnetospeed V3 chronograph is affordable, easy to transport, and easy to set up. With a MagnetoSpeed barrel-mounted chrono you can quickly and easily record muzzle velocity (MV) without having to set up tripods or walk down-range. The compact MagnetoSpeed chronos are easy to operate and transport. With the full-featured V3 model, everything you need comes in a small fitted case. In the top photo are the components used with the MagnetoSpeed V3 Kit:
1. V3 Bayonet sensor
2. Display and control unit
3. Bayonet spacers (plastic and rubber)
4. Cords and mounting hardware (left), suppressor heat shield (right)
5. Alignment rod (square cross-section)
6. Rail adapter (sold separately)
Our friend Gavin Gear of UltimateReloader.com reviewed the MagnetoSpeed V3 and came away impressed. Gavin explains that a good chrono is essential: “If you want to load and shoot precision ammunition, you need the tools that will produce and validate the precision of your loads. A good chronograph is one of those tools! In this post I’m going to introduce you to the MagnetoSpeed V3 chonograph, the high-end electromagnetic chronograph which fills out the top slot in MagnetoSpeed’s equipment portfolio.”
In this 11-minute video Gavin reviews MagnetoSpeed’s top-of-the-line V3 Chronograph. He shows what ships with the unit, how to set it up for both rifles and pistols, and then he puts it through its paces showing how it captures velocity data. Gavin says he will follow-up with future videos showing how to link the MagnetoSpeed V3 to your mobile phone and how to log velocity data for future reference. To learn more about this high-tech chrono, visit UltimateReloader.com.
Given its compact size, reasonable price, and easy of set-up, we believe all serious shooters should have a MagnetoSpeed in their gear collection even if their primary chronograph is a LabRadar. The MagnetoSpeed V3 complete system is available now for $399.99 from Shop.GoHunt.com (MSRP is $449.00).
NOTE: The .375 CheyTac is a proprietary cartridge of CheyTac USA. CheyTac® is a registered trademark. CheyTac® bullets, brass, and ammunition are offered by CheyTac USA, which also produces a variety of high-quality firearms for civilian and military use. See all CheyTac® products at CheyTac.com.
This Extreme Long Range (“ELR”) rifle features a massive BAT “L” Round Action, McMillan Beast Stock, 38″ Bartlein 1:7″-twist Barrel, T5 Terminator Muzzle Brake, R.A.D. Recoil Reduction unit, and a customized Cheek Riser. The “Beast” stock name is appropriate — this rifle weighs a massive 38 pounds. Including the T5 brake, the finished barrel, chambered in .375 CheyTac, is 44″ long! All the work was done by Hall-of-Fame shooter and gunsmith Thomas “Speedy” Gonzales, of S.G. Precision LLC in San Antonio, Texas. To see other rifles crafted by Speedy, visit his Facebook page.
Speedy milled vents in the fore-end. He told us: “when you’re burning 150+ grains of powder you need all the ventilation you can get to help reduce the barrel heat.”
There are many good brakes out there, then there’s the “TERMINATOR”! — Speedy
The Phoenix Bipod employs a lowering modification.
About the .375 CheyTac Cartridge
Some of the most successful ELR cartridges are based on the CheyTac family, including the .375 CheyTac (9.5×77) and .408 CheyTac (10.36 x 77). This .375 CheyTac cartridge has proven to be tough and accurate. And it is capable of winning — our friend Derek Rodgers won the 2017 King of 2 Miles (K02M) event shooting a .375 CheyTac (9.5×77).
Derek Rodgers was the 2017 King of 2 Miles. He was also the first-ever human to ever hit the maximum distance target target at 3368 yards (1.91 miles). His cartridge choice? The .375 CheyTac. Derek ran Cutting Edge Bullets in Peterson brass with Hodgdon H50BMG powder.
Q: Why did you choose the .375 CheyTac cartridge?
Derek: When I was asked to join the Applied Ballistics Team, I needed to get an ELR rifle built in a short period of time. I was under a very tight time schedule to get the project complete. In an effort to eliminate variables, I decided to keep things standard and as simple as possible. I chose the .375 CheyTac for the ease of getting components. The larger rifles are more difficult to get components quickly and I felt like the .375 CheyTac had enough attributes to be competitive at ELR distances.
Hunting season has started in many parts of the country, with others soon to follow. And National Hunting & Fishing Day is September 23, 2023, just two weeks away. If you’re planning a hunt, and want to improve your chances of success, you can benefit from today’s Saturday Showcase featuring noted huntress and outdoor video host Kristy Titus. Titus, co-host of the Team Elk TV show, is a certified instructor who has hunted around the globe. She grew up in the outdoors, running pack mules in Oregon with her father.
Successful Hunts with Kristy Titus and Field Dressing Methods
Kristy has her own successful YouTube Channel, Pursue the Wild with Kristy Titus. Here are three popular videos on that channel. Kristy’s field dressing video has amassed over 5.6 million views!
Best of North American Big Game Hunting
Caribou Hunting in the Northwest Territories
Gutless Field Dressing Method
Hunters who are deep in the backcountry may need to quarter the animal for easier field removal and to help cool the meat as quickly as possible. In this video, Kristy Titus shows the step-by-step process of the gutless method. Kristy recommends a good skinning knife such as the Buck Knives Pursuit Series. She also states you should have quality game bags plus a section of Polyethylene Visqueen material which can be purchased at local hardware stores.
Shooting Skills and Tactics for Hunters with Kristy Titus
As part of NRA Women TV, hunting guide Kristy Titus hosts a series of videos that explain important strategies and shooting skills for hunters. In these videos, Kristy demonstrates field positions that can be employed during a hunt. She also explains preparation for a hunt, including fitness training.
Click each link below to watch other Kristy Titus Hunting Videos.
Kristy says: “When it comes to bolt-action rifle fit, there is no ‘one size fits all’. When picking out your rifle [consider options] after the purchase to ensure you are as comfortable as possible.”


 I did want a minimum no-turn neck optimized for Lapua brass. The drawing indicated that the reamer would cut a .281″ neck and a throat of 1.0315″. This was very close to ideal, though I did have to turn two thousandths off the necks of Lapua 6BR brass after I necked it up. I resized using a .277″ bushing and the loaded rounds came out to be .279″. Realizing that this was in the ball park, I decided to go with the Elk Ridge Reamer and build a 25 BR that could shoot 110gr or 115gr bullets. Now the question was where to get a match-grade 25-caliber barrel. I called quite a few of the custom barrel-makers, including BlackStar Barrels in Texas (no longer operating). I have had wonderful success with the BlackStar barrel on my 6BR “Chantilly” — it delivered great accuracy and impressive velocities. Since the 25 BR was so similar, I went with another BlackStar. I ordered a 10-twist, 6-groove, 1.250″-diameter straight-contour tube.
 After chambering, the barrel finished at 1.245″ diameter and 27.5″ inches with an 11° crown. I actually had the throat lengthened to accept both Berger 110gr and 115gr bullets. The bases of the FB 110-grainers sit flush with the neck-shoulder junction, when they are seated .010″ into the lands. With the longer 115gr VLDs, the bottom of the bearing surface (i.e. start of boat-tail) is just about even with the neck-shoulder junction.
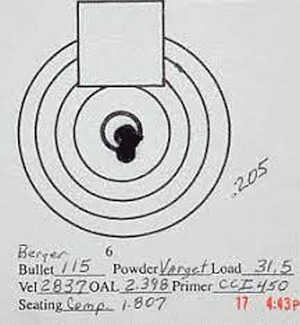 For her debut in competition, I took “Peppermint” to our local 600 yard F-class match. Shooting the Berger 115s with 31.5 grains Varget, she won with a perfect score of 200 with 14 Xs. At my club, we use a SR3 target. The X-Ring measures 3″ in diameter and the 10-Ring measures 7″. At the match there were some very good shooters with top-flight custom rifles in accurate calibers such as 6.5-284 and 22 Dasher. I was very fortunate to come out on top, but I give the credit to Peppermint’s good bench manners and outstanding accuracy.
 Now that I have several calibers in the BR cartridge family, (22 BR, 6mm BR, 6.5 BR, 7 BR, and a 30 BR), it is my humble opinion that they each have their own place. A varmint hunter’s dream, the 22 BR can push a bullet faster and more accurately than the 22-250. With an 8-Twist barrel, the 22 BR can send an 80gr SMK to 600 yards with extreme accuracy.


 The Match Pro ED’s offset SHOT-CALL reticle, located in the right barrel, has a dedicated focus adjustment and can be rotated for leveling after IPD (interpupillary distance) adjustment (i.e. how far the eyepieces are spread apart). Users can secure their preferred IPD with the included BRIDGESET stabilizer, which ensures the binocular is set for quick use and is stable when mounted on a tripod. Claimed light transmission is 92%. Suggested MSRP for the Match Pro ED 15×56 binoculars is $699.99.