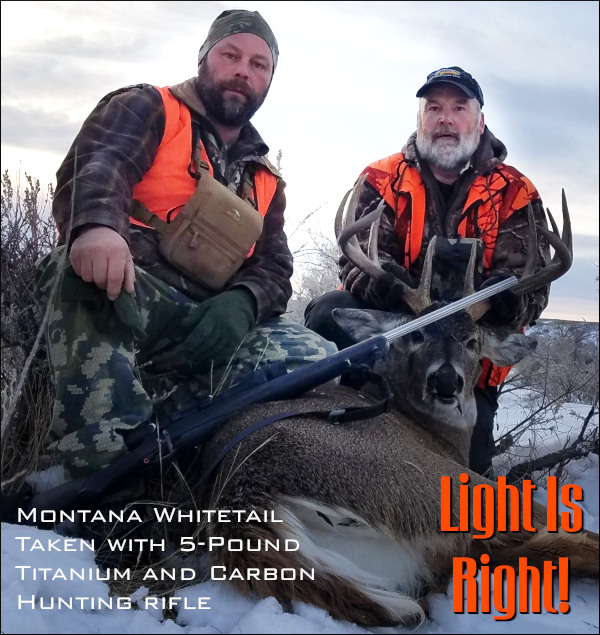
Here is Tom Mousel with Whitetail taken with his ultra-light hunting rifle fitted with 6mm Creedmoor Lilja barrel. Friend Cody (right) actually took the shot. This gun has a second barrel in 6.5 Creedmoor.
Hunting season is opening up soon across the country. Next Saturday, 9/28/24, is National Hunting and Fishing Day. This Sunday we feature a state-of-the-art, ultra-light hunting rifle. This rig is very accurate AND very light, and features two barrels, one in 6mm Creedmoor and the other in 6.5 Creedmoor. With this Titanium-actioned rifle, owner Tom Mousel has successful taken Whitetail deer and other game.
“Light is Right” when it comes to carrying deer rifles long distances in the backcountry. A lighter rifle DOES make a difference when you’re hiking many miles and carrying other gear including binoculars, laser rangefinders, food/water, and packs. And then, if you are successful, you’ll be carrying out game meat, so a lighter rifle translates to a lighter overall load.
When Forum member Tom Mousel (a top 1000-yard competitor) considered a new hunting rifle, he wanted a very light-weight rig. What he got was a low mass masterpiece — an ultra-accurate, five-pound hunting rifle. Not only does this twin-barrel rifle, as built by Alex Wheeler, come in under five pounds (before optics), but it has produced some quarter-MOA 3-shot groups at 1000 yards. The 6mm Creedmoor version of this rifle has demonstrated truly stellar accuracy at long range. The 6.5 Creedmoor barrel also shoots well and packs more punch for hunting use.
CLICK HERE to view full-screen large version of photo.
Here is Tom’s rifle weighing in at 4 pounds, 14 ounces with 21″ Lilja #1 contour 6mm barrel. Tom says: “Here’s the rifle with full Titanium action, bolt, and lug, in a Tom Manners 17 oz. carbon fiber stock. It’s exactly one pound heavier fitted with my Leupold Mark AR 4-12x40mm scope in Talley rings.”
Tom has two barrels for the rifle, one chambered for 6.5 Creedmoor and the other for 6mm Creedmoor. Tom reports: “The 6.5mm is a bit lighter being fluted. But I won’t be switching back now that I’ve shot the 6mm version. Neither has too much recoil, but the 6mm CM just kills the 6.5mm at distance for groups.”
Tom tells us: “What I like about this rifle is there were no corners cut to make it light. On some other ultra-lights, the fore-end has no strength or they are cut down really short. This is a full-sized stock, pillar-bedded with aluminum-filled epoxy and free-floated barrel. The ignition is set up with a TON of firing pin fall to function in the coldest temps.”
Gunsmith Alex Wheeler of Wheeler Accuracy is pleased with how this project turned out: “Tom has shot a bunch of sub-5″ groups and a couple one-inchers back-to-back at 1K. He has the Berger 115gr VLD going about 3050 fps.” Tom noted the 6mm barrel picked up about 50-60 FPS after the first 50 rounds. He shoots 115gr Berger VLDs with CCI 450s and Reloder 16, with the Bergers about .005″-.008″ in the lands.
Groups at 1000 Yards with 6mm Creedmoor Barrel, 115gr Bergers
Here are two of Tom’s 1000-yard targets. This is with the 6mm Creedmoor barrel shooting 115gr Berger VLDs pushed by Alliant Reloder 16 at about 3050 FPS. The average of the two groups is 0.246 MOA. Pretty amazing for an ultra-light rifle shot off a bipod. Tom acknowledges that he can’t do this every day. He says that “shooting 871 yards at my home range, the rifle typically shoots 4″ to 5″ 3-shot groups”.
Q & A with Tom Mousel About his Ultra-Light Hunting Rifle
Q: Why did you choose to build this rig?
Tom: I just wanted to do it to see how light we could build an accurate, good-shooting rifle.
Q: What are your favorite things about the rifle, and is there anything you would change?
Tom: Definitely the light weight, and the overall size — it has a pretty short barrel (21″), so it’s just handy. I wouldn’t change anything about the rifle, now that I have the Titanium bolt. When I bought the action originally it had the steel bolt.
Q: How does this rifle handle?
Tom: It points well considering it is a light rifle. The 6mm Creedmoor version has very little recoil. On a good bipod I can sight in at 1000 without a spotter.
Q: What are your favorite accessories?
I use a Solo Hntr Mtn Lite stretchy cover. You can see it in the photo at right showing me on a hunt. I like this because you can roll it up like a sock and and use it for a rear support.
Q: Why did you choose Alliant Reloder 16 powder?
Tom: Lonnie Anderson, a fellow Deep Creek shooter, did a 6mm Creedmoor and he said RL16 was absolutely the most accurate. We have also found that Reloder 16 is really consistent on velocities through the seasons — from 90 above to teens below zero.
Q: Could this ultra-light set-up work for a bigger caliber also?
Tom: I’ve tried bigger calibers, but I’ve never been satisfied with the consistency of the groups. There’s a cut-off — there’s too much torque and recoil. We see a limit — you don’t want “too much gun” for the platform. Even here, the 6.5 barrel just doesn’t shoot as well as the 6mm.
Q: What advice do you have for hunters considering ultra-light rifles?
Tom: Be careful about falling in love with ballistics and trying to build too much bang for too small a platform. If I built a 7mm WSM for example, I’d want to rifle to weigh at least two pounds more.
Full Titanium Action from Pierce Engineering
This photo shows the Pierce Engineering Titanium Featherweight short action featuring Titanium (Ti) receiver, Ti bolt, and Ti lug. This unit is a mere 15.90 ounces complete. (NOTE: with Titanium body and STEEL bolt the weight is 18.5 ounces). The long action version is 17.4 ounces for the complete Titanium action with Ti bolt and Ti lug.
Jud at Pierce Engineering tells us: “Both the Ti action body and Ti bolt are DLC-coated. This action also has an anti-bind rail for added smoothness and ease of functioning. This really is one of the lightest actions on the market. If you’re looking into building an ultra-light rifle I would seriously check one out! We make these with the highest level of detail, pride, and machining tolerances. They’re just sweet actions… and our Ti Featherweight short action is roughly half the weight of a Remington Model 7. So there’s a significant weight savings with the Pierce Ti Featherweight over a Model 7.”
Owner Profile — Tom Mousel, Hunter AND Long-Range Benchrest Ace
Tom Mousel knows a few things about accurate rifles. He is a top 1000-yard competitor at IBS matches and at the Deep Creek range near Missoula, Montana. In 2016 Tom set a remarkable 6-match Light Gun Group World Record, with a 2.9540″ group size Aggregate for SIX matches. And a year later, in 2017, Mousel set a 10-Match Heavy Gun World Record with a 5.3376″ Aggregate. NOTE: that is for TEN-shot groups in Heavy Gun. That’s an average ten-shot group under 6 inches for 10 matches! Over the past decade, Tom has remained at the top of the 1000-yard game, with many match wins at Deep Creek and other ranges.
If you are looking for a versatile, well-crafted semi-auto .22 LR pistol, here’s an option you should definitely consider — the SIG Sauer P322. Introduced in 2022, this .22 LR rimfire pistol that should be popular with SIG’s centerfire handgun owners and anyone who wants a quality, polymer-framed .22 LR pistol. The P322 offers excellent ergonomics and 20+1 capacity, making it good for cross-training and fun rimfire shooting.
This VIDEO explains the features of the new P322 (Loud Volume — turn down at work):
The P322 has many premium features, including an optics-ready removable rear sight plate allowing easy installation of a red dot optic. The P322 offers ambidextrous controls, interchangeable flat and curved triggers, and fiber optic front and rear sights. The P322 even comes with a threaded barrel adapter making it suppressor-ready right out of the box. And with a 20-rd magazine for 20+1 total capacity, the new P322 is the highest-capacity .22 LR pistol in its class. (And a mag extension is offered for 25-rd capacity).
Though it may look like a striker-fired pistol, the SIG P322 is a hammer-fired, single-action-only design (the hammer is enclosed by the rear of the slide). The P322 is blow-back operated with a fixed (non-tilting) 4″ barrel. This helps contribute to excellent accuracy and reliability.
Hands-On P322 Testing by 22Plinkster
SIG Sauer P322 Pistol Features:
Ambidextrous Controls With Reversible Magazine Catch
Optics-Ready Removable Rear Sight Plate
Fiber Optic Front and Rear Sights
Hammer-fired, Single-Action-Only, Fixed 4″ Barrel
Suppressor-Ready With Included Threaded Barrel Adapter
Interchangeable Trigger Shoes (flat and curved included)
20 Round Magazine Capacity (with +5 optional mag extension) SEE PRODUCT PAGE
Ever wonder how rifles, actions, stocks, optics, suppressors, and ammo components are produced in factories around the world? Today’s Saturday at the Movies installment features fascinating videos filmed inside major firearms industry factories including BAT Machine, ZEISS, Norma, SAKO, Nosler, CCI and Federal.
BAT Custom Rifle Actions — Factory Tour and Owner Interview
BAT Machine Co. makes some of the finest custom actions you can buy. Numerous national and world records have been set with BAT actions. To create this video, Ultimate Reloader’s Gavin Gear visited the BAT Machine production center in Post Falls, Idaho. Gavin talked with BAT’s founder Bruce Thom. The video features extensive footage of advanced CNC machines used to produce the superb BAT actions. If you own a BAT action, or hope to acquire one some day, definitely watch this video. CLICK HERE for Full Story.
Norma Ammunition Factory — Cartridge Creation Start to Finish
Norma has released a fascinating video showing how bullet, brass, and ammunition are produced at the Norma Precision AB factory which first opened in 1902. You can see how cartridges are made starting with brass disks, then formed into shape through a series of processes, including “hitting [the cup] with a 30-ton hammer”. After annealing (shown at 0:08″), samples from every batch of brass are analyzed (at multiple points along the case length) to check metal grain structure and hardness. Before packing, each case is visually inspected by a factory worker.
The video also shows how bullets are made from jackets and lead cores. Finally, you can watch the loading machines that fill cases with powder, seat the bullets, and then transport loaded rounds to the packing system. Guys, watch this video! You won’t be disappointed. The camera work and editing are excellent — there are many close-ups revealing key processes such as annealing and head-stamping.
SAKO Factory Tour in Finland
SAKO produces some of the best hunting rifles you can buy. SAKO, along with its sister company Tikka, operates sophisticated production facilities in Finland. In the video below, Canadian journalists visit the SAKO factory where rifles are made. It is interesting to see how stocks are made and barrels are bored and contoured. SEE More HERE.
Nosler Bullet Manufacturing
Ever wanted to see how Nosler bullets and cartridges are made? Here’s your opportunity. The Rocky Mountain Elk Foundation (RMEF) has produced a video (“Quality First”) that offers a behind-the-scenes look inside Nosler’s Oregon factory that produces bullets, brass, and ammunition. RMEF representatives visited Nosler’s famously-guarded manufacturing plant to show the technology used by Nosler to produce bullets and ammunition. After the intro, this video illustrates Nosler’s bullet construction techniques with a cool animation sequence. The video then showcases the Nosler ballistics lab, inspection room, and packaging line. SEE more HERE.
Video Showcases Nosler Production Facility and Ballistics Lab
ZEISS Sport Optics
ZEISS is a world leader in lens and optics technology. Along with ultra-high quality lenses used in production of computer chips and special optics for high-tech medical equipment, ZEISS produces great optics for hunters and shooters. ZEISS lenses are renowned for their sharpness, clarity, and high light transmission. ZEISS has a new series of LRP S3 and LRP S5 First Focal Plane scopes which promise to be favorites among PRS/NRL competitors and long-range hunters.
Silencerco Suppressor Fabrication Start to Finish
Here’s a cool video that shows the entire production process for a SilencerCo Octane pistol suppressor start to finish. Beginning with the raw materials, this video shows a wide variety of cutting, milling, drilling, burnishing, fitting, metal bathing, surface finishing, and laser etching processes. If you have any interest in production methods you’ll want to watch this video all the way through, and maybe a second time.
Rimfire Ammo Production at CCI/Speer and Federal Factories
YouTube host 22Plinkster got a chance to tour the CCI/Speer production facility in Lewiston, Idaho. This large plant produces both rimfire and centerfire ammunition. While touring the plant, 22Plinkster was allowed to capture video showing the creation of .22 LR rounds from start to finish. This is a fascinating video, well worth watching.
This revealing video shows all phases of .22 LR ammo production including cupping, drawing, annealing, washing, drying, head-stamping, priming, powder charging, bullet seating, crimping, waxing, inspection, and final packaging.
Field & Stream Tours Federal Ammo Plant in Minnesota
A while back Field & Stream toured the Federal ammunition production facility in Anoka, Minnesota. This large plant produces both rimfire and centerfire ammunition. While touring the plant, the reporter was allowed to capture video showing the creation of .22 LR rounds from start to finish. This is a fascinating video, well worth watching. Click speaker icon for sound.
Note to Viewers — After Starting Video, Click Speaker Icon to HEAR audio!
The Manufacturing Process for .22 LR Rimfire Ammunition Shooting Sports USA explains: “Rimfire cartridge cases are the oldest self-contained cartridge in existence, having been in continuous production since the mid-1850s. Rimfire cases are drawn from a thin piece of brass and formed with a hollow rim. A priming compound is then forced into the case using centrifugal force, where it is charged with powder and a bullet is seated in the mouth of the case. The case is then crimped around the bullet to ensure sufficient push and pull when the round is fired. When the firing pin strikes the thin brass rim of the case, the hollow rim is crushed and the primer is ignited.” Source: SSUSA.org 9/2/2017.
Many shooters these days clean their cartridge brass ultrasonically, or wet-tumble their cases with stainless media (above). Both methods get brass clean and shiny, inside and out. However, when those wet-cleaning processes are completed, you’re left with a pile of soaking wet brass. How do you dry your brass quickly and efficiently, without unsightly water spots? Read on for some great answers…
In our Shooters’ Forum, Member Terry asked: “How do you dry your brass after Ultrasonic cleaning?” In a Reloading Forum Thread, many smart suggestions were posted. A dozen fellow members outlined a variety of effective case-drying procedures, which work equally well for both wet-tumbled brass and ultrasonically-cleaned cases. Here are the Top 10 brass-drying suggestions from our Forum members.
TOP TEN Ways to Dry Cartridge Brass After Wet Cleaning
1. Food Dehydrator — Shake the brass in towel to get the bulk of water off. Next leave in the food dehydrator for 45 minutes or until there are no signs of moisture inside the cases. — Lawrence97
2. Lyman 5-Level Case Dryer — Rinse off cleaning solution(s), then load brass by type into racks in Lyman Cyclone Case Dryer. This is easier to load/unload than food dehydrators and holds more cases.
3. Hot Water + Compressed Air — Rinse all your cases as a batch using scalding hot water from the kitchen sink. Hot water evaporates off of brass very very quickly. Then hit them with compressed air. Takes 10 minutes. Simple. — SG4247
4. Oven Dry in Pre-Heated Oven — After pre-heating to 200° or so, turn off oven and put brass inside on a tray. Most important! Tell your wife what you are doing so she doesn’t crank it up to 425 to heat pizza! — MClark
NOTE: Many other members suggested oven drying at 150-200°. We recommend turning OFF the oven so you don’t cook your brass if you forget to remove the cases.
5. Towel Dry then Warm with Heat Gun — Roll brass in a towel until no more water shakes out. Lay out on cardboard box top and blow off with Harbor Freight heat gun. $9.99 on coupon. Two minutes of heated air and about half hour of wait and they are good to go. This is with primers removed. — Shaggy357
6. Compressed Air, then Sun Dry Outside – I rinse the brass, then blow them out with compressed air. Then, dependent on the time of year, lay them on a towel in the sun. — HogPatrol
7. Dishwasher on Dry Cycle – In the winter, I drop my wet brass cases neck-down on the rack pegs in the dishwasher, then turn on the dry cycle. In the summer…well, I’m in Texas. They go to the porch for a bit. — Toolbreaker
8. Alcohol Rinse then Air or Oven Dry — Rinse in 90% Isopropyl alcohol and either let air dry or stick in 175° oven for half an hour. Alternatively, use a dehydrator. — Zipollini
9. Slow Air-Dry in Loading Blocks — I have a reloading block with holes drilled in it. I simply load the block up and let it air-dry in the cupboard for a couple of days. — JCS
10. Wipe with Towel Then Anneal Normally with FLAME Annealer — This thread is stirring my OCD side. Seems complicated for just drying — my brass dries just fine when I anneal it. This entire process can’t take an hour per batch. When finished, the brass is cleaned, annealed, and ready to size. — CHLuke
NOTE: This is NOT recommended for use with electronic AMP annealers. Use this ONLY with flame annealers.
Deprime, then tumble brass with stainless media, water, Lemishine, and dish detergent.
Shake them easily in a strainer to knock out most media then grab 4-5 pieces, shake them over the bucket for the last of the media then inside a towel.
Finally blow out the primer pockets and wipe with a towel, load in the Annealeez flame annealer.
Today, AR-platform rifles are hugely popular. Dozens of manufacturers sell AR-type rifles, in a wide variety of configurations and calibers. But before there were M16s and AR-15s, ArmaLite produced a 7.62×51 caliber rifle, the AR-10. Yes before there were millions of 5.56 black rifles, there was a .30-caliber big brother with reddish-brown furniture. Invented by Eugene (‘Gene’) Stoner for the Armalite company in the late 1950s, this is the father of all of today’s AR-platform rifles. Way ahead of its time, this remarkable, select-fire battle rifle weighed just 7.25 pounds as first developed.
If you’re curious about the AR-10, in this video, Jerry Miculek puts an original 1957-vintage AR-10 through its paces on the range. This extremely rare, early-production rifle was provided by Mr. Reed Knight and the Institute of Military Technology. (The gun in the video was actually produced in the Netherlands under license, see video at 4:40.) This AR-10 is the direct ancestor of the AR-15, M16, and many of the modern sporting rifles that we use today.
The AR-10 was slim and light, weighing around 7 pounds. Some folks might argue that the original “old-school” AR-10 is actually better than some of today’s heavy, gadget-laden ARs. The AR-10’s charging “lever” was under the carry handle — that made it easier to manipulate with the gun raised in a firing position.
You’ll notice there is no “forward assist”. Inventor Gene Stoner did not believe a separate “bolt-pusher” was necessary. The forward assist was added to solve problems encountered in Viet Nam. Some critics say the forward assist “only takes a small problem and makes it a big problem.” For today’s competition ARs (that are never dragged through the mud) the forward assist probably is superfluous. It is rarely if ever needed.
Note also that the handguards are fairly slim and tapered. Today, six decades after the first AR-10 prototypes, we are now seeing these kind of slim handguards (made from aluminum or lightweight composites) used on “full race” ARs campaigned in 3-gun competition.
History of the AR-10
The AR-10 is a 7.62 mm battle rifle developed by Eugene Stoner in the late 1950s at ArmaLite, then a division of the Fairchild Aircraft Corporation. When first introduced in 1956, the AR-10 used an innovative straight-line barrel/stock design with phenolic composite and forged alloy parts resulting in a small arm significantly easier to control in automatic fire and over one pound lighter than other infantry rifles of the day. Over its production life, the original AR-10 was built in relatively small numbers, with fewer than 9,900 rifles assembled.
In 1957, the basic AR-10 design was substantially modified by ArmaLite to accommodate the .223 Remington cartridge, and given the designation AR-15. ArmaLite licensed the AR-10 and AR-15 designs to Colt Firearms. The AR-15 eventually became the M16 rifle.
AR-10 3D Model Shows Internal Parts
If you want to see more close-up details of the AR-10, computer artist Stefan Engdahl has created a very detailed 3D model of the AR-10 for use in computer simulations. This computer model features 18 separate objects so you can look at details of frame, barrel, trigger, sights and more.
Here are some additional images of early AR-10 models, with various configurations. Multiple handguard and muzzle options were employed during early development.
Color AR-10 photos from Arms Izarra, a Spanish company specializing in de-militarized, collectible firearms. Interestingly, this particular AR-10 was produced in the Netherlands under license.
A while back, the Precision Rifle Blog conducted a fascinating study of Muzzle Brakes. PRB figured out a way to show the actual “blast pattern” of gasses ejecting from the ports of muzzle brakes. The result was a fascinating (and eye-catching) series of images revealing the distinctive gas outflows of 20+ different types of muzzle brakes. If you are considering buying and installing a muzzle brake on your rifle, you should definitely review this important PRB Muzzle Brake Test.
For a prone shooter, particularly on dusty, dirty or sandy ground, muzzle blast is a major bummer. Muzzle blast can be very disturbing — not just for the trigger-puller but for persons on either side of the gun as well. Some muzzle brakes send a huge shockwave back towards the shooter, and others send blast towards the ground, kicking dirt and debris into the prone shooter’s face. If there was a way to illustrate those factors — shockwave and debris — that might help shooters select one brake design over another.
Cal Zant at PrecisionRifleBlog.com applied a unique blend of creativity and resourcefulness to try to answer that question for 20+ muzzle brakes. Using high-speed photography and household products, he captured the blast pattern of 20+ different brake designs for easy side-by-side comparison. Can you figure out how Cal managed to show muzzle brake blasts so clearly? His “hi-viz” solution, revealed in the article, is very clever. See the eye-opening results for 20+ brakes, with illustrative photos, by visiting the Precision Rifle Blog Muzzle Brake Ground Signature Test Page.
Hunting season is coming soon. For hunters that means many hours may be spent searching for animals through spotting scopes and binoculars — “glassing” for game. And when the hunter does find a good buck or doe, he’ll need to know the animal’s precise distance, so that demands a good laser rangefinder. Being carried in the field, the scopes on hunting rifles need to be tough and durable, and every hunting scope should have excellent low-light performance. And when the hunter finally takes his shot, his scope better be properly zeroed. Today’s Saturday showcase spotlights Hunting Optics. We offer eight great videos that help you select the right riflescope, spotting scope, rangefinder, and binoculars for your next hunt.
Here’s a good video by an avid hunter who treks in remote, mountainous zones. The host has learned what works… and what’s worth the weight to carry: “I’ve found that the combination of 10×42 binoculars and a 27–60x80mm spotting scope is the sweet spot for mountain hunting. This pairing balances weight with reach, allowing me to keep moving but also reach out and see well-hidden animals. In some cases, I will make use of an 18×56 binocular, but this is reserved for non-backpack hunts. With 25 years of mountain hunting experience, I can whole-heartedly recommend my preferred binocular pair as a fantastic and versatile set-up for northern mountain hunts at the very least.”
Ultimate Spotter Test — 19 Spotting Scopes Reviewed
The producers of this remarkable 19-product spotting scope comparison state: “If you are looking at choosing the best spotting scope for hunting… you are in the right place! We tested these 19 spotting scopes to find the best compact spotting scope, best 65mm spotting scope, and best 85mm spotting scope out there. We also wanted to find the best values on the market, and I think we definitely did that. While we certainly couldn’t test them ALL, we were able to put together this incredible lineup of some of the best spotting scopes out there to help you find what is going to work for your specific needs.”
First Focal Plane vs. Second Focal Plane Scopes
For the last century, Second Focal Plane (SFP) scopes have been most common on hunting rifles. Now there are an increasing number of First Focal Plane (FFP) optics favored by hunters. The main reason is that the reticle mark values (in Mils or MOA) are constant relative to the target size at all magnification levels. That is handy for hold-offs and hold-overs. On the other hand, a SFP scope maintains a constant reticle size and line thickness at all zoom values. For most hunting shots, taken inside 300 yards, that really should be fine. Many hunters feel they can spot their prey more easily without a busy reticle that obscures small details at higher magnification. This video explains the pros and cons of both reticle types. The final decision is up to you — much will depend on the terrain you hunt and the distances you shoot.
The Complete Optics Selection for For Deer Hunting
In this video, Vortex optics techs explain the optics package deer hunters will want to take into the field. Along with a good medium-power zoom riflescope, you’ll want binoculars and (probably) a spotting scope. You’ll also want a Laser Rangefinder (LRF) or laser-equipped binoculars. As the team points out, the LRF is not just to range your prey right before you take a shot. A top-quality LRF can range a reflective object as far as 1500 yards away. That helps you decide whether you want to hike a mile to reach that buck you see way out on the next ridge.
MOA vs. MIL — What You Need to Know
These days, scope manufacturers offer a wide selection of both MIL (Milliradian) and MOA (Minute-of-Angle) based optics. We do think that MOA is still predominant in the lighter-weight, lower-cost (sub-$500) scopes marketed for hunters. There are pros and cons for both angular measurement systems. One MIL is 3.6″ at 100 yards, while one MOA is 1.047″ at 100 yards. If you grew up thinking in inches, a 1/4-MOA click-value hunting scope might work best. If you shoot PRS or have other MIL scopes you may prefer a MIL-value optic for your hunting rifle. Both choices will do the job.
Comparison of Eight Laser Rangefinders
The Backfire team purchased eight rangefinders and tested them in the field. Most of the products are under $500. This is a good review if you are looking for a compact LRF at a moderate price. Looking at performance for the price, for the hunting market, the reviewers favored the Leupold RX-1600 and the waterproof Vortex Ranger 1800. COMMENTARY: If you can afford it, we recommend that serious hunters consider top-end laser rangefinder-equipped binoculars such as the ZEISS Victory RF and Leica Geovid.
How to Zero Your Hunting Rifle Efficiently
Last but not least, here’s a great video from Vortex that shows you how to quickly and efficiently sight-in and zero your hunting rifle before heading out into the field. This video explains a simple procedure that lets you get a solid zero in just three shots. Of course you probably want to fire a few more rounds to confirm your zero before you head off to your hunting grounds, but this will let you get on-target with a minimum amount of time and ammo expended. This helpful video has over 3 million views on YouTube!
Fouling Shots and Cold Bore Condition
If you recently cleaned your rifle, you may want to fire two or three fouling shots before you start this procedure. But keep in mind that you want to duplicate the typical cold bore conditions that you’ll experience during the hunt. If you set your zero after three fouling shots, then make sure the bore is in a similar condition when you actually go out hunting.
There is an all-new precision reloading press on the market. L.E. Wilson — a company famed for its dies, gauges, and case trimmers — has introduced an impressive new Wilson Single Stage Press for use with standard 7/8th threaded screw-in reloading dies. The action is very smooth with the press rod guided by a linear bearing. This press is available right now at Precision Reloading for $1134.00. And this new L.E. Wilson press will be available very soon at Creedmoor Sports for $1134.00, with back-orders permitted.
Wilson Single Stage Reloading Press Features
— Precision made in the USA
— Billet aluminum and stainless steel all made in house
— Three-rod design keeps press in complete alignment
— Four large mounting holes to attach firmly to bench
— Press rod is guided by LINEAR BEARING for smooth sizing/seating
— Positive stop machined into base of press to help square to benchtop
— Handle swaps easily from right to left hand just by unthreading handle
— Spent primer handling — primers collect in cavity in press rod
— Accepts most standard shell holders
— Works with most 7/8 die brands
— Hard anodized finish
Are sound suppressors useful in competition shooting? In some disciplines, and in venues where sound “moderators” are permitted, the answer is “yes”. In a past edition of Shooting Sports USA eZine, you’ll find an interesting article about the use of sound suppressors (aka “cans”). The article explores the use of suppressors in Europe and in tactical matches in North America. You’ll also find an explanation of the rules and regulations governing suppressor ownership and use in the United States.
Shooting Sports Editor Chip Lohman tests three rifles from the bench and found that sound suppressors did not harm accuracy. In fact, all three test rifles (one each in .223 Rem, .308 Win, and .338 Lapua Magnum), shot slightly better 5-shot groups at 200 yards when a suppressor was fitted to the barrel. However, the suppressors did alter point of impact. Interestingly, velocity standard deviation (SD) values were lower with suppressors in place for all three test rifles. This observation calls for further study.*
So the use of suppressors in competition could be a good thing. However, in the United States, current NRA rules prohibit the use of sound suppressors. NRA Rule 3.16.1 subsection (a) states: “Sound Suppressors are not authorized for use in High Power competition.” In addition, there are some practical problems with suppressors — the heat rising off of a naked suppressor can create mirage problems (that’s why some shooters wrap their cans with a cover).
Despite such issues, now commonly see suppressors on rifles used in tactical matches and PRS/NRL events. For example, many competitors in the Steel Safari field challenge match use suppressors. The photo below shows our friend Zak Smith competing in the Steel Safari with his suppressed Accuracy International rifle.
Commentary — What Can We Conclude?
Obviously, this three-rifle SSUSA test was not definitive. One well might observe different results with different types of suppressors, fitted to different kinds of rifles. Mounting a suppressor to any barrel will certainly affect harmonics and “tune”. But this SSUSA study does suggest that tactical shooters, who are allowed to use suppressors in competition, may find that the benefits of suppressors (significantly reduced recoil and less noise) outweigh any meaningful accuracy loss, at least in PRS-type matches.
NOTE: The article cautions that one should not extrapolate too much from the SD numbers, given the low number of test shots. Chronograph-maker Ken Oehler, when asked to comment on the SD values stated: “[You should] report the observed SDs, but draw no conclusions until… you can do more testing with larger sample sizes.”
Qualifications to Obtain a Suppressor
To legally obtain a suppressor, you must fill out Federal Forms and pay a $200 fee to the ATF. You must also pass BATFE background checks and otherwise comply with Federal and state laws. States can regulate suppressor ownership or use, so be sure to check the laws in your area. On the federal level, the process to acquire a suppressor is regulated under the National Firearms Act of 1934.
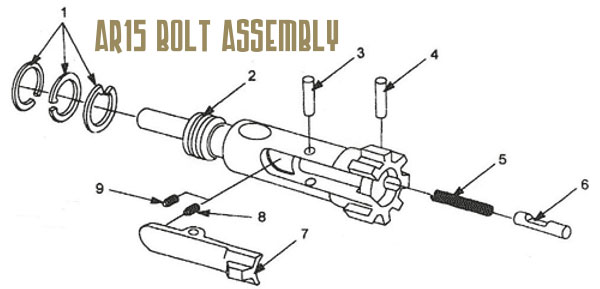
AR-platform rifles can be maintenance-intensive beasts. But some AR owners make the situation worse by not regularly cleaning important small parts, or by using too much oily/greasy lubricants in the wrong places. A properly maintained and lubricated AR15 can shoot hundreds of rounds (between cleanings) without a problem. If you learn where (and where not) to apply lubricant, you’ll find that your AR will run more reliably and the task of cleaning the bolt and bolt carrier will be less of a burden.
Here is a good video that explains AR-15 Cleaning and Maintenance. In this 30-minute NSSF video, Gunsite Academy instructor and gunsmith Cory Trapp discusses the proper way to clean and maintain the AR-15 carbine. Very knowledgeable, Trapp provides rock-solid advice for AR owners. Along with cleaning procedures, this video explains how to inspect key components and how to function-test your AR before each shooting session.
If you want to keep your black rifle running smoothly and reliably, you must clean it regularly and follow the correct maintenance procedures. Here’s another good video that explains how to properly disassemble and clean AR-platform rifles.
Take-Down and Full Cleaning of AR15 by Jerry Miculek
Here ace shooter Jerry Miculek takes down and cleans an AR-platform rifle belonging to his daughter Lena. This is a good video because Lena’s rifle was “run hard and packed up dirty” so you can see where carbon and grease build up. This 35-minute video is very thorough. Jerry is one of the nation’s top action carbine shooters, so listen carefully to his advice on cleaning and lubrication.




 Q: Why did you choose to build this rig?


 Norma has released a fascinating video showing how bullet, brass, and ammunition are produced at the


 5. Towel Dry then Warm with Heat Gun — Roll brass in a towel until no more water shakes out. Lay out on cardboard box top and blow off with Harbor Freight heat gun. $9.99 on coupon. Two minutes of heated air and about half hour of wait and they are good to go. This is with primers removed. — Shaggy357