Need something for the walls of your “man cave” or reloading room? Looking for a great birthday gift for one of your shooting buddies? The creators of the Cartridge Comparison Guide offer a collection of wall posters showing ammunition types from 17 caliber rimfire cartridges all the way up to giant 35mm military rounds. ChamberIt.com currently offers 12 different large wall posters that display a huge variety of cartridge types. For example, the American Standard Poster (shown above) contains every standardized cartridge mass produced in the USA as of 2021. The cartridges are 100% to scale (life size). These posters feature full color images on high gloss / high quality 100-lb poster paper.
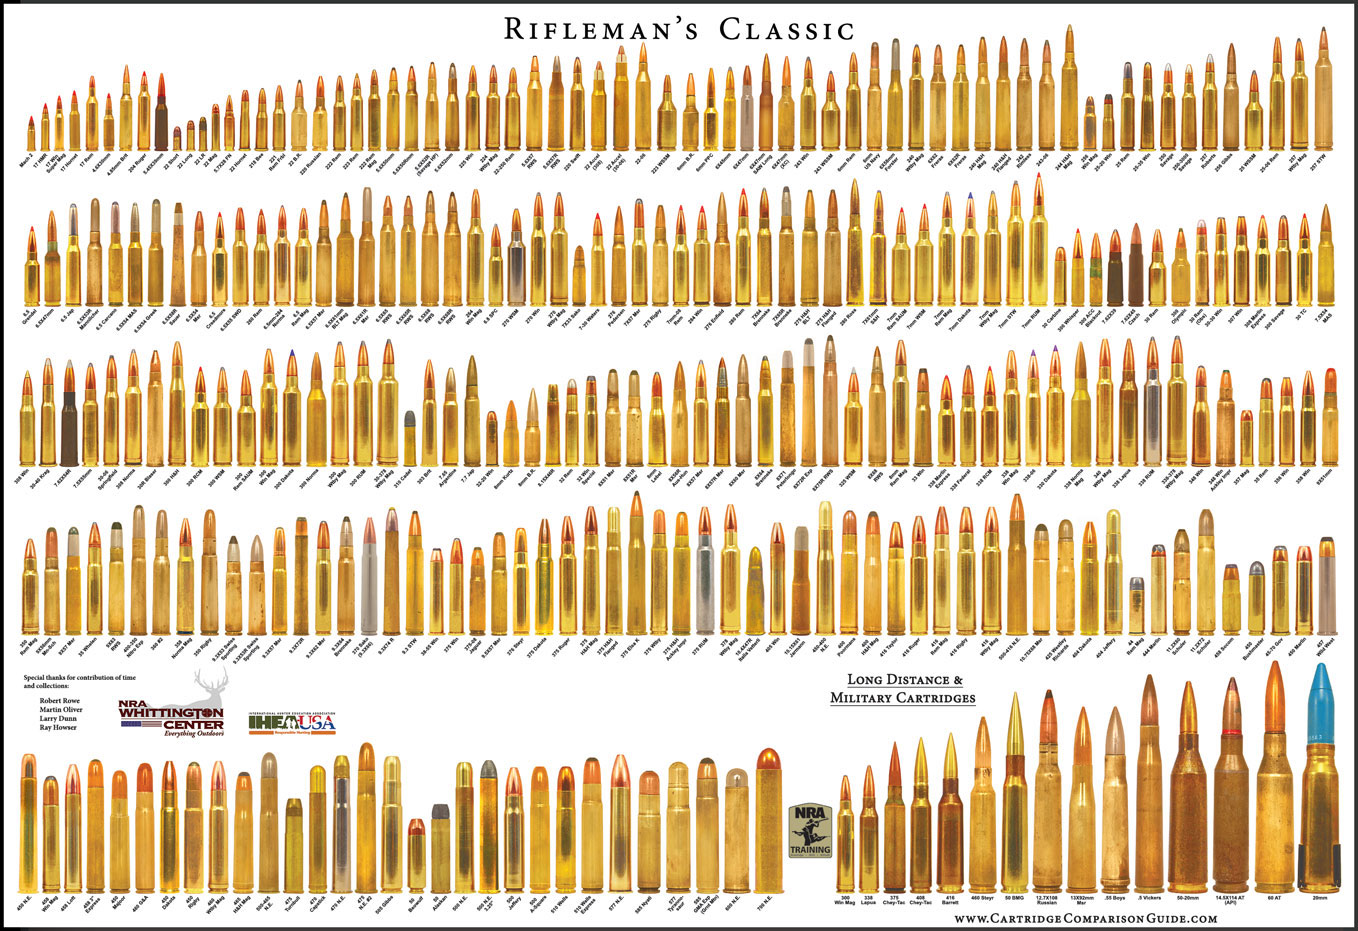
For example, the Rifleman’s Classic Poster (below), a full 38 inches wide and 27 inches tall, is the most comprehensive. This $17.76 poster displays over 300 rifle cartridge types at true size (within 4/1000 of an inch). Cartridges shown range from .17 caliber all the way up to the big boomers (including some cannon shells). The Rifleman’s Classic Poster includes nearly all American Standardized Rifle Cartridges and many European rifle cartridges.
Rifleman’s Classic Poster Click to view large size poster.
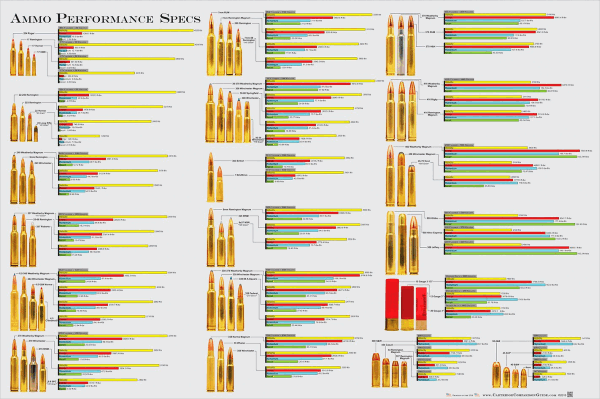
Ammunition Performance Specifications Poster
There is also an interesting Ammo Performance Specs poster. This shows dozens of popular hunting cartridges with the velocity, energy, momentum and recoil for each cartridge displayed in a bar graph.
This shows the actual size of the Ammo Performance Poster as displayed on a wall.
Small patches are not very efficient at distributing bore cleaning liquids inside your bore. The problem with a tight-fitting patch is that the solvent gets squeezed off in the first few inches. You can switch to a smaller jag, or a bore mop, but there is an even better way to get an ample amount of solvent in your bore. Just spray directly into the bore with a wash bottle, an inexpensive plastic bottle with an L-shaped dispensing neck, tapered at the end.
When using the wash bottle, you can either just plug the breech and spray from the muzzle end (where most copper fouling is), or, alternately, put the wash bottle neck directly in the chamber and spray forward. When spraying from the chamber forward, you may need to use a rubber O-Ring to seal off the action… depending on the bore size and the particular wash bottle’s neck spout diameter. We prefer to plug the breech and squirt from the muzzle.
Bottle Solvent Application Great for Smaller Bores
Using wet patches or wet brushes is an inefficient way to really saturate the tight bores of 17s, 20s, and 22s. Even with a cotton bore mop, most of the solvent will be squeezed out before it gets to the end of the bore, where most copper fouling occurs. For these smaller 17, 20, and 22-caliber bores, you can just take the wash bottle and stick the tapered nozzle right in the chamber. The tapered end will press fit in the throat, sealing off the chamber. With the barrel slightly nose-down, give the bottle a couple good squirts until the solvent mists out the muzzle. In just a few seconds, this will put more solvent in the bore than a half-dozen wet patches.
A solvent-filled wash bottle is also handy for wetting your brushes. It’s much easier to saturate a bore brush (without spilling solvent on your stock), by using the wash bottle. You can get wash bottles from USPlastic.com, Amazon.com, or lab supply stores.
Product innovation is all about “building a better mousetrap”, or in this case, building a better bore-cleaning patch. A real smart guy, Shane Smith, has invented a triangular patch that earned a patent. The U.S. Patent Office has awarded a utility patent for BoreSmith’s Triangle Patch™. This unique cleaning patch was designed by Shane Smith, a mathematician/physicist who employed his scientific and firearms knowledge to create innovative bore-cleaning products.
BoreSmith’s clever Triangle Patch™ (aka Pyramid Patch) presents more cleaning surface area to the bore wall than does a conventional square or round patch (of equivalent size). At the same time, the unique geometry makes Triangle Patches much less likely to jam in the barrel. This is because the notches in the sides of the triangle allow the patch to sit more uniformly on the jag (without bunching up). In addition, the Pyramid patch is must less likely to jam due to pleating. One reason conventional patches get stuck is unwanted 5-layer pleating. The special notches in the Pyramid patch remove all or most 5-layer pleating. As a result the patch does not bunch up and this also reduces rod bowing. SEE Triangle Patches HERE on Amazon.
Triangle Patch Function and Geometry Explained (See 1:18 time-mark):
NOTE: Despite what you may see in this video, you should ALWAYS insert brushes and patches from the chamber end first, using a fitted cleaning rod bore guide. With bolt-action rifles, NEVER insert a cleaning rod (with brush or jag) in through the muzzle. This may damage the delicate crown of your barrel.
The Triangle Patches work great with Boresmith’s patented dual-diameter bore brushes:
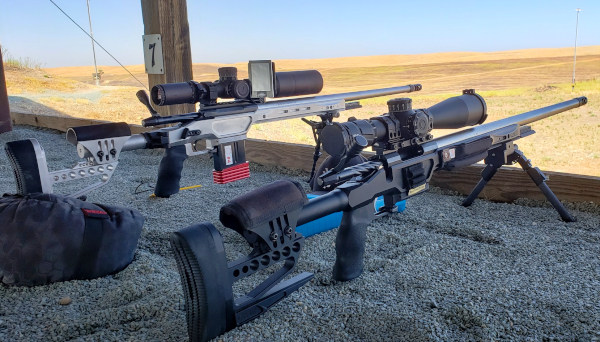
For today’s Sunday GunDay story, we feature highlights from two in-depth reports on rifles built around the relatively new 6GT cartridge (also known as the “6mm GT”). Developed by George Gardner (G.A. Precision) and Tom Jacobs (Vapor Trail), the 6GT was designed to feed well from magazines, be more efficient than the 6mm Creedmoor, and offer outstanding accuracy. It is just enough bigger than the 6mmBR or 6 Dasher so it feeds better. But it retains many of the qualities of the 6mmBR (high efficiency and outstanding accuracy). Burning significantly less powder than the 6mm Creedmoor, the 6GT is a bit less expensive to shoot, and should, theoretically at least, deliver better barrel life.
“The [6GT] is a more predictable and barrel-friendly cartridge than the 6mm Creedmoor. It can utilize the accurate and forgiving powders of the 6BR, has fantastic accuracy, and due to its shoulder angle and case length, it doesn’t suffer from feeding issues.” — PewPewTactical.com
We should say that the 6 Dasher has been used very successfully in PRS/NRL competition, with some aftermarket magazine accessories. For this reason, if you already shoot a 6 Dasher, moving to a 6GT may not be worth the cost of new dies and new brass. A.J. Deysel, writing for LoadDevelopment.com, writes:
“The longer case of the 6mm GT means it feeds as reliably from a magazine as a 6mm Creedmoor, and offers slightly higher powder capacity and in turn velocities than the 6mmBR variants, whilst still being able to use the same accurate and forgiving propellants.
You will also find many competitive and average Joes shooting 6mmBR and 6mm Dashers with a Primal Rights or some other mag conversion kit, having very few if any mag-feed issues at all, so that pretty much also nullifies the need to move away from those [chamberings] if you already own one of those or the reloading equipment for it.” — LoadDevelopment.com
Part I: The 6GT Cartridge for Precision Rifle Competition
Report by Vu Pham
I was ready to build a 6 Dasher when I saw a lot of buzz… about a new caliber George Gardner (Owner of G.A. Precision) and Tom Jacobs (Owner of Vapor Trail Bullets) designed, the 6GT. After some research and talking to George, I ditched the 6mm Dasher build and had GA Precision build me a 6GT on a GAP Templar action I already had in the safe. The reasons to try the 6GT in a new PRS-style rig were as follows:
1. Push a 110-115 grain class bullet at 2880-2930 FPS safely in the Sacramento heat.
2. Achieve a load that is reliable and predictable. The caliber must be easy-to-tune and predictable from barrel to barrel. I don’t want to spend weeks developing a new load each time I spin on a fresh barrel.
3. Be able to run the same mag in all my guns without having to tweak or use mag kits. The round must feed from AICS and AW magazines without major tweaking or hiccups.
4. Get good barrel life. The barrel needs to go 2200-2500 rounds with match-grade reliability and accuracy.
5. Have a competitive cartridge with the least possible recoil without sacrificing too much performance down range, compared to bigger options like the 6mm Creedmoor.
6GT feeding from un-modified magazines has been flawless in all the rifles we tested. The 6GT feeds so well, I sometimes have to do a press check to ensure there is a round in the chamber.
On paper the 6GT seemed like the perfect cartridge for PRS- and NRL-style competition. It has the low recoil of a 6 Dasher, with good feeding and mag compatibility. With the 6GT, a competitor can push 105gr bullets at 3000+ FPS or run heavier bullets at 2800-2900+ FPS.
Knowing that I would initially have to make my own 6GT brass and do quite a bit of load development, I enlisted the help of Dan Bertocchini with CS Tactical. Dan has a lot more experience with wildcats and is the man when it comes to this type of data gathering. He has been running a 6 Dasher for a few years so I was curious how he would compare the 6GT to his 6 Dasher.
Quick Summary: “I am really digging the 6GT and the capabilities it offers. It can launch 103gr Vapor Trails at 3000+ FPS or lob heavy 115gr DTACs in the low-to-mid 2900s comfortably. I think we will see this cartridge go mainstream in PRS/NRL-style competition in 2020.” — Vu Pham
The new 6GT Cartridge Was Tested in Three (3) Tactical Rifles:
Rifle 1: Vu’s 6GT 1.0
Builder: GA Precision
Action: Left Hand GAP Templar (large firing pin)
Barrel: Bartlein 7.7 Twist finished at 26″ with a 419 Hellfire Brake
Stock: KMW Sentinel
Optic: Vortex Razor Gen II 4.5-27x56mm EBR-7C MRAD
Bi-Pod: Harris
Trigger: Timney Calvin Elite
Magazines: AICS and AW
Support Bag: Wiebad Fortune Cookie
Rifle 2: Vu’s 6GT 2.0
Builder: Rubicon Precision
Action: Impact Precision 737
Barrel: Bartlein 7.0 Twist finished at 27″ with a 419 Hellfire Brake
Stock: XLR Industries Envy Chassis
Optic: Vortex Razor Gen II 4.5-27x56mm EBR-7C MRAD
Bi-Pod: Harris with Henderson Arca adapter
Trigger: Trigger Tech Diamond
Magazines: AICS and AW
Support Bag: Wiebad Fortune Cookie
Rifle 3: Dan’s 6GT
Builder: CS Tactical
Chambered by: Rubicon Precision
Action: Lone Peak Arms Fusion
Barrel: Proof 7.0 Twist finished at 28″ with a Muzzle Brake and More Brake
Stock: XLR Industries Envy Chassis
Optic: Minox ZP5 5-25x56mm MR4
Bi-Pod: Arca Cyke Pod (PRS)
Trigger: Trigger Tech Diamond
Magazines: MDT
Support Bag: Armageddon Gear OG Game Changer, Waxed Canvas
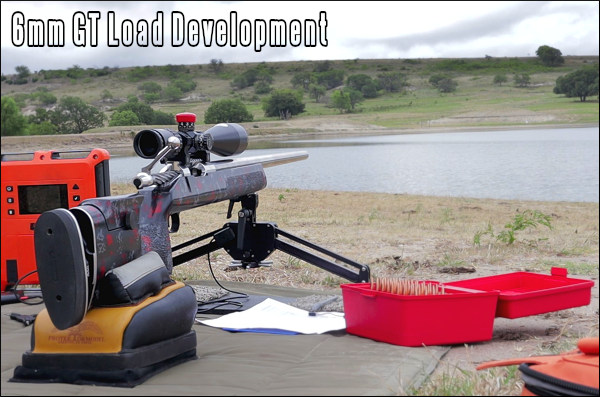
Alpha Munitions Pre-Production 6GT Brass George Gardner was kind enough to send us 50 pieces of Pre-Production Alpha 6GT brass for preliminary testing. Like the cases I formed from 6.5×47 Lapua brass, the Alpha 6GT brass will use a small rifle primer. Purchased direct from Alpha Munitions, 6GT brass is now $1.30 per case, which is comparable with Lapua 6mm Creedmoor brass, currently $120.99/100 at Grafs.com.
The major difference between 6.5×47 Lapua-formed brass and Alpha 6GT brass is the case capacity. Alpha 6GT brass has 1.5 to 1.7 grains more case capacity. When a piece of 6.5×47 Lapua brass is formed into a 6GT, the walls of the case now become the shoulder and part of the neck. In a normal piece of brass, the shoulder and neck are typically thinner because of the thickness of the brass tapering from the body to neck.
While the cartridge design was optimized for Hodgdon Varget, the extra case capacity of the Alpha 6GT brass opens the door to Hodgdon H4350 (my favorite powder) and Alliant Reloder 16.
Test Results with Alpha Munitions 6GT Brass
Initial test results were as expected from a premium brass-maker. Dan and I both got excellent Standard Deviations and Extreme Spreads over my MagnetoSpeed V3 and his LabRadar. This string below was with 112gr Barnes Match Burners and 33.8 grains of Varget. Can’t complain about a 3 FPS Extreme Spread!
Yes, H4350 Works with the Alpha Munitions Brass
Personally, I prefer running Alpha 6GT brass with H4350 rather than Varget pushing a heavier bullet. H4350 burns slower and cleaner which should equate to better barrel life. The Lapua-formed 6GT cases just do not have the capacity to reach the cartridge’s full capability with the slower burning powders.
Is the 6GT cartridge accurate? Definitely. Here is a 5-shot group at 600 yards shot by Dan. This was Alpha 6GT brass, with Hodgdon H4350 pushing Barnes 112gr Match Burner bullets.
PART II — 6GT Load Development with Multiple Powders
This text is taken from a full report by Mike McCasland on his 6GT (aka “6mm GT”) bolt action rifle. This rig was designed for general use, not just for PRS/NRL matches. In his 6GT rifle, Mike tested multiple powders including Varget, H4350, Reloder 16, Reloder 15, Shooters World Precision, and Vihtavuori N140. For more details, CLICK HERE for full report.
About the 6mm GT Cartridge
BRASS — The first thing you’ll find is cartridge brass choices for the 6 GT are rather limited currently. At present, the only commercial options are Hornady and Alpha Munitions. For the die-hard Lapua fans, you can technically make 6mm GT brass from 6.5×47 Lapua, however that process is very labor-intensive.
I have used both Hornady and Alpha brass in this rifle and haven’t noticed much difference between the two. I will say that my batch of Alpha brass was slightly softer than Alpha brass I’ve used in other calibers; you could feel a difference when neck turning cases. I’m unsure if that’s a batch issue, or something specific to their 6mm GT brass as a whole. As far as performance, there was little discernable difference. Oddly enough, the Hornady brass seemed to have slightly less case capacity than the Alpha; with most other cartridges it’s the other way around.
POWDERS — The 6mm GT was designed with Hodgdon Varget in mind, and that popular powder works exceedingly well in this platform. That said, the 6mm GT can work with a wide variety of powders, some yielding better performance than Varget.
I’ve tried a multitude of powders during my initial 6mm GT load development: Varget, Shooters World Precision, RL16, VV N140, H4350, and RL-15 to name a few. In my barrel, Hodgdon H4350 seems to deliver the best velocity/accuracy combination. SD and ES also seemed to be the lowest with H4350.
Load Development for the 6mm GT — Many Powders Tested
BULLETS — The most common 0.120″ freebore chamber allows for the majority of high-BC 6mm projectiles found in both F-Class and PRS. I had good luck with the pointed 107gr Sierra Match Kings (SMK), as well as the 110gr Hornady A-Tips in my rifle. For those looking to run the heavier 112-115 grain 6mm offerings, I believe GAP designed a 0.160″ freebore reamer that gets those bullets out of the neck/shoulder junction. Shown below is the 0.120″ freebore JGS reamer print:
SUMMARY — Good Cartridge with Much Potential
Generally speaking, I think the 6mm GT is a good little round. Some may not subscribe to this theory, but I believe some cartridges are inherently easier to tune than others. I’m not sure the 6mm GT is as easy-to-tune as a 6mmBR, 6 Dasher, or 6 BRA, but I don’t think it lags that far behind.
With relatively little trouble, I was able to find loads with both Varget and H4350 that would consistently shoot very well — 0.2 to 0.3 MOA. Moreover, I found the 6GT cartridge lives up to the velocity claims made by G.A. Precision. I was easily able to push the 110gr A-Tips to 2950 FPS, and the 107gr SMKs to low 3000 FPS range without any pressure signs, or unnecessary wear and tear on the brass.
As a fun test, I ran my 6mm GT rifle in a local 1000-yard F-Class match with the 110gr A-Tips, just to see just how well they would perform. Although wind conditions of the day and some E-Target issues prevented my 6mm GT rig from getting the better of the larger 7mm and .30-Cal rifles, the 6mm GT proved itself an accurate little round at distance. Here is a 1000-yard ShotMarker target:
After putting several hundred rounds through my 6mm GT rifle, I anticipate building another 6GT on a repeater action to give PRS a try. I think if you are looking for a dual-purpose rifle that can run tactical matches (with 100% feeding reliability), and can also be used for mid-range, F-Open Class competition, the 6mm GT would be a very good option.
About the author, Mike McCasland:
Mike McCasland is an avid shooter who competes regularly in F-Class matches. Based in Texas, Mike is the creator of the Texas Precision YouTube Channel. There you’ll find many videos covering reloading, gun projects, and marksmanship. Mike has done some notable product reviews including a comparison test of Micrometer Competition Seating Dies. To access Mike’s YouTube Channel, CLICK HERE.
A carpet is used up front for smoother tracking with the Joy-Pod’s flat, ski-style feet. The arms of the Joy-Pod were painted to match the stock. The rear bag features low-drag material on the ears.
F-Class competition grows in popularity every year. Unlike F-Open, the F-TR (Target Rifle) class is limited to the .223 Remington (5.56×45) or .308 Winchester (7.62×51) chamberings. F-TR rifles also use bipods rather than a front rest. But these are no ordinary Harris-style bipods. Modern F-TR bipods have a wide footprint for added stability and many F-TR shooters favor SEB Co-Axial joystick bipods (aka “Joy-Pods”). Today we are featuring an F-TR rig that showcases the types of components, and accessories used by top F-TR competitors — including a coaxial bipod and Labradar Chronograph. If you’re considering getting started in the F-TR game, take a close look at this modern F-TR build from Forum member DM.Oakes.
Modern F-TR Rig with Borden Action, Krieger Barrel, and SEB Joy-Pod
This handsome .308 Win F-TR rig features a smooth-running Borden BRM action, 30-inch 1:10″-twist Krieger barrel, and an X-Ring Laminated Wood stock. Up front is a coaxial “Joy-Pod” joystick bipod. This is a state-of-the art, wide footprint bipod used by many competitors at the Worlds in Canada. The long joystick allows the “driver” to quickly adjust both elevation and windage in a smooth, continuous motion. The Joy-Pod can be adjusted so it will hold setting during the shot — you don’t have to “hard-hold” the joystick. Many shooters let the joystick slide through their fingers as the rifle moves back on recoil. With a little practice (and careful placement of the rear sand-bag), the tracking is excellent and you can slide the gun right back to point of aim after each shot.
This F-TR rifle is shown during load testing with a LabRadar chronograph.
» Full LabRadar Field Test/Review by Ray Gross
If you are considering purchasing a LabRadar Chronograph system, we strongly suggest you read the very thorough and informative LabRadar Review by Ray Gross, past Captain of the USA F-TR team. Ray notes: “It takes me about 3 minutes to set up [my LabRadar] at the range. Because there are no downrange screens, I do not have to hold up other shooters on the range like I would when setting up a traditional chronograph. The convenience alone will mean that I will use it more often than my old chronograph. Every time I take it out, I enjoy it a little bit more.”
M1 Garand Springfield Armory July 1941 production. Facebook photo by Shinnosuke Tanaka.
Want an authentic surplus M1 Garand? You can get these classic battle rifles from the Civilian Marksmaship Program (CMP) through direct sales as well as online auctions. If you are looking to obtain an authentic, safe-to-shoot M1 Garand, the CMP is your best bet. Each M1 Garand rifle sold by the CMP is an genuine U.S. Government rifle that has been inspected, head-spaced, repaired if necessary, and test fired for function. Each rifle is shipped with safety manual, one 8-round clip, and chamber safety flag.
This CMP Video Explains the Process for Ordering an M1 Garand from the CMP:
M1 Garand Manufacturer Codes: SA (Springfield Armory), HRA (Harrington & Richardson Arms), IHC (International Harvester Co.), WRA (Winchester Repeating Arms)
The federal law that established the new CMP authorizes the Corporation to sell surplus .30 and .22 caliber military rifles, parts and ammunition to qualified U.S. citizens “for marksmanship”. Accordingly, the CMP sells government-surplus M1 Garands, .22 caliber target rifles, and small quantities of other rifles to qualified purchasers. CMP operations, warehousing, inspection, repair, test firing, sales order processing and distribution activities are headquartered in Anniston, Alabama.
M1 Garands at CMP Retail Store in Anniston, Alabama.
How to Order an M1 Garand from the CMP
To purchase an M1 Garand through the CMP, you must be an adult U.S. Citizen, who is a member of an affiliated organization, and who has participated in a “Marksmanship Activity”*. This basically means you need to join a a gun club and participate in a clinic or match. Proof of club membership and citizenship is mandatory for all ages. However, the marksmanship requirement is waived for those over 60 years. Garands must be ordered by mail or through official CMP Auctions. Orders are filled on a first-come, first-serve basis. Rifles of all grades are packed for shipment purely by “luck of the draw”. Most orders ship within 2-4 weeks. If price has changed after an order has been received, customers will be notified before new prices are charged. CLICK HERE for ordering information.
Bushnell Match Pro ED 15×56 Binocular with MRAD Reticle
Bushnell is now shipping its new Match Pro ED 15×56 binoculars, designed for precision and competition rifle shooters. These 15-power, high-magnification binoculars offer ED Prime glass and a proprietary, rotating Shot-Call MRAD reticle. This reticle allows fast shot calls and corrections — something important for PRS/NRL competition. Bushnell says these new 15×56 binoculars, when mounted securely, have “enough power to effectively replace your spotting scope with a wide field-of-view that puts less stress on your eyes and allows you to more easily observe projectile flight.”
Early prototype versions of the Match Pro ED 15×56 binocular have already proved their worth in PRS/NRL competition. Bushnell pro shooter Robert Brantley has used the Match Pro ED binocular in recent PRS matches where he’s won four consecutive Tactical Division titles. In this video, Brantley explains the key features of Bushnell’s 15X, reticle-equipped Match Pro ED binoculars:
“The new Match Pro binos offer the perfect setup for spotting and calling shots on the range,” said Brantley. “They offer … the ability to fine tune corrections with the Shot-Call reticle. It truly does offer the best of everything and I’m not ever going back to shooting without them.”
Two important features of the Match Pro ED binoculars are the Shot-Call reticle and BridgeSet Stabilizer. The offset MRAD reticle is designed for target sizing, ranging and follow-up shot correction. The reticle has a dedicated focus adjustment and can be rotated for leveling after IPD (interpupillary distance) adjustment. Users can lock in their preferred IPD with the integrated bridge-lock, which ensures the binoculars are set for quick use.
This unit has some cool features. The BridgeSet IPD stabilizer provides a barrel angle stop that keeps your inter-pupillary distance constant in the field. A first of its kind, the BridgeSet is like a zero stop for your binoculars. These binoculars also have dual adjustable diopters to keep both barrels perfectly focused. This is important because many folks have slightly different vision in their left vs. their right eyes.
Bushnell’s 15-power Match Pro ED binoculars boast fully multi-coated ED (Extra-Low Dispersion) Prime objective lenses and BaK4 Abbe-Koenig roof prisms with PC3 dielectric phase coatings to ensure 92% light transmission. These Match Pro ED binoculars also feature Bushnell’s EXO-Barrier for high resolution regardless of weather conditions. A rugged magnesium housing protects the internal mechanisms while IPX5 waterproof sealing shields the optics from moisture. Another very good feature is that you can mount a tripod adapter to either the front or rear bridges based on your preference. That’s handy. These binoculars weigh a hefty 56 ounces (3.5 pounds), so you’ll definitely want to mount them on a tripod.
Now in stock, Match Pro ED 15×56 binoculars are currently available for $699.99 at EuroOptic.com and other leading vendors. The Match Pro ED 15×56 binocular is backed by Bushnell’s 20-year Lifetime Ironclad Warranty. CLICK HERE to see full product profile on Bushnell.com.
L.E. Wilson Case Gage Depth Micrometer Tool Hands-On Tool Review by F-Class John
Are you looking for a better way to measure shoulder bump when sizing brass? When it comes to measuring your shoulder bump there has traditionally been just one way to do it and that’s with a set of calipers and some type of tool attached to a calipers jaw which contacts the case shoulder. While this method has worked well for decades there’s always been some inherent lack of consistency and repeatability. While a minor issue, the inability to get the exact number in completely dependent on the user’s pressure applied and the angle at which the jaws push on the brass.
Enter the L.E. Wilson Case Gage Depth Micrometer with its simple but effective use of Wilson case gauges to ensure a perfect measure of shoulder bump every time. The unit comes with the micrometer top as well as a check gauge which allows you to easily calibrate the micrometer whenever needed. On top of the micrometer unit, you’ll also need to purchase the appropriate case gauges for each of your cartridge types and then you’re ready to go. No other measuring instruments are needed (yep, no calipers are required).
Using the Wilson Depth Micrometer (perhaps a better name is Shoulder Bump Micrometer) is a straightforward process. Simply take your fired brass and insert it into the case gauge and place the micrometer top onto the primer side of the gauge. While holding the micrometer top firmly against the case gauge in one hand, slowly turn the micrometer until you feel it stop. You can back off and turn it again to verify the stop point and once you have it, look at the measurement on the micrometer. Now insert a sized piece of brass and repeat the procedure. Take note of the new number and subtract it from the fired brass number and you now have an exact amount of shoulder bump. Continue to adjust your sizing die until you have the correct amount of shoulder bump and you’re ready to size all your brass.
Watch Video to See how Shoulder-Bump Measuring Micrometer Tool Works
Guys, in this case a VIDEO is worth more than a thousand words. It may not be obvious from the photos how this system works. In fact, it is fast and easy. Drop brass into cartridge-specific case gauge, then put the Micrometer unit on top, and dial to touch. The video shows how this works.
SUMMARY — Tool is Fast, Precise, Repeatable, and Easy to Use — We Like It
The beauty of this tool is the simplicity with which it works. It uses a very accurate micrometer to simply measure how much further your brass is sitting forward inside the case gauge. After a couple uses, you’ll find that this tool is fast, accurate and incredibly repeatable. That gives you confidence that your brass is being sized properly. Ultimately, I found that using the micrometer top really became a joy as I set up a new set of dies and as I sized my brass, I could easily check the consistency as brass came off my press. If you’re looking to improve your sizing game, give the L.E. Wilson Case Gage Depth Micrometer a try. MSRP is $130.00.
Ruger Super GP100 Revolver in 9mm Luger (9x19mm)
Wouldn’t it be cool if you could shoot your 9mm semi-auto pistol ammo in an ultra-accurate revolver? Well you can. Ruger adapted its existing Super Redhawk frame to create the Super GP100 9mm Luger (9x19mm) revolver. As you can see, the Super GP100 9mm features a stubby 8-round PVD-coated cylinder to better fit the 9x19mm round. According to Guns.com the 9mm GP100 “uses a cylinder and extractor cut for moon clips to speed up reloading [and] sports a 6-inch half-lug sleeved and shrouded barrel with an 11-degree target crown[.]”
Watch this GunBlast video review to see how this unique Ruger 9x19mm wheelgun performs. Reviewer Boge Quinn said this a “competition grade gun” with nice fit and finish. Out of the box the Super GP100 9mm had a 9.5-lb double-action pull and a 4.5-lb single action trigger pull. It took a while for the pull to smooth out Quinn noted. Also, he said that if you do NOT use the supplied moon-clips it is awkward to remove the spent cartridges: “You don’t have to use a moon clip, but I don’t know why you wouldn’t… it just works great that way.”
The 9×19mm Parabellum (aka 9mm Luger) cartridge was introduced in 1902 by German weapons manufacturer Deutsche Waffen und Munitionsfabriken (DWM) for the Luger semi-auto pistol. Now 120 years later, Ruger brings us a sturdy, 6″-barrel revolver for this popular cartridge. Ruger adapted its existing Super Redhawk frame for this Super GP100 9mm revolver. In this video, Ruger engineer Mark Gurney explains the features of the Super GP100 9mm revolver:
Super GP100 9x19mm Features
Triple-locking cylinder locked into the frame at front, rear and bottom for more positive alignment and dependable operation.
High-strength stainless steel cylinder is fluted and shortened to reduce overall mass and increase rotational speed. Cylinder has PVD finish for durability and ease of extraction.
Polished and optimized internals, a centering boss on the trigger, and centering shims on hammer deliver a smooth double-action trigger pull with crisp/consistent let-off.
Cylinder and extractor are cut for moon clips to speed reloading during intense competition. Ships with three full moon clips and moon clip tool. The ejector and chamber mouths have a light chamfer to aid loading with moon clips.
Hogue hardwood grip is hand-finished for a smooth, polished feel. Grip frame accommodates a wide variety of custom grips.
Transfer bar mechanism provides security against accidental discharge.
Cold hammer-forged barrel has precise rifling for accuracy and longevity.
Barrel features 11° target crown for competitive-level accuracy.
.17 HMR and .22 WMR Options Enhance Ruger Precision Rimfire for Varmint Work
Many readers may not know this, but the Ruger Precision Rimfire rifle is available in two additional rimfire chamberings: .17 HMR and .22 WMR. While .22 LR ammo is considerably cheaper, .17 HMR and .22 WMR shoot flatter and deliver much more energy. This makes the Ruger rig way more suitable for varminting. In fact we think this .17 HMR transforms the Ruger Precision Rimfire into a very good “carry-around” varmint rifle. We really like the .17 HMR — it’s our favorite rimfire cartridge for small varmints out to 160 yards.
Both cartridge types, .17 HMR and .22 WMR, also offer higher velocities, less wind drift, and flatter trajectory than the .22 LR. This is a benefit when cross-training. You can shoot at more distant targets with considerably less elevation dialed in your scope. And the windage corrections will be less extreme.
Ruger says: “Faster, flatter and with high-performing bullets, .17 HMR and .22 WMR cartridges expand the capabilities of the Ruger Precision Rimfire platform. Like its .22 LR predecessor, these new magnum offerings maintain the same ergonomics, trigger and manual of arms as the larger centerfire Ruger Precision Rifle.”
Here’s an excellent video review of the .17 HMR Ruger Precision Rimfire rifle by YouTuber 22 Plinkster. The reviewer was impressed with the rifle’s accuracy with 17gr ammo.
Both Ruger Precision Rimfire rifles feature 18″ hammer-forged barrels threaded for muzzle devices, including the Ruger® Silent-SR®. The 15″ free-float handguard with Magpul M-LOK slots provides generous scope clearance and easy mounting of M-LOK-compatible rails and accessories.
Like its .22 LR version, the magnum Ruger Precision Rimfire models featured an adjustable bolt throw (that can emulate a centerfire action if desired), along with trigger that adjusts from 2.25 to 5 pounds. The .17 HMR and .22 WMR models ship with a 0 MOA Picatinny rail and one, 15-round BX-15 Magnum magazine or one, 9-round JMX-1 rotary magazine. The BX-15 Magnum is a natural pairing for the new Ruger Precision Rimfire in magnum calibers. It is also compatible with Ruger 77/17®, Ruger 77/22® and Ruger American® Rimfire rifles chambered in .17 HMR and .22 WMR.


 George Gardner was kind enough to send us 50 pieces of Pre-Production Alpha 6GT brass for preliminary testing. Like the cases I formed from 6.5×47 Lapua brass, the Alpha 6GT brass will use a small rifle primer. Purchased direct from

 BRASS — The first thing you’ll find is cartridge brass choices for the 6 GT are rather limited currently. At present, the only commercial options are Hornady and

 SUMMARY — Good Cartridge with Much Potential


 .17 HMR and .22 WMR Options Enhance


