TEN Shots in 0.303″ (0.289 MOA) at 100 Yards
How does Dan’s XP-100 pistol shoot? Look at that target showing TEN shots at 100 yards, with eight (8) shots in the main cluster at the top. The ten-shot group measures .303″ (0.289 MOA), as calculated with OnTarget Software. Not bad for a handgun! What do you think, can your best-shooting rifle match the 10-shot accuracy of this XP-100 pistol?
Report by Boyd Allen
This pistol belongs to Dan Lutke, a Bay Area benchrest shooter who publishes the results for the Visalia matches to the competitors and the NBRSA. He has been an enthusiastic competitor for an number of years, at various ranges, notably Visalia and Sacramento. The action is a Remington XP-100, to which a Kelbly 2 oz. trigger has been fitted. On top is an old Japanese-made Tasco 36X scope (these were actually pretty darn good). The Hart barrel (a cast-off from Dan’s Unlimited rail gun) was shortened and re-chambered for the 6x45mm, a wildcat made by necking-up the .223 Remington parent case. The custom stock/chassis was CNC-machined by Joe Updike from 6061 Billet Aluminum to fit the XP-100 action and mount a target-style AR grip with bottom hand rest. The gun was bedded and assembled by Mel Iwatsubu. In his XP-100 pistol, Dan shoots 65gr custom boat-tails with Benchmark powder.
This diagram shows the most common 6x45mm wildcat, which is a necked-up version of the .223 Remington parent cartridge. NOTE: The dimensions for Dan Lutke’s benchrest version of this cartridge may be slightly different.
ACAD drawing by Peter Gnanapragasam CC by SA 3.0, via Wikimedia Commons. Title Added.
Story tip from Boyd Allen. We welcome reader submissions.
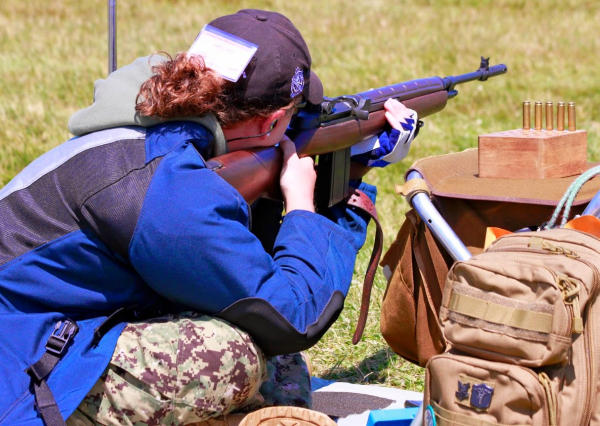
Do you own a Springfield M1A (or wish you did)? Then you should watch this 5-minute video from the American Gunsmithing Institute (AGI). This video shows the basics of the operation of the popular M1A rifle, the civilian version of the military M14. In this video, gunsmith John Bush field-strips the M1A and shows how the bolt, op rod, and trigger group fits together and operates. This video contains excerpts from the M1A Rifle Armorer’s Course, AGI Course #1584. The full Armorer’s Course is available on DVD from www.AmericanGunsmith.com.
Watch Highlights of AGI M1A Rifle Armorer’s Course:
Registration Opens for 2017 CMP Springfield M1A Match
The 11th annual Springfield Armory M1A Match will take place during the 2017 National Trophy Rifle Matches. The CMP will host the event on Saturday, July 22, following the John C. Garand Match. Competitors of all experience levels are encouraged to bring their M1A rifles to Camp Perry and compete. Registration for the match will open April 1, 2017, and is open to all individuals ages 12 and above, with an entry fee of $50 (junior $25).
The Springfield Armory M1A match began with one man’s idea and passion. Springfield Armory’s Mike Doy witnessed the waning of classic M1 Garand and M1A rifles from the competitive High Power firing lines. “I really wanted to get those M1A rifles out of safes and closets and back out onto the field. So 11 years ago, I promoted the idea of running an M1A-specific match at Camp Perry. That first year we had over 600 competitors and spectators.” Now the match offers some of the biggest pay-outs at Camp Perry. In recent years, Springfield Armory has donated over $25,000 worth of cash and prizes, including a $2,000 cash award to the overall winner.
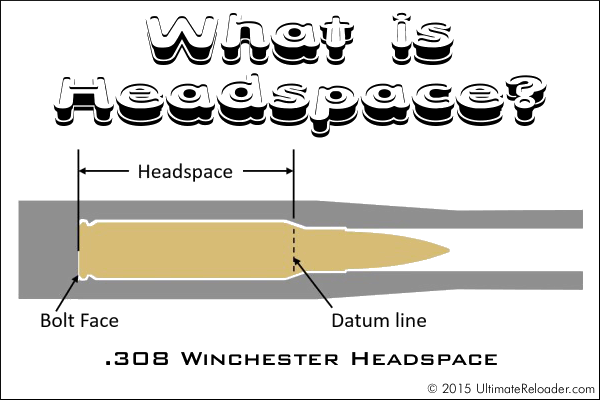
This illustration shows headspace measurement for the popular .308 Winchester cartridge, which headspaces on the shoulder. Image copyright 2015 Ultimate Reloader.
In this Brownells Tech Tip, Brownells gun tech Steve Ostrem explains what headspace is and why it’s one of the most critical measurements for nearly all firearms. Even if you’re an experienced rifle shooter, it’s worth watching this video to refresh your understanding of headspace measurements, and the correct use of “GO” and “NO-GO” gauges.
Headspace Definition
In firearms, headspace is the distance measured from the part of the chamber that stops forward motion of the cartridge (the datum reference) to the face of the bolt. Used as a verb, headspace refers to the interference created between this part of the chamber and the feature of the cartridge that achieves the correct positioning. Different cartridges have their datum lines in different positions in relation to the cartridge. For example, 5.56x45mm NATO ammunition headspaces off the shoulder of the cartridge, whereas .303 British headspaces off the forward rim of the cartridge.
If the headspace is too short, ammunition that is in specification may not chamber correctly. If headspace is too large, the ammunition may not fit as intended or designed and the cartridge case may rupture, possibly damaging the firearm and injuring the shooter. (Source: Wikipedia)
Headspace Gauges
Headspace is measured with a set of two headspace gauges: a “Go” gauge, and a “No-Go” gauge. Headspace gauges resemble the cartridges for the chambers they are designed to headspace, and are typically made of heat-treated tool steel. Both a “Go” and a “No-Go” gauge are required for a gunsmith to headspace a firearm properly. A third gauge, the “Field” gauge, is used (as the name implies) in the field to indicate the absolute maximum safe headspace. This gauge is used because, over time, the bolt and receiver will wear, the bolt and lugs compress, and the receiver may stretch, all causing the headspace to gradually increase from the “factory specs” measured by the “Go” and “No-Go” gauges. A bolt that closes on “No-Go” but not on “Field” is close to being unsafe to fire, and may malfunction on cartridges that are slightly out of spec. (Source: Wikipedia)
To learn more, read Brownell’s longer article Headspace Gauges and How to Use Them. Among other things, this explains the relative lengths of “Go”, “No-Go”, and “Field” gauges. The “Field” is actually the longest: “The GO gauge corresponds to the SAAMI (Sporting Arms & Ammunition Manufacturer’s Institute) minimum chamber length, while the FIELD gauge usually matches the maximum chamber depth, or slightly less. NO-GO gauges are an intermediate length between minimum and maximum, that, technically, is a voluntary dimension. A firearm that closes on a NO-GO gauge and does not close on a FIELD gauge may not give good accuracy and may have very short cartridge case life from the ammunition re-loader’s standpoint.”
A little work with the hand axe, after a trip through the band saw…
A while back, Forum member Preacher crafted a nice varmint rifle for fellow Forum member Dave 0. (aka “Waskawood”). But rather than buy an off-the-shelf stock, Preacher crafted this stock all by hand, starting from a laminated blank panel. He calls this stock project his “Axe Job”.
CLICK for Full-size Photo
This stock is being used on a prairie dog rifle, chambered for a 17-caliber wildcat, the 17 VHA, which is based on an H&K 4.6x30mm parent case. With about nine grains of 300 MP pistol powder, the 17 VHA drives 20-grainers at about 3850 fps. (SEE details at end of article).
The ‘Axe Job’
Report by Preacher
I like carving with the laminates because all the lines are right there in front of my eyes, so it’s easy to follow along and get it just right, until it’s pleasing to the eye. I never use a template, I just keep checking the lines as I go along. I have all the needed equipment to power build one of these, but I really enjoy the time spent on the hand work. From start to completely ready-to-install, I’ll have about six (6) weeks into one of these stock projects. A lot of that is drying time for the clear coats.
The majority of the laminated blank panels I use for my gunstocks are purchased directly from Cousineau Wood Products or from Rutply.com. You have to buy at least four full panels at a time, all the same color, but that will yield eight (8) stocks. Seems like I have a little over $150.00 in a blank large enough to start making a full-sized, benchrest-style stock.
A little work with a chisel…
A little work with a rasp. (Before I was rich and famous and could afford really good rasps, I used a good old horse shoe rasp.)
A little more work with the chisel…
Preacher’s Advice on Carving Your Own Stock
The one main advantage of being older that dirt, and tormented with MS the past 40 years, is lots of free time to enjoy what ever I can do these days, as long as I can set down to do it, and I can make a lot of wood chips setting down.
Any one can do this if they have the time to devote to it. All it takes is time and a good eye for details. I made a lot of firewood over the years, until I got the hang of it. Most all those problems were inletting, and screw hole spacing. Get those right the first time and you’re on your way….
A little more work with the rasp…
A few coats of Auto clear has it about buttoned up…
Micro 17 VHA Wildcat Here’s the finished rifle built by Preacher for Dave, using the ‘Axe Job’ stock. Dave tells us: “Preacher chambered the rifle for the 17 VHA, a wildcat based on the H&K 4.6x30mm MP7 PDW case necked down to 17 caliber. There are numerous articles in the Varmint Hunter’s Magazine about it. This efficient little round shoots 20gr ballistic tips at 3850+ fps. That’s not too shabby for ‘nine point something’ grains of pistol powder.”
“My intentions for my 17 VHA rifle are to plop down in the middle of a PD town with my swivel bench and shoot prairie dogs. I also thought it would be a nice platform to test the accuracy of the cartridge. If I like the little round as well as I think, I plan to build a more practical rifle that I can carry. I really want to thank Preacher for his patience with me through this project, as it was my first custom build.”
Forum member Bill Goad’s 6XC II Hunter Rests in a Whitetail Rack taken this past year.
One of the most popular items in our Shooters’ Forum is the ongoing “Pride and Joy” thread. Since 2009, Forum members have posted photos and descriptions of their most prized rifles. Here are some of the most recent “Pride and Joy” rifles showcased in our Forum. Do you have a gun you’d like to see featured there? Just Register for the Forum and you can add your favorite gun to the list.
TT Freestyle’s Husband and Wife Borden Benchrest Rifles
Here’s a pair of “His and Hers” rigs delivered by Santa in December. Forum member TT Freestyle reports: “After our rookie year in Short Range Benchrest with good used equipment, my wife and I decided we liked it enough to get two new Bordens for Christmas!”
FalconPilot’s Fabulous F-Classer in Shurley Claro Walnut Stock
This beauty belongs to Forum member FalconPilot. He tells us that his “Lastest F-Classer features a Shurley Brothers SOD stock in beautiful Claro Walnut.” Components include Bat M action, Bix-N-Andy trigger, and Nightforce Comp scope. FalconPilot has several barrels for this Open-Class rig, including tubes chambered for .284 Win and 6mm Dasher.
Eric’s Blacktical .308 Win for Precision Rifle Series
Forum member Eric32 spent months building out this rifle, “getting it to work just right for PRS”. Designed for practical/tactical matches, this rugged rig features a blue-printed Rem 700 action (with 1.5-lb 40X trigger) in an XLR Element chassis. On the end of the .308 Bartlein 5R barrel is a JP brake. Other components include: PiG skins barricade grips, Atlas Bipod, and GGG bungee sling. On top is a SWFA HD 5-20x50mm optic with Vortex scope level and custom throw-lever.
Forum member Willow reports: “Here is my new F-Open gun. It features a hydro-dipped LowBoy stock and LH Barnard Model P action with ‘V’ bedding block. The barrel is a straight profile 32″, 1:8.5″ twist Bartlein 5R, chambered in 280AI by Matt Paroz”. On top is a Vortex 10-60x52mm Golden Eagle in a Spuhr 3001 mount. Willow says his lightning bolt rig is a shooter: “After 42 rounds through the barrel, I’m liking what I am seeing so far”. Check out that trick aluminum base for his rear Edgewood bag.
Stinnett’s 6.4×47 Lapua Tactical Rig
Forum member Stinnett tells us: “This is my third 6.5×47 Lapua rifle — the 6.5×47 is the best cartridge ever! I’m not a huge fan of muzzle brakes. I look at them as tools — use the correct tool for the job. The ’47 doesn’t need a brake. .308 Winchester and up need muzzle brakes. For this rifle, I’m going to start out with 123gr Scenars and Reloder 15. I also like to shoot the 123gr SMKs and Varget. The SMKs are much less seating-depth sensitive. Very easy to find a load! Also gonna try the Berger 130 Hybrids and H4350.”
Components: McMillan A5 adjustable stock in GAP Camo, Stiller TAC 30 A/W action, Jewell HVR trigger, Badger bottom metal and DBM, Atlas Bipod, Nightforce NXS F1 3.5-15×50 with MLR 2.0 reticle. Metal has been Cerakoted graphite black.
6mm BRX Benchgun with Home-Made Cherry/Redheart Stock
You have to give credit to a guy who crafts his own custom wood stock. This 6mm BRX benchgun features a custom-built laminated stock featuring Cherry wood with vivid Redheart pieces on the sides and Redwood Burl on the buttplate. The front of the stock is 4″ wide. The action is a Benchrest Borden RBLP Right Eject unit, with custom titanium scope rings on top. Owner Erick C. is proud of this stock, saying it is “the best one I’ve built so far”. We agree it’s a beauty.
Ever wondered how the parts inside an AR15 work together? Just exactly how does the reciprocating bolt carrier feed rounds from the magazine? How do the elements in the trigger group work and reset after each shot? How does the gas system bleed gas from the barrel and operate the bolt carrier? These and other questions are answered in this eye-opening video from 45Snipers. Using “cutaway” 3D computer animation, this 5-minute video shows all features of an AR15 inside and out. This fascinating firearms animation allows the viewer to look inside the upper and lower receivers, into the bolt carrier, chamber, barrel, and magazine.
This video starts off slow and has annoying background music, but it is well worth watching if you own or shoot any AR-platform rifle. It illustrates all the key operations during the charging, loading, firing, and ejection processes. The cutaway animation shows how rounds are stripped from the magazine and then chambered. It then shows how every part of the trigger group works, and how the firing pin strikes the primer. You can even watch the bullet move down the barrel before the empty shell casing is removed from the chamber and tossed out the ejection port. Here are sample frames from the video:
Video find by Grant Ubl. We welcome reader submissions.
With all the blacktical rifles and tacticool camo gear on display at SHOT Show, it was nice to see some old style craftsmanship — hand-built rifles with colored case-hardened receivers, fine engraving, and beautiful wood. We found just that at the Shiloh Sharps booth. The heritage style of the Shiloh Sharps rifles harkens back to another era, when the West was still wild, and gifted smiths crafted rifles with pride, skill, and true artistry.
The cartridges shown in the photo (left to right above rifle) are: 45-110, 50-100, 45-90, and 40-70.
This video shows how Shiloh Sharps crafts its rifles, from “Foundry to Finish”:
Top to bottom – Remington firing pin assembly with ISS, Tubb SpeedLock alloy-composite system without ISS (current versions have dual, opposite-wound springs), and Remington short action firing pin assembly without ISS.
Each Wednesday, the U.S. Army Marksmanship Unit publishes a reloading “how-to” article on the USAMU Facebook page. Last week’s “Handloading Hump Day” article covered mechanical issues and related ignition irregularities that can cause vertical fliers even with good ammunition in an otherwise excellent rifle. We highly recommend you read this article, which offers some important tech tips.
Vertical Dispersion: Mechanical/Ignition Issues?
Poor or inconsistent ignition has long been known to be one of the “usual suspects” when one encounters vertical fliers that just shouldn’t be there. By having a sense of some of the basic principles involved, and a few basic areas to check, the shooter may avoid colsiderable frustration, not to mention time, expensive loading components and barrel wear.
Is your well-built rifle of high-quality components plagued with vertical fliers across more than 1-3 handload combinations? Consider the bedding, crown and scope/sight mounts. Are they correct? If so, then you might check for ignition issues before boldly undertaking an extensive, expensive, and quite possibly fruitless quest for the “magic handload”.
SEEING IS BELIEVING: While the author had been aware for many years that poor ignition should be considered and ruled out when dealing with vertical fliers in an otherwise-excellent rifle, actually seeing the problem and its almost instantaneous cure really drove the lesson home.
He was working with a “dot” rifle – a .22 LR match rifle that really stacked bullets into little piles at 50 yards and beyond. With one lot of ELEY Tenex, it produced consistent “bughole” groups at 50, but with another, selected lot of Tenex, similar groups were regularly ruined by single, vertical fliers that did not appear in other rifles. Rather than spending days burning up expensive, select ammunition looking for “magic lots”, he contacted a well-respected rimfire gunsmith and explained the situation.
Without so much as batting an eye, the highly-experienced ‘smith tore into the rifle’s action, and quickly found the cause(s) of the problem. He discovered a demonstrably weak firing pin spring, plus a chip out of the face of the firing pin where it contacted the cartridge rim.
After replacing and tuning the offending parts, the rifle immediately began shooting tiny, bughole groups with the previously “unacceptable” lot of Tenex. Centerfire rifles can also benefit from ensuring positive, consistent ignition. A wise riflesmith is literally worth his weight in gold!
So, what are some issues we as shooters can inspect in our rifles to help determine if ignition woes could be part of our problem? At the club level, ask yourself if that “experienced” Remington, Winchester 70, or even Springfield-based match bolt gun you’re using is still running its’ original 40-80 year-old factory striker spring? If so, a new replacement is cheap insurance against current or future problems. (And BTW, it might be best to stick to the normal, factory-spec spring weight. A super-powerful spring can cause vertical, just as a weak one one can.) Along with that, a routine check for proper firing-pin protrusion is a quick preventive measure that can rule out potential issues.
Other areas to consider are the centering and consistency of the firing pin’s operation in the bolt. Admittedly, with the increasing use of precision-machined custom actions, this is becoming less an issue every day. Below is the firing pin assembly from a custom BAT action:
However, particularly with factory actions, a very quick and easy check is to remove the bolt, let the firing pin go forward, and look at the firing pin tip through the firing pin hole. Is the tip off-center in the hole, and possibly striking it as it moves forward? Is the hole out-of-round or burred from being struck repeatedly? If so, a trip to the riflesmith is likely in order.
Similarly, machining issues in the bolt/firing pin system can lead to rough and erratic firing pin movement, in which the firing pin drags against an internal surface of the bolt. In high-quality rifles these issues are relatively rare, but not unheard-of, and it takes mere minutes to rule them out. It may be worthwhile to remove the cocking piece/firing pin/spring assembly and look for any unusual gouges, dings, peening, burrs or signs of abnormal wear.
This task is especially easy with Winchester 70s, Springfields, and the similar Mauser 98s, involving little more than the push of a button and unscrewing the cocking piece assembly. This is just one of the many reasons these tried-and-true actions have earned such a loyal following in the field, among hunters who must maintain their rifles away from a shop.
Particularly with older rifles, watch for and remove excess grease (or even Cosmoline!) from both the firing pin assembly and inside the bolt. This can help improve firing pin speed and consistency. Other bolt-action designs may need a take-down tool or other measures.
As part of this inspection, AFTER ENSURING THE RIFLE IS UNLOADED, slowly cock the rifle, dry-fire, and repeat several times. Listen carefully near the action for inconsistency in the sounds it generates. Does the striker falling make the same sound each time? Do you hear or feel grinding upon operation? If so, where?
Be sure to check the operation of the cocking piece (bolt shroud), firing pin within the bolt shroud, the cocking piece cam and the rear of the bolt body where the cocking piece cam operates. As with our examination for abnormal wear marks discussed above, look for marks indicating roughness or a possible need for light polishing. Then, clean and lightly grease the bearing surfaces while you’re at it.
Remington 700 bolt shroud and cocking cam
These are relatively easy checks that shooters can undertake to perform a preliminary inspection on their own. Other mechanical issues can also cause ignition issues, chiefly centered around the action of the trigger, sear and sear spring. If these are suspected, a trip to an experienced, qualified riflesmith for diagnosis is recommended. We hope you find this information helpful! Join us again next week, and in the meantime, enjoy the shooting sports safely!
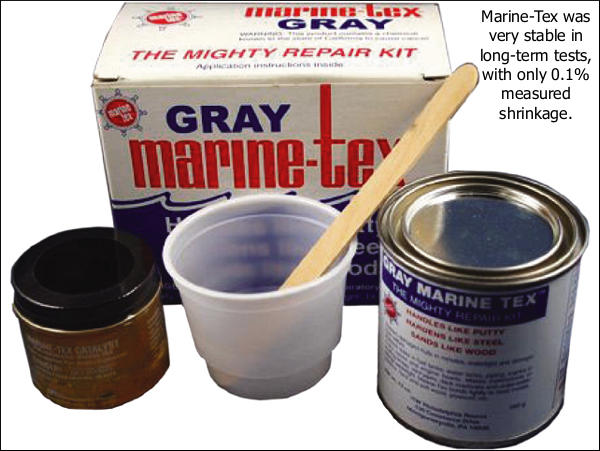
A customer of well-known gunsmith (and Hall-of-Fame shooter) Thomas “Speedy” Gonzalez recently asked Speedy about bedding compounds. Speedy offered some interesting advice based on long-term testing of various materials. Speedy favors Marine-Tex because it is very stable over time, while other materials can shrink up to 6% dimensionally. A good bedding job should be a perfect fit to your barreled action. If the bedding material shrinks over time, that is NOT a good thing….
Speedy’s customer asked: “I know you’re not a Devcon man in regards to bedding compounds but I respect your input in such matters and my question is this in regard to aluminum actions. If Devcon was considered, for an aluminum action, would you prefer aluminum compound formula or steel formula? I personally prefer Devcon steel and Marine-Tex for steel receivers but my experience with aluminum is limited. Also do you have a release agent preference that works better with aluminum?”
Speedy answered: “My only preference of one epoxy over another is their stability over time. My buddy who works for the Texas State Weights and Measures Department had me cast several of the most common types of epoxies used for bedding into 1.000″ machined blocks. After one year of being kept in a controlled climate and measured for shrinkage monthly, the Marine Tex shrunk only 1/10th of 1% (i.e. 0.1%) whereas almost all the others (including Devcon Steel formula, Devcon Aluminum formula…) shrunk 3% to 6%. The only other compounds that matched the Marine Tex were Araldite 1253 and Araldite 2014, with the latter being quite expensive for daily use.”
Speedy added: “The Marine Tex Grey has no atomized metal in its makeup even though it appears that it does. This can be proven by the use of a strong neodymium magnet. What is humorous to me is that people don’t like aluminum yet will bed their actions atop aluminum pillars that have twice the coefficient of expansion (COE) of steel. Like Devcon, it is what people have always done and used. Thus [they] perpetuate the same old stuff. That’s my two cents’ worth. But as I tell everyone, ‘I’ll tell you what I know or do, but it’s not my job to convince anyone to do it my way’.”
Release Agents — Try Shoe Polish
Regarding release agents, Speedy stated: “I use Kiwi Neutral or Tan shoe polish. This works great and you can find it anywhere. Do NOT use the black or brown as it will stick.”
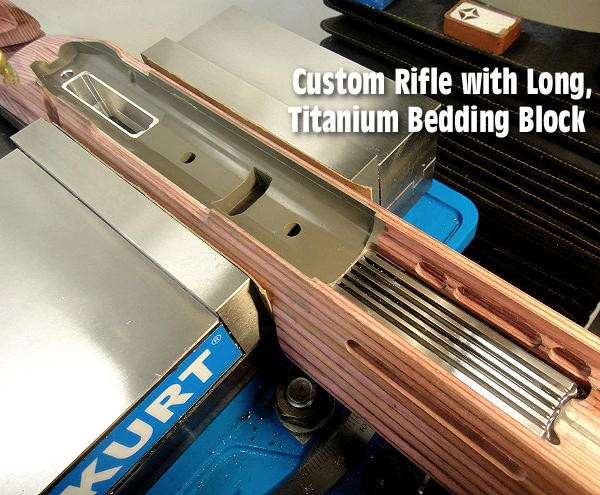
View More Photos of Speedy Inletting and Bedding Job CLICK HERE to see an interesting bedding job done by Speedy using a custom titanium bedding block. Speedy notes, “The stock was a raw blank requiring full inletting for the action to fit properly plus the titanium block. All the loading ports, bolt handle cut, bolt stop, and trigger guard cuts were done with diamond tooling to eliminate fraying and/or delamination of the wood.” You’ll find more projects by Speedy on his Facebook Page. Speedy is in San Antonio, Texas now, and accepting new projects with his company S.G. Rifles LLC.
There are many reasons you might want to make a chamber cast. You may have acquired an older rifle and need to verify the chamber dimensions. Or, if you have a new reamer, you may want to check the exact “cut” dimensions against the blueprint specs. A chamber casting is also valuable if you run across a firearm that you believe has a custom barrel on it and you want to find out the dimensions of the chamber. Lastly, you may want to prepare a chamber casting to be used in the making of custom dies. (Most reloading die makers know how to work from Cerrosafe chamber casts.)
Cerrosafe is a metal alloy that has some unique properties which make it ideal for chamber casting. First, it has a relatively low melting point of 158 to 190° Fahrenheit. This makes it easy for the handloader to melt the Cerrosafe in his home shop. Second, it shrinks slightly during cooling which allows it to be extracted from the chamber easily. It then re-expands to the chamber’s original size after about one hour at room temperature. After cooling for about 200 hours, the chamber cast will expand to about .0025″ larger than the actual chamber size.
One of our Forum members has done many Cerrosafe castings and he offers this smart advice:
1. Remove the barrel from the action to make the pour much easier. If you don’t remove the barrel, it can be hard to pour through the action (even with a funnel) and can make a mess if you’re not careful.
2. Pre-heat the barrel for 5-10 minutes in the oven on the very lowest setting (170° F in my oven). (DON’T overdo it!). Allow to cool for a couple minutes so you can pick it up and it is under 120° F. Pre-heating the barrel helps the Cerrosafe stay liquid as you pour the casting. This helps ensure a good, complete fit to the chamber.
How to Use Cerrosafe for Chamber Casting
The basic ingredient of Cerrosafe is bismuth. Bismuth is a heavy, coarse, crystalline metal which expands when it solidifies, up to 3.3% of its volume. When bismuth is alloyed with other metals, such as lead, tin, cadmium and indium, this expansion is modified according to the relative percentages of bismuth and other components present. As a general rule, bismuth alloys of approximately 50% bismuth exhibit little change of volume during solidification. Alloys containing more than this tend to expand during solidification and those containing less tend to shrink during solidification.
What all this means for the gunsmith is that you can make chamber castings using only Cerrosafe and a few, simple hand tools. To make a chamber casting, first clean and degrease the chamber. Use a tight-fitting, cotton patch that’s wrapped around a bore mop or brush to plug the bore just ahead of the throat. I usually leave the cleaning rod attached to the plug until it’s time to remove the plug. Melt the entire bar of Cerrosafe in a heatproof container that you can easily pour the hot Cerrosafe out of. You can use a propane torch or heat over a hot plate or the burner of a stove. Cerrosafe melts easily at 158°-195° F. While the casting metal is still liquid, stir very well, skim off the dross, and pour your chamber. The real trick with Cerrosafe is not to overheat it. If you heat the solid slowly, and keep it within the required temperature range, you shouldn’t get any dross.
Note the time the casting was poured. The casting will take only a very short time to solidify, usually within a minute. Wait 30 minutes and then remove the plug from the bore. Turn the muzzle upward and the casting will fall from the chamber. At 30 minutes after initial solidification, Cerrosafe shrinks slightly, so removal is very easy. Allow the new casting to cool thoroughly then measure the casting exactly one hour from the time it was cast. The casting will give you an exact measurement of the chamber. Cerrosafe casting metal can be used over and over. Remelt the entire amount back together and pour the Cerrosafe into a small mold of the appropriate size. Always melt the entire Cerrosafe ingot to make a chamber casting. For best results, never cut off, or use, just a part of the ingot.


 Headspace Gauges


 Here’s the finished rifle built by Preacher for Dave, using the ‘Axe Job’ stock. Dave tells us: “Preacher chambered the rifle for the 17 VHA, a wildcat based on the H&K 4.6x30mm MP7 PDW case necked down to 17 caliber. There are numerous articles in the Varmint Hunter’s Magazine about it. This efficient little round shoots 20gr ballistic tips at 3850+ fps. That’s not too shabby for ‘nine point something’ grains of pistol powder.”


 Is your well-built rifle of high-quality components plagued with vertical fliers across more than 1-3 handload combinations? Consider the bedding, crown and scope/sight mounts. Are they correct? If so, then you might check for ignition issues before boldly undertaking an extensive, expensive, and quite possibly fruitless quest for the “magic handload”.


 Cerrosafe is a metal alloy that has some unique properties which make it ideal for chamber casting. First, it has a relatively low melting point of 158 to 190° Fahrenheit. This makes it easy for the handloader to melt the Cerrosafe in his home shop. Second, it shrinks slightly during cooling which allows it to be extracted from the chamber easily. It then re-expands to the chamber’s original size after about one hour at room temperature. After cooling for about 200 hours, the chamber cast will expand to about .0025″ larger than the actual chamber size.


