The Lee Classic Cast “O”-style press has always been an excellent value — it works as well as some other presses costing twice as much. And now Lee has improved on its Classic Cast Press design by adding a breech-lock fitting in the top. This allows you to swap dies in and out in seconds, once your dies are equipped with breech-lock quick-change bushings. The Lee Classic Cast Breech Lock press is available for under $120.00. That makes it a bargain compared to other heavy-duty single-stage presses. Midsouth Shooters Supply offers this press (item #006-90999) for $112.95, while Natchez Shooters Supplies sells the press (item #LEE90999) for $112.99.
Breech-Lock System Allows Fast Die Exchanges
With the Lee Breech-Lock Press system, the die drops straight in from the top. Then, with a quick 1/6th (60°) turn, the die locks firmly in place (like the breech on an artillery canon). The interrupted three-start thread assures dies return and lock into the exact same position each time. Bushings cost $7.43 each at Midsouth. If you prefer, you can leave a bushing in the press, and screw your dies in normally. But consider that it normally takes a dozen or more turns to screw in a normally threaded die. The Breech-lock system is way faster.
The Lee Classic Cast press features a strong, cast-iron frame and all-steel linkage. The large 1 1/8″-diameter ram is guided by over twelve square inches of ram bearing surface. We like the fact that you can mount the handle on either side, and adjust handle angle and length. As Lee explains: “The start and stop position is adjustable with a 48-tooth, ratchet-type handle clamp. In addition, the handle length is completely adjustable. Shorten [it] when you’re loading handgun and short rifle cases.”
Lock-Ring Eliminator Quick-Change Bushings
With Lee’s basic quick-lock bushings, you control vertical die position with the normal locking ring that seats against the top of the bushing. That works fine, but Lee also offers a handy Lock-Ring Eliminator Bushing (Lee SKU 90063). This clever design combines bushing and lock-ring into a single part. The Eliminator is turned from a solid piece of steel and the lock ring is integrated into the design of the part. With the Eliminator you’ll get the most repeatable and precise die positioning because lock ring and bushing are all one piece. Moreover, some guys say the Eliminator Bushings are easier to grab and remove than the standard Lee Breech-Lock Bushings.
Reports from Classic Cast Press Owners
Press owners have praised their Lee Classic Cast Breech-Lock units. Here are reports from two MidwayUSA customers:
Five Stars: Perfect single stage press. Loads accurately 6mm BR and 308 Win for competition. Large clearance is also great for my 460 Wby and 30-378 Wby. Pistol rounds in 44 mag and 45 ACP also load easy. The press has a lot of leverage for full-length rifle case sizing. Nice primer disposal system. Lowest price for its class. This unit beats my Lyman press by several miles…. ”
— J. Davidson, California
Five Stars: I waited until Lee would bring out their breech-lock system in classic cast design. This thing is outstanding and better than my old RCBS partner press. Once you get the sweet setting of the die, lock it in place and next time you load, you need not fumble to find the best setting. Breech lock is the key. I choose this press over Hornady, due to all-steel construction. I load a lot of .308 Win and .223 Rem for my ARs and this requires full-length sizing. Lee meets the challenge with no flex and excellent ram/die fit and alignment. [T]he spent primer disposal is perfect vs. RCBS where primers can miss the primer catcher. The handle can also be placed left or right as needed and shortened for small cases or pistol to reduce the handle travel.”
— E. Stanley, Rockford, IL
If you’ve been shopping for a Progressive Reloading Press, here is an excellent opportunity. The Hornady Lock-N-Load AP Progressive Press is now on sale for just $378.99 at Midsouth Shooters Supply. That’s the lowest price for this press that we’ve seen in a long time. Plus — to sweeten the deal — Hornady will kick in 500 free bullets. As part of its 2015 Get Loaded promotion, Hornady will give 500 free bullets to purchasers of a Lock-N-Load AP Press (or other qualifying product).
The Lock-N-Load AP press is a good machine that has been refined and enhanced over the years. We like the rotary-style case-activated powder measure. We find this easier to adjust that the Dillon system with horizontal sliders. The auto-indexing Lock-N-Load AP press features a Five-Station Die Platform allowing you to use a lock-out die or separate sizing and crimping dies.
See How the Hornady L-N-L AP Progressive Press Works in this video:
The features of the Lock-N-Load AP press are reviewed in this video from UltimateReloader.com. Our friend Gavin Gear put the Hornady progressive through its paces. The video shows how to set up the press, how to install/adjust dies, how to set loads with the powder measure, and how to operate the built-in priming system. If you plan to purchase a progressive press from any manufacturer (Red, Blue, or Green), you should definitely watch this video before you purchase.
Our friend Grant Guess recently had a “close encounter” with a bad primer. An apparently defective primer caused part of the casehead on one of his rounds to blow out. This, in turn, allowed high pressure gas to vent through the damaged primer pocket. Take a good look, boys and girls. This is yet another very good reason to wear safety glasses. The cartridge was a 6.5-06, handloaded in necked-down Winchester-headstamp .270 Win brass. Grant reports:
“I had a blow through between the primer and the primer pocket today. The action was really smoking and I got a face full of gas. This was a reasonably light charge. Thank God for safety glasses.
I should also mention that it appears there is a 3/64 hole that is halfway between the primer and the primer pocket. Like it burned a small jet hole through both of them.”
Could this happen to you? It just might. On seeing this damaged case, one of Grant’s Facebook friends, Chris D., observed: “Search the internet, you will see a lot of these pin hole ‘in the corner’ failures. Obviously Winchester has some issues with the LR primers.”
Careful Examination Reveals Apparent Primer Defect
After this incident, Grant examined the damaged case: “I pinned the flash hole and it is not over-sized or under-sized. The primer clearly has an area where it had a defect. At [50,000 CUP], it doesn’t take much of a defect to cause issues. There was a slight bit of pucker-factor on the next shot….”
In response to our Bulletin story about the availability of Norma powders at Midsouth Shooters Supply, one of our Forum members asked: “I’m having trouble finding Reloder 15 for my 6.5×47 Lapua — should I consider running Norma 203B instead?” As we’ve explained before, these two powders, both made by Bofors in Europe, are very, very similar. Here are some hard numbers that should demonstrate how virtually identical these powders really are.
Target Shooter Magazine writer Laurie Holland compared Norma 203B and Reloder 15 using data from QuickLOAD. Laurie also checked load manuals to see how listed charge weights varied for the two propellants. Laurie concluded there was very little difference between Norma 203B and Reloder 15.
Norma 203B vs. Alliant Reloder 15 Commentary by Laurie Holland
Running [203B and RL15] through QuickLOAD doing a ‘charge table’ run for a 130gn Berger VLD at 2.700 COAL in 6.5X47 Lapua, gives very similar positions in the table [for both powders]. The charge required to achieve 62,000 psi estimated pressure varies by a mere 0.2 grains between the pair, Norma 203B being the heavier of the two. The estimated Muzzle Velocity (MV) also varies by a mere 2 fps, RL15 estimated to produce 2,946 fps MV compared to 2,944 fps for N203B at 62,000 psi (with the parameters I used).
If they aren’t the same thing, they’re so close as to make no difference and as Forum Boss points out, they’re made by the same people (Bofors) in the same plant.
[The Berger Reloading Manual includes data for both powders] for the .308 Winchester and heavier bullets (185 to 230 grains). Maximum charges and claimed MVs are not always identical, but are so close as to be marginally different production lots of the same thing, or maybe the result of minor testing variations.
.308 Win Max Charge Weights in Grains (RL15 / N203B) (Berger Manual)
MVs [for the four bullet types] are close but not identical, the largest difference being for the 210s which shows RL15 producing 2,428 fps MV v 2,383 for Norma 203B.
Norma 203B Chemistry
According to the Norma Reloading Handbook #1, Norma 203B has the following composition:
85% Nitrocellulose
7.5% Nitroglycerin
2.0% surface coating
4.6% Various chemicals
0.9% Water
3,957 J/g specific energy
890 g/l specific density
For comparison, the 7.5% NG component compares to 15% in Viht N500 series powders and 10% in Ramshot TAC / Big Game / Hunter.
Each Wednesday, the U.S. Army Marksmanship Unit publishes a reloading “how-to” article on the USAMU Facebook page. This week’s “Handloading Hump Day” post covers an important safety issue — why you should never assume that a stated “book” load for a particular bullet will be safe with an equal-weight bullet of different shape/design. The shape and bearing surface of the bullet will affect the pressure generated inside the barrel. Visit the USAMU Facebook page next Wednesday for the next installment.
Beginning Handloading, Part 13:
Extrapolating Beyond Your Data, or … “I Don’t Know, What I Don’t Know!”
Last week, we addressed several key facets of Service Rifle reloading. Today, we continue our Handloading Safety theme, focusing on not inadvertently exceeding the boundaries of known, safe data. Bullet manufacturers’ loading manuals often display three, four, or more similar-weight bullets grouped together with one set of load recipes. The manufacturer has tested these bullets and developed safe data for that group. However, seeing data in this format can tempt loaders — especially new ones — to think that ALL bullets of a given weight and caliber can interchangeably use the same load data. Actually, not so much.
The researchers ensure their data is safe with the bullet yielding the highest pressure. Thus, all others in that group should produce equal or less pressure, and they are safe using this data.
However, bullet designs include many variables such as different bearing surface lengths, hardness, and even slight variations in diameter. These can occasionally range up to 0.001” by design. Thus, choosing untested bullets of the same weight and caliber, and using them with data not developed for them can yield excess pressures.
This is only one of the countless reasons not to begin at or very near the highest pressure loads during load development. Always begin at the starting load and look for pressure signs as one increases powder charges.
Bullet bearing surface length (BSL) is often overlooked when considering maximum safe powder charges and pressures. In photo 1 (below), note the differences in the bullets’ appearance. All three are 7mm, and their maximum weight difference is just five grains. Yet, the traditional round nose, flat base design on the left appears to have much more BSL than the sleeker match bullets. All things being equal, based on appearance, the RN/FB bullet seems likely to reach maximum pressure with significantly less powder than the other two designs.
Photo 1: Three Near-Equal-Weight 7mm Bullets with Different Shapes
Due to time constraints, the writer used an approximate, direct measurement approach to assess the bullets’ different BSLs. While fairly repeatable, the results were far from ballistics engineer-grade. Still, they are adequate for this example.
Bullet 1 (L-R), the RN/FB, has a very slight taper and only reaches its full diameter (0.284”) very near the cannelure. This taper is often seen on similar bullets — it helps reduce pressures with good accuracy. The calculated BSL of Bullet 1 was ~0.324”. The BSL of Bullet 2, in the center, was ~0.430”, and Bullet 3’s was ~ 0.463”. Obviously, bullets can be visually deceiving as to BSL!
Some might be tempted to use a bullet ogive comparator (or two) to measure bullets’ true BSL for comparison’s sake. Unfortunately, comparators don’t typically measure maximum bullet diameter and this approach can be deceiving.
Photo 2: The Perils of Measuring Bearing Surface Length with Comparators
In Photo 2, two 7mm comparators have been installed on a dial caliper in an attempt to measure BSL. Using this approach, the BSLs differed sharply from the original [measurements]. The comparator-measured Bullet 1 BSL was 0.694” vs. 0.324” (original), Bullet 2 was 0.601” (comparator) vs. 0.430” (original), and Bullet 3 (shown in Photo 2) was 0.602” (comparator) vs. 0.463” (original). [Editor’s comment — Note the very large difference for Bullet 1, masking the fact that the true full diameter on this bullet starts very far back.]
Please join us again next week as we examine other lesser-discussed variables that affect pressure and velocity during handload development. In the meantime, stay safe, and favor center!
On our main AccurateShooter.com site, you’ll find a good article by G. Salazar on the Basics of Neck Turning. If you’re new to the neck-turning game, or are just looking for good tips on improving your neck-turning procedures, you should read German’s article. Below we offer some highlights and photos from the article, but you’ll need to read the whole story to view all the illustrations and follow all the procedures step by step.
Why Should You Consider Neck Turning?
Let’s assume that your rifle doesn’t have a tight neck chamber that requires neck turning; if you have a tight neck chamber, of course, the answer to the question is “because you have to”. For the rest of us, and that includes the vast majority of Highpower shooters, neck turning isn’t a requirement, but it can be a useful way to bring your ammunition a small but meaningful step closer to that pot of gold at the end of the rainbow: perfection. I’m not talking about a theoretical improvement, but a real one, an improvement that lies in equalizing and optimizing the neck tension of your loaded rounds. Inconsistent neck tension is a real contributor to increased muzzle velocity variance which itself is a significant factor in increased elevation dispersion at long range. So there’s our basic reason for neck turning: to equalize and optimize neck tension in order to reduce elevation dispersion.
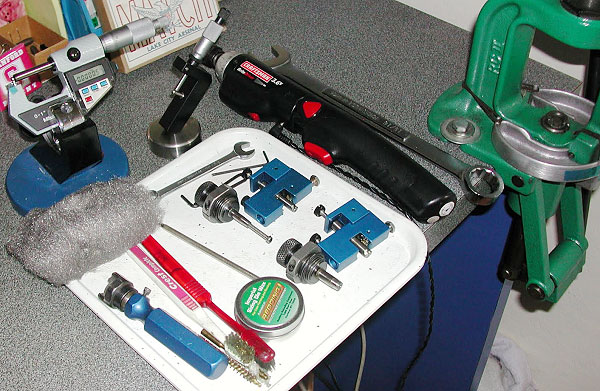
The Tools of the Trade
Here you see everything I use and a bit more. The press, a cordless screwdriver (always plugged in, turning is tough on the old battery), a couple of K&M neck turners (one set up for 6mm, the other for .30 caliber) an expander for each size, some Imperial lube, an old toothbrush or two to keep the cutter clean, a handle with a caseholder (for those emergencies when the screwdriver dies and there’s just one more case to go!), steel wool and a tubing micrometer finish the list of tools. Hey, I left the dial calipers out of the picture! They’re always handy, keep them around, but they are useless for measuring neck thickness, so don’t try. I usually use an Optivisor magnifier while I turn necks, very handy for a clear view of what’s happening on the neck.
Expanding the Neck
Put some lube on the inside of the case neck and run it into the expander. Really, this isn’t hard. I prefer to expand each case immediately before turning it as opposed to expanding all the cases and then turning them. Brass is somewhat springy and will tend to go back toward its original size; therefore, by expanding and turning immediately, you are more likely to have all cases fit the mandrel with the same degree of tightness and to get a more consistent depth of cut.
Cutter Adjustment for Cut Depth and Length
All the tools I’ve seen have pretty good adjustment instructions. The only thing they don’t tell you is that you should have five to ten spare cases to get it right initially. Anything of the right diameter will do while you learn, for instance, just use that cheap surplus .308 brass to do initial setup and save the precious .30-06 for when you know what you’re doing. Be patient and make your adjustments slowly; you’ll need to set the cutter for thickness as well as length of cut (just into the shoulder). The depth of cut (brass thickness) takes a bit of fiddling, the length of the cut is generally easy to set.
The Finished Product — A Perfectly Uniform Neck
If you read the whole article, and follow the procedures using quality tools, you should get very good results — with a little practice. To demonstrate, here’s an example of my finished, neck-turned brass. You’ll see there is a perfect, 0.0125″ thick neck. It’s very uniform around the circumference, usually I only see 1 or 2 ten-thousandths variance. Now, with the necks uniformed like this, we can select the bushing size that will give us our preferred neck tension and experiment with various levels of tension, secure in the knowledge that all of the cases will actually have the desired neck tension.
“Once-fired, lot-number-traceable Lake City 7.62×51. This has been de-primed, pocket-swaged, small base body die’d, full-length sized, trimmed with a Gracey Trimmer, and tumbled. Now it’s shiny again. It’s like gourmet macaroni for shooters!” — Dennis Santiago
Our friend Dennis Santiago shoots a variety of disciplines, including Vintage Military Rifle. He burns through a lot of brass, some of it run through gas guns, so he often saves money by acquiring once-fired Lake City Arsenal brass. But that stuff is often pretty ugly when it arrives. For his “previously-owned” Lake City Brass, Dennis does a complete case prep operation and a thorough cleaning/tumbling operation. Special attention is paid to the primer pockets — they are swaged to remove the military crimp. The cases are trimmed and chamfered in one operation using a Gracey Powered Case Trimmer.
Dennis likes once-fired Lake City brass for some applications. The price is right, and with proper attention to detail during case prep, Lake City brass can shoot exceptionally well indeed. You may want to sort Lake City brass by weight. To remove the military crimp you have a variety of options — you can swage it out with a special tool like Dennis does, or you can ream out the crimp. For Wilson trimmer owners, Wilson makes a special Primer Pocket Reamer to remove military crimps. It works very well, as shown below:
Case Processing with the Gracey Trimmer
Designed by Doyle Gracey 30 years ago, the Gracey machine trims, deburs and chamfers in one operation, indexing off the case shoulder. The manufacturer claims the Gracey will process 20 cases per minute while holding .002″ tolerances on trim length. Two steel cutters are employed — one cutter trims the case to length and puts a chamfer on the inside of the case mouth. The second cutter removes the burr from the outside of the case-mouth. A 1/15 hp motor turns 1550 rpm. Interestingly, a clamped rubber hose serves as the “drive shaft” to turn the cutting head.
“This model may have a piece of wood for a base, no on-off swith and a piece of bent sheet metial to contain brass shavings — but it does trim, debur and chamfer with great speed and accuracy at a nice price. The [Gracey] two-bladed cutter requires a little more patience to adjust than the one-piece cutter on the Giraud, but it gets the job done superbly. [The Gracey] does the job for less money, if you’re willing to tinker with the cutter blade adjustment.” Gracey machines are still available new from MatchPrep.com for $335.00 (or $235.00 without motor).
German Salazar has written a very thorough guide to measuring nearly all the critical dimensions of cartridge brass. In his Measuring the Case article, on his Rifleman’s Journal website, German reviews the tools and techniques required to measure everything from case overall length to case neck concentricity. Step-by-step, German shows how to measure: Case Length, Case Body length (below neck), Neck Diameter, Headspace, Base Diameter, Neck Thickness, and Case Neck Concentricity.
If you are an “advanced reloader” or want to be, you should read German’s article. Not only does German explain the most common measuring procedures, he highlights some alternative methods you might not have tried yet. The article also links to related discussions of more complex measurement tasts, such as determining case body wall thickness variation.
Even if you’re not a competitive shooter, measuring your brass can provide important safety benefits. As German explains in the conclusion of his article: “There are obviously a lot of measurements that can be taken on the cartridge case and in some cases, more than one way to take them. However, the first two that any new reloader must learn are case length and neck clearance, these two are safety concerns and if overlooked can results in serious damage to the rifle and injury to you.”
We are re-publishing this article at the request of Forum members who told us the information proved very valuable. If you haven’t read this Safety Tip before, take a moment to learn how you can inspect your fired brass to determine if there may be a potential for case separation. A case separation can be dangerous, potentially causing serious injury.
On the older Riflemans’ Journal blog, GS Arizona wrote an excellent article about cartridge Case-Head Separation. We strongly recommend that you read this article. It examines the causes of this serious problem and he explains the ways you can inspect your brass to minimize the risk of a case-head separation. As cases get fired multiple times and then resized during reloading, the cases can stretch. Typically, there is a point in the lower section of the case where the case-walls thin out. This is your “danger zone” and you need to watch for tell-tale signs of weakening.
The photo at the top of this article shows a case sectioned so that you can see where the case wall becomes thinner near the web. German scribed a little arrow into the soot inside the case pointing to the thinned area. This case hadn’t split yet, but it most likely would do so after one or two more firings.
One great tip offered involves using a bent paper clip to detect potential case wall problems. Slide the paper clip inside your case to check for thin spots. The author explains: “This simple little tool (bent paper clip) will let you check the inside of cases before you reload them. The thin spot will be immediately apparent as you run the clip up the inside of the case. If you’re seeing a shiny line on the outside and the clip is really hitting a thin spot inside, it’s time to retire the case. If you do this every time you reload, on at least 15% of your cases, you’ll develop a good feel for what the thin spot feels like and how it gets worse as the case is reloaded more times. And if you’re loading the night before a match and feel pressured for time — don’t skip this step!”
Hodgdon Powder Company, distributor of IMR powders, issued the following PRODUCT SAFETY WARNING AND RECALL NOTICE for six (6) lots of IMR 4007 SSC powder on September 2, 2015:
IMR Legendary Powders is officially announcing a product safety warning and recall notice for IMR 4007SSC on the six lot numbers listed below.
IMR has received reports that this particular powder in 1-lb and 8-lb containers may have become unstable due to possible rapid deterioration. Use of this product from these lot numbers may result in spontaneous combustion, fire damage or possible serious injury.
What to do (with Affected Lots of IMR 4007 SSC):
1. Stop using this product immediately! Fill the powder container with water which will render the product inert and safe for disposal.
2. Mail, email or fax a copy of the powder label showing the lot number to the contact information below to include your name, address, phone and email.
3. Replacement choice of any other IMR smokeless powder product will be shipped to you for no charge.
4. If you have loaded the powder subject to this recall into ammunition, we recommend that you pull the bullets, remove the powder and wet the powder with water for safe disposal.
IMR deeply regrets any inconvenience this may cause, but we believe in safety first. Contact information: IMR Powder Company, 6430 Vista Drive, Shawnee, KS 66218, email help@imrpowder.com, imrpowder.com, call 1-800-622-4366 or 913-362-9455 and fax 913-362-1307.


 Breech-Lock System Allows Fast Die Exchanges


 Norma 203B vs. Alliant Reloder 15


 On the older Riflemans’ Journal blog, GS Arizona wrote an excellent article about cartridge


