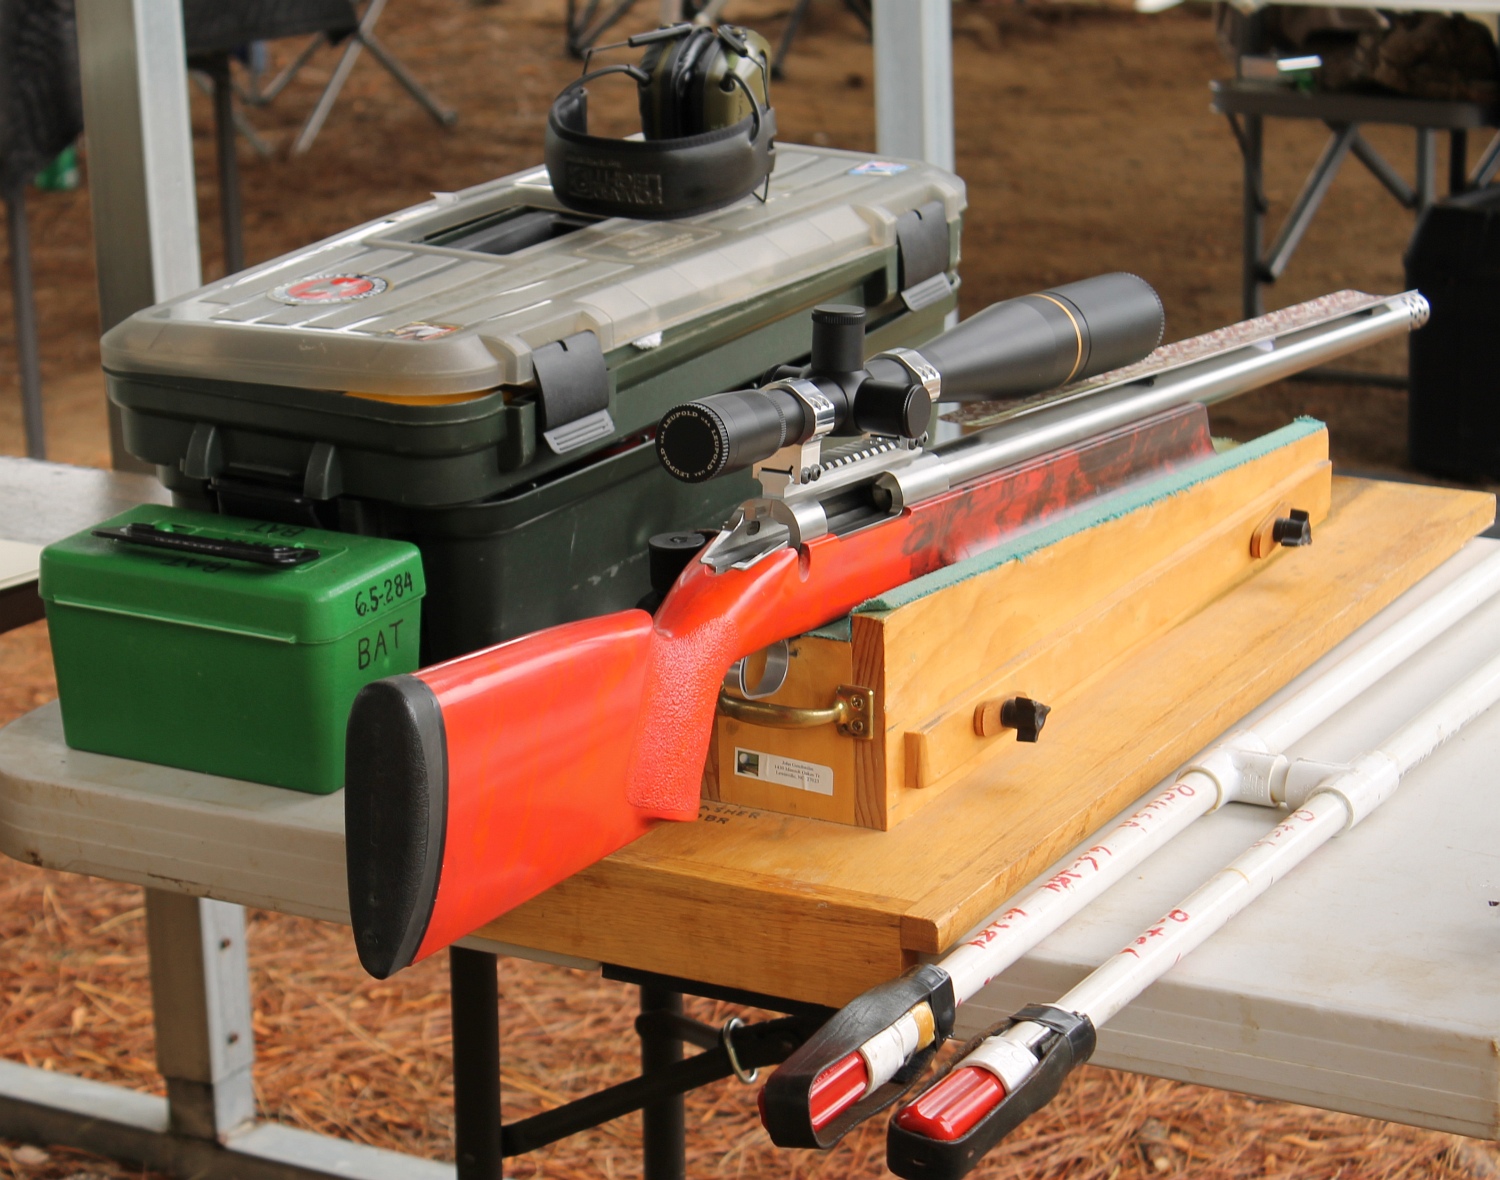
We saw some interesting gear at a 600-yard IBS match at the Piedmont Gun Club (Rutherfordton, NC). On display were a variety of hand-made wood cleaning cradles designed to fit on table tops. These typically employ a box-style design, with layer of cloth or other padding to cushion the underside of the stock. On display were both single-rifle cleaning cradle/boxes and dual-rifle rigs. This is a good do-it-yourself project that can be built with simple tools.
Click Photos to View Large Versions
Notice that these cradle-boxes feature an extended lower section in the rear. This lower “lip” butts up against the edge of the table so the whole assembly stays in place. In the photo above it appears that the lower section may actually be cut from a rubber block, but we’re not sure.
With all the talk about the new Norma Dasher brass coming in the fall from Bullets.com, we thought it was time to feature a special rifle chambered for the 6mm Dasher wildcat. This gun has a great story behind it. Forum member Bob A. (aka “Killshot”) used his “Forum Classifieds Special” to beat all comers in the F-Class Division in the American-Canadian Match and the Long Range Regional Match in 2013 in Sacramento, CA. Bob’s 6mm Dasher sports a blue-printed Rem 700 action. Who says you need a high-dollar custom action to run with the big dogs? In fact, this same gun, built with components sourced from AccurateShooter Forum Classified Ads, set a Sacramento F-Class range record of 200-17X a few years back. In this story, Bob talks about the build, and he explains his methods for loading ultra-accurate Dasher ammo.
Bob’s Budget-Build Dasher F-Classer
I wanted to build a proper rifle for F-Open but needed to keep it simple and, well, cheap. I found a solid “base” to build on in the form of a Dave Bruno-built, “pre-owned” 6-6.5×47 Lapua that I located in the AccurateShooter Forum classifieds in late 2011. The base action was a trued and blue-printed Remington 700 receiver circa 1971 with a spiral-fluted bolt. It was in a Shehane ST1000 stock painted sky blue and had a Jewell 1.5-oz BR trigger. I sent the bolt to Greg Tannel (Gretanrifles.com) to have the firing pin hole bushed and sleeved, the ejector removed and the hole filled and the face trued. I ugraded to Tannel’s Light Steel firing pin assembly while it was out.
Having the working bits completed, I needed a barrel. So I went to the AccurateShooter classifieds again and found a 1:8″-twist, 30″ x 1.25″ (diam.) Bartlein with a 0.236″-land bore. I called Dave Kiff and explained my pursuit and he recommended his PT&G “world record” 6 Dasher reamer (.2704″ no-turn neck and .104″ freebore). A month or so later the reamer and gauges arrived.
I had the barrel chambered by Marc Soulie of Spartan Precision Rifles (510-755-5293, Concord, CA). Marc is a great builder and I’m pleased to call him a friend.
The rifle got its good looks from a Pennsylvania artist named Kenny Prahl. His Prahl Designs shop (724-478-2538) added the white ghost-flames over the existing sky blue metallic paint.
Looks Great, Shoots Better
Fire-forming showed great promise — ten-shot groups of half an inch at 200 yards were typical. I lost only one case to a split neck and the “blow lengths” are good and consistent. This was followed up with load development which saw 100-yard, five-shot groups in the .1s and .2s as the rifle showed its preference for Reloder 15 over Varget powder, and for CCI 450s over all other primers. The bullet of choice was the ever-popular Berger 105gr Hybrid Target.
In February 2012 I began shooting the Dasher in monthly club matches at the Sacramento Valley Shooting Center, the home range of a number of excellent F-Class, Benchrest and High Power shooters. Using a Farley Coaxial rest up front (also picked up from a WTB ad on AccurateShooter’s Forum) and an Edgewood bag in the back, I gradually improved my gun-handling to the point where I could shoot a respectable score. This was very different from the bipod shooting I’d done in the past in F/TR.
Dasher Loading Tips
My chamber is set up for blue box Lapua 6mmBR brass. My case preparation is straight-forward. I fire-form with virgin cases right out of the box. I don’t size them but I will give the primer holes a good look and clean up the flash hole with a .058″ bit in a pin vise. To fire-form, I seat a Berger 108gr BT .030″ into the lands over a standard 6mmBR load of Varget.
For match loads, I use Alliant Reloder 15. While Varget is less sensitive to temp changes, RL15 has given me lower extreme spreads and better long range control. [Bob acknowledges that every barrel is unique, so a different powder might work better for you.]
I clean my fired cases with stainless steel media in a Thumler’s rotary tumbler after every firing. I anneal after every other firing using a Bench-Source machine which is very well made and easy to operate. I use a Whidden full length bushing die with Redding bushings for sizing.
While Varget and Reloder 15 remain in short supply, you can often find IMR 4320 powder back in the shelves of local gun stores. IMR describes IMR 4320 as follows: “Short granulation, easy metering, and perfect for the 223 Remington, 22-250 Remington, 250 Savage and other medium burn rate cartridges.” This older-generation powder is more temp sensitive than the Hodgdon Extreme propellants, but in the right application, it looks to be a viable alternative for folks who can’t source Varget, Reloder 15, and even H4895.
IMR 4320 Shoots Well in the .308 Winchester
A while back, GS Arizona wrote an excellent Riflemans Journal article, IMR 4320 — the Forgotten Powder. GS developed IMR 4320 loads for his .308 Win Palma rifle and competed with IMR 4320-powered ammo at long range matches. He concluded that: “[IMR 4320] appears to be a very useful alternative to some of the harder-to-get powders. The load is working extremely well at 1000 yards. In the [2009] Arizona Palma State Championship, several high placing competitors were using the 4320 load. We got sub X-Ring elevation at 1000 yards from several rifles, and that’s all I’m looking for in a Palma load.”
IMR 4320 Works for Dasher Shooter
Forum member FalconPilot shoots a 6mm Dasher with Berger 105gr Hybrids. Looking for an alternative to Varget, he decided to give IMR 4320 a try. The results were good. FalconPilot reports: “I’ve been looking for other options (besides Reloder 15, which I love, but it’s really dirty). While at a gun shop in Ohio, I ran across 8 pounds of IMR 4320. I had never even heard of it, much less tried it. Getting ready for upcoming mid-range shoots, I loaded five rounds with IMR 4320 to the exact same specs as my winning Varget loads for the 6mm Dasher. This recipe was 32.7 grains of powder, Wolf SMR primer, Berger Hybrid 105 jumped fifty thousandths.” Falcon pilot tested his IMR 4320 load at 600 yards:
As you can see from the photo at the top of this article, FalconPilot had good results — a 1.5″ group at 600 yards. He reports: “This group was shoot during the middle of the day, mirage bad, scope set to 25X. It looks like IMR 4320 is a [very close] replacement for Varget… with a tad bit slower burn rate.” FalconPilot tell us the accuracy with IMR 4320 rivals the best he has gotten with Varget: “This gun has always shot under 2 inches [for 5 shots] at 600 yards, and most of time shoots 1.5 to 1.7 inches.”
For comparison purposes, here are Heat of Explosion and Burn Rate values from QuickLOAD for IMR 4320, and for the popular Reloder 15 and Varget powders. You can see that these powders have similar characteristics “by the numbers”:
Manufacturer
Powder Brand
Heat of Explosion
Burning Rate Factor
IMR
4320
3890
0.5920
Alliant
Reloder 15
3990
0.5200
Hodgdon (ADI)
Varget
4050
0.6150
WARNING — When changing from one powder to another, always start with manufacturer’s stated load data. Start low and work up incrementally. Never assume that loads will be equivalent from one powder to another, even powders with similar burn rates.
What Other Forum Members Say:
I was using IMR 4320 in the mid 70s in my .222 Rem. Darned great powder and I never had a load that was not accurate from the .222 to .30-06 with that powder. — 5Spd
A fine powder overshadowed by the nouveau wave of “gotta have the newest — make me a better shot” powders. Try 4320 in a 22-250 — what a well-kept secret! IMR 4320 meters very well and is a flexible alternative to many of the hard-to-find powders so much in demand. — AreaOne
IMR 4320 was my “go to” powder in my .223 for many many years. This powder and Winchester 55gr soft point bulk bullets (the cheapest bullet I could buy at the time) accounted for thousands of prairie dogs, coyotes, and anything else that needed shooting. I still use IMR 4320 in some .223 loads and am very happy with it still. — pdog2062
I’ve been using it in a .308 Win for several years. I think it is very sensitive to temperature and always waited till the last minute to load my ammo with a close eye on the weekend forecast at the range. IMR 4320 Works pretty good for 155gr Palma and 168gr Hybrid [bullets] in my .308. — JayC
DJ’s Brass Service now offers custom case hydro-forming to your exact specs. Darrell Jones offers this service for a variety of popular cartridges: 6mm Dasher, 6mm BRX, 6mm BRDX, and 6mm Shehane. After hydro-forming your brass, Darrell can also neck-up or neck-down the cases to meet your needs. For example, if you shoot a 22 Dasher, Darrell can hydro-form the cases and then neck them down to .22 caliber. He can also turn the necks to your specs (for an additional charge).
Darrell is a hydro-forming wizard who has perfected the process over the last couple of years. He has learned a few special techniques along the way to ensure uniform case-forming. Without revealing any trade secrets, we can say the Darrell has very special dies and Darrell doesn’t use a mallet or hammer — he has a system that is much more consistent. Darrell tells us: “Many of my customers take this brass and load it ‘as is’ and go straight to a match and shoot some very nice groups.”
Hydro-forming by Darrell costs $0.60 (sixty cents) per case with a minimum order of $60. Neck-turning is an additional $0.50 (fifty cents) per case plus actual return shipping. The turnaround is usually less than five days.
With Darrell’s hydro-forming service you don’t have to buy any special dies or other equipment. Darrell says: “Simply send me the brass you need or have it dropped-shipped to me along with a fired case that has not been sized. If you need formed brass for a new build (gun not yet fired), let me know and I will size the brass to fit within .001 of a PT&G GO gauge.”
For more information, visit DJsBrass.com, or call Darrell at (205) 461-4680. IMPORTANT: Contact Darrell for shipping instructions BEFORE sending brass for processing. In a hurry, don’t have time? Just call Darrell and he’ll make something work for you.
Hydro-Forming Customer Reports
Here are testimonials from recent customers.
“Recently had Darrell Jones of DJ’s Brass Service hydro-form 6 BRX brass for me. The turn around time was very fast and the brass was to the exact specification I ask for. I actually shot the hydro-formed brass in a match [without further fire-forming]. It shot a 3.597″ — pretty amazing. Let DJ do the work for you!” — Mike Wilson (3 Time IBS Record Holder; 2013 and 2014 1000-yard IBS Shooter of the Year.)
“Darrell Jones of DJ’s Brass Service went far beyond the call of duty, to assist me in preparation to shoot for my first time in an IBS match. I have had an interest in 1000-yard competition for many years and finally got the opportunity to try it. After researching the winning competitors, rifles, and rounds I ordered a Panda action with Krieger barrel in 6mm Dasher from Kelby’s. It was one week before the match and I had a rifle and no rounds. I contacted Darrell to hydraulically form 6mm dasher from Lapua 6mm BR brass. He formed the brass and had it in the mail the next day[.] Since I have only reloaded for hunting or magazine fed rifles I was not familiar with proper seating to allow land engagement of the bullets for 1000-yard accuracy. Darrell took the time to advised me every step of the way to allow me to shoot a 3.158″ (5) shot group to win my first round of my first competitive match ever.” — Mike Youngblood
Do you have some old, tired brass that needs a thorough cleaning — inside and out? Consider using an ultrasonic cleaning machine. When used with the proper solution, a good ultrasonic cleaning machine can quickly remove remove dust, carbon, oil, and powder residue from your cartridge brass. The ultrasonic process will clean the inside of the cases, and even the primer pockets. Tumbling works well too, but for really dirty brass, ultrasonic cleaning may be a wise choice.
Our friend Gavin Gear recently put an RCBS Ultrasonic cleaning machine through its paces using RCBS Ultrasonic Case Cleaning Solution (RCBS #87058). To provide a real challenge, Gavin used some very dull and greasy milsurp brass: “I bought a huge lot of military once-fired 7.52x51mm brass (fired in a machine gun) that I’ve been slowly prepping for my DPMS LR-308B AR-10 style rifle. Some of this brass was fully prepped (sized/de-primed, trimmed, case mouths chamfered, primer pockets reamed) but it was gunked up with lube and looking dingy.”
UltimateReloader.com Case Cleaning Video (7.5 minutes):
Gavin describes the cleaning exercise step-by-step on UltimateReloader.com. Read Gavin’s Cartridge Cleaning Article to learn how he mixed the solution, activated the heater, and cycled the machine for 30 minutes. As you can see in the video above, the results were impressive. If you have never cleaned brass with ultrasound before, you should definitely watch Gavin’s 7.5-minute video — it provides many useful tips and shows the cleaning operation in progress from start to finish.
The RCBS ultrasonic cleaning machine features a large 3-liter capacity, 60 watt transducer, and 100 watt ceramic heater. The RCBS ultrasonic machine can be found under $140.00, and this unit qualifies for RCBS Rebates ($10 off $50 purchase or $50 off $300.00 purchase). RCBS also sells 32 oz. bottles of cleaning concentrate that will make up to 10 gallons of Ultrasonic Solution.
There are a wide variety of reloading tools designed to cut a slight chamfer in case necks and deburr the edge of the case mouth. You don’t need to spend a lot of money for an effective tool. A basic “rocket-style” 45° chamfering tool, such as the Forster, actually does a pretty good job taking the sharp edge off case mouths, particularly if you use a little scotch-pad (or steel wool) to smooth the edge of the cut. The $17.49 Forster chamfer tool, shown below, is a nicely-made product, with sharper cutting blades than you’ll find on most other 45° chamferers.
Many folks feel they can get smoother bullet seating by using a tool that cuts at a steeper angle. We like the 22° cutter sold by Lyman. It has a comfortable handle, and costs just $10.45 at MidsouthShooterssupply.com. The Lyman tool is an excellent value, though we’ve seen examples that needed sharpening even when new. Blade-sharpening is easily done, however.
Sinclair International offers a 28° carbide chamferer with many handy features (and sharp blades). The $29.99 Sinclair Carbide VLD Case Mouth Chamfering Tool will chamfer cases from .14 through .45 caliber. This tool features a removable 28° carbide cutter mounted in the green plastic Sinclair handle. NOTE: A hex-shaft cutter head power adapter can be purchased separately for $14.99 (Sinclair item 749-002-488WS). This can be chucked in a power screwdriver or used with the Sinclair Case Prep Power Center when doing large volumes of cases.
K&M makes a depth-adjustable, inside-neck chamferer (“Controlled Depth Tapered Reaper”) with ultra-sharp cutting flutes. The latest version, which costs $45.00 at KMShooting.com, features a central pin that indexes via the flash hole to keep the cutter centered. In addition, the tool has a newly-designed handle, improved depth-stop fingers, plus a new set-screw adjustment for precise cutter depth control. We caution, even with all the depth-control features, if you are not very careful, it is easy to over-cut, slicing away too much brass and basically ruining your neck. We think that most reloaders will get better results using a more conventional chamfer tool, such as the Forster or Lyman.
One last thing to note — tools like the K&M and the Sinclair chamferer are often described as VLD chamferers. That is really a misnomer, as bullets with long boat-tails actually seat easily with very minimal chamfering. In reality, these high-angle chamferers may be most valuable when preparing brass for flat-base bullets and bullets with pressure rings. Using a 22° or 28° chamferer can reduce the risk of cutting a jacket when using VLD bullets though — so long as you make a smooth cut.
Harrell’s Precision sells “semi-custom” full-length bushing dies for the PPC and 6BR chamberings. While the Harrell brothers do not cut the die to spec, they carry a large selection of dies made with slightly different internal dimensions. When you send in your fired brass, the Harrells choose a die from inventory with just the right amount of sizing (diameter reduction) at the top and bottom of the case. Given the quality, and precise fit, Harrell’s full-length dies are a good value at $70.00 plus shipping.
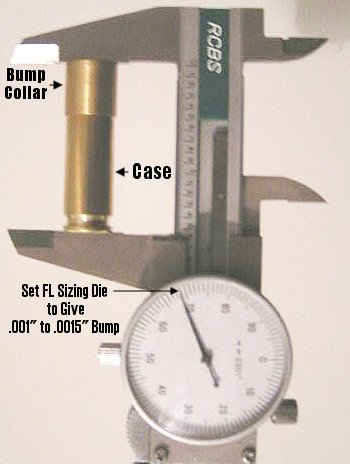
Bump Measuring Collar
The Harrell brothers provide a nice bonus item with each full-length die — a neat, little shoulder bump measuring device as shown in the photo at right. Hornady/Stoney Point sells a stand-alone tool that does the same job, but the Harrell’s bump collar is simpler and faster. To measure your shoulder bump, simply place the Harrell’s bump collar over the front of your deprimed case (before sizing) and measure the OAL with your calipers. Then size the case in your full-length die, replace the collar and repeat the measurement. You want to set your die so the shoulder moves back about .001″ to .0015″ for most applications. (With semi-auto guns you may want more bump.)
Here’s a handy new item, particularly if you load large quantities of bulk ammo for a variety of firearms. Lyman’s new Ammo Checkers check the diameters of reloaded rounds and factory ammo, so you can quickly confirm that your ammo fits a standard chamber. Just drop your loaded rounds in the Ammo Checker, and if the round fits into the gauge, it will fit in the gun’s chamber.
Lyman Ammo Checkers are multi-caliber — each orange block checks six or eight different cartridge types, with each caliber/cartridge name engraved on the gauge. Ammo Checkers are machined to SAAMI minimum chamber dimensions from solid blocks of 6061 T6 aluminum. Ammo Checkers are available in three versions covering most common handgun and rifle calibers:
Why Use a Case Gauge?
We find that case gauges like the Lyman Ammo Checker are particularly useful for handgun reloaders using progressive presses. The chambers of many popular semi-auto pistols are partly unsupported. This allows the case to swell in the bottom quarter. The case may not be sized adequately by your sizing die, which can lead to misfeeds or malfunctions.
Additionally, if you have loaded a large quantity of ammo for a semi-auto rifle such as an AR15, it’s not a bad idea to check your cartridges before you load them into your magazines. All you need is one mis-sized round to cause a stoppage. That will ruin your day if you are competing in a Service Rifle match or 3-Gun event.
Forum member Rich DeSimone uses a handy “Stub Gauge” for setting shoulder “bump” and seating depth. The gauge is made from a section of barrel lopped off when the muzzle is crowned. The chambering reamer is run in about 1/4 of the way, enough to capture the neck and shoulder area of the case. Rich then uses his full-length die to “bump” a master case with the ideal amount of headspace for easy feeding and extraction. He takes that case and sets it in this Stub Gauge, and measures from the front of the gauge to the rim. He can then quickly compare any fired case to a his “master” case with optimal headspace. Since the gauge measures off the shoulder datum, this tells him how much to bump his fired brass.
In addition, the Stub Gauge can be used to set bullet seating-depth. Rich has a channel cut transversely on one side of the gauge, exposing the throat area. Since the interior of the gauge is identical to the chamber in his gun, this lets him see where a seated bullet engages the rifling. He can tinker with bullet seating length until he gets just the right amount of land contact on the bullet, confirmed visually. Then he measures the case OAL and sets his seating dies accordingly. This is much handier than using a Stoney Point Tool to measure distance to the lands. As your barrel’s throat wears, you may seat your bullets out further to “chase the lands”, but the gauge provides a constant land engagement point, in the barrel’s “as new” condition. By measuring the difference between the land contact point on the gauge and the actual contact point on your barrel, you can determine throat “migration”.
Retired engineer Alexander Müller (aka Nando-AS on our Forum) produces handsome oak ammo caddies in his home workshop. Cartridge-specific, the caddy’s holes are sized for specific casehead diameters, so your cartridges go in and out easily. There are also through-holes, allowing loaded cartridges to be placed nose-down if you wish.


 Dasher Loading Tips
 While Varget and Reloder 15 remain in short supply, you can often find IMR 4320 powder back in the shelves of local gun stores. IMR describes IMR 4320 as follows: “Short granulation, easy metering, and perfect for the 223 Remington, 22-250 Remington, 250 Savage and other medium burn rate cartridges.” This older-generation powder is more temp sensitive than the Hodgdon Extreme propellants, but in the right application, it looks to be a viable alternative for folks who can’t source Varget, Reloder 15, and even H4895.


 Bump Measuring Collar

 Forum member Rich DeSimone uses a handy “Stub Gauge” for setting shoulder “bump” and seating depth. The gauge is made from a section of barrel lopped off when the muzzle is crowned. The chambering reamer is run in about 1/4 of the way, enough to capture the neck and shoulder area of the case. Rich then uses his full-length die to “bump” a master case with the ideal amount of headspace for easy feeding and extraction. He takes that case and sets it in this Stub Gauge, and measures from the front of the gauge to the rim. He can then quickly compare any fired case to a his “master” case with optimal headspace. Since the gauge measures off the shoulder datum, this tells him how much to bump his fired brass.


