The 2026 Southwest Nationals (SWN) have concluded. Held at the impressive Ben Avery range in Arizona, the 2026 SWN was a very successful event with good conditions (for the most part) and impressive scores by shooters in all three divisions: Sling, F-Open, and F-TR. We congratulate the new SWN Grand Agg Champions: Bobby Gill (Sling), Ryan Mitchell (F-Open), and Brad Sauve (F-TR). This was familiar territory for Sauve who has won the SWN F-TR title before.
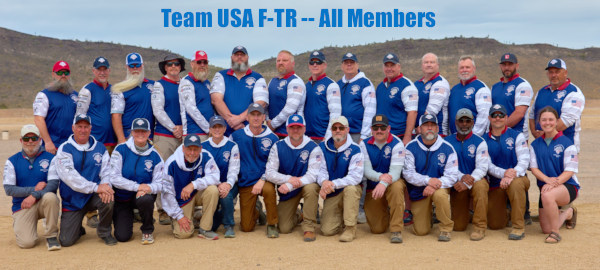
The SWN has both individual and team competition in all three classes. The winning team in the Sling Division was Team USAMU 2564-124X (Capt.: Jarrod McGaffic / Coach: Verne Conant). The top F-Open team was LOS CHINGONES 2590-153X (Capt.: Dennis Ray / Coach: Brian Bowling). The F-TR team competition was dominated by Team USA F-TR VORTEX 2575-123X (Capt.: Ian Klemm / Coach: Keith Trapp).
The 2026 SWN had very high participation in all classes. Observers said that 2026 may have rivaled the highest total turn-out in many years. Weather-wise, we’re told that conditions were “very manageable” for most of the week until the final day of individual competition. Wind angles and velocities became quite hard to diagnose on that last day. As a result many top shooters dropped multiple points in the last individual relay and this created major shake-ups in the leaderboard, with some very skilled shooters dropping out of the Top 20 after an otherwise impressive week.
A special congrats to our friend Gary Eliseo who actually ended up with the highest Sling Division overall score, 1240-64X. But because he used a scope throughout the match he could not win the Sling Grand Aggregate.* Gary Eliseo reported: “I had a great time at SWN 2026. It was a privilege to catch up with so many friends from around the country, managed to shoot a PB too! My UMRS/6.5 El-Mo did everything it could to make me look good.”
SLING TEAM Top 3
Team 44 USAMU HM 2564-124X
Team 49 USNMT VFB MRNAK HM 2564-115X
Team 46 USNRT GILL HM 2562-122X
F-OPEN Grand Aggregate Top 10
1. Ryan Mitchell, 1245-83X, Match Winner
2. Joe Traylor, 1245-74X
3. Tim Vaught, 1245-69X
4. Jason Simes, 1243-73X
5. Gwen Basalla, 1243-66X
6. Brad Johnson, 1242-78X
7. Pat Scully, 1242-74X
8. Erik Cortina, 1242-71X
9. Emil Kovan, 1242-64X
10. Brian Bowling 1241-78X
F-TR TEAM Top 3
Team 23 USA F-TR VORTEX HM 2575-123X
Team 21 USA F-TR BERGER HM 2568-118X
Team 13 CREEDMOOR SPORTS GOLD MA 2556-111X
Report from F-Open Competitor John Masek (F-Class John)
This year’s Southwest Nationals appeared to have the highest attendance I’ve ever seen. The Mid-Range match on Wednesday isn’t usually all that full but this year every firing position was used which is something I’ve never seen before in Mid-Range. Long range was also sold out which I believe is around 365 shooters with the majority being in the F-Open category. I don’t know the exact count, but there were nearly three full pages of F-Open shooters listed — that means there could’ve been close to 200 F-Open shooters. Overall there was beautiful weather with mostly gorgeous conditions during the week, and it was great seeing everyone from across the country and even the world.
Conditions were manageable for a lot of the shooters throughout the week with some of the highest scores I’ve ever seen — 16 F-Open shooters all shot a perfect 450 points on the Palma day Friday. Saturday got just a little trickier, but still many of the top shooters were managing to only have dropped a couple points over the two days. Sunday started with mild conditions again, but the final relay on Sunday afternoon completely shook the leaderboard up. While there were certainly top shooters who were able to hold their positions… but just as many dropped quite a few places down. It was one of the trickiest conditions I’ve ever seen that didn’t involve giant winds.
* Scopes help older sling rifle shooters whose eyes are starting to wear out. But, Gary Eliseo explains: “In this event, the match director dictates that a Palma rifle be used on the first day, and if you want to shoot an ‘any rifle’ on Day Two it also must have iron sights with the third day being ‘any sights’ so ‘F-sling’ is a category where ‘any sights’ are allowed to be used on all three days but that makes us ineligible to win the Grand Aggregate.”
The 2026 Southwest Nationals (SWN) competition concludes this afternoon, February 15, 2026, at the Ben Avery range in Arizona. With skilled shooters in Sling, F-TR, and F-Open classes, the SWN is one of the USA’s most popular multi-class, long-range rifle events held annually. We’ll have a full report on SWN individual and team final results tomorrow.
To show the type of rifle that can win a SWN title, today we feature the .308 Winchester F-TR rifle of talented F-Class shooter Peter Johns. With this impressive rig, Peter won the F-TR Division at the 2020 Berger SW Nationals (SWN), after finishing second in 2019. And Peter also won mid-range AND long-range Texas State championships in 2019. Along the way Peter set a new 600-yard NRA National F-TR Record (200-18X), and tied the 600-yard F-TR Aggregate Record with 600-47X. This Sunday GunDay story features Peter and his trophy-grabbing .308 Win F-TR rifle.
How to Campaign a Winning .308 Winchester F-TR Rifle
Report by Peter Johns
I started contemplating F-Class shooting after talking with Darrell Buell at SHOT Show a decade ago. My first F-Class match was with a Savage VLP with a 26″ Shilen 7mm SAUM barrel and a Harris bipod. After that initial match in Texas I knew I had a lot to learn. I decided that F-TR was the place to start. This story follows my development as an F-TR shooter and showcases the rifle that delivered multiple F-TR match wins in 2019 and 2020.
Watch Peter Johns Shoot his .308 Win F-TR Rig
Equipment Showcase — Key Components of Peter’s F-TR Rifle
Omar Alonzo (Alonzo Custom Rifles, (713) 283-4384, Gunbuilder284@gmail.com) does all my gunsmithing. I believe this is one of the major reasons I have been doing so well in the last couple years. He does a phenomenal job with rifle bedding. He also fixed the timing on my action. The first barrel he chambered has really helped me win matches and set records.
In this Video, Peter talks about his key rifle components and gear:
McMillan Kestros BR Stock — I switched to a Kestros BR stock when they first came out. I painted the stock myself. I am very grateful to Kelly McMillan for letting me be one of the first to try them. The Kestros BR tracks better than any stock I have tried. NOTE — the Kestros was so light that I had to add a steel bar under the forearm to get closer to the F-TR weight limit with a 30″ HV barrel. [Editor: That has the advantage of lowering the center of gravity and the bar can slide fore/aft to adjust center of balance]. I use a SEB Bigfoot rear bag with slick ears and 3/4″ spacing. When I got the Kestros I thought the rear bag spacing was too wide but it worked so well I didn’t change.
Kelbly (Stolle) Panda Action and Krieger Barrel — My rig has a Kelbly Panda F-class action with a Bix’N Andy trigger. At the Berger SWN, I used a Krieger 1:10″-twist 30″ HV 4-groove barrel. It is superbly accurate. I have been bouncing between Krieger and Bartlein for barrels for the last few years. The best barrel I have had is a 30″ Krieger 4-groove HV, however the Bartleins have been very good as well.
Duplin Bipod with Articulating Feet — I really liked the Pohlabel articulating feet that are available for the SEB JoyPod so I asked Dan Pohlabel for permission to copy his feet. I bought some aluminum and made the best copy I could. Since SWN, Duplin has coming out with a new bipod with articulating feet which are considerably better than the feet I made. I use a board and a piece of stall mat with carpet glued on it for the bipod to sit on.
Vortex Golden Eagle Scope — I use the 15-60x52mm Vortex Golden Eagle on all my F-Class rifles. I see the mirage better with the Golden Eagle than any other scope and it tracks perfectly. I also use a Vortex Razor spotting scope with long eye relief lens on the line to help watch mirage and flags. I also use the Razor spotting scope to call wind for Team Texas.
Cleaning Procedure — Less is More — No Cleaning During SWN Long Range Event
Peter has learned that he can go for long round counts without cleaning: “I have found that my .308 Win rigs, for the most part, shoot really well dirty. I can usually get 300 or more rounds before cleaning. I cleaned my barrel at the 2020 SWN after the mid-range event and fouled it before the long-range. I did not clean my barrel again until I got home from the match.”
Peter does clean thoroughly when he gets home: “After a big match I clean my rifles with Boretech Eliminator and a bronze brush followed by Iosso until the majority of carbon is removed from the barrel, as verified with a Lyman borescope. After a thorough cleaning, I find that I need to shoot a bunch of foulers. I will usually go to my practice range and shoot a 20-shot practice match and I will see the accuracy tighten up in the back half.”
600-yard practice target on left. On right is 600-yard record match target shot at 2019 TX State Championships (on ShotMarker targets). This 200-18X was a NRA National Record for F-TR division.
Peter’s Match Load and Reloading Methodology
Loading for .308 Win F-TR — Do What Matters
My loading technique has evolved almost full circle from where I started. I went from the basics to doing every step a person could conceive. Then I decided to start testing all the different steps to see what didn’t matter or made things worse. I am now back to almost no steps in my reloading process. I don’t clean brass anymore. I just wipe the case off, lube, size, prime, and load. I anneal when I feel the necks getting inconsistent when seating the bullets. I pre-load all my ammo for matches. I tried seating them at the match but I didn’t find it to matter on the score card and it takes my focus away from conditions.
Peter’s 2020 SWN-winning .308 Win load consists of Berger 200.20X bullets, Lapua Palma brass, Federal 205M primers, and Varget powder. Peter revealed: “The Berger 200-grainers are running in the mid-2600 fps range. I have tried them much faster but found the best consistency at this speed.”
Peter measures powder to the kernel and also weighs/sorts other components. He runs Berger 200.20X bullets slightly off the lands in a 0.170 freebore chamber. Notably he tests a variety of powders, ascertaining each barrel’s particular preference: “In the last few years I have tried N140, N150, H4895, and Varget. I think they are all good powders for F-TR and the 200.20X bullet. This year I was using Varget. At the 2018 SWN I placed 4th with H4895, in 2019 SWN I got 2nd with N140. I find what powder my particular barrel likes best. I also test CCI BR4 and Fed 205M to see which my rifle likes best. This year I was using Fed 205M. I have been using Lapua Palma brass and it seems to last forever.” Peter full-length sizes with a Redding bushing FL die. He seats his Berger bullets with a Wilson inline seater.
Q & A with Peter Johns, F-TR Ace
Q: What was your biggest challenge at the 2020 Berger SW Nationals?
Peter: I think the biggest challenge was staying focused on conditions. I think the hardest thing for me to do is to stop shooting when the wind conditions are out of my ability to call accurately. I focused hard on this aspect of my game this year and it has paid off. This match is super well run and staff does an excellent job which allows the shooters to maintain their focus.
Q: What gear/hardware items give you an edge over the competition?
Peter: The Kestros BR stock (below) is not used by many F-TR shooters and I think it gives me a huge advantage over the competition. This stock fits me perfectly and tracks in such a manner that I can shoot fast and accurately when conditions are right.
Q: What is your advice for newcomers in F-Class and Long Range competition?
Peter: Go to a top gunsmith building F-Class rifles and do what he says. Competition is the best way to get better. So shoot as many matches as you can. Find top shooter rivals and strive to beat them.
Q: Do you have any specific Gun Handling Tips for F-TR shooters?
Peter: I shoot better with a really light grip and cheek pressure. I can shoot well with a heavier grip and cheek pressure but when the tension of a big match is going my pressure will vary and cause poor accuracy. The most consistent I can shoot is with light gun handling. I also focus on trying to watch the bullet hit through the scope to ensure good follow through and this prevents me from jerking the trigger. There are a bunch of ways to hold a rifle that have proven to be successful. I think a shooter needs to test and find what works best for them.
Q: What do you like most about F-Class and Long Range competition?
A. I really like technical things. F-Class is right in my wheel house for technical stuff. Also, the people in the shooting world are top notch. I enjoy talking with other shooters.
Q: Do you prefer individual events or team matches?
Peter: I prefer the team matches by far because it is a social event with collaboration and there is a lot more pressure. I put a lot of effort into learning the wind for the team matches which in the long run helps me with individual matches.
Peter Johns calls wind for Team Texas at 2018 F-Class Nationals in Raton.
Overcoming Serious Injury in U.S. Navy to Become a Top-Level Marksman
Peter Johns is a U.S. Navy veteran, rank Chief (E7). In 2006, during his duty aboard the U.S.S. Nimitz, Peter sustained very serious and extensive burns in a massive electrical fire. Showing great strength of character, Peter went through a tough, 4-year program of surgeries and rehab. The photo below shows Peter doing therapy during his recovery process.
Peter tells us: “As many of you know I was badly burned on board the U.S.S. Nimitz in 2006. That has limited me in my ability to compete in physical activities that I used to enjoy but F-Class has filled the gap for my competitive nature. I medically retired from the Navy as a Chief (E7) in 2010 after four years of surgeries and physical therapy. I was very surprised to find how accepting and nice people have been in the shooting community. I think the shooting community is comprised of the best people in the world.”
An accurate, self-loading .22 LR rifle, such as this Volquartsen, is our gun of choice for speed shooting with rimfire reactive targets.
Reactive targets offer “instant gratification” — with every hit your target moves, spins, or falls. Shooting reactive targets with a rimfire rifle is fun AND affordable. The price of .22 LR rimfire ammunition has been pretty stable recently, so you can still get very decent rimfire ammo for well under $5.00 a box, such as CCI Blazer ($4.29/box) and Aguila Super Extra ($3.99 to $4.19/box). Now priced at $3.99 for 50 rounds, the Aguila Std. Velocity is just 8 cents a round! At that price, you can shoot every weekend.
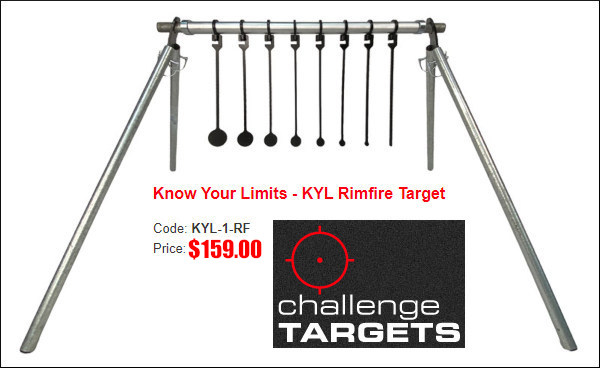
Rimfire Know Your Limits Target Rack Challenge Targets offers the popular Know Your Limits (KYL) rimfire target for $159.00. This KYL target has become popular for NRL22 and PRS Rimfire shooters. Start on the left by engaging the 2″ round target and work your way to the right. Each shot gets progressively harder as the target sizes decrease. With each solid hit, the target plate will spin giving providing hit confirmation. The target rack easily breaks down for transport in a couple minutes.
Make Your Own Shooting Gallery with Reactive Rimfire Targets
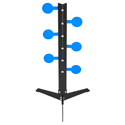
For .22 LR fans, the folks at Action Target have created a whole series of steel rimfire targets. Much lighter than their centerfire counterparts, these rimfire targets are easier to transport and easier to set up. With this wide selection of reactive targets, you can create your own shooting gallery.
Rimfire Dueling Tree
Rimfire Spinning Jack
Rimfire Plate Rack
Rimfire Buffalo
In this video, Michael Bane reviews Action Target’s line of rimfire targets, which includes plate racks, spinners, dueling trees, and more. As Michael explains: “This line of targets is very well thought out. For example — dueling trees are a lot of fun. But a centerfire dueling tree weighs a lot, it’s hard to cart it around. A rimfire dueling tree is easy to set up, easy to carry around.”
New PT Target “Walks” When Hit
Action Target has a cool reactive target that doesn’t even need a stand or base. The patent-pending PT Twist rests on the ground, and flops over or “walks” when hit. Constructed from a single piece of 3/16″-thick A514B steel, the PT Twist has no welds or bolts to break or ricochet. Watch the PT Twist in action:
A few seasons back, Forum member Rick from Louisiana (aka RMulhern) rigged up a fantastic target for long-range shooting. Rick, a long-time competitive Palma shooter, had a large 72″x72″ steel target fabricated with two separate center rings that are equivalent to the official paper Palma/Creedmoor target. He says he’s “shot a lot of Palma on that target, as well as lots of Black Powder Cartridge (BPCR) rounds”. The big steel target works great when Rick shoots his Sharps 45/110 BPCR at 800 to 1000 yards. The large steel background (painted white) helps Rick see and hear his hits. If you understand the high-arching trajectory of 500+ grain projectiles shot from a 45/110, you know it can take a few rounds to get Point of Impact dialed in.
Rick reports: “These are two of my favorite rifles to shoot: a M1874 Shiloh Sharps in caliber 45/110 (2 7/8) made in Big Timber, Montana by Kirk Bryan and family. The other is a 6.5×47 Lapua on a blue-printed M700 action with 1:8.5″-twist Krieger barrel and F5 McMillan Tactical stock. Many of the shooters that take up BPCR have a tendency to get away from their smokeless powder rifles in favor of the blackpowder game. Frankly I have the best of both worlds as I enjoy shooting both (smokeless and BPCR), although I must admit that I probably spend the majority of my time on the range with the Sharps rifles these days.” (Rick’s pretty good with his Sharps by the way — he recently shot a 95, 96, and 100 (clean) for 3×10 shots at 800 yards.)
Gongzilla: $1000 Worth of Steel with Three Plate Layers
Rick tells us: “Here’s the deal — everything is steel! The large plate is 72″x72″ and the black bull is 44″ diameter. The 20″-diameter central white bull is made from 1/2″-thick AR400 bull-dozer plating. That’s the same size as the regulation Palma/Creedmoor paper target. The white square and black bull are 3/8″-thick mild steel. Plates are off-set 2″ from each other. I welded a 2″ length of square tubing to the back of both plates and the bolt slides through and is attached to the large plate. I used 2 3/8″ upset tubing (oil field pipe) for the holder framing.” Rick says he invested about $1000.00 in metal for the target, but that was 15 years ago. Today the steel would be much more expensive.
Rick says the AR400 armor plate in the center bull is very strong: “You can shoot a .338 Lapua Magnum at 200 yards and it won’t damage the center bull”. The mild steel works well for the cast bullets Rick uses with his Sharps 45/110. Also, Rick says the mild steel is rugged enough for 6.5mm and .308 hollowpoint match bullets, if you’re at least 500 yards away. However, Rick told us, “If I would make [the target] again, I would make the black bull AR400 as well. [That way] you would never have to worry about big dents or beating the plate up at any distance. The AR400 is very tough steel. You can shoot a Sierra or Lapua HP bullet and they will just splatter.”
Rick told us: “I built this target with off-set clanger plates. The white clanger is AR400. Bullets just splatter!” Does he worry about hitting the bolt head? Not at all. Rick says: “When I hit the bolt head, I break my arm patting myself on the back!”.
Happy Valentine’s Day
Today is February 14th, Valentine’s Day. To celebrate this romantic holiday, talented shooter Kirsten Joy Weiss has devised a cool trick shot with her .22 LR Volquartsen semi-auto rifle.
Kirsten wants to create a heart on a paper card. Braving winter weather, Kirsten drills three shots into a heart shape on her target. This trick shot is performed, Kirsten adds, “for the love of shooting”.
See more cool trick shots on Kirsten’s popular YouTube Channel which now boasts 339,000 subscribers. Learn more about Kirsten’s shooting background on her website, KirstenJoyWeiss.com.
Valentine’s Day 2023 — Best Wishes
That’s right, today is February 14th — Valentine’s Day. While testing a rifle at the range a few seasons back, Forum member Ron B. (aka Snakepit) managed a 3-shot group that would definitely make Mr. Cupid proud. Yep, Ron shot a lovely cluster that formed a sweet little heart in the splatter-type target.
That’s nice enough, mind you — but it gets even better. Ron’s heart-shaped, three-shot group was shot at SIX HUNDRED yards, making this a Valentine’s Day Masterpiece of precision shooting (and, we have to say it, quite a little bit of luck). Good Shootin’ Snakepit!
600-Yard Heart Shot with a Savage and Factory Ammo!
In our Shooter’s Forum, Ron explained that this group was actually shot with factory ammo… from a Savage no less:
“This will be one that may be hard to believe for some but it is my Savage 12 FTR .308 and I was shooting 168gr Federal Gold Medal Match. The stock has been modified for benchrest shooting with a 3″-wide shoe on the forward stock. I do not shoot this rifle very often as most of my time is spent with my 30″ Brux barreled 6BR working up loads and shooting. That day I had put the scope back on it and was sighting it in at 600 yards and those were my last three shots after my last scope correction and then I was out of ammo. This rifle has always been very accurate. The weather was good, no wind or mirage.”
Do you have trouble seeing your bullet holes (on paper) when shooting past 400 yards? That’s a common issue even with premium ($2000+) high-magnification scopes. Here’s a target that solves that problem. A hit creates a larger black circle “halo” that’s much more visible than a plain bullet hole, making this target ideal for use at longer range (500 yards and beyond).
The 12″ square Birchwood Casey white background Sight-In Target displays a black “halo” around each hit (like the yellow circle on a conventional Shoot-N-C). Larger than bullet diameter, the “halos” can be easily seen with a high-magnification scope at long range (see video below). The self-adhesive target features five diamonds with contrasting red box centers. For precise aiming, you can position your cross-hairs to align with the corners of the boxes. Or, you can put a target dot sticker in the middle.
This video shows Black Shot Halos on white background:
While we envision using this target with optics at long range, Birchwood Casey says that open sights show up well against the white background, making these targets well-suited for indoor ranges or use in low light conditions.
This reactive white background grid target has 5 aiming points and a 1-inch grid overlay for easy, precise sight adjustments. It comes with target pasters to cover up the bullet holes (halos). The White/Black Shoot-N-C 12″ Square GRID Sight-In Targets come in 5-packs with target pasters for $9.49 from MidwayUSA or $8.69 from Palmetto SA. If you prefer reactive Shoot-N-C circle targets, there is an 8″ circle target, a 12″ circle target, and a large 17.5″ circle target with red diamond center (photo right). These all have bullet pasters.
High-Viz Option — Yellow on Black Grid with Yellow Halos
If you prefer seeing ultra-high-contrast yellow/green “halos” for your hits, Birchwood Casey also makes adhesive grid targets with five yellow-edged diamonds. Red circles provide precise aiming points in the middle of each box. You can quickly estimate group size or dial-in your zero using the hi-viz yellow 1″ grid lines. These yellow-on-black targets are available in three sizes: 8″ square, 12″ square, and 17.25″ square. These yellow-on-black grid targets start at $9.99 for an 8″ six-pack.
As an Amazon affiliate, this site can earn revenues through sales commissions.
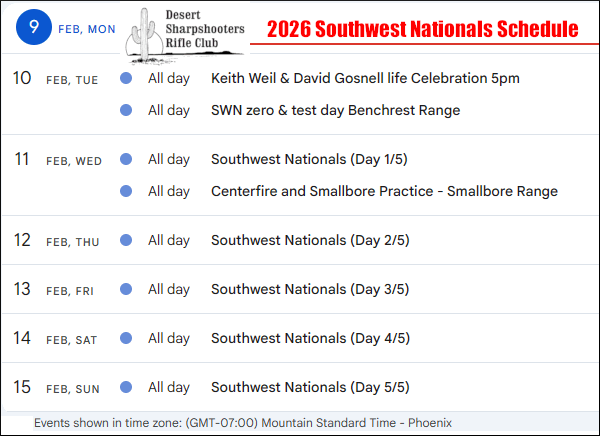
The 2026 Southwest Nationals (SWN) start today, 2/11/2026, at the Ben Avery Range outside Phoenix, AZ. The big event starts with a 600-yard Mid-Range Match. Many of the nation’s most talented F-Class and sling shooters will be there. But no matter what your skill level, it is still possible to make major mistakes that can spoil the day and/or put you out of the running for the entire match. This article aims to help competitors avoid the big errors/oversights/failures, aka “train wrecks”, that can ruin a match.
Photo by Sherri Jo Gallagher.
In any shooting competition, you must try to avoid major screw-ups that can ruin your day (or your match). In this article, past F-TR National Mid-Range and Long Range Champion Bryan Litz talks about “Train Wrecks”, i.e. those big disasters (such as equipment failures) that can ruin a whole match. Bryan illustrates the types of “train wrecks” that commonly befall competitors, and he explains how to avoid these “unmitigated disasters”.
Urban Dictionary “Train Wreck” Definition: “A total @#$&! disaster … the kind that makes you want to shake your head.”
Success in long range competition depends on many things. Those who aspire to be competitive are usually detail-oriented, and focused on all the small things that might give them an edge. Unfortunately it’s common for shooters lose sight of the big picture — missing the forest for the trees, so to speak.
Consistency is one of the universal principles of successful shooting. The tournament champion is the shooter with the highest average performance over several days, often times not winning a single match. While you can win tournaments without an isolated stellar performance, you cannot win tournaments if you have a single train wreck performance. And this is why it’s important for the detail-oriented shooter to keep an eye out for potential “big picture” problems that can derail the train of success!
Train wrecks can be defined differently by shooters of various skill levels and categories. Anything from problems causing a miss, to problems causing a 3/4-MOA shift in wind zero can manifest as a train wreck, depending on the kind of shooting you’re doing.
Below is a list of common Shooting Match Train Wrecks, and suggestions for avoiding them.
1. Cross-Firing. The fastest and most common way to destroy your score (and any hopes of winning a tournament) is to cross-fire. The cure is obviously basic awareness of your target number on each shot, but you can stack the odds in your favor if you’re smart. For sling shooters, establish your Natural Point of Aim (NPA) and monitor that it doesn’t shift during your course of fire. If you’re doing this right, you’ll always come back on your target naturally, without deliberately checking each time. You should be doing this anyway, but avoiding cross-fires is another incentive for monitoring this important fundamental. In F-Class shooting, pay attention to how the rifle recoils, and where the crosshairs settle. If the crosshairs always settle to the right, either make an adjustment to your bipod, hold, or simply make sure to move back each shot. Also consider your scope. Running super high magnification can leave the number board out of the scope’s field view. That can really increase the risk of cross-firing.
2. Equipment Failure. There are a wide variety of equipment failures you may encounter at a match, from loose sight fasteners, to broken bipods, to high-round-count barrels that that suddenly “go south” (just to mention a few possibilities). Mechanical components can and do fail. The best policy is to put some thought into what the critical failure points are, monitor wear of these parts, and have spares ready. This is where an ounce of prevention can prevent a ton of train wreck. On this note, if you like running hot loads, consider whether that extra 20 fps is worth blowing up a bullet (10 points), sticking a bolt (DNF), or worse yet, causing injury to yourself or someone nearby.
3. Scoring/Pit Malfunction. Although not related to your shooting technique, doing things to insure you get at least fair treatment from your scorer and pit puller is a good idea. Try to meet the others on your target so they can associate a face with the shooter for whom they’re pulling. If you learn your scorer is a Democrat, it’s probably best not to tell Obama jokes before you go for record. If your pit puller is elderly, it may be unwise to shoot very rapidly and risk a shot being missed (by the pit worker), or having to call for a mark. Slowing down a second or two between shots might prevent a 5-minute delay and possibly an undeserved miss.
Photo by Sherri Jo Gallagher.
4. Wind Issues. Tricky winds derail many trains. A lot can be written about wind strategies, but here’s a simple tip about how to take the edge off a worse case scenario. You don’t have to start blazing away on the command of “Commence fire”. If the wind is blowing like a bastard when your time starts, just wait! You’re allotted 30 minutes to fire your string in long range slow fire. With average pit service, it might take you 10 minutes if you hustle, less in F-Class. Point being, you have about three times longer than you need. So let everyone else shoot through the storm and look for a window (or windows) of time which are not so adverse. Of course this is a risk, conditions might get worse if you wait. This is where judgment comes in. Just know you have options for managing time and keep an eye on the clock. Saving rounds in a slow fire match is a costly and embarrassing train wreck.
5. Mind Your Physical Health. While traveling for shooting matches, most shooters break their normal patterns of diet, sleep, alcohol consumption, etc. These disruptions to the norm can have detrimental effects on your body and your ability to shoot and even think clearly. If you’re used to an indoor job and eating salads in air-conditioned break rooms and you travel to a week-long rifle match which keeps you on your feet all day in 90-degree heat and high humidity, while eating greasy restaurant food, drinking beer and getting little sleep, then you might as well plan on daily train wrecks. If the match is four hours away, rather than leaving at 3:00 am and drinking five cups of coffee on the morning drive, arrive the night before and get a good night’s sleep.”
Keep focused on the important stuff. You never want to lose sight of the big picture. Keep the important, common sense things in mind as well as the minutia of meplat trimming, weighing powder to the kernel, and cleaning your barrel ’til it’s squeaky clean. Remember, all the little enhancements can’t make up for one big train wreck!
Let’s face it, shooting the same bullseye or grid targets over and over again can get boring. Here’s a unique set of Playing Card Targets, courtesy of the NRA. With very cool graphics and a page-filling design, these eye-catching targets can work both indoors and outdoors.
At 100 yards, these are fun scoped rifle targets — you can aim at the small circles or dots on each target. Indoors, with a pistol, just aim for the larger graphic elements, such as the red hearts or black diamonds. If you have access to a color printer, these targets look great.
The NRA Blog published this nice set of super-sized playing card targets. These boast a variety of aiming points (large and small) so they work well for rifles as well as pistols. On the Queen of Diamonds, aim for the large bull-style designs in the “red zone” or aim for the smaller dots on the periphery. For a real challenge, try to shoot each one of the 26 small red diamonds in the curved, central white stripes.
On the Five of Clubs target, you can aim for the smaller club symbols, or shoot for the orange, purple, and green “dripping paint” bulls in the large, central club. The Ace of Spades target offers a colored bullseye in the center, plus a very small bullseye in the letter “C”. That should provide extra challenge for those of you with very accurate rifles. Enjoy these targets.
This popular video, viewed 3.9 million times on YouTube, provides a clear explanation of Minute of Angle (MOA) and how that angular measurement is used. Among novice shooters, there is much confusion over this term. In this NSSF Video, Ryan Cleckner, a former U.S. Army Sniper Instructor, defines the term “Minute of Angle” (MOA) and explains how you can adjust for windage and elevation using 1/4 or 1/8 MOA clicks on your scope. This allows you to sight-in precisely and compensate for bullet drop at various distances.
For starters, Ryan explains that, when talking about angular degrees, a “minute” is simply 1/60th. So a “Minute of Angle” is simply 1/60th of one degree of a central angle, measured either up and down (for elevation) or side to side (for windage). At 100 yards, 1 MOA equals 1.047″ on the target. This is often rounded to one inch for simplicity. Say, for example, you click up 1 MOA. That is roughly 1 inch at 100 yards, or roughly 4 inches at 400 yards, since the target area measured by 1 MOA increases in linear fashion with the distance.
More Minute of Angle (MOA) Explanatory Videos
This Gunwerks video explains that Minute of Angle subtends approximately 1″ for each 100 yards (well, 1.047″ to be more precise). That means a Minute of Angle increases in actual measured size the greater the distance of the target from the shooter.
This lengthy (24-minute) video defines Minute of Angle, and uses multiple diagrams to illustrate how MOA angular measurements works. The video also how MOA-based click values translate to point-of-impact changes at various distances.


 The 2026 Southwest Nationals (SWN) have concluded. Held at the impressive Ben Avery range in Arizona, the 2026 SWN was a very successful event with good conditions (for the most part) and impressive scores by shooters in all three divisions: Sling, F-Open, and F-TR. We congratulate the new SWN Grand Agg Champions: Bobby Gill (Sling), Ryan Mitchell (F-Open), and Brad Sauve (F-TR). This was familiar territory for Sauve who has won the SWN F-TR title before.


 The
The 


 A few seasons back, Forum member Rick from Louisiana (aka RMulhern) rigged up a fantastic target for long-range shooting. Rick, a long-time competitive Palma shooter, had a large 72″x72″ steel target fabricated with two separate center rings that are equivalent to the official paper Palma/Creedmoor target. He says he’s “shot a lot of Palma on that target, as well as lots of Black Powder Cartridge (BPCR) rounds”. The big steel target works great when Rick shoots his Sharps 45/110 BPCR at 800 to 1000 yards. The large steel background (painted white) helps Rick see and hear his hits. If you understand the high-arching trajectory of 500+ grain projectiles shot from a 45/110, you know it can take a few rounds to get Point of Impact dialed in.

 Happy Valentine’s Day

 Valentine’s Day 2023 — Best Wishes


 Train Wrecks (and How to Avoid Them)


 4. Wind Issues. Tricky winds derail many trains. A lot can be written about wind strategies, but here’s a simple tip about how to take the edge off a worse case scenario. You don’t have to start blazing away on the command of “Commence fire”. If the wind is blowing like a bastard when your time starts, just wait! You’re allotted 30 minutes to fire your string in long range slow fire. With average pit service, it might take you 10 minutes if you hustle, less in F-Class. Point being, you have about three times longer than you need. So let everyone else shoot through the storm and look for a window (or windows) of time which are not so adverse. Of course this is a risk, conditions might get worse if you wait. This is where judgment comes in. Just know you have options for managing time and keep an eye on the clock. Saving rounds in a slow fire match is a costly and embarrassing train wreck.


