Here’s a simple task you can do that will give your seater die a more perfect fit to your match bullets. You can lap the inside of the seater stem so that it matches the exact profile of the bullet. This spreads out the seating force over a larger area of the bullet jacket. That allows smoother, more consistent seating, without putting dents, creases, or sharp rings in your bullets.
This process is demonstrated here by our friend Erik Cortina of Team Lapua-Brux-Borden. Erik, one of the nation’s top F-Class shooters and a skilled machinist, explains: “Here I’m lapping my new seater die stem with lapping compound. I chuck up a bullet in the lathe and lap the inside of the seating stem. I put lapping compound on the bullet and also in the stem. You can do the same with a hand drill and bore paste. You can see in the piture below how much contact area the stem has on the bullet after being lapped. This bullet is a Berger 7mm 180-grain Hybrid. ”
It can be helpful but it’s not necessary to make your seating stem an exact match to a bullet, particularly if you’re loading hunting or varmint rounds. But it is helpful to do some mild internal stem polishing. This should eliminate any ring (or dent) that forms on the bullet jacket during seating.
Sharp edges on a seating stem can cause a ring to be pressed into the bullet jacket — especially with compressed loads that resist downward bullet movement.
Q2: Is there any down-side to the process?
Not really. However, if you shoot many different bullet types for a particular cartridge, you may not want to conform the stem aggressively to one particular bullet design. Lightly lap the inside of the stem to remove burrs/sharp edges but leave it at that. A light lap will prevent a ring forming when seating bullets.
A while back, Sinclair International’s Reloading Press Blog featured a “round-table” discussion of reloading techniques. Sinclair’s team of tech staffers were asked: “What do you feel is the one-most crucial step in precision reloading?”
Here are their responses (along with comments from our Editors):
Phil Hoham: “I feel that when working up a load do not go too high or too low in your powder charge. Stay away from ‘suggested loads’ you hear at the range, or on the internet. Always be sure to use a published reloading manual that presents not only minimums and maximums, but also pressure, velocity, and a proper range of powders used. Do not get distracted in the reloading process, and remain focused at all times during each step involved.”
AccurateShooter.com: Some loads presented on the Internet are OK as a starting point, but it is absolutely critical to understand that pressure maximums will vary considerably from one rifle to another (of the same chambering). For example, one 6mmBR rifle shooting 105gr bullets can max out with 30.0 grains of Varget powder, while another rifle, with the same chamber dimensions, but a different barrel, could tolerate (and perform better) with half a grain more powder. You need to adjust recommended loads to your particular rifle and barrel.
Pete Petros: “This could be a very broad topic, but if I were to pick one, it would be making sure to pay close attention, and weigh each and every powder charge to ensure that each load is exact and consistent. This is important not only for accuracy, but also for safety reasons.”
AccurateShooter.com: If you’re shooting beyond 200 yards, it is critical to weigh your loads with an accurate scale or automated system such as the AutoTrickler V3/V4. Loads that are uniform (within a few kernels) will exhibit lower Extreme Spread and Standard Deviation. And remember, even if you stick with the same powder, when you get a new powder lot, you may have to adjust your load quite a bit. For example, .308 Palma shooters have learned they may need to adjust Varget loads by up to a full grain from one lot of Varget to the next.
Ron Dague: “I feel that the most important step(s) in reloading for accuracy are in the initial case prep. Uniforming the primer pocket to the same depth to ensure consistency in primer seating is a crucial step. Additionally de-burring the flash holes, each in the same way to clean up and chamfer the inside is important. It ensures that the ignition from the primer is uniform and flows out in the same consistent pattern. Doing so will create uniform powder ignition and tighten up your velocity Extreme Spread.”
AccurateShooter.com: With some brands of brass, primer pocket uniforming and flash-hole deburring is useful. However, with the best Lapua, Norma, and RWS brass it may be unnecessary, or worse, counter-productive. So long as your Lapua brass flash-holes are not obstructed or smaller than spec, it may be best to leave them alone. This is particularly true with the small flash holes in 220 Russian, 6BR, and 6.5×47 cases. MOST of the flash-hole reaming tools on the market have cutting bits that vary in size because of manufacturing tolerances. We’ve found tools with an advertised diameter of .0625″ (1/16″) that actually cut an 0.068″ hole. In addition, we are wary of flash-hole deburring tools that cut an aggressive inside chamfer on the flash-holes. The reason is that it is very difficult to control the amount of chamfer precisely, even with tools that have a depth stop.
Rod Green: “I feel that bullet seating is the most important step. If you had focused on making sure all prior steps (case prep, powder charge, etc.) of the process have been carefully taken to ensure uniformity, bullet seating is the last step, and can mean all the difference in the world in terms of consistency. Making sure that the bullet is seated to the same depth each time, and time is taken to ensure that true aligned seating can make the load.”
Bob Blaine: “I agree with Rod. I strongly feel that consistent bullet seating depth is the most important step in creating the most accurate hand loads. I have seen the results in both my bench and long range rifles. Taking the time to ensure exactness in the seating process is by far, the number one most important step in my book.”
AccurateShooter.com: Agreed. When loading match ammo, after bullet seating, we check every loaded round for base of case to ogive length. If it varies by more than 3 thousandths, that round is segregated or we attempt to re-seat the bullet. We measure base of case to bullet ogive with a comparator mounted on one jaw of our calipers. You may have to pre-sort your bullets to hold the case-base to ogive measurement (of loaded rounds) within .003″.
Do you have a friend who is getting started in hand-loading? Or would you like a refresher course in some of the more important aspects of reloading? Today’s video showcase provides a wealth of information. In these videos, Philip Massaro, Editor-in-Chief of the Gun Digest Annual, explains the techniques handloaders should employ to create safe and accurate pistol and rifle ammunition. These videos are part of an 11-Video Reloading Series from Gun Digest.
After the intro video, there is a video on case resizing, with a focus on full-length sizing. Next Massaro explains how primers work and he demonstrates how to seat primers. There is a video dedicated to bullet choice, followed by a video on bullet seating, both with and without crimping. Today’s video showcase concludes with a helpful video on troubleshooting, showing how to check your ammo and disassemble rounds when something isn’t right.
Basics Of Reloading
What goes into reloading ammo? Here are the five basic handloading steps — removing the primer, resizing the case, inserting a new primer, adding powder, and seating a new bullet. Gun Digest also has a related video on Reloading Tools, explaining the basic tools you’ll need: dies, press, scale, powder measure or powder-dispensing machine, and measuring tools.
Case Prep and Resizing
The reloading process starts with your cartridge brass. You need to remove carbon from the case exterior, check for case damage and signs of incipient separation. And it often makes sense to clean the primer pockets. It’s also wise to check case length, and chamfer/debur the case necks (as needed). Then the cases should be resized before loading. We recommend full-length resizing for rifle rounds.
Primer Types Explained
What is the difference between a large rifle primer and a magnum large rifle primer? Can you use magnum primers in standard cartridges and vice versa? These are among the topics discussed in this video.
Priming Procedures — Using Press or Hand Tool — and Powder Throwing
In this video, Philip Massaro tackles primer installation, the first process of assembly in reloading and case charging. Learn the differences between large and small primers, and how to use a primer cup accessory on a single stage press. Then Massaro shows various methods to dispense the correct powder charge.
Bullets — How to Select the Right Projectile for your Application
Not every bullet is appropriate for every job. Find out what projectile you’ll need to win a shooting match or put meat on the table. Not all bullets are created equal — hunting bullets are different than match bullets and varmint bullets are different than big game projectiles. With this in mind, Phil Massaro examines different bullet designs — including a look at Nosler’s line of projectiles.
Cartridge Completion — Bullet Seating
In this installment, Philip Massaro covers the final step in cartridge assembly, bullet seating. He covers how to use a micrometer seating die for reloading, as well as various ways to crimp handgun bullets. Massaro demonstrates seating bullets for the .357 Mag, .45 ACP, .30-06 Springfield, and .458 Win Magnum cartridges. The video also covers using a roll-crimp and taper crimp.
Reloading Troubleshooting
This is a very important video, that shows how to troubleshoot potential problems with handload ammunition. The host shows how to check for potential case head separation and other brass problems. He shows how to get stuck cases out of dies using the drill and tap procedure. Also covered are collet bullet pullers and inertia hammers for removing seated bullets from cases. This is necessary if you mistakenly seat too deeply or forget to charge the case with powder.
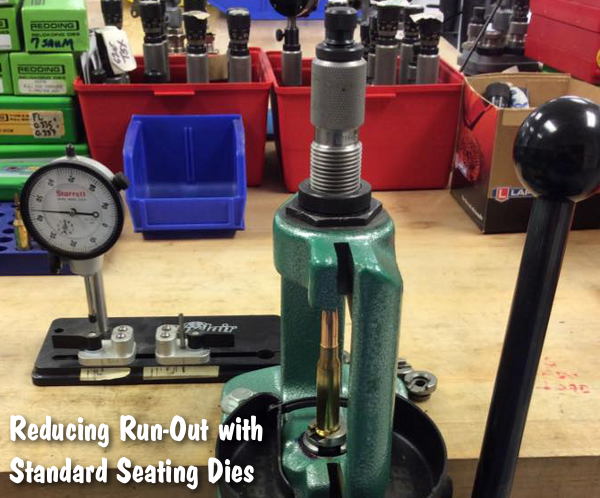
The U.S. Army Marksmanship Unit (USAMU) regularly publishes reloading “how-to” articles on the USAMU Facebook page. This USAMU article, the second in a series on improving concentricity, has many useful tips. If you use standard (non-micrometer) seating dies when loading some cartridge types, this article is worth reading. And visit the USAMU Facebook page for other tips on handloading and marksmanship.
Once again, it’s time for USAMU’s “Handloading Hump-Day!” Last week, we addressed achieving very good loaded-cartridge concentricity (AKA “TIR”, or Total Indicator Runout) using standard, “hunting grade” reloading dies.
We explained how to set up the Full-Length Size die to float slightly when correctly adjusted for desired case headspace. We also cited a study in which this method loaded ammunition straighter than a set of [higher grade] match dies from the same maker. [One of the keys to reducing TIR with both sets of dies was using a rubber O-ring below the locking ring to allow the die to float slightly. READ Full-Length Sizing Die TIP HERE.]
Now, we’ll set up a standard seating die to minimize TIR — the other half of the two-die equation. As before, we’ll use a single-stage press since most new handloaders will have one. A high-quality runout gauge is essential for obtaining consistent, accurate results.
Having sized, primed and charged our brass, the next step is bullet seating. Many approaches are possible; one that works well follows. When setting up a standard seating die, insert a sized, trimmed case into the shell-holder and fully raise the press ram. Next, back the seating stem out and screw the die down until the internal crimping shoulder touches the case mouth.
Back the die out one-quarter turn from this setting to prevent cartridge crimping. Next, lower the press ram and remove the case. Place a piece of flat steel on the shellholder and carefully raise the ram. Place tension on the die bottom with the flat steel on the shellholder. This helps center the die in the press threads. Check this by gently moving the die until it is well-centered. Keeping light tension on the die via the press ram, secure the die lock ring.
If one were using a micrometer-type seating die, the next step would be simple: run a charged case with bullet on top into the die and screw the seating stem down to obtain correct cartridge OAL.
However, with standard dies, an additional step can be helpful. When the die has a loosely-threaded seating stem, set the correct seating depth but don’t tighten the stem’s lock nut. Leave a loaded cartridge fully raised into the die to center the seating stem. Then, secure the stem’s lock nut. Next, load sample cartridges and check them to verify good concentricity.
One can also experiment with variations such as letting the seating stem float slightly in the die to self-center, while keeping correct OAL. The runout gauge will show any effects of changes upon concentricity. However, the first method has produced excellent, practical results as evidenced by the experiment cited previously. These results (TIR Study 2) will reproduced below for the reader’s convenience.
TIR Study 2: Standard vs. Match Seating Dies
50 rds of .308 Match Ammo loaded using carefully-adjusted standard dies, vs. 50 using expensive “Match” dies from the same maker.
Standard dies, TIR:
0.000” — 0.001” = 52%;
0.001”– 0.002” = 40%;
0.002”– 0.003” = 8%. None greater than 0.003”.
AccurateShooter Comment: This shows that, with careful adjustment, the cheaper, standard dies achieved results that were as good (or better) than the more expensive “Match” Dies.
These tips are intended to help shooters obtain the best results from inexpensive, standard loading dies. Especially when using cases previously fired in a concentric chamber, as was done above, top-quality match dies and brass can easily yield ammo with virtually *no* runout, given careful handloading.
Figure 1. When the bullet is seated farther out of the case, there is more volume available for powder. This enables the cartridge to generate higher muzzle velocity with the same pressure.
Effects Of Cartridge Over All Length (COAL) And Cartridge Base To Ogive (CBTO) – Part 1 by Bryan Litz forBerger Bullets.
Many shooters are not aware of the dramatic effects that bullet seating depth can have on the pressure and velocity generated by a rifle cartridge. Cartridge Overall Length (COAL) is also a variable that can be used to fine-tune accuracy. It’s also an important consideration for rifles that need to feed rounds through a magazine. In this article, we’ll explore the various effects of COAL, and what choices a shooter can make to maximize the effectiveness of their hand loads.
Sporting Arms and Ammunition Manufacturers’ Institute (SAAMI)
Most loading manuals (including the Berger Manual), present loading data according to SAAMI (Sporting Arms and Ammunition Manufacturers’ Institute) standards. SAAMI provides max pressure, COAL and many other specifications for commercial cartridges so that rifle makers, ammo makers, and hand loaders can standardize their products so they all work together. As we’ll see later in this article, these SAAMI standards are in many cases outdated and can dramatically restrict the performance potential of a cartridge.
Bullet seating depth is an important variable in the accuracy equation. In many cases, the SAAMI-specified COAL is shorter than what a hand loader wants to load their rounds to for accuracy purposes. In the case where a hand loader seats the bullets longer than SAAMI specified COAL, there are some internal ballistic effects that take place which are important to understand.
Effects of Seating Depth / COAL on Pressure and Velocity
The primary effect of loading a cartridge long is that it leaves more internal volume inside the cartridge. This extra internal volume has a well known effect; for a given powder charge, there will be less pressure and less velocity produced because of the extra empty space. Another way to look at this is you have to use more powder to achieve the same pressure and velocity when the bullet is seated out long. In fact, the extra powder you can add to a cartridge with the bullet seated long will allow you to achieve greater velocity at the same pressure than a cartridge with a bullet seated short.
When you think about it, it makes good sense. After all, when you seat the bullet out longer and leave more internal case volume for powder, you’re effectively making the cartridge into a bigger cartridge by increasing the size of the combustion chamber. Figure 1 illustrates the extra volume that’s available for powder when the bullet is seated out long.
Before concluding that it’s a good idea to start seating your bullets longer than SAAMI spec length, there are a few things to consider.
Geometry of a Chamber Throat
The chamber in a rifle will have a certain throat length which will dictate how long a bullet can be loaded. The throat is the forward portion of the chamber that has no rifling. The portion of the bullet’s bearing surface that projects out of the case occupies the throat (see Figure 2).
The length of the throat determines how much of the bullet can stick out of the case. When a cartridge is chambered and the bullet encounters the beginning of the rifling, known as the lands, it’s met with hard resistance. This COAL marks the maximum length that a bullet can be seated. When a bullet is seated out to contact the lands, its initial forward motion during ignition is immediately resisted by an engraving force.
Seating a bullet against the lands causes pressures to be elevated noticeably higher than if the bullet were seated just a few thousandths of an inch off the lands.
A very common practice in precision reloading is to establish the COAL for a bullet that’s seated to touch the lands. This is a reference length that the hand loader works from when searching for the optimal seating depth for precision. Many times, the best seating depth is with the bullet touching or very near the lands. However, in some rifles, the best seating depth might be 0.100″ or more off the lands. This is simply a variable the hand loader uses to tune the precision of a rifle.
This image is from multi-time Nat’l Long Range Champion Nancy Tompkins, author of Prone and Long Range Rifle Shooting. Nancy loves to photograph the Aurora Borealis.
As a Christmas present for our readers, today we showcase eight very informative videos from AccurateShooter Forum member F-Class John. A talented F-Class competitor with a smart, technically-focused mind, John has created a series of videos about reloading and precision loading tools, along with rifle and shooting accessories. Many of John’s product reviews are the most thorough and detailed you’ll find in video format. You’ll find over 120 informative videos on F-Class John’s popular YouTube Channel.
21st Century Hydro Press and Arbor Press — Product Review
Many of the world’s top benchrest, long-range, and F-Class shooters prefer to seat their bullets using arbor-type presses with inline dies. This allows smooth, repeatable bullet-seating with very low run-out. One of the very best arbor-type seating presses ever created is the 21st Century Hydro Press. This offers plenty of leverage driving a precision ram. The Hydro Press also features a hydraulic line to drive a precision seating force gauge. Along with the Hydro Press, John tests 21st Century’s standard arbor press.
Cartridge Case Separation — Tell-Tale Warning Signs
If you reload and haven’t experienced a case separation yet then you are fortunate. It’s a fact of life in the shooting world. A bad case separation can have very unfortunate consequences. Therefore you need to watch for warning signs on your cartridge brass, so you stay safe. The video above shows what to look for — and how to recognize signs of incipient separation. One important factor leading to case head separation is improper head-spacing causing growth. To learn more about case head separation watch F-Class John’s follow-up video Case Head Separation Causes, identification and prevention.
Accuracy One Concentricity Gauge — Product review
Every person who makes precision hand-loads should have a quality concentricity gauge to measure run-out of case-necks and loaded rounds. Here John tests one of the best such tools on the market, the Accuracy One Concentricity Gauge. This measures the internal and external neck runout of cartridge cases as well as seated bullet runout. It can also measure the runout of the ogive, bearing surface, and boat-tail of individual bullets and can even measure primer pocket runout. John notes: “I think most precision shooters should have one of these to make sure their ammo is within their specs they’re happy with.”
How to Use a Barrel Tuner to Improve Accuracy and Repeatability
In this video, John works with a barrel tuner created by Erik Cortina, a member of Team Lapua/Brux/Borden. A tuner can be useful in modulating barrel vibrations and that can translate to smaller groups on target. Sometimes the positive effects are quite noticeable. Tuners have been popular with short-range benchresters for many years and now they are becoming more common on top F-Class and Long Range rifles.
John says: “I’ve been using Erik’s E.C. Tuner for a while now and I really like what it’s done to help as my final step in load development. Just remember, a tuner is a tool, not a magician. You still need good load development practices, good brass prep, and solid skills but the tuner does help make great loads even better.”
Teslong Rigid 26″ Borescope with 4.5″ Monitor — Product Review
There are a variety of affordable Teslong digital borescopes for inspecting your barrels and diagnosing issues. All Teslongs deliver impressively sharp images/video. Some units plug into a laptop or tablet, while others work via a dongle to communicate wirelessly. Here John tests a 26″ rigid model borescope that comes complete with its own 4.5″ viewing screen. Priced at $129.99 on Amazon, this system is completely self-contained — you don’t need a laptop or smartphone. You don’t have to worry about connections and there are no Apps to install or configure. John says: “Teslong now offers a 26″ rigid rod model with a 4.5″ monitor. This allows you to use the unit without the need for any mobile device or computer.”
Dillon 550 vs. Dillon 750 for Precision Reloading — Pros and Cons
Progressive presses are not just for bulk reloading these days. Many top shooters, including 5-time National Long Range Champion John Whidden, use Dillon progressive presses to complete many cartridge loading operations more efficiently. Even in the F-Class world, Top Guns such as Erik Cortina have found ways to use Dillon progressives for bullet pointing, case prep and other repetitious tasks, even if a precision arbor press is used for final bullet seating. In this video, F-Class John compares two Dillon options: “If you’re deciding between a Dillon 550 or 750/650 reloading press for precision reloading, here are some pros and cons of each. Both are capable of producing high quality ammunition but each has their own quirks so knowing your capabilities and loading style is important when choosing one over the other.
AutoTrickler V3 — General Set-Up and Operational Advice
In this video, John offers some general advice for setting-up the AutoTrickler system. He notes that you want to set the initial drop weight (from the powder measure) in an optimal range: “When you set the original drop you need it to be about 1 to 1.5 grains below. Some people set it too close to the final weight they want and it actually doesn’t let the trickler unit work as efficiently, consistently and accurately as it will if you start 1 to 1.5 grains low.” John also explains how to hook up the cords and how to position the trickler unit. John places his AutoTrickler on a 30-lb piece of granite, with a thin polymer “anti-static” pad on top. John also uses a line conditioner and grounding wire to provide the best electrical flow to the scale and trickler. John also shows how the angle of the trickler unit can be adjusted. If you own an AutoTrickler or plan to purchase one, we definitely recommend you watch this entire video.
ShotMarker Power-User Tip — How to Test Unit without Shooting
The ShotMarker is an advanced system that plots shot location using electronic sensors mounted on a frame. ShotMarker arrays are now used in many competitions because they are reliable, precise, and much more affordable than competing systems. Invented by Canadian Adam MacDonald, the ShotMarker plots bullet entry on target using sensors activated by the bullet’s soundwaves. Using 8 high precision MEMS microphones placed in the corners of your frame, ShotMarker precisely measures the point of impact and down-range velocity of each shot, so that you can analyze your groups and shoot for score in competition. In this video, John shows how you can quickly and easily test your ShotMarker before deploying it at the range: “Here’s a quick and simple way to ensure your system is working 100% before taking a shot on it.”
Sinclair International has created a series of helpful articles on rifle cartridge reloading. Today’s feature lists ten basic steps for precision hand-loading, with links to longer, detailed Sinclair Int’l technical articles providing more complete information. There’s a lot of helpful info here guys, if you click all the links to access the ten “long form” articles.
Tying It All Together: 10 Steps To Precision Handloads
Feature based on article by Roy Hill, Brownells/Sinclair Copywriter
Sinclair Int’l offers a series of detailed articles on hand-loading precision rifle ammunition. The articles are included in Sinclair’s GunTech Articles Archive, but sorting through the index to find each article takes time. To help you access all these articles quickly, here’s a handy summary of ten key topics, with links to longer articles covering each subject in detail.
Part 1: The first step in making high-quality handloads is to carefully choose the best brass for your application. You need to know how to identify the different types of brass and how to choose the best kind for the ammo you want to load. CLICK HERE for Part 1.
Part 2: Even high-quality brass can have burrs around the flash hole that can interfere with the primer flame and cause inconsistent ignition – which can lead to shot groups opening up. Flash hole deburring is a critical step in making sure primers ignite powder consistently. CLICK HERE for Part 2.
Part 3: The next step is to make sure the primer pockets are square and uniform. Like flash hole deburring, primer pocket uniforming may reduce variations in primer ignition by ensuring more consistent primer seating. CLICK HERE for Part 3.
Part 4: Making sure all your cases are precisely the same length is crucial, especially when you use cases that have been fired before. Case trimming is the way to get there. CLICK HERE for Part 4.
Part 5: After trimming, cases still have to be resized. In order for them to work through the resizing die, they have to be lubricated. The case lube method you choose is crucial to making precision handloads. CLICK HERE for Part 5.
Part 6: Now it’s time to choose the dies that will resize your cases. There are several important options to consider in selecting the right sizing dies. CLICK HERE for Part 6.
Part 7: Wait! You’re not quite ready to start sizing yet. There’s yet more to consider before you start cranking cases through the press. Learn more about setting up and adjusting your sizing dies. CLICK HERE for Part 7.
Part 8: Once the cases are completely prepped, it’s time to start putting fresh components back into them. We start off by seating primers. CLICK HERE for Part 8.
Part 9: After the primers are seated, it’s time to drop in the powder. There are several tools that will help you handle powder for precision handloads. CLICK HERE for Part 9.
Part 10: The final step in the process is carefully seating the bullet to just the right depth. And then… you’re ready to try your loads at the range. CLICK HERE for Part 10.
Here’s a simple task you can do that will give your seater die a more perfect fit to your match bullets. You can lap the inside of the seater stem so that it matches the exact profile of the bullet. This spreads out the seating force over a larger area of the bullet jacket. That allows smoother, more consistent seating, without putting dents, creases, or sharp rings in your bullets.
This process is demonstrated here by our friend Erik Cortina of Team Lapua-Brux-Borden. Erik, one of the nation’s top F-Class shooters and a skilled machinist, explains: “Here I’m lapping my new seater die stem with lapping compound. I chuck up a bullet in the lathe and lap the inside of the seating stem. I put lapping compound on the bullet and also in the stem. You can do the same with a hand drill and bore paste. You can see in the piture below how much contact area the stem has on the bullet after being lapped. This bullet is a Berger 7mm 180-grain Hybrid. ”
It can be helpful but it’s not necessary to make your seating stem an exact match to a bullet, particularly if you’re loading hunting or varmint rounds. But it is helpful to do some mild internal stem polishing. This should eliminate any ring (or dent) that forms on the bullet jacket during seating.
Sharp edges on a seating stem can cause a ring to be pressed into the bullet jacket — especially with compressed loads that resist downward bullet movement.
Q2: Is there any down-side to the process?
Not really. However, if you shoot many different bullet types for a particular cartridge, you may not want to conform the stem aggressively to one particular bullet design. Lightly lap the inside of the stem to remove burrs/sharp edges but leave it at that. A light lap will prevent a ring forming when seating bullets.
Sinclair International has created a series of helpful articles on rifle cartridge reloading. Today’s feature lists ten basic steps for precision hand-loading, with links to longer, detailed Sinclair Int’l technical articles providing more complete information. There’s a lot of helpful info here guys, if you click all the links to access the ten “long form” articles.
Tying It All Together: 10 Steps To Precision Handloads
Feature based on article by Roy Hill, Brownells/Sinclair Copywriter
Sinclair International offers a series of detailed articles on hand-loading precision rifle ammunition. The articles are included in Sinclair’s GunTech Articles Archive, but sorting through the index to find each article takes time. To help you access all these articles quickly, here’s a handy summary of ten key topics, with links to longer articles covering each subject in detail.
Part 1: The first step in making high-quality handloads is to carefully choose the best brass for your application. You need to know how to identify the different types of brass and how to choose the best kind for the ammo you want to load. CLICK HERE for Part 1.
Part 2: Even high-quality brass can have burrs around the flash hole that can interfere with the primer flame and cause inconsistent ignition – which can lead to shot groups opening up. Flash hole deburring is a critical step in making sure primers ignite powder consistently. CLICK HERE for Part 2.
Part 3: The next step is to make sure the primer pockets are square and uniform. Like flash hole deburring, primer pocket uniforming may reduce variations in primer ignition by ensuring more consistent primer seating. CLICK HERE for Part 3.
Part 4: Making sure all your cases are precisely the same length is crucial, especially when you use cases that have been fired before. Case trimming is the way to get there. CLICK HERE for Part 4.
Part 5: After trimming, cases still have to be resized. In order for them to work through the resizing die, they have to be lubricated. The case lube method you choose is crucial to making precision handloads. CLICK HERE for Part 5.
Part 6: Now it’s time to choose the dies that will resize your cases. There are several important options to consider in selecting the right sizing dies. CLICK HERE for Part 6.
Part 7: Wait! You’re not quite ready to start sizing yet. There’s yet more to consider before you start cranking cases through the press. Learn more about setting up and adjusting your sizing dies. CLICK HERE for Part 7.
Part 8: Once the cases are completely prepped, it’s time to start putting fresh components back into them. We start off by seating primers. CLICK HERE for Part 8.
Part 9: After the primers are seated, it’s time to drop in the powder. There are several tools that will help you handle powder for precision handloads. CLICK HERE for Part 9.
Part 10: The final step in the process is carefully seating the bullet to just the right depth. And then… you’re ready to try your loads at the range. CLICK HERE for Part 10.
Figure 1. When the bullet is seated farther out of the case, there is more volume available for powder. This enables the cartridge to generate higher muzzle velocity with the same pressure.
Effects Of Cartridge Over All Length (COAL) And Cartridge Base To Ogive (CBTO) – Part 1 by Bryan Litz forBerger Bullets.
Many shooters are not aware of the dramatic effects that bullet seating depth can have on the pressure and velocity generated by a rifle cartridge. Cartridge Overall Length (COAL) is also a variable that can be used to fine-tune accuracy. It’s also an important consideration for rifles that need to feed rounds through a magazine. In this article, we’ll explore the various effects of COAL, and what choices a shooter can make to maximize the effectiveness of their hand loads.
Sporting Arms and Ammunition Manufacturers’ Institute (SAAMI)
Most loading manuals (including the Berger Manual), present loading data according to SAAMI (Sporting Arms and Ammunition Manufacturers’ Institute) standards. SAAMI provides max pressure, COAL and many other specifications for commercial cartridges so that rifle makers, ammo makers, and hand loaders can standardize their products so they all work together. As we’ll see later in this article, these SAAMI standards are in many cases outdated and can dramatically restrict the performance potential of a cartridge.
Bullet seating depth is an important variable in the accuracy equation. In many cases, the SAAMI-specified COAL is shorter than what a hand loader wants to load their rounds to for accuracy purposes. In the case where a hand loader seats the bullets longer than SAAMI specified COAL, there are some internal ballistic effects that take place which are important to understand.
Effects of Seating Depth / COAL on Pressure and Velocity
The primary effect of loading a cartridge long is that it leaves more internal volume inside the cartridge. This extra internal volume has a well known effect; for a given powder charge, there will be less pressure and less velocity produced because of the extra empty space. Another way to look at this is you have to use more powder to achieve the same pressure and velocity when the bullet is seated out long. In fact, the extra powder you can add to a cartridge with the bullet seated long will allow you to achieve greater velocity at the same pressure than a cartridge with a bullet seated short.
When you think about it, it makes good sense. After all, when you seat the bullet out longer and leave more internal case volume for powder, you’re effectively making the cartridge into a bigger cartridge by increasing the size of the combustion chamber. Figure 1 illustrates the extra volume that’s available for powder when the bullet is seated out long.
Before concluding that it’s a good idea to start seating your bullets longer than SAAMI spec length, there are a few things to consider.
Geometry of a Chamber Throat
The chamber in a rifle will have a certain throat length which will dictate how long a bullet can be loaded. The throat is the forward portion of the chamber that has no rifling. The portion of the bullet’s bearing surface that projects out of the case occupies the throat (see Figure 2).
The length of the throat determines how much of the bullet can stick out of the case. When a cartridge is chambered and the bullet encounters the beginning of the rifling, known as the lands, it’s met with hard resistance. This COAL marks the maximum length that a bullet can be seated. When a bullet is seated out to contact the lands, its initial forward motion during ignition is immediately resisted by an engraving force.
Seating a bullet against the lands causes pressures to be elevated noticeably higher than if the bullet were seated just a few thousandths of an inch off the lands.
A very common practice in precision reloading is to establish the COAL for a bullet that’s seated to touch the lands. This is a reference length that the hand loader works from when searching for the optimal seating depth for precision. Many times, the best seating depth is with the bullet touching or very near the lands. However, in some rifles, the best seating depth might be 0.100″ or more off the lands. This is simply a variable the hand loader uses to tune the precision of a rifle.


 A while back, Sinclair International’s Reloading Press Blog featured a “round-table” discussion of reloading techniques. Sinclair’s team of tech staffers were asked: “What do you feel is the one-most crucial step in precision reloading?”


 Effects Of Cartridge Over All Length (COAL) And Cartridge Base To Ogive (CBTO) – Part 1


 Effects Of Cartridge Over All Length (COAL) And Cartridge Base To Ogive (CBTO) – Part 1


