Hunting season is coming up very soon, so it’s time to get your rifle squared away. You’ll want to zero that rifle before the hunt, and you need to know how your shots will impact with a cold barrel.
Commonly, hunters won’t have the ability to fire one or two fouling shots before heading out on a hunt. Therefore it’s important that a hunter understands how his rifle shoots with a “cold bore shot”. Both the point of impact (and possibly velocity), may be different with a cold bore than with a barrel that has been warmed and fouled with a series of shots. In this video from the U.S. Army Marksmanship Unit (USAMU), you’ll learn how to determine your cold bore point of impact (POI) for a rifle that just been cleaned, as well as the cold bore POI with a barrel that has already been “fouled in”.
SGT Joe Hein of the USAMU shows how to plot cold bore POI with both a clean bore and a fouled bore. Note that the “cold bore” shot from a fouled barrel was closer to the follow-up shots than the cold bore shot from a clean barrel. This is typical of many factory barrels. SGT Hein provides a simple way to understand your rifle’s cold bore performance. Hein’s advice can keep you from missing that long range shot at that big buck on opening day. A little time spent on the range before that critical first shot will help ensure you have meat in the freezer this season.
Last Saturday, 9/28/24, was National Hunting and Fishing Day. Working on your wind reading skills can improve your odds of a successful hunt. Image from NHFDay.org.
Thomas Haugland, a Shooters’ Forum member from Norway, is a long-range target shooter and hunter. He has created an interesting video showing how to gauge wind velocities by watching trees, grass, and other natural vegetation. The video commentary is in English, but the units of wind speed (and distance) are metric. Haugland explains: “This is not a full tutorial, but rather a short heads-up to make you draw the lines between the dots yourself”. Here are some conversions that will help when watching the video:
.5 m/s = 1.1 mph | 1 m/s = 2.2 mph | 2 m/s = 4.5 mph
3 m/s = 6.7 mph | 4 m/s = 8.9 mph | 5 m/s =11.2 mph
How to Gauge Wind Speed and Hold Off Using Reticles
This field video shows how to observe natural indicators — trees and vegetation — to estimate wind velocity. Then it shows how to calculate hold-offs using the reticle hash-marks. Thomas shoots a fast-cycling Blaser R93 rifle with Norma 6XC ammunition.
Hunting season has started in many parts of the country. And today, Saturday, September 28, 2024, is National Hunting and Fishing Day. Every year, this event is held on the 4th Saturday of September. First recognized by President Nixon in 1972, this is now the 52nd year the event has been celebrated across the USA. To help mark this day, we are offering six informative videos for hunters. These cover planning your hunt, selecting good optics, and optimizing your rifle. There are also hunting stories from Africa and Norway.
How to Sight-In Your Hunting Rifle
This video and related article offer good basic advice for sighting-in a hunting rifle. There are a series of six points covered. Here’s Tip #1: “Find a safe place to shoot your rifle with a backstop. If possible, use a bench and a rock-solid shooting rest. Sighting-in is all about consistency, so the less human error you have, the better. For safety, be sure to also bring ear and eye protection.” READ FULL ARTICLE on NRAWomen.com.
Prepare For Your Hunt — Get Fit and Practice Positions
As part of the NRA’s Tips & Tactics video series, Kristy Titus explains how to prepare for a hunt. Titus, co-host of the Team Elk TV show has hunted around the globe. She grew up in the outdoors, running pack mules in Oregon with her father. In this video, Kristy discusses fitness training and demonstrates field positions that can be employed during a hunt.
Kristy explains: “Hunting can lead you into some steep, rough country. It’s really important that you train both your body and your mind to handle the elements and the rigors of hunting So, if you plan on going on a mountain hunt, get out and train your body. Train with your firearm. Get off the bench and have some fun with this. Do some positional shooting or, if you want to add a stress dynamic… have someone put you under a time parameter.”
Kudu Hunting in Africa
Pieter “Piet” Malan is a South African precision rifle shooter and hunter who has created an impressive YouTube Channel with over 300 videos. While Pieter’s Impact Shooting Channel focuses primarily on tactical PRS/NRL type disciplines, his channel also includes dozens of videos of interest to hunters. Here is Pieter’s excellent video about Kudu hunting — Kudu Hunting Paradise Part 2. After watching this, with the exotic game and stunning terrain, you’ll probably want to book an African Safari.
Deer Hunting in Norway’s Fjord Mountains
Here’s a video with some truly stunning scenery. Watching this video is like taking a virtual vacation to Norway, where you can explore the scenic mountains in the Fjord region. Forum member Kenneth Skorpen (aka “Sal”) has created a cool video of a deer-hunting trip he took in Norway. He didn’t bag a buck on this trip, but the walk in the Fjordland mountains took Kenneth through some spectacular scenery. (At the 11:25 time mark you’ll see an amazing sunset over the Fjord.)
Kenneth did encounter a doe that had fallen down the mountain, and apparently broken its neck (14:35 time mark). The terrain is very steep, and Kenneth observed that: “I feel fortunate to be able to do this, but I also feel very tired in my legs. Did you know that the hares around here have shorter left legs due to the steep hills?”
Load Development for .308 Win Hunting Rifle
In this video, F-Class ace Keith Glasscock shows load development with a .308 Winchester hunting rifle. Here Keith uses a large X-type sandbag for a front support. He is shooting a Remington 700 bolt-action rifle, with Barnes TSX solid copper bullets, PPU Brass, Federal 210m primers, and AR Comp powder. Keith said the Barnes bullets were excellent — he commented that these bullets were “match quality in terms of precision”. Keith achieved some very small three-shot groups with AR Comp and the TSX projectiles. Keith did note that point-of-impact shifted up significantly with increases in charge weight (see 6:20-7:10). With thinner-contour hunting barrels, this is not unexpected. But POI change should be observed carefully during load development, as you may need to adjust your zero after completing testing.
Hunting season has already started in some states, and is right around the corner in other locations. For readers who plan to hunt game this fall, we recommend you brush up on hunter safety and learn the laws in your jurisdiction. Here are some helpful resources for hunters: Safety Tips, Hunter Education, License Requirements, and Where-to-Hunt interactive map. Top photo courtesy Horn Fork Guides, Ltd., in Colorado.
Hunter Safety Tips NRAFamily.org has a good article listing seven salient safety tips for hunters. Anyone preparing for a fall hunt should read this article before heading into the field. Here are three key bits of advice:
1. Be Positive of Your Target before Shooting
This might sound overly simplistic, but the fact remains that, every year during whitetail season, farmers everywhere are forced to spray-paint their cattle or risk having them “harvested” by hunters who don’t bother confirming the species of the large ungulate in their sights. Why does this happen? The most likely explanation is “buck fever,” meaning that the hunter wants so badly to see a nice big buck that sometimes his eyes deceive him into thinking that there’s one there. When in doubt, don’t shoot.
2. Scopes Are Not Binoculars
Never use a riflescope as a substitute for binoculars. The temptation to do so is real, but when one does this, one is by definition pointing the muzzle of the gun at unknown targets.
3. Know When to Unload
When finished hunting, unload your firearm before returning to camp. You should also unload your gun before attempting to climb a steep bank or travel across slippery ground.
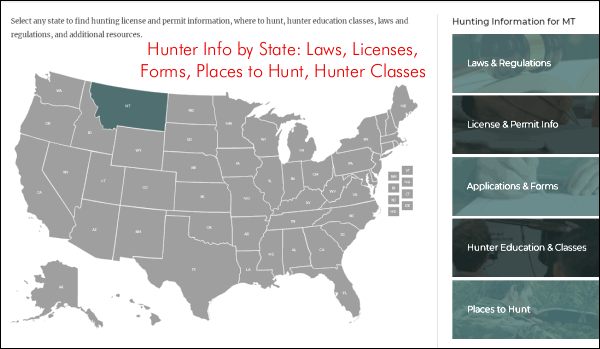
Visit WhereToHunt.org
There’s a great online resource for hunters that will help you find game locations in your state and ensure you have all the proper permits and game tags. WheretoHunt.org features an interactive map of the country. For all 50 states, the NSSF has compiled information about hunting license and permits, where to hunt, hunter education classes, laws and regulations and more. For each state you’ll also find a link for required applications and license forms.
Click Map to Get State-by-State Hunting INFO
Hunting Affiliation Groups
There are many good organizations dedicated to promoting hunting and preserving our hunting habitats. These groups all offer valuable information for hunters:
Tomorrow, September 28th, is National Hunting and Fishing Day, held each year on the fourth Saturday of September. To help the avid hunters among our readers, here are Twenty Tips that can help ensure a safe and successful hunt. These tips have been compiled from our AccurateShooter Hunting Forum, with help from Hunting Editor Colton Reid (who has already been out hunting this month). Some items are preparatory — such as working with maps, sighting in the rifle, and improving physical fitness. We also talk about equipment — having the right gear, from proper boots to a GPS for multi-day hunts.
Of course there are entire volumes written on hunting, but these 20 Tips can benefit all hunters. Follow these suggestions and you should have a safer hunting experience with greater likelihood of success. If you liked these pointers, you’ll find two dozen more helpful hints on the NSSF Website.
Preparations Before The Hunt
1. Map Your Hunt and Notify Others — Before your hunt, make a plan and notify friends and family members about WHERE you are going and your intended return date and time. Print out a Google Satellite map and locate landmarks and trailheads. Mark where you plan to park your vehicle and give a copy of this map to friend and/or family members. A hunter may injure himself by falling off a rock, or tumbling in a creek-bed. After that kind of injury the hunter may be confused or unable to walk. If you get stranded in the wilderness, you want trusted persons to know where you are. So, before you leave on a trip, provide a map to a friend or family member. Show them where you will leave your vehicle, and where you expect to be every day of your hunting adventure.
2. Licenses and Permits — Make sure you have a valid hunting licenses and all the necessary tags. Begin this process with ample time before your intended hunt(s). The NSSF adds: “If you are crossing state or national borders, find out about any special considerations you must take care of. Border crossings can mean knowing about firearm transport laws or Chronic Wasting Disease-related regulations.”
3. Work on Your Fitness — On a multi-day hunt you may be trekking many miles. You need to be in good shape. If you are out of shape you may be putting yourself in a precarious situation, particularly if you underestimate the terrain difficulty. As the NSSF says: “Not being able to handle the conditions lessens your chances of success, can turn a great experience into an agonizing one and can endanger your health.”
4. Do Your Homework — Study the area you will be hunting. Talk to other hunters. Look at satellite photos. Get a real sense of the walking and terrain challenges. For a multi-day hunt, MAKE a PLAN. The NSSF states: “Eliminate surprises. Learn as much about where you will be staying, the area you will be hunting, what the weather might be like and what you need to bring[.]”
5. Rifle and Ammo — Make sure your rifle is sighted-in and your ammo is tested. Sight-in your rifle with the ammo you plan to use on your hunt. CLICK HERE for 4-Shot Sight-in Method. After sighting-in from the bench, confirm your zero by shooting from typical hunting positions (kneeling and with forearm supported on a rock or post).
6. Shooting Positions — Practice the shooting positions you will use in the field. Practice sitting, kneeling, and prone positions. You should also practice with shooting sticks, using your day pack as a rest, and with a bipod. Try to have a rock-steady rest before taking your shot.
7. Back-Up Irons — If possible, select a rifle with back-up iron sights. While modern scopes are very durable, they can and do fail (glass can crack). If you’ve invested a lot of time and money in your hunt, back-up iron sights can keep you in the game even if your riflescope fails.
8. Communications and GPS — Bring a GPS if you are in a wilderness area far from civilization. It’s a good idea to bring a cell phone, but you may not have coverage if you’re quite a distance from populated areas. A smart-phone also doubles as a digital camera to record your trophies. For navigation and safety, consider getting Garmin inReach Explorer+. This high-tech handheld unit features interactive SOS, connecting you to the GEOS 24/7 search-and-rescue monitoring center. They also allow you to send and receive text messages, no matter where you are, via advanced inReach satellite technology. Yes you can communicate even if you are miles from the nearest cell tower.
9. Select Good Gear — Make sure you have GOOD BOOTS that are comfortable — you’ll spend a lot of time on your feet. You may want a pack with harness for your rifle so you have both hands free. On a multi-day trip, make sure you can carry enough water, and that you will stay warm enough at night. Good practices for backpacking apply to multi-day hunts.
10. Make a Gear Checklist — Create a complete checklist of the gear and supplies you need. That includes arms, ammunition, rangefinder, binoculars, proper clothing (including spare clothes), hunting accessories, sleeping gear (on multi-day hunts), toiletries, medications. Don’t forget a good first aid kit — lots of bad things can happen during any wilderness trip. You can cut a hand, break an ankle or worse.
During The Hunt
11. Have a Plan — know where you plan to go and when. Try to be where you want in the early morning and early evening hours when deer are likely most active.
12. Take Your Time — If you spot a deer and get too excited and don’t take your time you may spook him. Go slow and glass. If possible, wait for the animals to bed down and relax. Then work out the best way to approach your prey. Remember, “You get so few opportunities, don’t screw it up!”
13. Glass More, Walk Less — Let your eyes do the walking — get good binoculars and use them. With their heightened senses of smell and hearing, deer/elk are able to spot you way better than you can spot them. If you are walking around a lot, chances are you are getting spotted by your prey.
14. Riflescopes Are Not Binoculars — Never use a riflescope as a substitute for binoculars. The temptation to do so is real, but when one does this, one is by definition pointing the muzzle of the gun at unknown targets. We like binoculars with built-in rangefinders. When glassing at long range, try supporting your binoculars on your pack.
15. Be Sure of Your Target before Shooting — Every year during whitetail season, farmers are forced to spray-paint their cattle or risk having them “harvested” by hunters who don’t bother confirming the species in their sights. Hunters with “buck fever” can make mistakes. When in doubt, don’t shoot.
16. Know When to Unload — When finished hunting, unload your firearm before returning to camp. You should also unload your gun before attempting to climb a steep bank or travel across slippery ground.
17. Bring Hearing Protection — While pursuing and stalking your prey you’ll want full sensory use of your ears. But when you’re finally ready to take the shot, slip in hearing protection. A shot from a large-caliber hunting rifle can exceed 170 decibels. Unprotected exposure to noise from a SINGLE 170+ dB shot can cause permanent hearing damage. (Source: ASHA.org). If you make a follow-up shot, you double that noise hazard. Therefore a hunter with a non-suppressed rifle should have hearing protection available.
You can keep a pair of easy-to-use quick-insert ear plugs on a cord around your neck. Or, get a lightweight neck band with earbuds, such as the Sellstrom Band, Peltor Band, or 3M Safety Band, all with a good 25 dB or better Noise Reduction Rating. You can keep these lightweight bands around your neck for quick deployment before you shoot.
“Once a hunter is successful, the REAL work begins.” — Colton Reid
18. Harvesting the Animal — When dressing your animal, be careful with the meat. You’ll want very sharp knives. Some hunters prefer knives with replaceable, razor-sharp blades. Don’t rush the task. Make sure you don’t get moisture or dirt on meat. The three spoilers of meat are heat, moisture, and dirt.
19. Pace Yourself When Packing Out — If you DO succeed, and bring down a big buck, will you be able to dress the animal and carry out the meat? Always be prepared to hike out with extra weight. If you are successful, make sure not to waste the meat you worked so hard for. Choose a pack that can help you carry a heavy load. Remember, this is not an insignificant challenge — you may be carrying 60 to 100 extra pounds in addition to your other gear. Again, take your time. Rest as needed. Don’t hurt yourself.
20. Remember to Enjoy the Experience — Our Hunting Editor, Colton Reid, offers this sage advice to all hunters, but particularly to novices: “Have fun, and appreciate your hunt, whether you bag a buck or not. It is a privilege to experience the wilderness and to get away from the city. Enjoy it while you’re out there. And keep your spirits up. You may get tired, but remember that ‘comes with the territory’. At the end of the day, yes you may be exhausted. And you may want to quit and go home. But stay positive, stay focused. Be patient, the experience is worth it.”
CLICK HERE for Hunter Training/Mentoring Programs State-by-State.
Visit WhereToHunt.org
There’s a great online resource for hunters that will help you find game locations in your state and ensure you have all the proper permits and game tags. WheretoHunt.org features an interactive map of the country. For all 50 states, the NSSF has compiled information about hunting license and permits, where to hunt, hunter education classes, laws and regulations and more. For each state you’ll also find a link for required applications and license forms.
Hunting season is coming soon around the country. If you want to get hunting tips from experts, here is a great audio “infotainment” resource. Leupold offers podcasts, 40-75 minutes in length, on a variety of topics of interest to hunters and precision shooters. A podcast is like a radio show that’s available 24/7, at your convenience. When you want to “tune in”, via your home computer or mobile devices, just visit the Leupold Podcast Page.
Oregon-based optics-maker Leupold & Stevens (“Leupold) offers the “Core Insider” podcast series. These podcasts deliver hunting advice and recount successful hunting trips — such as Caribou hunting in Alaska. Other Leupold podcasts provide optics info, industry intel, and tech tips. Leupold’s Core Insider podcasts can also be accessed directly from Leupold.com. From the Leupold Podcast Home Page, you can stream the podcasts live or download for later listening.
You can also stream these podcasts via iTunes and Spotify.
The Leupold Core Insider Podcasts cover a wide variety of shooting and hunting topics. One early episode features Leupold team members Kyle Lamb and Buck Doyle discussing long-range shooting, while recent Episode 55 explains how Binoculars and Rangefinders function. There are now 96 Leupold Podcasts available online for FREE.
With hunting season coming up soon, we know that many readers will be out in the field — with a set of binoculars. On most game hunts, you’ll speed a lot more time glassing with binocs than looking through your riflescope. With wide field of view and extended low-light capability, a good set of binoculars will be your most important game-finder. And with premium LRF binoculars, such as the ZEISS Victory series, one tool serves both for spotting and laser ranging.
“Without the stabilization of your binoculars [provided by] a tripod … you will be missing a majority of the game you are glassing for.” — Outdoorsmans.com
In this article, Vortex Optics’ Mark Boardman, an experienced hunter, explains the benefits of using a tripod with high-magnification binoculars. Everybody knows that powerful spotting scopes work best when mounted to a stable tripod or otherwise secured to a steady mount. Yet when most folks use binoculars, they never even think of using a tripod, despite the fact that tripod adapters are available for many premium binoculars.
Outdoorsmans Tripod Adapters Outdoorsmans.com sells tripod adapters for various kinds of binoculars. These really work: “Mounting your binoculars to a quality tripod is a must for the serious western hunter. Without the stabilization of your binoculars [by] mounting them to a tripod … you will be missing a majority of the game you are glassing for.”
A serious hunter should learn how to glass with tripod support, using methods outlined here. With binoculars offering more that 8X magnification, you can really benefit from a steady mount. You’ll be amazed at the difference the tripod will make.
Hunting season is starting soon in most areas of the country. Here’s a way you can improve your hunting skills/knowledge. The NRA is offering a FREE online Experienced Hunter Education Course for those preparing to take advantage of the 2024 hunting season.
“Our Experienced Hunter Education Course provides those who might have taken a season or two off a convenient way to sharpen their skills before heading back into the field,” said Peter Churchbourne, director of NRA’s Hunters Leadership Forum.
NRA’s free 2-hour course is a firearm and hunting safety-training refresher in a convenient and engaging platform available through desktop, tablet, or smartphone. The course is available to everyone at www.NRAEHE.org. NOTE: The course is NOT a substitute for state-mandated hunter safety requirements and does not offer any certifications.
The NRA’s NRA Experienced Hunter Education Course, is an online training program designed to help hunters brush up their skills. Free to all, this comprehensive hunting refresher course will help hunters become safer and more confident before heading out into the field. CLICK HERE for more information.
“If you’ve taken a break from the shooting sports or haven’t hunted in a season or two, our Experienced Hunter Education Course is the perfect refresher for firearms safety and safe hunting practices,” explained Elizabeth Bush, managing director of NRA Community Engagement. “Best of all, we’re offering this service completely free of charge.”
Course Description
This online training course is specifically designed for individuals who have not hunted in the past year or more and are looking for a safety refresher before they head back out in the field. In this course, hunters will have the opportunity to refresh their skills by taking a look at safe hunting practices and firearms safety. Once completed, you will be a safer hunter in the field.
KEY FEATURES: Ballistics Solver, GPS Tagging, Weather Forecast, Field Notes with Photos
Hunters, here’s a great FREE mobile APP for both Apple and Android systems. The ZEISS Hunting App offers many practical functions: full-featured ballistics calculator, field notes with photo archive, compass function, GPS tagging for documentation of hunting experiences, and a detailed weather forecast service. The Hunting App is offered as a FREE download for Android and iOS (iPhone/iPad) mobile devices.
Three Minute Video Explains Zeiss Hunting App Features:
The Zeiss Hunting App integrates multiple useful features — ballistics solver, compass, GPS tagging, hunt history. The “Field Notes” function can record a wide variety of info — you can save photos, record your shots and hits, log animal sightings during the hunt, and even plot game locations on a map. Zeiss explains: “This allows users to optimally record events, the game population in the hunting territory, and their own hunting experiences.” Shots can be tagged via GPS through the shooter’s and the target’s position, and then displayed on a map. The Field Notes hunt diary shows all entries in chronological order.
Full-Featured Ballistics Solver
The integrated ballistic calculator allows hunters to easily customize the settings to suit their favorite cartridges. You can enter your own data, or choose bullet/cartridge info from a database containing over 7000 ammunition types from a variety of manufacturers. The ballistics solver can be programmed for for current weather conditions (temp/humidity), and the angle (inclination) of the shot.
Weather Functions
The weather tool offers a Five-Day Forecast, and you can choose multiple locations. In addition to the current location, users can also display the weather for their hunting areas of choice. The weather forecast includes temperature, precipitation, wind direction, wind speed, humidity, and air pressure. (Note: For precise ballistics solutions, you must input the ACTUAL conditions at your shooting location).
This video explains how to define a hunting zone and set GPS location tags on the map:
Hunt Log and Photos
The Field Notes function can do many things. You can log all your shots and hits, and you can plot game sightings during the hunt. Events can be augmented with photos and GPS data. With the Field Notes mapping function, you can even locate game populations in the hunting territory. A compass and automatic night mode round off the list of smart features.
Armageddon Gear (“AG”) produces outstanding support bags, gun cases, slings, suppressor covers, and personal gear for PRS/NRL shooters. Along with its tactical competition items, Armageddon Gear also offers an extensive line of products for hunters. AG’s Products for Hunters include hunting support bags, rifle cases, chest packs, slings, travel bags, and apparel.
Armageddon Gear hunting products are featured this week on Shooting USA Television. You’ll get a first hand look at the popular hunting products such as chest rigs, travel cases, hats, and more. AG states: “All our products are made from the best domestically sourced materials, crafted to stand the test of time, and designed to keep you more organized and ready when afield.”
Shooting USA SHOW TIMES: This Shooting USA Episode airs Wednesday, July 17, 2024 at 9:00 PM Eastern and Pacific; 8:00 PM Central. If you miss the regular broadcast, you can stream the show online at any time on Vimeo for $0.99 per episode or $1.99/mo for unlimited streaming.


 Here’s a video with some truly stunning scenery. Watching this video is like taking a virtual vacation to Norway, where you can explore the scenic mountains in the Fjord region. Forum member Kenneth Skorpen (aka “Sal”) has created a cool video of a deer-hunting trip he took in Norway. He didn’t bag a buck on this trip, but the walk in the Fjordland mountains took Kenneth through some spectacular scenery. (At the 11:25 time mark you’ll see an amazing sunset over the Fjord.)


 Outdoorsmans Tripod Adapters