


Sunday GunDay: “Red Rocket” F-Open Rifle with Eliseo Chassis

Forum member Martin Tardif (aka “Killick” in our Forum) competes with a very accurate .284 Win F-Open rig fitted with a Barnard action, Brux barrel, and Eliseo F1 chassis. Unlike some F-Class shooters, Martin has tried many disciplines over the years, including service rifle and Mid-Range and Long Range sling competition. But he told us, “After experiencing arthritis in my hands and wrists, I decided I would dabble with F-Class. And that has turned into a happy obsession.” Today’s story features the object of that happy obsession — Martin’s tack-driving .284 Win he calls the “Red Rocket”.
F-Open Match Rifle — .284 Winchester “Red Rocket”
by Martin Tardif
This is the story of the new “Red Rocket”, my new F-Open rifle. It’s chambered in .284 Winchester (.317″ neck, .220″ freebore). This rifle features Barnard P action, Barnard single-stage trigger (4 oz.), and Brux 30″ one-inch straight-taper, 1:8.5″-twist barrel fitted with Blake Tuner. The barreled action rides in a Gary Eliseo Competition Machine (CMI) F1 F-Open metal chassis with Marine Corps Red powder coat. On top is March 48x52mm fixed-power High Master scope. In a previous incarnation, this same Barnard action served in a wood-stocked F-Class rig, a Red Retromod built from a modified Anschutz stock. I still have the Barnard action (and trigger), but mostly everything else is new.
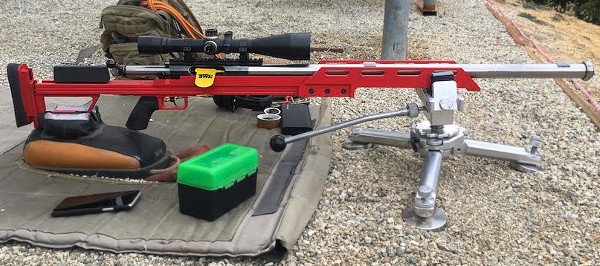
Here’s the .284 Win “Red Rocket” with CMI F1 Stock, Barnard action, Brux barrel, and Blake Tuner on my SEB Mini at Burbank Rifle and Revolver Club in SoCal.
My previous F-Class rifle started out as a Palma rifle back around 2008. With a modified Anschutz prone stock, that .308 Win Palma sling gun served me well, helping me earn the 2009 California State Palma Championship. Much later I grafted more wood on and whittled that same stock into an F-Open specimen (shown below). That did get me to Long Range High Master but it definitely had limitations. For one it had annoying flex in the fore-end and the buttstock was not aligned with the barrel channel.

I wanted to upgrade my stock to get a more consistent, better-shooting F-Open performer. So in April of 2020 I contacted Gary Eliseo of Competition Machine and ordered one of his streamlined, F1 “boom-stick” chassis units. These feature a very low Center of Gravity. I sent Gary my Barnard action and had Brux send him a barrel that I had won at the 2020 SWN raffle.
This video shows Martin shooting the “Red Rocket” in California
This rifle has been a success from the very start. At its first big match, the 2020 California State Championships, the Red Rocket tied for First Place on points but finished second overall on X-count.
Martin tells us: “The new red Eliseo stock is phenomenal and far surpasses the old red stock on my RetroMod project previously featured on the Daily Bulletin. The three things I like best about this Eliseo F1 chassis system are:
1. The lean, clean, efficient engineering and styling.
2. Easy manipulation of buttstock and cheek piece adjustments, ease of bolt removal.
3. Inherent confidence in its straightness and the durability of all the parts and finish.”
“I’m extremely impressed with the potential of this rig and I have still yet to fiddle with the tuner and test some of my Wolf/KVB primers. It’s all gravy now.” — Martin Tardif

I received the finished rifle in September and was impressed with its stark and consummate functionality and there is no doubt as to that function. The collinear aspect from any angle suggests a Red Rocket Car on the Bonneville Salt Flats, so that’s what I call this rig.

Reloading Methods and Load Development
My virgin brass prep starts with a .284 neck mandrel with the occasional squirt of WD-40, then to the drill press to turn the necks to 0.014″ wall thickness with my PMA Model B turner. After a quick dip in the media tumbler I run the whole batch through my DIY cake pan annealer and they’re ready for sizing. I like the Whidden Gunworks full length bushing dies. I use a .310″ bushing and a loaded round measures .312″. After sizing, I run the cases through the tumbler for 10-15 minutes to clean them up and then they are primed. I’m using my stash of S&B primers with an RCBS benchtop primer seater with a Holland Perfect Primer Seater add-on. I do point my 180-grain Berger Hybrid bullets with a Hoover die (see below).


Here is Martin’s reloading bench. From left to right: A&D FX-120i Force Restoration Scale with Auto-Trickler V3, Hoover Bullet-Tipping Die, Whidden .284 Win FL Sizing Die with PMA click-adjust lock ring, Hodgdon H4350 powder. Martin reports: “I’m also using some of F-Class John’s Auto Trickler Methods — using two powder cups to speed up the process, hash marks on Auto Trickler gear drive, and minimal openings on FX-120i wind guards. These all improve the powder measuring.
Load Development and Accuracy Testing in Competition
I started load testing in November 2020. I tried both H4831sc and H4350 at 100 yards. I usually have excellent results with H4831sc but the Brux tube stubbornly preferred H4350. So I took a preliminary recipe (52.2 grains) to the California Long Range Championship and tied for First Place on points but got beat on Xs. Having seen a little too much vertical at the state match, I went with a lighter load that looked good for vertical at 100 yards (51.8 grains — see photo below). That load got me an overall win at our 1000-yard club match.

I wanted to fine tune that load so I started a seating depth test. I did a final head to head test, comparing .015″ jump (away from first lands contact) and .018″ jump at 1000 yards. The .015″ jump load was the clear winner. This 15-round group was shot at 1000 yards with no flags on an overcast day with no mirage.

The ShotMarker screenshot above shows 15 shots at 1000 yards with bullets seated .015″ out, switching winds and no flags, just watching the mirage. I added .25 MOA up after the first round ‘9’ (me fighting a clean barrel on first shot) and went to town.
Advice for New F-Class Shooters — by Martin Tardif
1. Watch a Top Competitor — Find a good shooter that you respect and watch and take note of their equipment, how they set up to shoot, how they shoot, what conditions they shoot in or don’t. Ideally you should ask to be squadded with them (if possible) so you can score for them. That way you’re not dividing your attention from the shooter you’re supposed to be scoring for. Be mindful not to pester them while they are setting up. Best to wait until they have finished shooting and try to ask questions off the firing line, others still shooting need to concentrate.
2. Cartridge Selection for F-Open– Go to Accurate Shooter’s 7mm Cartridge Guide and scroll to the .284 Winchester section by Charles Ballard. You can read further about the 7mm WSM and 7mm SAUM but for a caliber that’s not fussy you should stick with the .284 Win.
3. Reloading Equipment — To win, you really need ammo as perfect as you can make it. You should be able to find out everything you need to know about reloading equipment via the Accurateshooter Forum’s Reloading and Competition areas. It’s a one-stop shopping brain trust for everything F-Class, Sling, and Benchrest. And the Forum Marketplace is literally a never ending ‘Gun Show’ of For Sale items. It’s a great place to buy quality used stuff for newbies.
As a final bit of advice — BELIEVE the wind — it’s smarter than you are!
Commentary on Metal Chassis vs Wood Stock
I previously had a wood F-Class stock so flexible you could easily pinch the barrel to the fore-end with one hand and hold it there. My Eliseo metal chassis is MUCH more rigid. I don’t think there is any argument that a metal stock is more rigid than wood. I also think a metal stock with its monolithic properties has a more consistent cross-sectional density along its length than a wood stock would have due to the vagaries of grain structure. However I have no experimental data to support that theory, or how that might positively affect shot to shot consistency. I CAN say that the gun shoots better, with smaller groups and higher scores, than the previous wood stock version.

The CMI F1 chassis has three main sections: rear assembly, main assembly, and fore-end. The main assembly is a 27″-long solid billet section with milled cavities for the rear assembly and trigger group. This also supports the action V-Block which cradles the full length of the action. The V-Block is mated to the top of the billet in a milled channel but doesn’t touch the sides to avoid uneven harmonics. The rear assembly hold the LOP-adjustable butt pad/bag rider and “easy off” cheek piece. The 3-piece fore-end is fitted to the main section with screws. The complete F1 chassis with grip and cheek piece weighs 6 pounds.


F1 Chassis Maker Gary Eliseo Talks about His Design
The F1 was designed to incorporate the most important features needed in an F-Open rifle system. Top priority was placed on how the rifle tracked. The chassis had to be perfectly straight, and immune to weather so it will stay straight. On the F1, the fore-end is designed to keep the centerline of the barreled action as low as possible. This super-low center of gravity, along with the tall vertical sides, keep torque to a minimum, so the gun doesn’t twist or hop, but instead comes straight back.
The F1 chassis can be fitted with bedding blocks to accommodate any action. These action bedding blocks are carefully epoxy-bedded to the chassis so the customer’s barreled action is perfectly in line with the central axis of the chassis. In addition to optimizing tracking, I also took a look at how the shooter interfaced with the rifle. I wanted the cheek piece to be narrow so that the shooter would not be forced into applying side pressure on the stock to get their eye behind the scope. The cheek piece is also easy to remove for those who shoot without one. This also facilitates bolt removal.
If you’re interested in an F1 F-Open Chassis, contact Gary via the Competition Machine eMail page. The current price for an F1 Chassis with Cerakote finish (any color) is $1295.00. Lead time is about 12 weeks.


Green Tools for Red Rocket — Martin uses an RCBS Rock Chucker single-stage press on an Inline Fabrication UltraMount. Primers are seated with an RCBS Bench Primer fitted with Holland’s Gunsmithing Perfect Primer Seater Adapter. This provides ultra-consistent primer seating.
F-Class Match Strategies for California Ranges
My strategy for a match clearly depends on the specific location. For instance, at my home range, the Burbank Rifle and Revolver Club, which has several cuts and gullies crossing the canyon, the wind comes primarily from NNE and since the range faces slightly NNE the predominant condition will be a head or right wind so I’m looking for R to L mirage and left angled flags.By contrast, Coalinga CA is a much more open/exposed range which can make it much more challenging. When you see all the flags going against the mirage for the majority of the string (after you’ve gone for record of course) that can be tough. So I like to watch the wind while I’m scoring and for a few minutes during sighters and shoot them in a few ‘looks’ if I can get them. But sometimes you have to go with your gut if your sighters whisper “go-for-record-you-knucklehead” and so it’s off to the races. It often seems like I should have just chased the spotter when I’m waiting out a fishtail or let-up there.


