Kirsten Joy Weiss has created a useful video about Dry-Fire practice. Dry-Fire is a method of training without a live round in the chamber. Dry-Firing is effective, Kirsten explains, because “it eliminates all the extra noise and messages that you get when you fire a live round. Without recoil, without the sound of a shot going off etc., all you hear is the click of the trigger. This allows you to focus on your sight picture and your trigger press.” This the lastest installment in Kirsten’s ‘How to Shoot Awesomely’ series. Kisten says: “I hope it helps you, and keep on aiming true!”
The Benefits of Dry-Fire Training
If you are not doing Dry-Fire practice yet, then it’s time to start. Dry-Fire training is essential to the sling disciplines, and very useful for F-Class. Dennis DeMille, a national Service Rifle Champion, told us that, for every minute he spent in actual competition, he would spend hours practicing without ammunition. While in the USMC, Dennis would practice in the barracks, working on his hold and dry-firing:
“The most important thing is to spend time off the range practicing. Most of what I learned as a High Power shooter I learned without ammunition — just spending time dry firing and doing holding exercises. Holding exercises will really identify the weak parts of your position. The primary purpose of dry firing is to get you used to shooting an empty rifle. If you can shoot a loaded rifle the same way you shoot an empty rifle then eventually you will become a High Master.”
Dry-Fire Training Can Benefit Benchrest Shooters
What about benchrest? Well, we’ve found that Dry-Fire sessions can even benefit benchresters — it can help reveal flaws in your trigger technique, or inconsistencies in the way you address the rifle from shot to shot. With the gun set up with your front rest and rear bag, if you see the scope’s cross-hairs wiggle a lot when you pull the trigger, you need to work on your technique. Also, dry-fire practice can help you learn to work the bolt more smoothly so you don’t disturb the gun on the bags.
F-Class ace Erik Cortina recently interviewed noted author and Olympic Gold Medal-winning shooter Lanny Bassham. For his popular video channel, Erik asked Lanny about his book With Winning in Mind. The two talented shooters also broadly discussed the “mental game” in the shooting sports and Lanny’s program for visualization of a winning performance. Lanny explains that after you have mastered your rifle skills, and learned to read the wind, it is important to adopt a winning mentality and to visualize success. Lanny should know. He won a shooting Gold Medal in the Olympics along with 22 world individual and team titles.
Watch Full Video Interview
Here is the wide-ranging and fascinating hour-long Lanny Bassham interview hosted by Erik Cortina. If you are looking to enhance your motivation, discipline, and “mental focus” when competing, this video is worth watching:
Visualization is a process of mental preparation that is done before you get to the range. Many of the greatest shooting champions have used this technique to get ready for big matches, and to optimize their performance during record fire. If you want to enhance your “mental game” through pre-match visualization, we strongly recommend Lanny Bassham’s book, With Winning in Mind.
As a competitive smallbore 3P shooter, Bassham developed a mental management system. Using this system, Lanny Bassham won 22 world individual and team titles, set four world records, and captured an Olympic Gold Medal in Montreal in 1976. His techniques have been embraced by professional and Olympic athletes in many sports. With Winning in Mind covers a complete system of “mental management” techniques used by Olympians and elite champions.
Putting principles into practice — Anette Wachter
Our friend Anette Wachter, aka “30CalGal”, did a series of videos for the NRAWomen.com site. In one episode, Anette talks about the “mental game” in competition. Specifically she explains how to “visualize success”:
I have found that a lot of my success in competition has come through what I call a ‘mental rehearsal’. I actually visualize every stage of the match and I visualize the success of the match and winning the match.
I actually visualize that round going downrange into the target, and the target coming up with a dead-center ‘X’. I visualize this over and over. If you visualize success you will achieve success.
Jeff Hansen of Utah now holds Distinguished Rifleman Badge #2561. Jeff’s journey to Distinguished status began with a box filled with his grandfather’s old shooting medals, which led him to the Camp Perry National Matches in Ohio.
Though he had no intention of shooting competitively, only arriving to see the ghosts of his grandfather and uncles, he was so moved by the ambiance of Perry that he began his own marksmanship career — eventually leading him to a prestigious Distinguished Badge.
At the 2022 National Matches, Jeff fired his best scores yet. In the National Trophy Individual (NTI) Match, he reached an overall score of 487-9X for 52nd overall out of nearly 790 competitors. And at the 600-yard line he shot an outstanding 199-5X out of a 200 possible.
“He was on the range with me shooting that 199″, Jeff said of his grandfather. “I felt like he was right there when I finished up. I just hope other people see this and see what I’ve tried to do – if I can do this, they can do this”, he said. “Chase that dream”.
Left to Right: Alvin Hansen, Ray Hansen, and Jeff’s Grandfather Lou Hansen at Camp Perry.
Inspired by My Grandfather to Become a Distinguished Marksman
Jeff Hansen earned his Distinguished Rifleman Badge in 2022 – a journey which began with his Grandpa’s own marksmanship tales from the 1920s and 1930s.
As early as I can remember, my grandfather, Lou, was a huge influence in my life. He was a great marksman. My dad, Ed Hansen, would tell me about the hunting trips they would go on and how Grandpa would make incredibly long shots to get an amazing bull elk or mule deer, only taking one shot to do so. He was always taking me hunting and fishing and shooting – lots of sleepovers where I didn’t actually sleep much, if any, because I would be so excited for the adventures that were going to happen with him the next day.
Whether it was hunting ducks, pheasants, chukars or just shooting, it didn’t matter. It was always an awesome experience with him. Life was great. Then, we got some tough news – my grandfather had leukemia. He fought a courageous battle with it for a couple of years, then in 1978, when I was 8, he passed away. Needless to say, I was devastated.
Inspired by Grandfather’s Shooting Medals
Not too long after he passed away, my dad brought home a box from Grandpa’s. It was full of medals. He carefully removed them and told me they were from when my grandfather competed in rifle matches with his brothers (Alvin Hansen, a U.S. Army veteran of World War I in France, Ray Hansen, and Oscar Hansen) at Camp Perry, Ohio, in the late 1920s to 1937.
Shooting medals from 1920s and 1930s with picture of Lou Hansen and his brothers.
My Grandpa was really humble – never said much about his trips to Camp Perry or his accomplishments there. Seeing the contents of the box, my grandfather became an even bigger hero to me. The medals he earned that impressed me the most were the three President’s Hundred brassards from 1935, 1936 and 1937 – along with many others.
I grew up looking at those medals thinking I wish I could do that maybe, someday. My life moved forward. My dad, a U.S Air Force veteran, and I both loved hunting, fishing, and shooting and still went as often as we could. Later, I got married and now have three daughters and one son. As my family grew up, we also enjoyed hunting, fishing, and shooting together.
Then, life threw some blows. My dad passed away suddenly in November 2014, and my mom fought a fierce battle with cancer for a few years before passing away in March 2018. Not long after she passed away, I found myself hanging [my grandpa’s] medals on the wall in my own home. Seeing them there got me thinking about how awesome it would be to go to Ohio and watch the President’s Match – not shoot, just watch.
In July 2018, I went. I’ve got to admit there were a few tears in my eyes driving between the two iconic lighthouses at the entrance to Camp Perry. I loved it.
The year I came happened to be the year SFC Brandon Green of the U.S. Army Marksmanship Unit cleaned the President’s Match — a record that still holds today. I got to talking to one of the Army Reserve team guys, asking him questions about competing, and he couldn’t believe I was there just to watch. I showed him some pictures of my grandfather’s medals, scorebook, and of Camp Perry in the 1930s. Matt Goad and Jon Arcularius of the Army Reserve team came over to look at them.
They said, “Hey, you can’t come all the way out here with a family history like that and not shoot here!”
They offered to sign me up for the NTI match the following day and even said they would get a rifle, ammo, and anything else I would need. That was so awesome, but I couldn’t make it work – I was flying back home the next day. Although I didn’t shoot, they did get me all the information I needed to get started.
I loved every minute of my first Camp Perry trip. It was because of the people there, showing me such kindness and taking me under their wings, that I thought, “I’ve shot all my life and hunted, and I’ve always liked marksmanship. This is something I can do.”
When I got home, I ordered a White Oak upper and started changing parts on my AR-15 to make it ready for matches. I was ready in the spring of 2019 and started shooting mostly small matches.
Grandpa Lou was humble and never talked about his achievements at Camp Perry.
At first, all I wanted to do with my rifling career was get a President’s Medal — following in my Grandpa’s footsteps. I didn’t know what “going Distinguished” was all about. I got a Silver Achievement Medal in the first match I went to, then started to go to more matches. Through that, I caught wind that winning President’s is one thing, but you’ll get to President’s if you excel your skills and go Distinguished. So, that became the new goal.
By summer, I was traveling to EIC matches and earned my first points at Nampa, Idaho, on July 21, 2019. After that, it was time to head back to Perry for the President’s and the NTI.
I didn’t do as well as I wanted, but it was an amazing experience to be competing where my grandfather had. I struggled the rest of the year and didn’t earn any more points until 2020. It was tough trying to find matches during COVID, but I ended up earning 12 more points by the end of the year. I missed a hard leg at Twentynine Palms, California, by X-Count, and things got tough after that.
I figured I needed to step up the way I was practicing, so I got a Shot Marker electronic target system and some wind flags so I could practice full distance. I’m very lucky that I can practice 30 minutes from home any time I want on public land.
At the 2022 National Matches, Jeff fired a superb 199-5X at the 600-yard line.
Starting in the first part of December, I had some extremely hard things going on in my personal life, and I didn’t feel like practicing. I didn’t even pick up my rifle for two months. I missed the first EIC in Phoenix in January, and before I knew it, February was half gone. Then, one of my friends talked me into going to the Western CMP Games in Phoenix in March.
Practice was tough, and sometimes I wondered why I was even trying. Tons of things were going wrong, and I was about DONE. I wanted to quit, many times. [But then] Western Games was fun, and I did well, but gained no points.
Navy Matches were coming around at the end of April, so I practiced as much as I could and made the trip. With several friends going, it would be great getting together after the matches and have a good time. I shot well the first day as well as on that Saturday. I even shot my personal best National Match Course score. Then Sunday, May 1, was the real test – the EIC match.
I struggled in standing and dropped a few more points than usual. Sitting was the same – rapid prone was good. Slow prone went well. The wind had some fairly big changes, but I worked through it and ended up with 477-11X. I figured there’s no way I’m making the cut for a hard leg this time and headed to the pits to finish out the match. We finished and waited for the results.
When the results were posted, I couldn’t believe it – I FINALLY GOT THAT HARD LEG! I did it. On top of earning my goal at last, it’s awesome to have my friend Jeff Lovat (#2383) be the one to present me with my Distinguished pin. (That President’s Hundred medal is still out there – maybe next year!)
The Honor of Earning the Distinguished Marksman Badge
Though I certainly enjoy earning my Distinguished Badge, the greatest thing I have gained from accomplishing this is without a doubt all the friends and people I have gotten to know along the way. To all my shooting friends, thanks for not letting me quit – part of this accomplishment is yours too.
To all of you that are working toward that goal, don’t ever quit. Keep practicing, and your day will come. Never quit until you reach your goals.
No matter what, I do know one thing. When I walk that stage at Perry at the 2022 National Matches and get my Distinguished Badge officially presented to me — well my father, my grandfather and his brothers will be walking it with me.
About the Distinguished Badge Program
To earn a Distinguished Badge, a competitor must earn 30 Excellence-In-Competition (EIC) points or more in a qualifying competition. Individuals earn the 6, 8 or 10 “leg” points based on score and a percentage of match participation, with at least one “hard” leg, worth 8 or 10 points. Currently, the CMP administers Distinguished Badges for:
Service Rifle
Service Pistol
.22 Rimfire Pistol
Junior Air Rifle
Smallbore Rifle
International Shooter
Distinguished Marksman Badge
Distinguished Air Rifle and Air Pistol
Distinguished Service Revolver Badge
SSG Amanda Elsenboss, now with the Pennsylvania National Guard, is the 2021 NRA National High Power Champion. And Amanda also won the NRA Long Range National Championship in 2019. These two major titles place Amanda among the greatest American shooters and one of only three women in U.S. history to win the High Power title. Amanda combines a superb “mental game” with outstanding gun-handling and wind-reading skills.
In the archives of On The Mark magazine, DCM Emeritus Gary Anderson, an Olympic Gold medal-winning shooter in his younger years, offers sage advice for competitive shooters.
In his article Ten Lessons I Wished I Had Learned as a Young Shooter, Anderson provides ten important guidelines for everyone involved in competitive shooting. Here are the Ten Lessons, but you should read the full article. Anderson provides detailed explanations of each topic with examples from his shooting career.
LESSON 1 – NATURAL ABILITY WILL NOT MAKE YOU A SHOOTING CHAMPION.
(You also need hard work, training effort and perseverance.)
LESSON 2 – ANGER IS THE ENEMY OF GOOD SHOOTING.
(The key to recovering from a bad shot is to stay cool, no matter what happens.)
LESSON 3 – BAD SHOTS CAN TEACH YOU MORE THAN GOOD SHOTS.
(Today, error analysis is one of the most powerful tools for improving scores.)
LESSON 4 – NEVER GO WITHOUT A SHOT PLAN.
(A shot plan is a detailed breakdown of each of the steps involved in firing a shot.)
LESSON 5 – PRACTICE IN BAD CONDITIONS AS WELL AS GOOD CONDITIONS.
(Most competitions are fired in windy conditions or where there are plenty of distractions.)
LESSON 6 – CHAMPIONS ARE POSITIVE, OPTIMISTIC PEOPLE.
(Negative shooters expect bad results; positive shooters expect to train hard to change bad results.)
LESSON 7 – IT’S NOT ABOUT WHETHER YOU WIN OR LOSE.
(It’s about how hard you try to win.)
LESSON 8 – YOUR DOG WON’T BITE YOU AFTER SHOOTING A BAD SCORE.
(Hopefully your coach, parents and friends won’t bite you either.)
LESSON 9 – YOUR PRESS CLIPPINGS CAN HURT YOU OR HELP YOU.
(Winning can go to our heads. We start thinking we are so good we don’t have to work hard any more.)
LESSON 10 — YOU NEVER SHOT YOUR BEST SCORE.
(Great champions are always looking for ways to improve.)
USAMU shooters on the firing line at the Wa-Ke’-De outdoor range in Bristol, IN. Photo courtesy USAMU.
About Gary Anderson Gary Anderson served as the Director of the Civilian Marksmanship Program (CMP) from 1999-2009, and is now DCM Emeritus. As a Nebraska farmboy, Gary grew up hunting and shooting. Dreams of winning an Olympic Gold Medal in shooting led Gary to the U.S. Army. In 1959, he joined the elite U.S. Army Marksmanship Unit. Just two years later, he won his first national championship.
At the 1962 World Shooting Championships in Egypt, Anderson stunned the shooting world by winning four individual titles and setting three new world records. At the 1964 Tokyo Olympics, Gary won the 300m free-rifle Gold Medal, setting a new world record in the process. At the 1966 World Shooting Championships in Germany, Anderson won three additional world titles. At the 1968 Olympics, Gary won a second gold medal in the 300m free-rifle event.
After his “retirement” from international competition, Gary competed in the National High Power Championships, winning the President’s National Trophy in 1973, 1975 and 1976. Over his competitive career, Anderson won two Olympic Gold Medals, seven World Championships, and sixteen National Championships. He is unquestionably one of the greatest American marksmen ever.
Vertical stringing is a common problem that all precision shooters will face sooner or later. In addition to ammo inconsistencies, many other factors can cause vertical stringing. Accordingly, it’s important that you analyze your gun handling and bench set-up systematically.
EDITOR: Folks, READ THIS ARTICLE! You WILL benefit. There are some VERY important insights here. You’ll learn ways to set up your gun better, and check for various technical issues. That can save you time at the range and save you money spent on expensive bullets and powder.
In this article, Hall of Fame benchrest Shooter Speedy Gonzalez explains how to eliminate mechanical and gun-handling problems that cause vertical spread in your groups. Speedy’s article addresses the many human and the hardware factors that can cause vertical.
Speedy Gonzalez, noted shooter, gunsmith and member of the Benchrest Hall of Fame, offers these pearls of wisdom to help you eliminate vertical in your shot strings. Remember that vertical can result from myriad gear issues and gun-handling mistakes. Try to isolate one item at a time as you work to improve your groups.
BAGS and REST–VERY IMPORTANT
• Front Rest Wobble — You will get vertical if the top section of the front rest is loose. Unfortunately, a lot of rests have movement even when you tighten them as much as you can. This can cause unexplained shots.
• Rifle Angle — If the gun is not level, but rather angles down at muzzle end, the rifle will recoil up at butt-end, causing vertical. You may need to try different rear bags to get the set-up right.
• Front Bag Tension–Vertical can happen if the front sand bag grips the fore-arm too tightly. If, when you pull the rifle back by hand, the fore-arm feels like it is stuck in the bag, then the front bag’s grip is too tight. Your rifle should move in evenly and smoothly in the sand bags, not jerk or chatter when you pull the gun back by hand.
• Sandbag Fill — A front sandbag that is too hard can induce vertical. Personally, I’ve have never had a rifle that will shoot consistently with a rock-hard front sandbag. It always causes vertical or other unexplained shots.
• Bag Ears — If the channel between the Rear Bag’s ears is not in line with the barrel, but is twisted left or right, this can affect recoil and vertical consistency. And take note — if the bag is off-axis quite a bit, you can also get horizontal stringing.
• Reliability — ALL your bench equipment must work flawlessly. If it doesn’t, get it fixed or get rid of it. We need all our attention on wind flags.
GUN HANDLING and BENCH TECHNIQUE
• Be Consistent — You can get vertical if your bench technique is not the same every shot. One common problem is putting your shoulder against the stock for one shot and not the next.
• Free Recoil — Free recoil shooters should be sure their rifle hits their shoulder squarely on recoil, not on the edge of their shoulder or the side of their arm.
• Head Position — Learn to keep your head down and follow-through after each shot. Stay relaxed and hold your position after breaking the shot.
• Eyes — Learn to shoot with both eyes open so you can see more of the conditions.
• Last Shot Laziness — If the 5th shot is a regular problem, you may be guilty of what I call “wishing the last shot in”. This is a very common mistake. We just aim, pull the trigger, and do not worry about the wind flags. Note that in the photo above, the 5th shot was the highest in the group–probably because of fatigue or lack of concentration.
• Last Shot Low — I hear a lot of discussion about low shots in a group and apparently this occurs a lot on the 5th shot. If your 5th shot that goes out most of the time, you can bet you are doing something at the bench.
• Seating — When possible, bring your own stool so that you can sit comfortably, at a consistent height, every time you shoot.
LOAD TUNING
• Find the Sweet Spot — A load that is too light or too heavy can cause vertical problems. When you’ve tuned the load right, you should see a reduction in vertical. Even 0.1 grain may make a difference, as will small changes in seating depth.
• Primers — If you’re getting vertical, and everything else looks fine, try another brand of primers. And remove the carbon from the primer pockets so the primers seat uniformly every time.
• Case Prep — When you chamfer the inside of your case necks make sure they are smooth enough that they don’t peel jacket material off when you seat the bullet. Bullets with J4 Jackets (like Bergers) and Lapua Scenar bullets seem more prone to jacket scratching or tearing than Sierra bullets.
• Shell Holders — Keep shell holders clean, in both your press and priming tool. I have seen so much dirt/crud in shell holders that the cases end up get sized crooked because the rim is not square to the die.
• Water in Cases — I see people walking around with case necks turned up in the loading block. A lot of the time there is condensation dropping from the roof of your loading area. If one drop of water gets in a case you are in trouble. How many times have you had a bad low shot when it has been raining and you have been walking around with your cases turned up in your block?
MECHANICAL and HARDWARE ISSUES
• Barrel Weight — A lot of rifles are muzzle-heavy. Some rifles have too heavy a barrel and this causes vertical, especially when shooting free recoil. Basically the gun wants to tip forward. The remedy is to trim or flute the barrel, or add weight in the rear (if you can stay within weight limits).
• Unbalanced Rifle — If the rifle is not balanced, it does not recoil straight, and it will jump in the bags. If the rifle is built properly this will not happen. Clay Spencer calls this “recoil balancing”, and he uses dual scales (front and rear) to ensure the rifle recoils properly.
• Firing Pin — A number of firing-pin issues can cause vertical. First, a firing pin spring that is either too weak or too strong will induce vertical problems. If you think this is the problem change springs and see what happens. Second, a firing pin that is not seated correctly in the bolt (in the cocked position) will cause poor ignition. Take the bolt out of rifle and look in the firing pin hole. If you cannot see the entire end of firing pin it has come out of the hole. Lastly, a firing pin dragging in bolt or shroud can cause vertical. Listen to the sound when you dry fire. If you don’t hear the same sound each shot, something is wrong.
• Trigger — A trigger sear with excessive spring load can cause problems. To diagnose, with an UNLOADED gun, hold the trigger in firing position and push down on sear with your thumb. If it is hard to push down, this will cause vertical problems.
• Stock Flex — Some stocks are very flexible. This can cause vertical. There are ways to stiffen stocks, but sometimes replacement is the best answer.
SCOPE ISSUES
• Lock Rings — This year alone I have seen nine lock rings on scopes that are not tight. Guess what that does to your group? Make sure yours are tight.
• Big Tubes Need Tension — We’ve observed that some 30mm scope rings are not getting tight enough, and scopes are slipping in the rings under recoil. This will cause point of aim movement.
• Windage Bases — If you’re using a conventional-style single dovetail with rear windage adjustment, make sure both sides of the windage screws are tight. This can induce both windage AND vertical issues since the rear ring is held down by the windage tension.
AWARENESS of CONDITIONS and READING WIND
• Basic Wind-Reading Rule–If you do not know how to read wind flags or are very inexperienced, try to shoot your group with the flags all going in one direction.
• Rate of Fire — The longer you wait between shots when a condition is changing, the more the condition change will affect your shots.
• Look Far and Wide — Learn to look at the whole field of flags, not just the row in front of you. Many times a change quite a ways out will cause shot to go out of your group well before that change shows up in front of your bench.
• Don’t Fear the Wind — When you realize that the wind is your friend you will become a much better benchrest shooter. By this I mean that wind skills can separate you from other shooters who have equally good equipment. To learn how to read the wind, you must practice in challenging winds, not only in good conditions.
• Watch Wind Direction AND Velocity — Pay attention to angle changes on flags. Even though you see the same windspeed indicators, angle changes make a big difference in your groups.
• Watch While You Wait — Between courses of fire, whenever possible, watch conditions on the range. That way you will be aware of any changes in conditions since your last group and you will be mentally prepared for the new condition.
SPECIAL ADVICE for HUNTING RIFLES
• Clean That Barrel — Most hunting rifle barrels do not get cleaned enough. If you keep barrel clean it will shoot better for you. You should clean your barrel well after every 10 to 12 shots. If you’re lazy, just use Wipe-Out.
• First Shot Inconsistency — Most hunting rifles will not put the first shot (after cleaning) with the subsequent shots. So, after cleaning, if you have a rifle that tosses that first shot high or wide, then shoot one fouling shot before going hunting or before you shoot for group.
• Barrel Heat — Thin-contour “sporter” barrels WILL change point of impact as they heat up. When testing loads for your hunting rifle, take your time and don’t let the barrel get hot on you.
They say that a man can never have too much money or too much time. Darrell Jones would add that a man can never have too many BR-based rifles. Darrell had a fleet of BRs, in 22BR, 6mm BR, 6.5 BR, 7 BR, and 30 BR. But he was intrigued by the potential of a rifle in the .257 caliber. Could it shoot as well as a 6mm BR? Could it challenge the more popular calibers in the highly competitive 600-yard benchrest game? Through careful research and component selection, Darrell created a 25 BR rifle that proves the viability of the 25 BR as a competition round. Pushing 115gr high-BC Berger bullets at 2837 fps, Darrell’s 25 BR “Peppermint” won first place in its very first match.
The Barely Bigger BR — Exploring the .25 Caliber Option
Rifle Report by Darrell Jones
I decided to build a 25 BR after several weeks of deliberation and ruling out a .257 Ackley Improved. Part of my dilemma was that I wanted to shoot F-Class competition at 600 yards, and I was unsure about the accuracy potential of the 25 BR. However, I currently have several BRs chambered in 22 BR, 6BR, 6.5 BR, 7 BR, and 30 BR and they all shoot exceptionally well at 600 yards. This lead me to believe a 25 BR should deliver fine accuracy, just like its other BR siblings. Why wouldn’t a 25 BR shoot accurately provided that I built it with the right components? The feasibility saga began. I began searching diligently for custom 25-caliber bullets. Unfortunately, there are not many 25-caliber custom bullet makers. I actually found only two custom bulletsmiths who produce the 25s. I did look at Fowlers and then looked at Bergers. Both Jeff Fowler and Berger made 110-grain flat-base bullets when I was looking. [Editor — this 110gr bullet is no longer listed by Berger]. The Berger 110gr FB bullets (.414 ballistic coefficient) shot very well out of my 12-twist 25-06 Ackley. However, I wanted to shoot a heavier bullet if possible. Berger makes a 25-caliber 115gr VLD boat-tail with a high ballistic coefficient. This needs a 10-twist barrel.
Panda Action, McMillan Stock, Weaver T-36
As you can see, I went with a Panda polished action and a weighted McMillan BR stock painted metallic silver with red candy cane stripes thus the name “Peppermint”. This gun actually does double duty now as a 25 BR and 6 PPC switch barrel. When I want to run the gun as a 6 PPC for short range, I simply screw on the PPC barrel, then swap in a bolt (fitting the PPC bolt face) from another Panda action I own. That’s one advantage of owning custom Kelbly actions! Don’t even think about exchanging bolts between factory guns. Kelbly rings and a Weaver T-36 fixed-power scope handle the optical duties while a Jewell trigger set at one ounce takes care of the firing mechanism.
Chambering for the .25 Caliber BR Wildcat
I wanted a chamber that would let me shoot both the 110s and the 115s. I took some time surfing the net looking for rental reamers that had suitable throat dimensions. I found that Elk Ridge Reamer Rentals had a 25 BR pilot reamer available. I called and Elk Ridge faxed me a reamer diagram that indicated it was designed to tight SAMMI specs. I asked how often was the reamer used and was told “not very often”.
I did want a minimum no-turn neck optimized for Lapua brass. The drawing indicated that the reamer would cut a .281″ neck and a throat of 1.0315″. This was very close to ideal, though I did have to turn two thousandths off the necks of Lapua 6BR brass after I necked it up. I resized using a .277″ bushing and the loaded rounds came out to be .279″. Realizing that this was in the ball park, I decided to go with the Elk Ridge Reamer and build a 25 BR that could shoot 110gr or 115gr bullets. Now the question was where to get a match-grade 25-caliber barrel. I called quite a few of the custom barrel-makers, including BlackStar Barrels in Texas (no longer operating). I have had wonderful success with the BlackStar barrel on my 6BR “Chantilly” — it delivered great accuracy and impressive velocities. Since the 25 BR was so similar, I went with another BlackStar. I ordered a 10-twist, 6-groove, 1.250″-diameter straight-contour tube.
After chambering, the barrel finished at 1.245″ diameter and 27.5″ inches with an 11° crown. I actually had the throat lengthened to accept both Berger 110gr and 115gr bullets. The bases of the FB 110-grainers sit flush with the neck-shoulder junction, when they are seated .010″ into the lands. With the longer 115gr VLDs, the bottom of the bearing surface (i.e. start of boat-tail) is just about even with the neck-shoulder junction.
Accurate Load Development
The barrel broke in easily with just 10 shots, using a “shoot one and clean” process. The load I started with was 31.5 grains of Varget with CCI 450 primers. The Berger 110s and Berger 115s had the same Point of Impact (POI) at 100 yards. However, the 115s impacted two inches higher at 600 yards with the same load. That shows the benefits of a higher BC. Pushed by the CCI 450s and 31.5 grains of Varget, the 115-grainers were running about 2837 FPS. I boosted the load up to 32.0 grains but I noticed primer cratering, so I backed off, settling on 31.5 grains for the 115gr Berger VLD.
Peppermint Wins at 600 Yards
For her debut in competition, I took “Peppermint” to our local 600 yard F-class match. Shooting the Berger 115s with 31.5 grains Varget, she won with a perfect score of 200 with 14 Xs. At my club, we use a SR3 target. The X-Ring measures 3″ in diameter and the 10-Ring measures 7″. At the match there were some very good shooters with top-flight custom rifles in accurate calibers such as 6.5-284 and 22 Dasher. I was very fortunate to come out on top, but I give the credit to Peppermint’s good bench manners and outstanding accuracy.
As you can see from the target, “Peppermint” is a very accurate rifle that has proven herself in competition. It takes a good gun to finish “on top” in her very first match. So far, I’m very happy with the project, and more than satisfied with the accuracy of the 25 BR. This is definitely a worthy cartridge for Egg Shoots, 500m varmint matches, and the 600-yard F-Class game.
BR-Based Cartridge Comparison
CALIBER
22 BR
6mm BR
25 BR
6.5 BR
7 BR
30 BR
Bullet
80gr SMK
107gr SMK
115gr Berger
107gr SMK
130gr SMK
118gr BIB
BC
.420
.527
.522
.420
.391
na
Load Grains
31.0 H4350
30.0 Varget
31.5 Varget
32.0 Varget
34.0 AA2460
34.0 H4198
Barrel Length
27″
27″
27.5″
27.5″
28″
24″
Velocity
3100 fps
2880 fps
2837 fps
2851 fps
2719 fps
2970 fps
Comparing the BR-Based Variants
Now that I have several calibers in the BR cartridge family, (22 BR, 6mm BR, 6.5 BR, 7 BR, and a 30 BR), it is my humble opinion that they each have their own place. A varmint hunter’s dream, the 22 BR can push a bullet faster and more accurately than the 22-250. With an 8-Twist barrel, the 22 BR can send an 80gr SMK to 600 yards with extreme accuracy.
The 6 BR can do it all. The 6mm caliber offers a wide variety of quality bullets suitable for any shooting situation. All the major custom barrel makers produce outstanding 6mm barrels in a full range of twists. Moreover, since the 6 BR cartridge is so popular, there is a great store of knowledge about reloading for the 6 BR. It is easy to find a load that will shoot superbly in any bullet weight.
The 25 BR has proved to be easily tuneable, proficient and not fickle. You can obtain extreme accuracy without great effort in load development. The 115gr Berger offers a good high-BC projectile for this caliber, making the 25 BR a viable alternative to the 6 BR. As I’ve shown, it is competitive with a 6 BR in head to head competition.
Compared to the 25 BR, the 6.5 BR has a small edge in ballistics. However, there are not many light bullet choices available, especially from custom makers. The 123gr Lapua Scenar is an excellent bullet with a .547 stated BC, but it may be a bit heavy for the case capacity.
The 7 BR was designed for silhouette shooting, and it excels at that task. The 7 BR can push a 130 grain bullet fast enough to knock over the steel silhouettes at 500 meters with real consistency.
The 30 BR is nothing less than outstanding. The 30 BR is now the dominant cartridge on the benchrest Score-shooting circuit. It is also highly accurate for group shooting at 200 yards and very capable of winning a 600-yard F-Class match. Barrel life of over 6,000 rounds is realistic.
I like all the “flavors” of BR derived from the 6mm BR Norma case. However, if I could only have one BR in my safe, give me my 8-Twist, 6 BR “Chantilly” and I will be a happy camper. The final point I would make is if a cartridge is stamped BR on the case, it will shoot extremely accurately if you can.
In today’s inflationary economy, FREE is good. Here’s a list of classic, older shooting books that can be downloaded for FREE from Google Books. This list includes many classic treatises on rifle marksmanship that still have value for today’s competitive shooters. In addition, we’ve included illustrated firearm histories, such as Townsend Whelen’s fascinating book, The American Rifle, and The Gun and its Development (9th Ed.), by William Wellington Greener.
In the list below, the title link will take you to the Google Books page for each book. You can read the entire book online, or (in most cases) you can download it to your computer as a PDF file and save it (or print it). You can also create your own Google Library and save the books there for access from any computer.
To download a book, first click the title from the list above. Then, on the Google book page, look for the row of buttons under the book title. Click the “Download PDF” Button. This will load the full book as a PDF into your browser. You can then save this to your computer or tablet hard drive. Choose a location to hold your new e-book, and click “save”. Alternatively, click the blue “READ for Free” button and the book will appear right on the Google site, with navigation (forward/back) arrows at the top of the page.
Do you find that the crosshairs in your scope get blurry after a while, or that you experience eye strain during a match? This is normal, particularly as you get older. Focusing intensely on your target (through the scope or over iron sights) for an extended period of time can cause eye strain. Thankfully, there are things you can do to reduce eye fatigue. For one — breathe deeper to take in more oxygen. Secondly, give your eyes a break between shots, looking away from the scope or sights.
In our Forum there is an interesting thread about vision and eye fatigue. One Forum member observed: “I have noticed recently that if I linger on the target for too long the crosshairs begin to blur and the whole image gradually darkens as if a cloud passed over the sun. I do wear contacts and wonder if that’s the problem. Anyone else experienced this? — Tommy”
Forum members advised Tommy to relax and breath deep. Increase oxygen intake and also move the eyes off the target for a bit. Closing the eyes briefly between shots can also relieve eye strain. Tommy found this improved the situation.
Phil H. explained: “Tom — Our eyes are tremendous oxygen hogs. What you are witnessing is caused by lack of oxygen. When this happens, get off the sights, stare at the grass (most people’s eyes find the color green relaxing), breath, then get back on the rifle. Working on your cardio can help immensely. Worked for me when I shot Palma. Those aperture sights were a bear! The better my cardio got the better and longer I could see. Same thing with scopes. Try it!”
Keith G. noted: “Make sure you are still breathing… [your condition] sounds similar to the symptoms of holding one’s breath.”
Watercam concurred: “+1 on breathing. Take a long slow deep breath, exhale and break shot. Also make sure you take a moment to look at the horizon without looking through rifle or spotting scope once in a while to fight fatigue. Same thing happens when using iron sights.”
Arizona shooter Scott Harris offered this advice: “To some extent, [blurring vision] happens to anyone staring at something for a long time. I try to keep vision crisp by getting the shot off in a timely fashion or close the eyes briefly to refresh them. Also keep moisturized and protect against wind with wrap-around glasses”.
Breathing Better and Relaxing the Eyes Really Worked…
Tommy, the shooter with the eye problem, said his vision improved after he worked on his breathing and gave his eyes a rest between shots: “Thanks guys. These techniques shrunk my group just a bit and every little bit helps.”
Read more tips on reducing eye fatigue in our Forum Thread: That Vision Thing.
To avoid eye fatigue, take your eyes away from the scope between shots, and look at something nearby (or even close your eyes briefly). Also work on your breathing and don’t hold your breath too long — that robs your system of oxygen.
F-Class ace Erik Cortina recently interviewed noted author and Olympic Gold Medal-winning shooter Lanny Bassham. For his popular video channel, Erik asked Lanny about his book With Winning in Mind. The two talented shooters also broadly discussed the “mental game” in the shooting sports and Lanny’s program for visualization of a winning performance. Lanny explains that after you have mastered your rifle skills, and learned to read the wind, it is important to adopt a winning mentality and to visualize success. Lanny should know. He won a shooting Gold Medal in the Olympics along with 22 world individual and team titles.
Watch Full Video Interview
Here is the wide-ranging and fascinating hour-long Lanny Bassham interview hosted by Erik Cortina. If you are looking to enhance your motivation, discipline, and “mental focus” when competing, this video is worth watching:
Visualization is a process of mental preparation that is done before you get to the range. Many of the greatest shooting champions have used this technique to get ready for big matches, and to optimize their performance during record fire. If you want to enhance your “mental game” through pre-match visualization, we strongly recommend Lanny Bassham’s book, With Winning in Mind.
As a competitive smallbore 3P shooter, Bassham developed a mental management system. Using this system, Lanny Bassham won 22 world individual and team titles, set four world records, and captured an Olympic Gold Medal in Montreal in 1976. His techniques have been embraced by professional and Olympic athletes in many sports. With Winning in Mind covers a complete system of “mental management” techniques used by Olympians and elite champions.
Putting principles into practice — Anette Wachter
Our friend Anette Wachter, aka “30CalGal”, did a series of videos for the NRAWomen.com site. In one episode, Anette talks about the “mental game” in competition. Specifically she explains how to “visualize success”:
I have found that a lot of my success in competition has come through what I call a ‘mental rehearsal’. I actually visualize every stage of the match and I visualize the success of the match and winning the match.
I actually visualize that round going downrange into the target, and the target coming up with a dead-center ‘X’. I visualize this over and over. If you visualize success you will achieve success.
Do you know which one of your eyes is dominant? It’s easy to determine eye dominance with a simple exercise. Pick an object about 6-10 feet away (a light switch or door knob works well). Make an “OK” sign with your right hand (see photo) and hold that about 18″ from your face. Now, with both eyes open, look through the circle formed by your thumb and index finger. Center the circle on the object, so you can see the object in the middle.
Now, here’s the important part — while still holding your hand up, centered on the object, first close your right eye. If you don’t see the object anymore, then your right eye is dominant. If you still see the object, then repeat the procedure with the left eye shut and right eye open. If you don’t see the object when your left eye (only) is closed, then you are left-eye dominant.
The digital archives of Shooting Sports USA contain many interesting articles. A while back, Shooting Sports USA featured a “must-read” expert Symposium on Eye Dominance, as it affects both rifle and pistol shooting. No matter whether you have normal dominance (i.e. your dominant eye is on the same side as your dominant hand), or if you have cross-dominance, you’ll benefit by reading this excellent article. The physiology and science of eye dominance is explained by Dr. Norman Wong, a noted optometrist. In addition, expert advice is provided by champion shooters such as David Tubb, Lones Wigger, Dennis DeMille, Julie Golob, Jessie Harrison, and Phil Hemphill.
Top Rifle Champions Talk About Eye Dominance:
David Tubb — 11-Time National High Power Champion
I keep both eyes open, always. Some use an opaque blinder in rifle or shotgun shooting. If you close your non-dominant eye, you will not get as good a sight picture. If your aiming eye is not your dominant eye, you have even more of a problem to overcome.
Lones Wigger — World, National and Olympic Champion Rifleman
Shooters should try to use the dominant eye unless the vision is impaired and the non-dominant eye has better vision. You should always shoot with both eyes open since this will allow the shooting eye to function properly.
Dennis DeMille — National Service Rifle Champion
I close my non-shooting eye initially. Once I pick up my sight picture, it’s not something I focus on. For those that use a patch, I recommend that they use something white to block their view, rather than cover the eye.
Bruce Piatt — 2015 World Shooting Championship Winner
Some shooters, especially those with nearly equal or cross-dominance, will naturally find themselves squinting one eye. When anyone does this, you are also closing your dominant eye to some extent and adding stress to your face.


 The Benefits of Dry-Fire Training
 F-Class ace Erik Cortina recently interviewed noted author and Olympic Gold Medal-winning shooter Lanny Bassham. For his popular video channel, Erik asked Lanny about his book
  Our friend


 In the archives of
 Gary Anderson served as the Director of the Civilian Marksmanship Program (CMP) from 1999-2009, and is now DCM Emeritus. As a Nebraska farmboy, Gary grew up hunting and shooting. Dreams of winning an Olympic Gold Medal in shooting led Gary to the U.S. Army. In 1959, he joined the elite U.S. Army Marksmanship Unit. Just two years later, he won his first national championship.
 In this article, Hall of Fame benchrest Shooter Speedy Gonzalez explains how to eliminate mechanical and gun-handling problems that cause vertical spread in your groups. Speedy’s article addresses the many human and the hardware factors that can cause vertical.
  • Front Bag Tension–Vertical can happen if the front sand bag grips the fore-arm too tightly. If, when you pull the rifle back by hand, the fore-arm feels like it is stuck in the bag, then the front bag’s grip is too tight. Your rifle should move in evenly and smoothly in the sand bags, not jerk or chatter when you pull the gun back by hand.


 I did want a minimum no-turn neck optimized for Lapua brass. The drawing indicated that the reamer would cut a .281″ neck and a throat of 1.0315″. This was very close to ideal, though I did have to turn two thousandths off the necks of Lapua 6BR brass after I necked it up. I resized using a .277″ bushing and the loaded rounds came out to be .279″. Realizing that this was in the ball park, I decided to go with the Elk Ridge Reamer and build a 25 BR that could shoot 110gr or 115gr bullets. Now the question was where to get a match-grade 25-caliber barrel. I called quite a few of the custom barrel-makers, including BlackStar Barrels in Texas (no longer operating). I have had wonderful success with the BlackStar barrel on my 6BR “Chantilly” — it delivered great accuracy and impressive velocities. Since the 25 BR was so similar, I went with another BlackStar. I ordered a 10-twist, 6-groove, 1.250″-diameter straight-contour tube.
 After chambering, the barrel finished at 1.245″ diameter and 27.5″ inches with an 11° crown. I actually had the throat lengthened to accept both Berger 110gr and 115gr bullets. The bases of the FB 110-grainers sit flush with the neck-shoulder junction, when they are seated .010″ into the lands. With the longer 115gr VLDs, the bottom of the bearing surface (i.e. start of boat-tail) is just about even with the neck-shoulder junction.
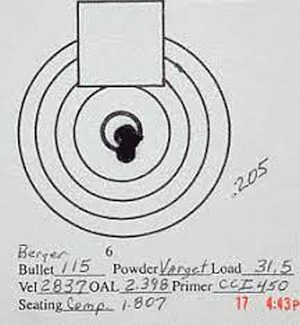 For her debut in competition, I took “Peppermint” to our local 600 yard F-class match. Shooting the Berger 115s with 31.5 grains Varget, she won with a perfect score of 200 with 14 Xs. At my club, we use a SR3 target. The X-Ring measures 3″ in diameter and the 10-Ring measures 7″. At the match there were some very good shooters with top-flight custom rifles in accurate calibers such as 6.5-284 and 22 Dasher. I was very fortunate to come out on top, but I give the credit to Peppermint’s good bench manners and outstanding accuracy.
 Now that I have several calibers in the BR cartridge family, (22 BR, 6mm BR, 6.5 BR, 7 BR, and a 30 BR), it is my humble opinion that they each have their own place. A varmint hunter’s dream, the 22 BR can push a bullet faster and more accurately than the 22-250. With an 8-Twist barrel, the 22 BR can send an 80gr SMK to 600 yards with extreme accuracy.

 In today’s inflationary economy, FREE is good. Here’s a list of classic, older shooting books that can be downloaded for FREE from Google Books. This list includes many classic treatises on rifle marksmanship that still have value for today’s competitive shooters. In addition, we’ve included illustrated firearm histories, such as Townsend Whelen’s fascinating book, The American Rifle, and The Gun and its Development (9th Ed.), by William Wellington Greener.


 Do you know which one of your eyes is dominant? It’s easy to determine eye dominance with a simple exercise. Pick an object about 6-10 feet away (a light switch or door knob works well). Make an “OK” sign with your right hand (see photo) and hold that about 18″ from your face. Now, with both eyes open, look through the circle formed by your thumb and index finger. Center the circle on the object, so you can see the object in the middle.


