Editor: Many new barrels will deliver higher velocities with the same load after 100-150 rounds through the bore. The exact reasons for this speed-up are not 100% certain, and velocity increases (if any) will vary from one barrel to the next. But this “speeding up” phenomenon is common, so be prepared if this happens with your next barrel. If you do experience a significant velocity increase you should probably re-tune your load AFTER the velocity stabilizes at the higher level.
From the Sierra Bullets Blog Article by Mark Walker, Sierra New Product Development Director
In a previous post, I discussed a couple of methods to tune a load to your barrel to help achieve the best accuracy possible. People most often work on load tuning if they get a new rifle or have a different barrel installed. In both instances, the barrel is new and has not been fired very much. According to most competitive shooters, this is the most accurate your barrel will ever be, so getting it tuned and shooting accurately is a priority.
The Speed Up Phenomenon After 100-150 Rounds
Even though after you work up a load and your new barrel is shooting great, a lot of shooters notice that at around 100 to 150 rounds their rifle may stop shooting as accurately. I had this happen to a rifle and I was confused as to why something that worked so well to begin with would all of a sudden quit shooting. I decided to break out the chronograph to do another load work up to see what was going on. To my surprise, the velocity had increased around 80 fps over the original velocity! After performing another ladder test and adjusting the seating depth, the rifle was once again shooting well.
There are several thoughts on why this may happen, however, you can rest assured that it does happen. One thought is that as the barrel breaks in, the tooling marks in the throat of the chamber smooth out and allow less resistance to the bullet as it exits the bore thereby increasing speed. Another idea is that the throat area starts to get a little rough which in turn causes more resistance which increases pressure and therefore more velocity. I’m sure there are some out there who have a better understanding as to why this happens, but it can definitely affect the accuracy of your rifle. So be aware and never be afraid to rework a load to keep your rifle in tune.
Experts Confirm That Barrel Speed-Up Is Common Two respected shooters have observed an increase in velocity with new barrels, typically after 100 rounds. Gunsmith and Hall-of-Fame benchrest shooter Thomas “Speedy” Gonzalez has documented barrel speed-up with testing. Moreover, Speedy’s bore-scope barrel inspections revealed a smoothing of the barrel lands. Jim See, a top PRS competitor, has encountered barrel speed-up many times. Accordingly, he re-tunes his load at 150 rounds.
“Alex Lipworth and I documented this phenomenon about four years ago and I have told all my customers about this. My son Mikee would shoot 100 rounds through all new barrels we planned on shooting before we would begin to do load development. We had a shooting snail that caught all the bullets set up in front of an indoor bench. We called it a wear-in process because upon careful examination of the bore when the ‘Speed Up’ takes place the cut-rifled bore resembles that more of a button-rifled barrels with the lands taking on more the softer look of a buttoned bore.” — Speedy Gonzalez
“Seen it [barrel velocity increase] too many times to count. All my match barrels get a ‘generic round’ loaded for them, which has worked well in barrels historically. After I hit 150 rounds I fine-tune the load and never look back, until the tube starts to slow down at it’s life end.” — Jim See
Note the owner’s name, “S. Limbourne” was engraved on the bolt release (and trigger guard, see below).
Competition rifles don’t need to be beautiful, as long as they shoot. But who doesn’t like a spectacular figured-wood stock, particularly when it is combined with a superb custom action and a tack-driving barrel. This custom .284 Winchester F-Class Open division rig was crafted by gunsmith Thomas “Speedy” Gonzalez for competitive shooter Scott Limbourne. The handsome Bacote wood stock comes from Cerus Rifleworks, while the action is a polished Borden RBRP BRMXD. Two Brux 1:9″-twist barrels were chambered for the project, both finished at 32″. The stock is also fitted with a R.A.D. Recoil System. This rig has top-of-the-line hardware all around.
Action: Borden BRMXD – Polished
Rail: 20 MOA Polished
Chambering: .284 Winchester
Trigger: Jewell BR – Blueprinted
Barrel: (2x) Brux 32″ 1:9″ Twist
Stock: Cerus F-Open in Exhibition Grade Bacote
Recoil System: R.A.D. System
Extras: Carbon Fiber Tunnel Plate, Custom Engraving Work on Action, Trigger Guard, and Bolt Release.
You’ll find other impressive rigs on Speedy’s Facebook Page. If you’d like a superb custom rifle like this, call Thomas “Speedy” Gonzalez at 972-672-6630, or send email to: speedy.godzilla [at] msn.com.
Vertical stringing is a common problem that all precision shooters will face sooner or later. In addition to ammo inconsistencies, many other factors can cause vertical stringing. Accordingly, it’s important that you analyze your gun handling and bench set-up systematically.
EDITOR: Folks, READ THIS ARTICLE! You WILL benefit. There are some VERY important insights here. You’ll learn ways to set up your gun better, and check for various technical issues. That can save you time at the range and save you money spent on expensive bullets and powder.
In this article, Hall of Fame benchrest Shooter Speedy Gonzalez explains how to eliminate mechanical and gun-handling problems that cause vertical spread in your groups. Speedy’s article addresses the many human and the hardware factors that can cause vertical.
Speedy Gonzalez, noted shooter, gunsmith and member of the Benchrest Hall of Fame, offers these pearls of wisdom to help you eliminate vertical in your shot strings. Remember that vertical can result from myriad gear issues and gun-handling mistakes. Try to isolate one item at a time as you work to improve your groups.
BAGS and REST–VERY IMPORTANT
• Front Rest Wobble — You will get vertical if the top section of the front rest is loose. Unfortunately, a lot of rests have movement even when you tighten them as much as you can. This can cause unexplained shots.
• Rifle Angle — If the gun is not level, but rather angles down at muzzle end, the rifle will recoil up at butt-end, causing vertical. You may need to try different rear bags to get the set-up right.
• Front Bag Tension–Vertical can happen if the front sand bag grips the fore-arm too tightly. If, when you pull the rifle back by hand, the fore-arm feels like it is stuck in the bag, then the front bag’s grip is too tight. Your rifle should move in evenly and smoothly in the sand bags, not jerk or chatter when you pull the gun back by hand.
• Sandbag Fill — A front sandbag that is too hard can induce vertical. Personally, I’ve have never had a rifle that will shoot consistently with a rock-hard front sandbag. It always causes vertical or other unexplained shots.
• Bag Ears — If the channel between the Rear Bag’s ears is not in line with the barrel, but is twisted left or right, this can affect recoil and vertical consistency. And take note — if the bag is off-axis quite a bit, you can also get horizontal stringing.
• Reliability — ALL your bench equipment must work flawlessly. If it doesn’t, get it fixed or get rid of it. We need all our attention on wind flags.
GUN HANDLING and BENCH TECHNIQUE
• Be Consistent — You can get vertical if your bench technique is not the same every shot. One common problem is putting your shoulder against the stock for one shot and not the next.
• Free Recoil — Free recoil shooters should be sure their rifle hits their shoulder squarely on recoil, not on the edge of their shoulder or the side of their arm.
• Head Position — Learn to keep your head down and follow-through after each shot. Stay relaxed and hold your position after breaking the shot.
• Eyes — Learn to shoot with both eyes open so you can see more of the conditions.
• Last Shot Laziness — If the 5th shot is a regular problem, you may be guilty of what I call “wishing the last shot in”. This is a very common mistake. We just aim, pull the trigger, and do not worry about the wind flags. Note that in the photo above, the 5th shot was the highest in the group–probably because of fatigue or lack of concentration.
• Last Shot Low — I hear a lot of discussion about low shots in a group and apparently this occurs a lot on the 5th shot. If your 5th shot that goes out most of the time, you can bet you are doing something at the bench.
• Seating — When possible, bring your own stool so that you can sit comfortably, at a consistent height, every time you shoot.
LOAD TUNING
• Find the Sweet Spot — A load that is too light or too heavy can cause vertical problems. When you’ve tuned the load right, you should see a reduction in vertical. Even 0.1 grain may make a difference, as will small changes in seating depth.
• Primers — If you’re getting vertical, and everything else looks fine, try another brand of primers. And remove the carbon from the primer pockets so the primers seat uniformly every time.
• Case Prep — When you chamfer the inside of your case necks make sure they are smooth enough that they don’t peel jacket material off when you seat the bullet. Bullets with J4 Jackets (like Bergers) and Lapua Scenar bullets seem more prone to jacket scratching or tearing than Sierra bullets.
• Shell Holders — Keep shell holders clean, in both your press and priming tool. I have seen so much dirt/crud in shell holders that the cases end up get sized crooked because the rim is not square to the die.
• Water in Cases — I see people walking around with case necks turned up in the loading block. A lot of the time there is condensation dropping from the roof of your loading area. If one drop of water gets in a case you are in trouble. How many times have you had a bad low shot when it has been raining and you have been walking around with your cases turned up in your block?
MECHANICAL and HARDWARE ISSUES
• Barrel Weight — A lot of rifles are muzzle-heavy. Some rifles have too heavy a barrel and this causes vertical, especially when shooting free recoil. Basically the gun wants to tip forward. The remedy is to trim or flute the barrel, or add weight in the rear (if you can stay within weight limits).
• Unbalanced Rifle — If the rifle is not balanced, it does not recoil straight, and it will jump in the bags. If the rifle is built properly this will not happen. Clay Spencer calls this “recoil balancing”, and he uses dual scales (front and rear) to ensure the rifle recoils properly.
• Firing Pin — A number of firing-pin issues can cause vertical. First, a firing pin spring that is either too weak or too strong will induce vertical problems. If you think this is the problem change springs and see what happens. Second, a firing pin that is not seated correctly in the bolt (in the cocked position) will cause poor ignition. Take the bolt out of rifle and look in the firing pin hole. If you cannot see the entire end of firing pin it has come out of the hole. Lastly, a firing pin dragging in bolt or shroud can cause vertical. Listen to the sound when you dry fire. If you don’t hear the same sound each shot, something is wrong.
• Trigger — A trigger sear with excessive spring load can cause problems. To diagnose, with an UNLOADED gun, hold the trigger in firing position and push down on sear with your thumb. If it is hard to push down, this will cause vertical problems.
• Stock Flex — Some stocks are very flexible. This can cause vertical. There are ways to stiffen stocks, but sometimes replacement is the best answer.
SCOPE ISSUES
• Lock Rings — This year alone I have seen nine lock rings on scopes that are not tight. Guess what that does to your group? Make sure yours are tight.
• Big Tubes Need Tension — We’ve observed that some 30mm scope rings are not getting tight enough, and scopes are slipping in the rings under recoil. This will cause point of aim movement.
• Windage Bases — If you’re using a conventional-style single dovetail with rear windage adjustment, make sure both sides of the windage screws are tight. This can induce both windage AND vertical issues since the rear ring is held down by the windage tension.
AWARENESS of CONDITIONS and READING WIND
• Basic Wind-Reading Rule–If you do not know how to read wind flags or are very inexperienced, try to shoot your group with the flags all going in one direction.
• Rate of Fire — The longer you wait between shots when a condition is changing, the more the condition change will affect your shots.
• Look Far and Wide — Learn to look at the whole field of flags, not just the row in front of you. Many times a change quite a ways out will cause shot to go out of your group well before that change shows up in front of your bench.
• Don’t Fear the Wind — When you realize that the wind is your friend you will become a much better benchrest shooter. By this I mean that wind skills can separate you from other shooters who have equally good equipment. To learn how to read the wind, you must practice in challenging winds, not only in good conditions.
• Watch Wind Direction AND Velocity — Pay attention to angle changes on flags. Even though you see the same windspeed indicators, angle changes make a big difference in your groups.
• Watch While You Wait — Between courses of fire, whenever possible, watch conditions on the range. That way you will be aware of any changes in conditions since your last group and you will be mentally prepared for the new condition.
SPECIAL ADVICE for HUNTING RIFLES
• Clean That Barrel — Most hunting rifle barrels do not get cleaned enough. If you keep barrel clean it will shoot better for you. You should clean your barrel well after every 10 to 12 shots. If you’re lazy, just use Wipe-Out.
• First Shot Inconsistency — Most hunting rifles will not put the first shot (after cleaning) with the subsequent shots. So, after cleaning, if you have a rifle that tosses that first shot high or wide, then shoot one fouling shot before going hunting or before you shoot for group.
• Barrel Heat — Thin-contour “sporter” barrels WILL change point of impact as they heat up. When testing loads for your hunting rifle, take your time and don’t let the barrel get hot on you.
Editor: Many new barrels will deliver higher velocities with the same load after 100-150 rounds through the bore. The exact reasons for this speed-up are not 100% certain, and velocity increases (if any) will vary from one barrel to the next. But this “speeding up” phenomenon is common, so be prepared if this happens with your next barrel. If you do experience a significant velocity increase you should probably re-tune your load AFTER the velocity stabilizes at the higher level.
From the Sierra Bullets Newsletter Article by Mark Walker, Sierra New Product Development Director
In a previous post, I discussed a couple of methods to tune a load to your barrel to help achieve the best accuracy possible. People most often work on load tuning if they get a new rifle or have a different barrel installed. In both instances, the barrel is new and has not been fired very much. According to most competitive shooters, this is the most accurate your barrel will ever be, so getting it tuned and shooting accurately is a priority.
The Speed Up Phenomenon After 100-150 Rounds
Even though after you work up a load and your new barrel is shooting great, a lot of shooters notice that at around 100 to 150 rounds their rifle may stop shooting as accurately. I had this happen to a rifle and I was confused as to why something that worked so well to begin with would all of a sudden quit shooting. I decided to break out the chronograph to do another load work up to see what was going on. To my surprise, the velocity had increased around 80 fps over the original velocity! After performing another ladder test and adjusting the seating depth, the rifle was once again shooting well.
There are several thoughts on why this may happen, however, you can rest assured that it does happen. One thought is that as the barrel breaks in, the tooling marks in the throat of the chamber smooth out and allow less resistance to the bullet as it exits the bore thereby increasing speed. Another idea is that the throat area starts to get a little rough which in turn causes more resistance which increases pressure and therefore more velocity. I’m sure there are some out there who have a better understanding as to why this happens, but it can definitely affect the accuracy of your rifle. So be aware and never be afraid to rework a load to keep your rifle in tune.
Experts Confirm That Barrel Speed-Up Is Common Two respected shooters have observed an increase in velocity with new barrels, typically after 100 rounds. Gunsmith and Hall-of-Fame benchrest shooter Thomas “Speedy” Gonzalez has documented barrel speed-up with testing. Moreover, Speedy’s bore-scope barrel inspections revealed a smoothing of the barrel lands. Jim See, a top PRS competitor, has encountered barrel speed-up many times. Accordingly, he re-tunes his load at 150 rounds.
“Alex Lipworth and I documented this phenomenon about four years ago and I have told all my customers about this. My son Mikee would shoot 100 rounds through all new barrels we planned on shooting before we would begin to do load development. We had a shooting snail that caught all the bullets set up in front of an indoor bench. We called it a wear-in process because upon careful examination of the bore when the ‘Speed Up’ takes place the cut-rifled bore resembles that more of a button-rifled barrels with the lands taking on more the softer look of a buttoned bore.” — Speedy Gonzalez
“Seen it [barrel velocity increase] too many times to count. All my match barrels get a ‘generic round’ loaded for them, which has worked well in barrels historically. After I hit 150 rounds I fine-tune the load and never look back, until the tube starts to slow down at it’s life end.” — Jim See
Every Saturday we present interesting, informative videos for our Daily Bulletin readers. Here we feature five YouTube videos that offer a ton of useful information for serious shooters. We start with a great video about setting up rifle, rest, and bag on the bench. Then Hall-of-Fame benchrest shooter Speedy Gonzalez shows smart methods for cleaning barrels. Next F-Class Ace Keith Glasscock explains how to optimize your rifle after travel. In the fourth video, AutoTrickler inventor Adam MacDonald shows how to optimize the AutoTrickler V4. Next the truly outstanding 21st Century Power Neck-Turning lathe is showcased.
How to Set Up Your Rifle, Rest, and Bag on the Bench
To get the best results in benchrest shooting, you need to set up all the gear on your bench properly. That includes front rest placement, rear bag position, spotting scope set-up, and placement of cartridge holder/caddy, and possibly an elbow/forearm rest. When setting up the hardware, you need to align the front rest and rear bag properly to get optimal tracking. In addition you want to make sure the rear bag doesn’t slide or rotate a bit from shot to shot. And you also want to set your seat height/location so the shooter’s position is optimal and comfortable. This helpful video shows how to set up your rifle and gear for a benchrest match or load development/practice at the range. Credit to Boyd Allen for finding video.
Cleaning Barrels with Speedy — Smart Techniques
There are many effective methods to clean barrels. But some are more efficient that others and can help you do the job more quickly, with less effort. Here respected gunsmith and Hall-of-Fame benchrest shooter Speedy Gonzalez shows his procedures for cleaning competition barrels. He uses Sharpshoot-R Liquid Patch-Out and Wipe-Out Accelerator as primary solvents. Watch carefully — Speedy has some clever techniques for starting a patch in the rifling, and he is also careful about exiting the muzzle when brushing. Speedy also explains the importance of keeping your rods clean. And he prefers nylon brushes because, as the barrel starts to get wear in the throat, “the bronze bristles will actually start eating into that and you’ll see little grooves if you have a good borescope.” (See video 00:38-01:35)
Loading for PRS vs. F-Class — Keith Glasscock
Keith Glasscock is one of America’s top F-Class shooters, having finished second at the National Championships multiple times. He also now shoots PRS/NRL Precision Rifle matches. Keith, who has an engineering background, runs the popular Winning in the Wind YouTube channel. There you’ll find great advice on wind reading, load tuning, precision reloading and many other topics. In this video, Keith offers very smart advice on how to optimize a PRS load compared to a F-Class load. Accuracy counts for both disciplines, but the key objectives can be different.
Adjusting AutoTrickler V4 with its Inventor, Adam MacDonald
Adam MacDonald is the brilliant Canadian engineer who created the AutoTrickler series of automated powder dispensing systems. These work with advanced scales to dispense powder rapidly, but with a precise final trickle accurate to a single kernel. In this video, Adam explains how best to adjust and calibrate the AutoTrickler V4 when using powders that flow at different rates.
21st Century Power Neck-Turning Lathe — Great Tool
Turning case-necks can be tedious and tough on older hands if you’re using hand-held tools. Quite a few years ago 21st Century released a great compact, neck-turning lathe that delivers superb, consistent results. This Editor uses that original lathe with hand crank and I can affirm that it works great. It is easy to use, fast, and the turned necks come out smooth with consistent rim thickness. But you still had to turn a crank. Well, in 2018, 21st Century created an upgraded Power Neck-Turning Lathe with an electric motor and lever to advance the cases to the cutter. The power head glides on stainless steel guide rails. Power is controlled with a red button in the feed handle.
This advanced, powered mini-lathe is absolutely superb. It works brilliantly and makes the task of turning case-necks fast and VERY easy. And there is even a 3-Way trimmer upgrade that will trim cases to length at the same time as the necks are turned.
BONUS — How to Spot Fake Online Sellers of Components
With the shortage of premium reloading components, particularly powder and primers, many handloaders are desperate to find components when even big companies such as Midsouth and MidwayUSA are completely sold out. Enter the scammers. There are criminals, many based overseas, who have created entire websites designed to steal your money. You might find such a site when searching for “Varget powder in stock” or “CCI BR4 primers”. These sites look like regular business webstores, with product photos and modern shopping cart systems. But it’s all a scam.
Key giveaways are: 1) The site does NOT take Visa, Mastercard, or Discover but requires payment with Zelle, Venmo, Bitcoin, or AppleCash only; and 2) The site has hard-to-find powders, such as H4895 and H4198, that nobody else has, and you can put thousands of pounds in the shopping cart.
Bottom line here — if the site allows you to order vast amounts of powder and/or primers, and does not take ANY major Credit Card types, it is almost surely a scam. If you see links to pay with Crypto-Currency (such as Bitcoin) run away!
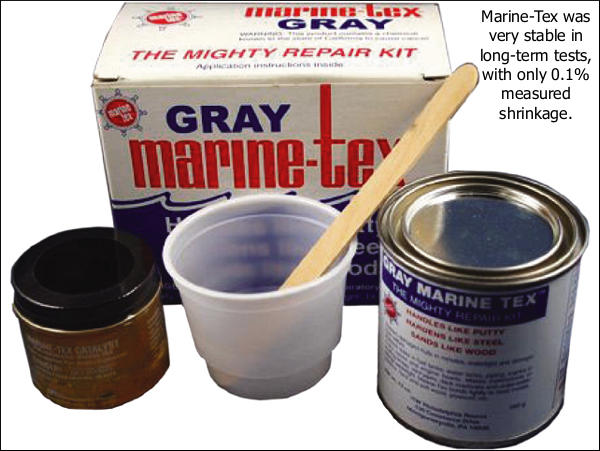
A customer of well-known gunsmith (and Hall-of-Fame shooter) Thomas “Speedy” Gonzalez recently asked Speedy about bedding compounds. Speedy offered some interesting advice based on long-term testing of various materials. Speedy favors Marine-Tex because it is very stable over time, while other materials can shrink up to 6% dimensionally. A good bedding job should be a perfect fit to your barreled action. If the bedding material shrinks over time, that is NOT a good thing….
Speedy’s customer asked: “I know you’re not a Devcon man in regards to bedding compounds but I respect your input in such matters and my question is this in regard to aluminum actions. If Devcon was considered, for an aluminum action, would you prefer aluminum compound formula or steel formula? I personally prefer Devcon steel and Marine-Tex for steel receivers but my experience with aluminum is limited. Also do you have a release agent preference that works better with aluminum?”
Speedy answered: “My only preference of one epoxy over another is their stability over time. My buddy who works for the Texas State Weights and Measures Department had me cast several of the most common types of epoxies used for bedding into 1.000″ machined blocks. After one year of being kept in a controlled climate and measured for shrinkage monthly, the Marine Tex shrunk only 1/10th of 1% (i.e. 0.1%) whereas almost all the others (including Devcon Steel formula, Devcon Aluminum formula…) shrunk 3% to 6%. The only other compounds that matched the Marine Tex were Araldite 1253 and Araldite 2014, with the latter being quite expensive for daily use.”
Speedy added: “The Marine Tex Grey has no atomized metal in its makeup even though it appears that it does. This can be proven by the use of a strong neodymium magnet. What is humorous to me is that people don’t like aluminum yet will bed their actions atop aluminum pillars that have twice the coefficient of expansion (COE) of steel. Like Devcon, it is what people have always done and used. Thus [they] perpetuate the same old stuff. That’s my two cents’ worth. But as I tell everyone, ‘I’ll tell you what I know or do, but it’s not my job to convince anyone to do it my way’.”
Release Agents — Try Shoe Polish
Regarding release agents, Speedy stated: “I use Kiwi Neutral or Tan shoe polish. This works great and you can find it anywhere. Do NOT use the black or brown as it will stick.”
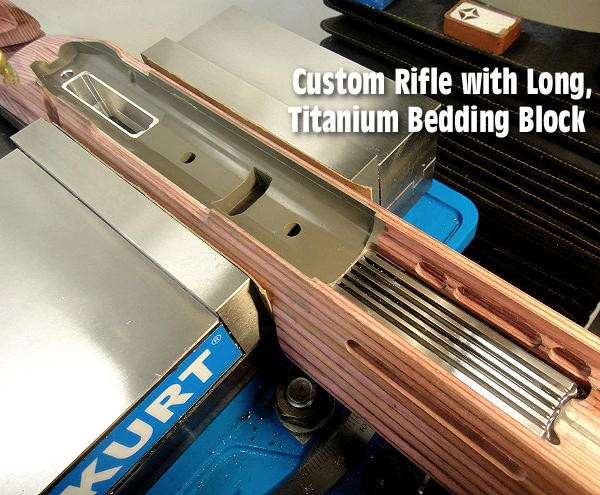
View More Photos of Speedy Gunsmithing
On his Facebook Page you can see a variety of other projects by Speedy. Some time ago, Speedy did a bedding job using a custom titanium bedding block. Speedy notes, “The stock was a raw blank requiring full inletting for the action to fit properly plus the titanium block. All the loading ports, bolt handle cut, bolt stop, and trigger guard cuts were done with diamond tooling to eliminate fraying and/or delamination of the wood.”
Vertical stringing is a common problem that all precision shooters will face sooner or later. In addition to ammo inconsistencies, many other factors can cause vertical stringing. Accordingly, it’s important that you analyze your gun handling and bench set-up systematically.
EDITOR: Folks, READ THIS ARTICLE! You WILL benefit. There are some VERY important insights here. You’ll learn ways to set up your gun better, and check for various technical issues. That can save you time at the range and save you money spent on expensive bullets and powder.
In this article, Hall of Fame benchrest Shooter Speedy Gonzalez explains how to eliminate mechanical and gun-handling problems that cause vertical spread in your groups. Speedy’s article addresses the many human and the hardware factors that can cause vertical.
Speedy Gonzalez, noted shooter, gunsmith and member of the Benchrest Hall of Fame, offers these pearls of wisdom to help you eliminate vertical in your shot strings. Remember that vertical can result from myriad gear issues and gun-handling mistakes. Try to isolate one item at a time as you work to improve your groups.
BAGS and REST–VERY IMPORTANT
• Front Rest Wobble — You will get vertical if the top section of the front rest is loose. Unfortunately, a lot of rests have movement even when you tighten them as much as you can. This can cause unexplained shots.
• Rifle Angle — If the gun is not level, but rather angles down at muzzle end, the rifle will recoil up at butt-end, causing vertical. You may need to try different rear bags to get the set-up right.
• Front Bag Tension–Vertical can happen if the front sand bag grips the fore-arm too tightly. If, when you pull the rifle back by hand, the fore-arm feels like it is stuck in the bag, then the front bag’s grip is too tight. Your rifle should move in evenly and smoothly in the sand bags, not jerk or chatter when you pull the gun back by hand.
• Sandbag Fill — A front sandbag that is too hard can induce vertical. Personally, I’ve have never had a rifle that will shoot consistently with a rock-hard front sandbag. It always causes vertical or other unexplained shots.
• Bag Ears — If the channel between the Rear Bag’s ears is not in line with the barrel, but is twisted left or right, this can affect recoil and vertical consistency. And take note — if the bag is off-axis quite a bit, you can also get horizontal stringing.
• Reliability — ALL your bench equipment must work flawlessly. If it doesn’t, get it fixed or get rid of it. We need all our attention on wind flags.
GUN HANDLING and BENCH TECHNIQUE
• Be Consistent — You can get vertical if your bench technique is not the same every shot. One common problem is putting your shoulder against the stock for one shot and not the next.
• Free Recoil — Free recoil shooters should be sure their rifle hits their shoulder squarely on recoil, not on the edge of their shoulder or the side of their arm.
• Head Position — Learn to keep your head down and follow-through after each shot. Stay relaxed and hold your position after breaking the shot.
• Eyes — Learn to shoot with both eyes open so you can see more of the conditions.
• Last Shot Laziness — If the 5th shot is a regular problem, you may be guilty of what I call “wishing the last shot in”. This is a very common mistake. We just aim, pull the trigger, and do not worry about the wind flags. Note that in the photo above, the 5th shot was the highest in the group–probably because of fatigue or lack of concentration.
• Last Shot Low — I hear a lot of discussion about low shots in a group and apparently this occurs a lot on the 5th shot. If your 5th shot that goes out most of the time, you can bet you are doing something at the bench.
• Seating — When possible, bring your own stool so that you can sit comfortably, at a consistent height, every time you shoot.
LOAD TUNING
• Find the Sweet Spot — A load that is too light or too heavy can cause vertical problems. When you’ve tuned the load right, you should see a reduction in vertical. Even 0.1 grain may make a difference, as will small changes in seating depth.
• Primers — If you’re getting vertical, and everything else looks fine, try another brand of primers. And remove the carbon from the primer pockets so the primers seat uniformly every time.
• Case Prep — When you chamfer the inside of your case necks make sure they are smooth enough that they don’t peel jacket material off when you seat the bullet. Bullets with J4 Jackets (like Bergers) and Lapua Scenar bullets seem more prone to jacket scratching or tearing than Sierra bullets.
• Shell Holders — Keep shell holders clean, in both your press and priming tool. I have seen so much dirt/crud in shell holders that the cases end up get sized crooked because the rim is not square to the die.
• Water in Cases — I see people walking around with case necks turned up in the loading block. A lot of the time there is condensation dropping from the roof of your loading area. If one drop of water gets in a case you are in trouble. How many times have you had a bad low shot when it has been raining and you have been walking around with your cases turned up in your block?
MECHANICAL and HARDWARE ISSUES
• Barrel Weight — A lot of rifles are muzzle-heavy. Some rifles have too heavy a barrel and this causes vertical, especially when shooting free recoil. Basically the gun wants to tip forward. The remedy is to trim or flute the barrel, or add weight in the rear (if you can stay within weight limits).
• Unbalanced Rifle — If the rifle is not balanced, it does not recoil straight, and it will jump in the bags. If the rifle is built properly this will not happen. Clay Spencer calls this “recoil balancing”, and he uses dual scales (front and rear) to ensure the rifle recoils properly.
• Firing Pin — A number of firing-pin issues can cause vertical. First, a firing pin spring that is either too weak or too strong will induce vertical problems. If you think this is the problem change springs and see what happens. Second, a firing pin that is not seated correctly in the bolt (in the cocked position) will cause poor ignition. Take the bolt out of rifle and look in the firing pin hole. If you cannot see the entire end of firing pin it has come out of the hole. Lastly, a firing pin dragging in bolt or shroud can cause vertical. Listen to the sound when you dry fire. If you don’t hear the same sound each shot, something is wrong.
• Trigger — A trigger sear with excessive spring load can cause problems. To diagnose, with an UNLOADED gun, hold the trigger in firing position and push down on sear with your thumb. If it is hard to push down, this will cause vertical problems.
• Stock Flex — Some stocks are very flexible. This can cause vertical. There are ways to stiffen stocks, but sometimes replacement is the best answer.
SCOPE ISSUES
• Lock Rings — This year alone I have seen nine lock rings on scopes that are not tight. Guess what that does to your group? Make sure yours are tight.
• Big Tubes Need Tension — We’ve observed that some 30mm scope rings are not getting tight enough, and scopes are slipping in the rings under recoil. This will cause point of aim movement.
• Windage Bases — If you’re using a conventional-style single dovetail with rear windage adjustment, make sure both sides of the windage screws are tight. This can induce both windage AND vertical issues since the rear ring is held down by the windage tension.
AWARENESS of CONDITIONS and READING WIND
• Basic Wind-Reading Rule–If you do not know how to read wind flags or are very inexperienced, try to shoot your group with the flags all going in one direction.
• Rate of Fire — The longer you wait between shots when a condition is changing, the more the condition change will affect your shots.
• Look Far and Wide — Learn to look at the whole field of flags, not just the row in front of you. Many times a change quite a ways out will cause shot to go out of your group well before that change shows up in front of your bench.
• Don’t Fear the Wind — When you realize that the wind is your friend you will become a much better benchrest shooter. By this I mean that wind skills can separate you from other shooters who have equally good equipment. To learn how to read the wind, you must practice in challenging winds, not only in good conditions.
• Watch Wind Direction AND Velocity — Pay attention to angle changes on flags. Even though you see the same windspeed indicators, angle changes make a big difference in your groups.
• Watch While You Wait — Between courses of fire, whenever possible, watch conditions on the range. That way you will be aware of any changes in conditions since your last group and you will be mentally prepared for the new condition.
SPECIAL ADVICE for HUNTING RIFLES
• Clean That Barrel — Most hunting rifle barrels do not get cleaned enough. If you keep barrel clean it will shoot better for you. You should clean your barrel well after every 10 to 12 shots. If you’re lazy, just use Wipe-Out.
• First Shot Inconsistency — Most hunting rifles will not put the first shot (after cleaning) with the subsequent shots. So, after cleaning, if you have a rifle that tosses that first shot high or wide, then shoot one fouling shot before going hunting or before you shoot for group.
• Barrel Heat — Thin-contour “sporter” barrels WILL change point of impact as they heat up. When testing loads for your hunting rifle, take your time and don’t let the barrel get hot on you.
Editor: Many new barrels will deliver higher velocities with the same load after 100-150 rounds through the bore. The exact reasons for this speed-up are not 100% certain, and velocity increases (if any) will vary from one barrel to the next. But this “speeding up” phenomenon is common, so be prepared if this happens with your next barrel. If you do experience a significant velocity increase you should probably re-tune your load AFTER the velocity stabilizes at the higher level.
From the Sierra Bullets Blog Article by Mark Walker, Sierra New Product Development Director
In a previous post, I discussed a couple of methods to tune a load to your barrel to help achieve the best accuracy possible. People most often work on load tuning if they get a new rifle or have a different barrel installed. In both instances, the barrel is new and has not been fired very much. According to most competitive shooters, this is the most accurate your barrel will ever be, so getting it tuned and shooting accurately is a priority.
The Speed Up Phenomenon After 100-150 Rounds
Even though after you work up a load and your new barrel is shooting great, a lot of shooters notice that at around 100 to 150 rounds their rifle may stop shooting as accurately. I had this happen to a rifle and I was confused as to why something that worked so well to begin with would all of a sudden quit shooting. I decided to break out the chronograph to do another load work up to see what was going on. To my surprise, the velocity had increased around 80 fps over the original velocity! After performing another ladder test and adjusting the seating depth, the rifle was once again shooting well.
There are several thoughts on why this may happen, however, you can rest assured that it does happen. One thought is that as the barrel breaks in, the tooling marks in the throat of the chamber smooth out and allow less resistance to the bullet as it exits the bore thereby increasing speed. Another idea is that the throat area starts to get a little rough which in turn causes more resistance which increases pressure and therefore more velocity. I’m sure there are some out there who have a better understanding as to why this happens, but it can definitely affect the accuracy of your rifle. So be aware and never be afraid to rework a load to keep your rifle in tune.
Experts Confirm That Barrel Speed-Up Is Common Two respected shooters have observed an increase in velocity with new barrels, typically after 100 rounds. Gunsmith and Hall-of-Fame benchrest shooter Thomas “Speedy” Gonzalez has documented barrel speed-up with testing. Moreover, Speedy’s bore-scope barrel inspections revealed a smoothing of the barrel lands. Jim See, a top PRS competitor, has encountered barrel speed-up many times. Accordingly, he re-tunes his load at 150 rounds.
“Alex Lipworth and I documented this phenomenon about four years ago and I have told all my customers about this. My son Mikee would shoot 100 rounds through all new barrels we planned on shooting before we would begin to do load development. We had a shooting snail that caught all the bullets set up in front of an indoor bench. We called it a wear-in process because upon careful examination of the bore when the ‘Speed Up’ takes place the cut-rifled bore resembles that more of a button-rifled barrels with the lands taking on more the softer look of a buttoned bore.” — Speedy Gonzalez
“Seen it [barrel velocity increase] too many times to count. All my match barrels get a ‘generic round’ loaded for them, which has worked well in barrels historically. After I hit 150 rounds I fine-tune the load and never look back, until the tube starts to slow down at it’s life end.” — Jim See
NOTE: The .375 CheyTac is a proprietary cartridge of CheyTac USA. CheyTac® is a registered trademark. CheyTac® bullets, brass, and ammunition are offered by CheyTac USA, which also produces a variety of high-quality firearms for civilian and military use. See all CheyTac® products at CheyTac.com.
This Extreme Long Range (“ELR”) rifle features a massive BAT “L” Round Action, McMillan Beast Stock, 38″ Bartlein 1:7″-twist Barrel, T5 Terminator Muzzle Brake, R.A.D. Recoil Reduction unit, and a customized Cheek Riser. The “Beast” stock name is appropriate — this rifle weighs a massive 38 pounds. Including the T5 brake, the finished barrel, chambered in .375 CheyTac, is 44″ long! All the work was done by Hall-of-Fame shooter and gunsmith Thomas “Speedy” Gonzales, of S.G. Precision LLC in San Antonio, Texas. To see other rifles crafted by Speedy, visit his Facebook page.
Speedy milled vents in the fore-end. He told us: “when you’re burning 150+ grains of powder you need all the ventilation you can get to help reduce the barrel heat.”
There are many good brakes out there, then there’s the “TERMINATOR”! — Speedy
The Phoenix Bipod employs a lowering modification.
About the .375 CheyTac Cartridge
Some of the most successful ELR cartridges are based on the CheyTac family, including the .375 CheyTac (9.5×77) and .408 CheyTac (10.36 x 77). This .375 CheyTac cartridge has proven to be tough and accurate. And it is capable of winning — our friend Derek Rodgers won the 2017 King of 2 Miles (K02M) event shooting a .375 CheyTac (9.5×77).
Derek Rodgers was the 2017 King of 2 Miles. He was also the first-ever human to ever hit the maximum distance target target at 3368 yards (1.91 miles). His cartridge choice? The .375 CheyTac. Derek ran Cutting Edge Bullets in Peterson brass with Hodgdon H50BMG powder.
Q: Why did you choose the .375 CheyTac cartridge?
Derek: When I was asked to join the Applied Ballistics Team, I needed to get an ELR rifle built in a short period of time. I was under a very tight time schedule to get the project complete. In an effort to eliminate variables, I decided to keep things standard and as simple as possible. I chose the .375 CheyTac for the ease of getting components. The larger rifles are more difficult to get components quickly and I felt like the .375 CheyTac had enough attributes to be competitive at ELR distances.
This discussion of rear bag designs and fill levels may offer some new insights for many readers. By “tuning” your rear bag you can reduce hop on shot-firing and help your rifle track better. All that can translate to better scores, particularly with large-caliber rifles.
Tuning Your Rear Sand Bags
Over the years, noted gunsmith and a Benchrest Hall-of-Fame inductee Thomas ‘Speedy’ Gonzalez has learned a few things about “tuning” rear sandbags for best performance. On his Facebook page, Speedy recently discussed how sand bag fill levels (hard vs. soft) can affect accuracy. Speedy says you don’t want to have both your front and rear sandbags filled up ultra-hard. One or the other bag needs to have some “give” to provide a shock-absorbing function (and prevent stock jump). And you want to tune your fill arrangements to match your shooting style. Free recoil shooters may need a different fill levels than bag squeezers (who a softer bag but harder ears).
SAND BAGS & HOW TO FILL THEMby Speedy Gonzalez
I was asked several times by competitors at the S.O.A. Matches and F-Class Nationals as to how I fill my sand bags for benchrest competition. Here is a copy of a reply I gave several years ago:
Back in the old days, Pat McMillan told me: “You can not have two bags filled so hard that you gun bounces on them in the process of firing round at your target, especially if you have a rig with a very flexible stock. The bags must be set up in a manner for them to absorb the initial shock of the firing pin moving forward and igniting the primer.
Then [they must] maintain their shape and absorb the second shock wave as well the rearward thrust and torque of the rifle. What happens to the rifle when this is not done? Well let me tell you. The rifles have a very bad tendency to jump and roll in the bags. This causes many of those wild, lost shots that one can’t explain.”
Here’s some Good General Advice for Bag Set-up:
1. You should not have TWO hard bags [i.e. both front AND rear] in your set-up.
2. Heavy sand magnifies these phenomena.
3. If you are a bag squeezer, pack ears hard and leave bag pliable enough to squeeze for the movement required. You may pack front bag as hard as rules permit.
4. Free recoil shooters pack both bags firm, but not so hard as to allow stock jump. Especially if you have a stock with a very flexible forearm.
5. We use play-ground sand, also know as silica sand. I sift mine to get any large impurities out then mix it with 25% to 50% with Harts parakeet gravel to the desired hardness that I am looking for. The bird gravel keeps the sand from packing itself into that solid as a brick state.
Speaking of bricks — another thing that happens when shooters employ that heavy zircon sand is the ears form a low spot under them from recoil and then tend to rock back and forth with the rifle causing many low shots to crop up. Edgewood makes an Edgewood/Speedy rear bag specially reinforced under the ears to eliminate this scenario.
Shown below are the latest SEB Bigfoot Bags. Note that the bags sit perfectly flat — there is no bulge on the bottom even though the bags are “packed to the brim with sand”.
General Thoughts about Bag Construction and Ear Materials
I do not like the solid double-stitched leather bottoms. While this seems like a good idea, I see more shooters have problems because of them. They tend to slide around the bench and or slide with the rifle on recoil. The standard Protektor with Cordura rabbit ears and an Otto ring bag with a Cordura front would be what I would suggest to the new shooter or one of the Edgewood / Speedy rear bags, these mimic the “Donut” and feature a ring of leather around the bottom circumference that keep the bottom from rocking on the bench or ground[.]
One last note –If you use the Cordura bags, keep them sprayed with a good silicon spray or “Rain-Ex”. This keeps them from getting sticky. — Speedy


 Two respected shooters have observed an increase in velocity with new barrels, typically after 100 rounds. Gunsmith and Hall-of-Fame benchrest shooter Thomas “Speedy” Gonzalez has documented barrel speed-up with testing. Moreover, Speedy’s bore-scope barrel inspections revealed a smoothing of the barrel lands. Jim See, a top PRS competitor, has encountered barrel speed-up many times. Accordingly, he re-tunes his load at 150 rounds.


 In this article, Hall of Fame benchrest Shooter Speedy Gonzalez explains how to eliminate mechanical and gun-handling problems that cause vertical spread in your groups. Speedy’s article addresses the many human and the hardware factors that can cause vertical.
  • Front Bag Tension–Vertical can happen if the front sand bag grips the fore-arm too tightly. If, when you pull the rifle back by hand, the fore-arm feels like it is stuck in the bag, then the front bag’s grip is too tight. Your rifle should move in evenly and smoothly in the sand bags, not jerk or chatter when you pull the gun back by hand.


 Back in the old days, Pat McMillan told me: “You can not have two bags filled so hard that you gun bounces on them in the process of firing round at your target, especially if you have a rig with a very flexible stock. The bags must be set up in a manner for them to absorb the initial shock of the firing pin moving forward and igniting the primer.


