Want to see how some of the best rifle shooters in the world operate in high-stakes, 1000-yard competition? This video shows Team Sinclair powering to victory at the 2014 F-Class National Championships in Phoenix. Scoring an impressive 792-38X, Team Sinclair topped the field, winning the 4-man team title and setting a new 1000-yard F-TR National Team Record in the process. It was a close match, with America’s “powerhouse” F-TR teams battling it out for the top three spots: Team Sinclair (Gold), Team X-Men (Silver), and Team Michigan (Bronze). Team Sinclair’s wind coach Ray Gross did a superb job. Ray also serves as the Captain of the USA F-TR Rifle Team.
Along with the Team Sinclair shooters, this video also features Team X-Men (orange shirts), and Team Michigan. Starting at the 2:05 time-mark, you can hear Bryan Litz calling wind for Team Michigan. Watch the mirage in the video and see if you can match Bryan’s wind calls with the movement of the mirage. This is a great opportunity to see F-TR Top Guns in action. Team score cards appear in the video, starting at the 3:01 time-mark.
Watch Team Sinclair, Team X-Men, and Team Michigan at 2014 F-Class Nationals:
Warning — Video starts with loud rock music. You may want to turn down your speakers if at work.
Thanks to Paul Phillips for editing and uploading this video. Photos courtesy Nightforce Optics.
Would you like a target-cam system that fits in a single, compact weatherproof container, sets up quickly without tripods or external antennas, and works with smartphones, iPads, Android tablets, and Windows laptops? Well then you would like the brand new Bullseye AmmoCam Sight-In, a self-contained target-cam system in a sturdy plastic box resembling a classic military ammo can. Simply set the unit downrange, flip the “on” switch, and start shooting. The whole system weighs just 5 pounds. The manufacturer offers a 30-day unconditional money-back guarantee.
The $349.00 wireless Bullseye AmmoCam is a stand-alone video camera/transmitter that works out to 300 yards. The built-in software identifies and flashes your last shot on the display — that’s smart. The signal can be received by a WiFi-enabled smartphone, tablet, iPad, or Windows laptop computer. It even allows multiple users to connect simultaneously (so your buddy can watch your target as you shoot). There are no wires to string or bulky antennas to set up. The whole system is simple and easy, and weighs just five pounds. The fully weatherproof container is a compact 14″ x 8″ x 10″. Daytime battery life is 12+ hours.
Bullseye AmmoCam Sight-In Edition
The AmmoCam Sight-in model works out to 300 yards with clear line of sight. With a built-in lamp to illuminate the target, the AmmoCam system works both in day-time and after dark. The 5-lb, $349.00 package includes all the following:
Video Camera with night illumination.
WiFi Transmitter (with built-in router).
Rechargeable lithium-ion battery pack w/charger (12+ hour run time).
Target Manager software package for iPhone, iPad, Windows XP, Vista, Windows 7 and 8.
Secure, fully weatherproof 14″ x 8″ x 10″ Carrying Case.
Bullseye 1000-Yard Long-Range Edition
While we understand the appeal of the dead-simple AmmoCam, we know that many shooters want to go out way past 300 yards. For them, Bullseye Camera Systems offers a 1000-Yard Long Range Edition System, priced at $549.00. This is a complete package which includes video camera, router with high-gain antenna, tripod, carrying case, and all necessary connectors. Bullseye Target Manager software works with iPhone, iPad, Windows XP, Vista, Windows 7 and Windows 8 (and soon Max OSX).
Frank Galli (aka “Lowlight”), the head honcho of Sniper’s Hide, has created a good 15-minute wind-reading video for the Scout web network. This video, a segment from the Sniper’s Hide Day One DVD, covers many of the important basics of wind reading. It’s a helpful introduction for those getting started in long-range rifle shooting.
Quote 1: “On the range, people describe the wind as the Great Equalizer. Next to your drop, drift from wind is the second most important consideration for the long range precision rifle shooter. Unlike drop, which is predictable, the wind is a constantly changing factor.”
Quote 2: “Wind is like water. It’s important to understand how terrain will effect the wind, how it will change the direction, velocity and consistency. It’s responsible for turbulence, it’s responsible for unseen changes that will throw our shot off. Wind will ebb and flow just like waves crashing on the beach. We need to understand the frequency and velocity of each wave.”
Frank Galli, aka “Lowlight”, runs the popular SnipersHide.com website. A while back, Frank completed a gunsmithing course with Robert Gradous. Frank recounts the learning process in an informative, nicely-illustrated article on the ‘Hide. Frank explains how he put together a new 6.5 Creedmoor tactical rifle using a Bartlein barrel, Bighorn Action (Rem clone with floating bolt-head), and a “lightly used” Accuracy International 1.5 chassis. The HD video below shows the process start-to-finish. READ Full Article.
During Frank’s “hands-on” training sessions with Gradous, Frank learned to thread and chamber a barrel, fit a recoil lug, and install the barreled action in the AI chassis. Chambering was done with great care: “We spent the better part of the day working the barrel. I feel this is a critical component and seeing the attention to detail in Robert’s approach confirmed it for me. When it came time to chamber Robert had a custom tight chamber reamer there for a 6.5CM but I’m shooting a tactical rifle, tight chambers aren’t for me, and this was clear, as out came the standard SAAMI reamer.”
Frank also learned how to modify an aluminum chassis: “the AI chassis had the recoil lug opened up, but it was opened in the wrong direction. This was going to require milling increasing the gap to at least a 1/2″ in size. Robert was really leery of this, but my attitude was, ‘it’s just a chassis and nothing a little Marine Tex can’t handle’.” Thankfully the chassis mod came out OK.
Once the barreled action was complete and the AI chassis was successfully milled, Frank applied a tan Cerakote finish to the barreled action. This would give a proper tactical look to the rifle, while providing superior corrosion resistance for the metal parts. To learn more about Cerakote finishing, check out the Cerakote Application Video, published last week in the Daily Bulletin.
When the rifle was complete, Frank took it out for testing with a variety of ammo, both factory fodder and handloads. There were some initial worries about accuracy as it took a while for the barrel to break in. A few sessions of bore cleaning were required before the barrel stopped fouling and then — like magic — the rifle started printing really small groups.
By the end of his load testing session, Frank was getting good groups with Hornady 120gr GMX factory 6.5 Creedmoor ammo, and really superb groups with handloads. The 120gr GMX ammo “was going 3100 fps with no ill effects”. The best handloads were approaching 1/4 MOA for three shots, and Frank’s load with Berger 130 VLDs shot even smaller than that: “In my opinion the load development we did was worth its weight in gold. Where else can you build in a rifle in two days, then go out and develop a baseline load using everything from 120gr ammo to 140gr ammo with a few in between? My favorite load and clearly the rifle’s too, was the [Berger] 130gr VLD. This gave us great velocity, awesome groups [with some one-holers] and really nice results at distance.”
Lowlight’s Gunsmithing Story is a ‘Must-Read’
We recommend you read Frank’s story. It shows that, with the right tools, and the supervision of a master smith, even a novice can produce an ultra-accurate rifle. For those of you who have considered taking a gunsmithing class, Frank’s successful experience with gunsmith Robert Gradous should give you plenty of motivation.
Here’s an interesting contest from Kahr Firearms Group (Kahr), the makers of Kahr compact carry pistols. To demonstrate the accuracy of its pistols, Kahr invites shooters to showcase their long-range pistol skills in a YouTube Video. There’s some serious prize money up for grabs.in this Long Range Shooting Video Contest. The contest winner receives $5000.00 worth of firearm products and accessories from Kahr, Magnum Research, and/or Auto Ordnance.
Submit Video for a Chance to Win
To enter the contest you need to shoot a Kahr pistol at a distance of at least 100 yards. Video your shooting session, and upload that to YouTube. The person whose YouTube video gets the most views will be named the Grand Prize winnner. The contest period runs November 1, 2014 through December 31, 2014 and the winner will be announced on January 6, 2015.
“Our goal of this shooting contest is to dispel the myth that accuracy is sacrificed in exchange for a smaller sized pistol, like that found in our concealed carry product line.” stated Justin Moon, CEO of Kahr Firearms Group.
The Long-Range Shooting Contest video must be original footage running from thirty seconds to three minutes in length. The footage must demonstrate shooting at a target distance of 100-yards (or more), exclusively using a Kahr pistol. CLICK HERE for Contest Rules.
Tech Tip — Pistol Accuracy
What kind of accuracy is possible with a small semi-auto pistol? Rested from a bench, we’ve seen production 1911s shoot inside 2″ at 50 yards. That may be hard to achieve with a Kahr, but who knows? If you are using the standard Kahr iron sights, you may want to use a 6 o’clock hold on a black bullseye. Alternatively, you can make a target with a large, thick horizontal line with a red/orange dot in the center (see sample below) The horizontal line helps you align the top of your front blade with the rear sights for best control over elevation.
Try Custom Hand-loads
If you’re serious about this contest, you should experiment with various custom hand-loads. (As far as we can tell, the contest rules allow custom-loaded ammo.) You may find that you get the best results with cast lead bullets (as opposed to jacketed bullets). Try a variety of load recipes, with a range of velocities (slow, medium, and fast). Some of our pistols like fast loads, while other handguns prefer slow (725-950 fps), subsonic loads.
If you want to see how a muzzle brake really works, definitely watch this remarkable slow-motion video compiled by Proof Research.
This amazing video features a variety of firearms: suppressed 9mm pistol, .338 Norma rifle, .300 WinMag rifle, 12ga comp’d shotgun, plus an AR15 and AR10.
This Must-Watch Video Has Some Amazing Ultra-Slow-Motion Segments
Watch the ultra-slow motion segment at the 2:55 mark and you can actually see a .30-cal bullet spin its way through the muzzle brake, leaving trail of flame that blows out the ports. Interestingly, at the 3:10 mark, you can also see a bright “afterburn” ball of fire that forms a few inches ahead of the muzzle milliseconds after the bullet has left the barrel. Perhaps this is late ignition of unburned powder?
Proof Research (PR) sells high-grade hunting and tactical rifles built with PR-made actions and carbon-wrapped barrels. For more information, visit ProofResearch.com.
Credit Steve of TheFirearmBlog.com for this YouTube video. Footage by JNZ for Proof Research.
New handloaders often ask us for advice on reloading techniques and equipment selection. It’s always best for novice reloaders to work under the guidance of an experienced mentor. Nothing beats “learning the ropes” with an experienced reloader at ones side. In addition, new handloaders should acquire one or more good reloading manuals, such as the Hornady Reloading Handbook (9th Ed.). We recommend reading the introductory chapters of a reloading manual to get a good understanding of the basic principles involved.
Along with print manuals, instructional DVDs are available. RCBS sells a 32-minute, step-by-step Precisioneered Handloading DVD, narrated by Shooting USA’s Jim Scoutten. This $9.19 DVD covers the basics of metallic cartridge reloading and shotshell reloading.
For those who have already mastered the basics, Redding offers a 45-minute instructional DVD, appropriately named Advanced Handloading: Beyond The Basics ($17.52 at Amazon.com). The Redding DVD, produced with help from Sierra Bullets, is narrated by John Barsness, field editor of Rifle and Handloader magazines. The Redding DVD does go “Beyond the Basics” but it really is more an intermediate resource — it doesn’t reveal some of the most sophisticated methods of case prep and load tuning used by competitive benchrest shooters. Nonetheless it is a good resource for those getting started with rifle cartridge reloading.
Where did all the .22 LR ammunition go? Why are the prices so high? Why can’t the rimfire ammo-makers step up production? Across the country, firearm owners are asking these questions, and demanding answers.
Part of the explanation comes down to production capacity. America’s rimfire ammo production facilities are already running at full capacity. There is no easy way in increase production. In the video below, the crew from Shooting USA Television visits the ATK production facility in Lewiston, Idaho. This plant can produce 4,000,000 rounds of CCI rimfire ammo in one 24-hour period. This informative video shows the complete process of rimfire ammunition production from start to finish.
This is a ‘must-watch’ video that reveals some very interesting things. Did you know that 1200 cases (in one large tray) are filled with powder in a single operation? (See 05:45 mark). Likewise, bullets are also lined up in a matching 1200-count tray (See 6:00 mark). This way 1200 bullets can be seated into 1200 rimfire cases in one efficient procedure.
When you watch the video, and see the complex, expensive machinery involved, you’ll realize that it’s no easy thing to increase rimfre ammo production. The rimfire plants are already running at full capacity. To produce significantly greater quantities of .22 LR ammunition, manufacturers would have to make huge capital investments.
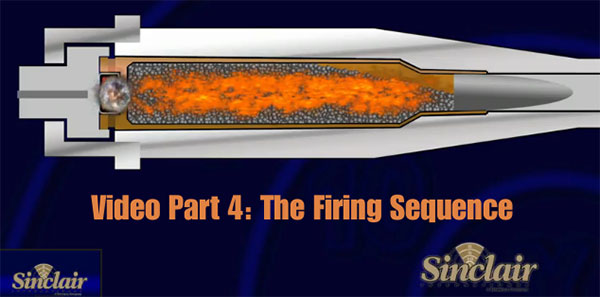
Sinclair International has produced an eight-part video series on metallic cartridge reloading, hosted by Sinclair’s former President Bill Gravatt. The entire series can be viewed (for free) via Sinclair’s “How-To Videos” archive. While this set of videos starts with the basics, it covers many more advanced aspects of reloading as well. Accordingly, both novice and experienced reloaders can benefit from watching the eight videos. We think everyone should watch Video No. 2, which outlines the hazards of reloading and provides guidelines for safe reloading practices.
We also strongly recommend Video No. 4 to readers who are getting started in reloading. This “How Things Work” segment covers the sequence of events inside the chamber (and barrel) when the cartridge is fired. The video includes helpful graphics that show what happens to the primer, powder, cartridge, and bullet when the round is fired. The video also illustrates “headspace” and explains how this can change after firing. We think this video answers many common questions and will help reloaders understand the forces at work on their brass during the firing process.
If you own a modern smart-phone, you have a shooting coach in your pocket. What we mean is that the video-recording capability of your smart phone can help improve your shooting. Have you ever watched yourself shooting, under match conditions? Well you may be shocked (and surprised) by what you see. Video reveals all. If you are flinching, you’ll see it. If you’re not returning your rifle to the same place on the rests after each shot, you’ll see it. If you are not maintaining a consistent cheek weld from shot to shot, you’ll see it.
If you are a serious competitive shooter (or aspire to be one), you should take a camera to the range next time you practice. Have a friend film you while you are shooting in “match-like conditions”, i.e. with time limits and a specific course of fire. After the filming session, review the video carefully.
Our IT guy, JayChris, has improved his shooting skills by filming his practice sessions and watching for gun-handling errors or other mistakes. Recently Jay won the F-Open division at the TCSA (Rattlesnake) match. Jay says his progress has been aided by video analysis:
“Video-tape yourself in match conditions (or under mock match conditions when practicing). I have video from my first season of shooting at a long range match some years ago. I can compare that to video shot in 2014. Going back to year one, I could see how much moving around I was doing. The video camera is a useful tool. I video myself every so often at the practice range, just to make sure I’m consistent. When reviewing the video, I’ve caught myself dropping a shot right after re-settling into a new position where I didn’t even notice I was doing it while shooting.”
Video analysis has helped our IT Guy, JayChris, shoot better and make fewer mistakes.
Watch Your Position on Video
Jay continues: “Watching myself and other shooters on video has shown me how important it is to establish a comfortable shooting position. I used to move all over the place between shots. I spent some time getting a feel for a position where I could eject and load without breaking my cheek/shoulder weld, and that I could hold through a 20-shot string. It’s probably not as super critical as sling shooting positions, but I think it makes a big difference. It also helps ensure that your view through the scope remains the same. If you have parallax, changing your cheek weld has consequences. This includes making sure your rifle is set on the bags at a comfortable height — too high or too low and you are straining yourself and adding muscle tension into the equation.”
Use Video To Analyze Mistakes After Matches
Video can help you identify inconsistent holds and gun-handling mistakes. A video review can be part of the regular “post-mortem” you should do after every match. Bryan Litz says: “After each match, carefully analyze how you lost points and make a plan to improve. Beginning shooters will lose a lot of points to fundamental things like sight alignment and trigger control. At every step along the way, always ask yourself why you’re losing points and address the issues.”
Video can help you spot problems (such as inconsistent head position or bad trigger technique) that cost you points. We had one friend who was complaining about “mysterious horizontal” at matches. A post-match video session revealed that he was yanking the trigger to the side, rather than pulling straight back. He then consciously worked on his trigger control and his scores improved noticeably.
Video Equipment — What You Need
If you own a digital point-and-shoot camera made within the last four years, chances are you can shoot video. It may not be HD video, but it will suffice for the task of analyzing your shooting technique. Apple iPhones and iPads (and some Android phones) can take excellent video as well, but you’ll have to figure out a mounting system if you’re out by yourself. If you don’t currently own any device that can shoot video, consider one of the choices below. You can get a great camera for under $250.00 these days. The selections below all feature wide-angle capability, so you can position the camera close to the shooter. That’s important when shooting at crowded ranges. The Panasonic Lumix ZS20 has built-in GPS functionality, so you can tag your photos/videos with latitude and longitude.
One tip — you do NOT need to record at 1920×1080 Full HD resolution. It’s nice that some of the latest cameras (including the GoPro) offer this resolution, but 1920×1080 files will be HUGE, and older computers may have trouble playing back the video. For your range movies (to be viewed on a computer), we suggest you record at 720p HD.


 Would you like a target-cam system that fits in a single, compact weatherproof container, sets up quickly without tripods or external antennas, and works with smartphones, iPads, Android tablets, and Windows laptops? Well then you would like the brand new


 Once the barreled action was complete and the AI chassis was successfully milled, Frank applied a tan Cerakote finish to the barreled action. This would give a proper tactical look to the rifle, while providing superior corrosion resistance for the metal parts. To learn more about Cerakote finishing, check out the
  By the end of his load testing session, Frank was getting good groups with Hornady 120gr GMX factory 6.5 Creedmoor ammo, and really superb groups with handloads. The 120gr GMX ammo “was going 3100 fps with no ill effects”. The best handloads were approaching 1/4 MOA for three shots, and Frank’s load with Berger 130 VLDs shot even smaller than that: “In my opinion the load development we did was worth its weight in gold. Where else can you build in a rifle in two days, then go out and develop a baseline load using everything from 120gr ammo to 140gr ammo with a few in between? My favorite load and clearly the rifle’s too, was the [Berger] 130gr VLD. This gave us great velocity, awesome groups [with some one-holers] and really nice results at distance.”


 If you want to see how a muzzle brake really works, definitely watch this remarkable slow-motion video compiled by

 Where did all the .22 LR ammunition go? Why are the prices so high? Why can’t the rimfire ammo-makers step up production? Across the country, firearm owners are asking these questions, and demanding answers.

 If you own a modern smart-phone, you have a shooting coach in your pocket. What we mean is that the video-recording capability of your smart phone can help improve your shooting. Have you ever watched yourself shooting, under match conditions? Well you may be shocked (and surprised) by what you see. Video reveals all. If you are flinching, you’ll see it. If you’re not returning your rifle to the same place on the rests after each shot, you’ll see it. If you are not maintaining a consistent cheek weld from shot to shot, you’ll see it.
 Video Equipment — What You Need


