Print and Laminate a Ballistics Data Card
Three-gun match competitor Zak Smith employs a simple, handy means to store his elevation and wind dift data — a laminated data card. To make one, first generate a come-up table, using one of the free online ballistics programs such as JBM Ballistics. You can also put the information in an Excel spreadsheet or MS Word table and print it out. You want to keep it pretty small.

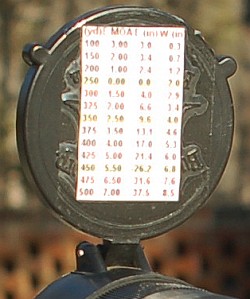
Below is a sample of a data card. For each distance, the card includes drop in inches, drop in MOA, drop in mils. It also shows drift for a 10-mph cross wind, expressed three ways–inches, MOA, and mils. Zak explained that “to save space… I printed data every 50 yards. For an actual data-card, I recommend printing data every 20 or 25 yards.” But Zak also advised that you’ll want to customize the card format to keep things simple: “The sample card has multiple sets of data to be more universal. But if you make your own data card, you can reduce the chance of a mistake by keeping it simple. Because I use scopes with MILS, my own card (bottom photo) just has three items: range, wind, drop in MILS only.”

Once you have the card you can fold it in half and then have it laminated at a local office store or Kinko’s. You can keep this in your pocket, tape it to your stock, or tie the laminated card to your rifle. If you regularly shoot at both low and high elevations, you may want to create multiple cards (since your ballistics change with altitude). To learn more about ballistic tables and data cards, check out the excellent “Practical Long-Range Rifle Shooting–Part 1″ article on Zak’s website. This article offers many other insights as well–including valuable tips on caliber and rifle selection.
Another option is to place your ballistics card on the back of the front flip-up scope cover. This set-up is used by Forum member Greg C. (aka “Rem40X”). With your ‘come-up’ table on the flip-up cover you can check your windage and elevation easily without having to move up off the rifle and roll the gun over to look at the side of the stock. Greg tells us: “Placing my trajectory table on the front scope cover has worked well for me for a couple of years and thought I’d share. It’s in plain view and not under my armpit. And the table is far enough away that my aging eyes can read it easily. To apply, just use clear tape on the front objective cover.”


