Future Tech? 3D Printed Metal Rimfire Receiver Made in NZ

Here’s something truly innovative — a 3D-printed metal rimfire receiver!
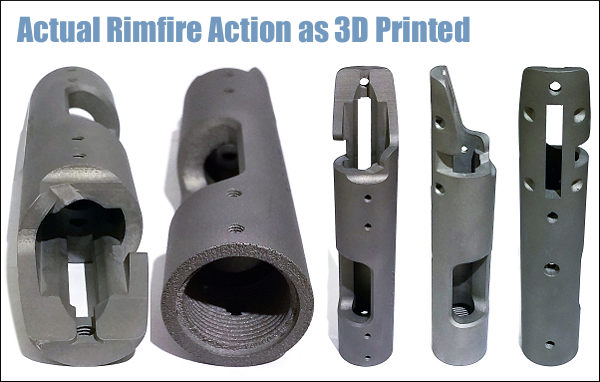
Forum member Marcos G. (aka MFP_BOP) has designed and created his own rimfire action. But it’s not machined or forged. This new action was created with a 3D sintered metal printer. A 3D modeler by profession, Marcos has the requisite skill set and access to a very high-tech (and expensive) metal printer. As printed, the actual receiver is shown below. It has just been sent out to be age-hardened to 40 HRC, after which final finish work (e.g. cleaning up tenon threads) will be done. To learn more about this 3D-printing project, read this FORUM Thread.

When most of us think of 3D printing, we think of small plastic parts — nothing as strong as steel. But there are 3D printers that employ sintered metal to build complex metal components. Marcus says the receiver he’s created should have “stated yield and tensile strength similar to investment casting.” The material used for the action is 15-5 PH® Stainless Steel (in sintered form).
The action was designed to use a PT&G 40X rimfire bolt. Marcos notes that “There is an extraction cam inside of the action, something that would be very hard or impossible to do by regular machining and/or EDM.”
Born in Brazil, Marcos now lives in New Zealand. He tell us that: “New Zealand is a very gun-friendly country. I just need my A-CAT license to make [a receiver.]” So there are no special legal restrictions (as might apply in the USA). The printer is EOS270 laser metal sintering machine. Marcos says: “The current price for one of those machines is in five figures, but I am 99.99% sure that in 5-7 years this technology will be readily available to anyone.”
As designed, the receiver was 1.4″ in diameter. Marcos reports it came out of the printer at 1.403″. The designed boltway is .690″ and it came out .687″. Marcos notes: “I haven’t noticed any warping. The threads are rough, really! Interior and exterior finishes are really good though, probably because of the way it’s been printed: upside down (must have gone through tumbling afterwards). I will have to run some taps and single-point-cut the tenon threads to clean them up.”

Marcos says the actual printing process took a lot of time: “I should have asked how long it took to be printed!” But consider this, the 7″-long receiver is created in layers only 20 microns thick, so you can understand why the process took so long.
Reasons to Print a Rimfire Receiver
Marcos 3D-printed his own action basically to save money: “Some may be asking why I printed this receiver. Here’s a little history… I tried different ways to bring a Stiller 2500X action into New Zealand. The final price to my door was NZ $3000.00 (about $2195.00 USD). Designing and making one would be way cheaper, but I felt nobody here could machine the internal abutments with precision. Also printing was still a little cheaper and printing offered the chance to put in it all details I wanted — such as M4 threads, internal cam, and fillets.”
Similar Posts:
- 3D Metal Printed Rimfire Receiver from New Zealand
- Future Tech: 3D Metal Printing of Gun Parts and 1911 Pistol
- How to Blueprint a Rem 700 Action — Rifleshooter.com Reveals
- Blueprinting Rem 700 Action — “How-To” with Rifleshooter.com
- How to Blueprint a Rem 700 Action — RifleShooter.com Report
Tags: 22LR, 3D, 3D Printing, 40X Bolt, Forum Thread, Marcos, Metal Printing, MFG_BOP, New Zealand, PT&G


