The October 22, 2025 episode of Shooting USA TV features the Vintage Sniper Rifle match at Talladega Marksmanship Park in Alabama. Vintage Sniper competitions use period correct battle rifles with older-style optics. Teams of two engage targets at three hundred and six hundred yards. “It’s a match that brings … a nostalgic competitor out. You’ll see World War II time-period rifles, sniper-type rifles that were used during World War II, [and] Korean War era,” noted Mark Johnson of the CMP. “The optics are either original optics or current reproduction of old optics.”
Shooting USA Broadcast Times: Wednesday 9:00 PM Eastern and Pacific, 8:00 PM Central on Outdoor Channel. Check your local listings for the Outdoor Channel.
Vintage Sniper Rifle matches have proven popular with competitors of all ages, from 18 to 80. These matches are conducted with two-man teams, using vintage rifles with scopes. Most shooters use bolt-action rifles such as the 1903 Springfield and Swedish Mauser, but there is also a semi-auto class popular with Garand shooters. Along with today’s Shooting USA episode, you can watch a previous Vintage Sniper match on YouTube. Click the arrow below to start the 48-minute show:
Vintage Sniper Rifle Competition at Talladega
The Vintage Sniper Match at the CMP’s Talladega Marksmanship Park is a popular two-man team event, for shooter and spotter, using military rifles in service up to 1953. One added challenge is the time limit. The team has only 20 seconds to complete each shot — That’s 20 seconds for the spotter to read the conditions, and for the shooter to pull the trigger.
Who can identify this vintage European rifle, with its unusual scope mount?
October is Halloween month, so we thought we’d share the seasonal spirit with our readers. In this video, our friend Kirsten Joy Weiss shows off her impressive trick-shot skills. To help celebrate the gouls/goblins holiday, Kirsten “carved” a pumpkin using her semi-auto Volquartsen .22 LR rifle.
Kirsten had to send a lot of rimfire rounds into her orange friend. It turns out the little .22-caliber bullets worked better on exit than entry — Mr. Pumpkin’s posterior side was more impressive than his front. But overall, the effort turned out very well indeed, as you can see. Nice job, Kirsten.
On inspection, Kirsten found that the most impressive Jack ‘O Lantern face appeared on the reverse side of her pumpkin. The “exit wounds” were better than the entry holes.
Every serious hand-loader benefits from a precise, repeatable, and efficient powder dispensing system. There are many electronic powder dispensers on the market, starting at about $195 for a Frankford Arsenal Intellidropper and $240 for a Lyman Gen6. At the high end, the ultimate powder weighing/dispensing system would be an Auto-Trickler V4 mated to an top-tier electronic Force Restoration scale. Such a system can run $1200 or more, depending on scale cost.
In today’s Saturday video showcase we feature eight videos about electronic powder dispensers, as well as Auto-Trickler systems (both V3 and V4). If you are in the market for a new powder scale/dispenser system, we recommend you watch these videos. You may be surprised by some of the findings, and you will certainly learn more about these machines — their pros and cons. That knowledge can help you decide what electronic powder dispenser best deserves your hard-earned dollars.
Five Powder Dispenser Comparison Test (All Units Purchased)
If you are in the market for a sub-$500 electronic powder dispenser, definitely watch this review. This Backfire comparison test is notable because the tester spent his own money to purchase all five powder dispensers being reviewed. That means Backfire could tell the full truth, both good and bad, about the machines. In fact, Backfire bought TWO ChargeMaster Lites because one failed (See 14:12 time-mark). The reviewer liked the RCBS ChargeMaster Supreme, but his top choice overall was the Hornady Auto Charge Pro. He favored the overall design, and really liked the way the dispensing speeds could be easily set faster or slower. Here are highlights from the video review:
00:08 Speed Test
03:09 Accuracy Test
07:57 Frankford Arsenal Intellidropper
09:08 Lyman Gen 6
10:44 RCBS Chargemaster Supreme
12:03 Hornady Auto Charge Pro
14:12 RCBS Chargemaster Lite
14:41 Conclusions
AutoTrickler V3 vs. Hornady Auto Charge Pro
In the Backfire comparison video above, the Hornady Auto Charge Pro powder dispenser earned top marks among sub-$500 units. Here the Auto Charge takes on some tougher competition — an ultra-precise Force Restoration scale fitted with an Auto-Trickler V3, a system that cost upwards of $1150.00 U.S. Dollars. The Australian duo running the comparison found the Auto-Trickler system was more accurate and consistent. Notably, with a dispense speed of just 14 seconds. the Auto-Trickler V3 system was significantly faster than the Hornady machine. The Auto-Tricker V3 has been superseded by the new Auto-Trickler V4 which retails for $490.00 USD. Add $630 or more for a good Force Restoration scale such as the A&D FX-120i.
RCBS New ChargeMaster Supreme and Other ChargeMasters
In this well-made video, Gavin Gear of UltimateReloader.com does a detailed review of the new-generation RCBS ChargeMaster Supreme. He puts it through his paces, verifying its accuracy and repeatability. He shows how the unit can be programmed. At the 17:20 time-mark, Gavin employs an A&D FX-120i Force Restoration scale to check the ChargeMaster Supreme’s charge-weighing precision. The results were good.
Frankford Arsenal Intellidropper vs. RCBS ChargeMaster Link
The Frankford Arsenal Intellidropper, now just $194.49 on Amazon, was very innovative when first released, offering remote Bluetooth access and a wide range of programmable features. The downloadable App stores your load data and has preloaded bullet and powder databases. This video compares the Intellidropper with another Bluetooth-enabled modern powder dispenser, the RCBS Chargemaster Link. A free RCBS App allows you to control settings remotely.
Hornady Auto Charge Pro Review by Ultimate Reloader
As the $359 Hornady Auto Charge Pro dispenser was top-rated in the Backfire comparison at the start of this article, we thought we’d include a detailed review from Gavin Gear of UltimateReloader.com. If you are thinking of buying a Hornady Auto Charge Pro, definitely watch this video, as it is the most thorough Auto Charge Pro review on the web and Gavin is by far the most articulate tester. SEE FULL TEST.
AutoTrickler V4 and Force Restoration Scale
The AutoTrickler V4, paired with a quality Force Restoration scale, is the “Rolls Royce” of electronic powder dispensing systems, offering unrivaled charge-weight accuracy, great repeatability, and ultra-fast dispensing speeds. If you have the budget — $490 for the V4 plus $625+ for scale — the AutoTrickler V4 is a superb system that lets you load extremely accurate, consistent ammo. This detailed F-Class John video shows how to set up the system properly and control the dispensing and trickling functions.
RCBS MatchMaster vs. AutoTrickler V3 with A&D FX-120i Scale
This video is interesting because it compares the most advanced and expensive mass-market electronic dispenser, the $899 RCBS MatchMaster, with an AutoTrickler V3 mated to an ultra-precise Force Restoration scale. The AutoTrickler V3 + scale system offers wicked fast dispensing while delivering near-single-kernel precision and great repeatability. The MatchMaster has some interesting features, including dual dispensing tubes and a special slower, “Match Mode” dispensing function which provides enhanced precision.
BONUS Video: RCBS ChargeMaster Dispenser vs. Four Scales
This video answers the question “How does a common powder dispenser’s weighing accuracy compare to stand-alone scales?” Here the tester compares the weighing precision of an early-model RCBS ChargeMaster with four dedicated scales: A&D FX-120i (Force Restoration), Hornady G2-1500, Hornady GS-1500 (Gen 1), and a WAOAW milligram scale. These scales range significantly in price, with the FX-120i Force Restoration the most expensive by far. The features/prices of the four scales are listed at 4:41 time-mark. Accuracy/repeatability comparison testing with test weights starts at 10:12 time-mark.
The 6.5 Creedmoor cartridge has become extremely popular in the last few years. It is a popular cartridge among PRS and tactical competitors, and has been used successfully by deer hunters and silhouette shooters. Notable major manufacturers such as Ruger and Savage are selling popular rifles chambered for this mid-sized cartridge. The availability of affordable factory rifles chambered in 6.5 Creedmoor further fuels its popularity.
To mark the popularity of the 6.5 Creedmoor, we’ve sourced five videos from YouTube. These videos cover loading for the 6.5 Creedmoor and also test accuracy in both custom and factory rifles. Enjoy this 6.5 Creedmoor Video Fest:
1. Gas Gun Shoot-Out: 6.5 Creedmoor vs. .308 Win
In this TFB TV video, testers put a 6.5 Creedmoor up against a .308 Winchester with AR-10 type rifles. The head-to-head test compares the ballistics, trajectory, recoil, and inherent accuracy of the two popular cartridge types. We can’t call this a definitive test because most 6.5 Creedmoor shooters run bolt-action rifles. The key take-aways are that the 6.5 Creedmoor has significantly less recoil, and a flatter trajectory (at least with typical factory ammo). Still, the video is a good starting point for anyone considering a gas gun in 6.5 Creedmoor.
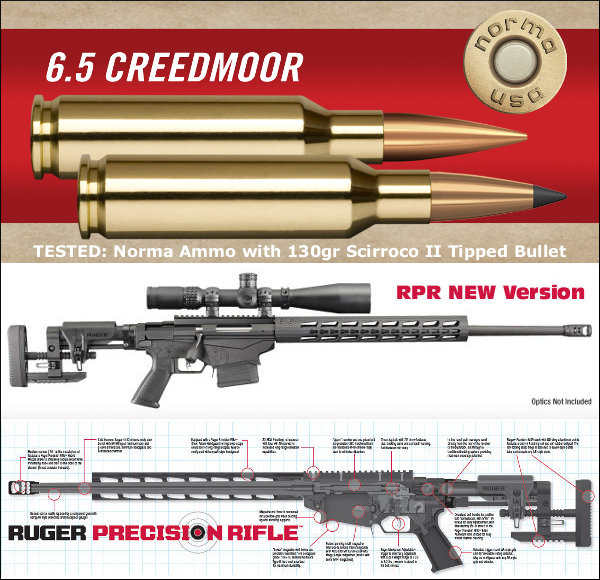
2. Ruger Precision Rifle with Norma 6.5 Creedmoor Ammo
In this video Gavin Gear tests Norma-brand factory ammo in a Ruger Precision Rifle chambered in 6.5 Creedmoor. Gavin reports: “Norma is known for its high-quality brass and ammunition. Recently, I saw that Norma had announced a new addition to their Professional Hunter lineup of ammunition: in 6.5 Creedmoor! I thought I should try some out with the Ruger Precision Rifle. As you saw in the video, this ammunition behaves more like match ammunition.”
3. 6.5 Guys Test Lapua 6.5 Creedmoor Brass in Tactical Rifles
If you have a 6.5 Creedmoor rifle, or are considering getting a gun chambered for this cartridge, we strongly recommend you watch the full 6.5 Guys Video. Ed and Steve spent a lot of time conducting this test, and the video includes helpful summaries of their findings.
4. Reloading for the 6.5 Creedmoor — Gear and Components
If you own a 6.5 Creedmoor rifle, and plan to start hand-loading for the popular cartridge, this video may help you select effective load components. The video examines a wide variety of brass, powder, and bullets options for the cartridge. In addition the reviewer looks at various reloading dies and tools suitable for 6.5 Creedmoor hand-loading.
5. The Springfield Armory M1A — Now Offered in 6.5 Creedmoor
Many folks may not realize that Springfield Armory now makes an M1A chambered in 6.5 Creedmoor. With considerably less recoil, this 6.5 CM version is easier to shoot than the classic 7.62×51 M1A: “Having a 6.5 Creedmoor caliber in the M1A lineup gives long-range shooters more choices with the precision and accuracy they require,” says Springfield Armory CEO Dennis Reese.
Here’s an entertaining video from Fog Ammunition. Starting with boxes of bullets and bags of cartridge brass, this video shows how components are bulk-sorted, then .223 Rem ammunition is produced on a modern, linear multi-stage loading machine. In assembly-line fashion, cases are primed, powder is added, bullets are placed, final seating depth is set, and then the case is crimped.
If you’ve never seen an automated loader in action you should definitely watch this video. With this kind of machine, a new round is produced every second or so (see video 1:15 to 1:55). The .223 Remington ammunition featured in this video is loaded with Sierra BlitzKing bullets. Fog offers both rifle and pistol ammo loaded with quality components.
Video Shows Automated Loading Process Start to Finish (Worth Watching):
In a helpful NSSF video, Ryan Cleckner explains why you normally should avoid canting your rifle — rotating it clockwise or counter-clockwise. Cleckner explains that canting the rifle in one direction or another will change the point of impact: “When you rotate the rifle, not only does the [POI move] in the direction that you’re rotated, [but] it also loses some of its elevation as it rolls down.” This, Cleckner explains, can make you miss on one side or the other:
Cant to the Left — You’re going to miss low and left.
Cant to the Right — You’re going to miss low and right.
In this video, starting at the one-minute mark, Cleckner shows the effect of rifle canting when engaging a 600-yard target. A few degrees of cant (either to the left or to the right), moves the shot POI completely off the steel silhouette target. The POI change occurs mainly because you are lowering (and laterally shifting) the scope sight-line relative to the bore axis, effectively changing your zero.
David Tubb has explained: “Every 1 degree you are off on a cant, is about six inches of difference laterally at 1000 yards”.
Position Shooting with Sling — Rifle Cant Considerations
Cleckner’s discussion assumes that the scope or sights are set to hit center with the rifle level and plumb. That works for most situations when shooting prone off bipod, front mechanical rest, or front sandbag. However, many sling shooters, including David Tubb and John Whidden, do tilt or cant their rifles slightly inward because this allows a more comfortable hold with sling, or allows better eye-to-sight alignment. Holding the rifle at an angle can work — but the angle of cant must be consistent for every shot. Canting the rifle is not a sin by itself. However, after you confirm your zero on your target, the degree of cant must be the same for EVERY shot. You must maintain that exact same degree of rotation on each shot or you will experience the shot POI movement Cleckner illustrates. Consistency is the key.
John Whidden, 5-time Nat’l Long Range Champion, holds a Palma rifle. John now shoots a match rifle with an Anschutz stock which he holds more upright, but still with some counter-clockwise cant. John also installed his iron sights at an angle so that the adjustments are correct (and plumb) even with his canted hold: “While it may not be obvious in the picture, the sights on my rifle are set up so that they’re straight vertical and horizontal while I hold the rifle canted. Making sure your adjustments (scope or sights) are vertical and horizontal is a critical piece of the pie.”
Inexpensive 30mm and 1″ Scope-Mounted Bubble Levels
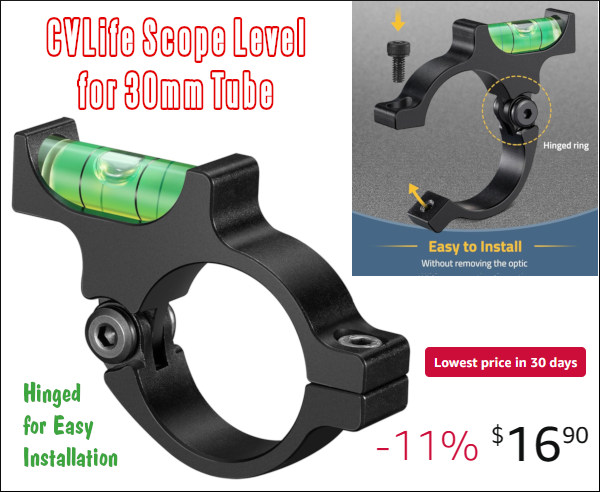
The best way to avoid inconsistent rifle canting is to use a bubble level fitted to rail or scope. One very affordable product is the CVLIFE Scope Bubble Level. This features a 30mm milled inside diameter with a handy hinge to simplify mounting. This unit installs easily, the level is nicely elevated, and user reviews have been very positive. You could easily pay $40.00 or more for a 30mm scope level. This costs just $16.90 on Amazon. If you have a 1″ scope tube, consider the SME dual-diameter level. This fits 30mm tubes PLUS has an insert to fit 1″ tubes. It’s $19.99 at MidwayUSA.
In April 2020, the National Rifle Association (NRA) launched NRAWomen.com, a website dedicated to the fastest-growing group of firearm owners — America’s women. This website serves the increasing number of female gun owners, huntresses, and competitive shooters. Female involvement in firearms is growing significantly. Consider these numbers: Statistica estimates that 19% of women in the USA owned firearms in 2020, while 23% of women surveyed in a 2011 Gallup Poll stated they owned a gun.
Jessie Harrison is one of the greatest female pistol shooters on the planet.
Here are three excellent Articles from the NRAWomen.com website, all worth reading. For each example, Click the Photo or direct link to read the full article on NRAWomen.com.
1. Flying with Firearms — What You Need to Know
We recommend that any gun owner, female OR male, should definitely read this article. It is one of the better discussions on the web of airline travel with firearms, covering international travel as well as domestic flights. The article notes that you should obtain U.S. Customs Form 4457 before flying overseas with a firearm.
“Flying with a gun is actually a lot easier than you’d probably expect. You need a couple of specific gear items, and you need to know the proper procedure, but it’s a relatively simple process. I’ve flown with long guns and handguns dozens of times around the country and around the world. The process is generally the same, but with some additional steps and maybe additional hassle depending on the airport [and personnel.]” READ FULL ARTICLE on NRAWomen.com.
2. Modular Safes — Smart Option for Easier Moving
The second article features a great video showing how to assemble a modular safe in under 30 minutes. This article also explains the benefits of modular gunsafes — primarily easier transport and installation.
“Modular safes have been around for a few years now and are becoming more popular. Here’s why: The safe comes delivered to you in panels, so you can bring them into your home one at a time and put it together anywhere you like. This makes it easy to carry up and down stairs, onto elevators or anywhere! Security — Is it as secure as one that comes pre-assembled? The answer is, absolutely.” READ FULL ARTICLE on NRAWomen.com.
3. Rimfire .22 LR Handguns for Self-Defense
This article looks at a wide variety of .22 LR pistols and revolvers. The author discusses the pros and cons of a rimfire defense gun, concluding that while the stopping power is limited, having some protection is better than going unarmed.
“Over the last few months we’ve seen the launch of new handguns chambered for .22 LR that sport the same looks and features as center-fire handguns designed for daily concealed carry. The models I’ve had a chance to work with so far include the compact Taurus TX22 semi-automatic pistol, the pocket-size Ruger Lite Rack LCP II, Kel-Tec’s P17 semi-automatic and the Taurus 942 8-shot snubnose revolver.” READ FULL ARTICLE on NRAWomen.com.
AR-platform rifles can be maintenance-intensive beasts. They need regular inspection, cleaning, and lubrication. But some AR owners make the situation worse by not regularly cleaning important small parts, or by using too MUCH oily/greasy lubricants in the wrong places. A properly maintained and lubricated AR15 can shoot hundreds of rounds (between cleanings) without a problem. If you learn where (and where not) to apply lubricant, you’ll find that your AR will run more reliably and the task of cleaning the bolt, bolt carrier, and upper receiver internals will be less of a burden.
Here we showcase videos that show how to field-strip an AR-15, inspect the key parts, clean components, and lubricate internal parts as needed. Along with these videos, we recommend you read the comprehensive AR-15 Gun Cleaning Clinic article from the Brownells website. This explains in detail important procedures that the videos might only cover in a few seconds.
If you want to keep your black rifle running smoothly and reliably, you must clean it regularly and follow the correct maintenance procedures. Here are five videos that explain how to properly disassemble and clean AR-platform rifles.
1. How To Clean Your AR-15 | Cleaning and Maintenance Tips
This is a quick 90-second starter video that may help new AR owners. Ricky Lehnhardt of OTIS Technology demonstrates the basics of cleaning and maintaining your AR-15. Lehnhardt does a good job identifying the points that need cleaning on the inside of ARs. However he works very quickly in the video. You may want to pause the video at some points. Also, Lehnhardt employs a cable for pulling patches and brushes through the barrel. Yes this is fast and easy. However, for match AR rifles, we recommend that you instead use a cleaning ROD with fitted bore guide.
2. Take-Down and Full Cleaning of AR-15 by Jerry Miculek
Here ace shooter Jerry Miculek takes down and cleans an AR-platform rifle belonging to his daughter Lena. This is a good video because Lena’s rifle was “run hard and packed up dirty” so you can see where carbon and grease build up. This 35-minute video is very thorough. Jerry is one of the nation’s top action carbine shooters, so listen carefully to his advice on cleaning and lubrication.
3. AR-15 Maintenance: Field-strip, Clean and Lubricate an AR-15
Gunsite Academy instructor and gunsmith Cory Trapp demonstrates the proper way to field-strip, clean, and lubricate an AR-15 carbine. In this 30-minute video, Trapp offers several important technical tips and hints. For example, at 11:05 Trap demonstrates how to determine if your bolt needs new gas rings. Along with cleaning procedures, this video explains how to inspect key components and how to function-test your AR before each shooting session.
4. AR-15 Dissassembly and Cleaning Guide
This video does a good job, with close-ups, showing how to remove the bolt carrier and clean the inside of the upper receiver. Then you can see how to work with various tools to clean the bolt, bolt carrier, and inside of chamber. We also recommend that you inspect the ejector recess and extractor recess. When we’ve inspected ARs that failed to cycle properly, we have often found nasty gunk (mixture of carbon, greasy lube, and brass particles) in these areas.
5. Basic AR-15 Quick and Easy Field Maintenance
In this NSSF-sponsored video, pro shooter Ryan Muller demonstrates basic, quick field maintenance of his AR-15. This would be for a quick cleaning and lubrication of the reciprocating parts. This covers rapid maintenance in the field. For full field-stripping and thorough cleaning, watch the previous videos.
Handy Mat for Cleaning AR Rifles
When working on an AR-15, it’s smart to have a pad that can absorb solvents and cushion your upper and lower. The $29.99 Real Avid Smart Mat is a good choice. This features printed take-down instructions and it has a handy parts tray on the right side. The mat rolls up for convenient storage. Click HERE to learn more.
Vital Inspections You Should Do After Disassembly
Last but not least, here are recommended inspections you should do every time you do a full field-strip and cleaning of your black rifle:
Generally you want the biggest, heaviest gunsafe you can afford. However, for many gun owners, a 1000+ pound behemoth is impractical. For those who relocate frequently for their jobs, or who live up many flights of stairs, it is more practical to have a safe that breaks down into separate pieces for transport. In our Guide to Gunsafes, we reviewed the Zanotti Safe, a quality modular safe that breaks down into smaller, lighter components. Now there is a another modular safe that competes with the Zanotti. Snapsafe’s Titan Modular Safe ships in three (3) flat boxes. Simply unpack the components and assemble the 400-lb. Titan on-site in about 30 minutes without tools.
Watch video to see how the SnapSafe Titan can be assembled without tools:
The SnapSafe™ Titan holds 12+ rifles, weighs 400 lbs. assembled, and measures 59″ H x 22″ W x 17.5″. Side panels are 9 gauge steel and the door is 3/16″ steel secured by eight 1″-diameter chrome steel locking bolts. SnapSafe claims that its patented structure can be stronger than conventional welded construction. It has a UL-listed digital lock with EMP-proof mechanical key backup. The Titan boasts fire-sealing gaskets lining the door frame. These gaskets, combined with ceramic wool blankets in the walls provide a claimed one hour of fire protection against temperatures up to 2300ºF.
SnapSafe sells its Titan 12+ long-gun capacity safe for $1969.00 delivered. There are also larger-capacity modular safes — the $2509.00 Super Titan (24 gun capacity), and the massive $3269.00 Super Titan XL Double Door (36 gun capacity). All prices include shipping to the lower 48 states. Below is an Ultimate Reloader video showing the assembly of a Titan double-door safe.
In some areas of the country (California in particular), hunters are now forbidden to use bullets that contain lead. If you need a lead-free projectile for your deer rifle, consider Nosler’s E-Tip projectile. This has plenty of penetrating power and retained energy while complying with laws requiring “unleaded” ammunition. An “expansion chamber” behind the green polymer tip helps ensure reliable expansion with 95% weight retention. The video below shows a .30 caliber, 180gr lead-free E-Tip impressively power through TWO 12-inch blocks of Ballistics Gel at 100 yards. This was fired from a .308 Winchester.
Watch 180gr eTip Penetration and Expansion in Ballistic Gelatin:
Nosler claims the E-Tip (“Expansion Tip”) bullet has advantages over other solid copper hunting bullets: “Unlike the competitor’s one-piece designs, Nosler E-Tip bullets will not blow the petals off at extreme velocities nor will the low end expansion ever be questioned, as the minimum impact velocity is set at 1800 fps for standard calibers.” One hunter, posting on Facebook, gave the E-Tip high marks: “I have had the opportunity to take a pig with a 130 gr E-Tip from my .270 and they work flawlessly. My son took two pigs with his .300 Win Mag and 165gr E-Tips and they worked flawlessly as well.”
This video illustrates the design and construction of the Nosler eTip Bullet:





 October is Halloween month, so we thought we’d share the seasonal spirit with our readers. In this video, our friend






 Generally you want the biggest, heaviest gunsafe you can afford. However, for many gun owners, a 1000+ pound behemoth is impractical. For those who relocate frequently for their jobs, or who live up many flights of stairs, it is more practical to have a safe that breaks down into separate pieces for transport. In our
  The
The 


