This week we focus on five classic metal-framed 9mm pistols. These five world-class handguns all shoot the 9mm Luger (9x19mm) cartridge. Most have been used by military and police forces as well as used by civilians for sport-shooting and defense. This Editor has shot all five pistol types and owned three. I can recommend all of them. Metal-framed pistols typically have a lower center of gravity and weigh more than Glocks and other polymer-framed handguns. Consequently, they tend to have less muzzle flip, and less perceived recoil than polymer-framed handguns.
SIG Sauer P226
The SIG Sauer P226 is a high-quality, ultra reliable single-action/double action handgun with a proud Swiss/German heritage. It has a very ergonomic grip that fits most hands very well. Standard P226s do NOT have a manual safety, but the P226 has a decocking lever drops the hammer safely. This Editor has trained new shooters with a Sig P226 and Glock 17. For 80% of my trainees the Sig P226 pointed better due to the superior grip design. This meant that the sight picture was better, and the trainees achieved better results with the P226 vs. the Glock 17. The P226 is also a very reliable firearm. I have over 6000 rounds through my P226 with not one single jam. That’s impressive. The first video, reviewing the SIG P226, has over 1.4 million YouTube views, indicating it is very popular with pistoleros.
HK P7 Series (PSP, P7m8, P7m13)
This Editor has shot a P7m8 extensively. It is superbly accurate. With a very low bore axis, it has much less muzzle flip than most 9mm pistols. And with a fixed barrel, the slide moves straight back during cycling. The HK P7 blowback-operated semi-automatic pistol was designed and manufactured by German gun-maker Heckler & Koch (H&K) from 1978 to 2008. It is thin, superbly accurate, with a precise trigger that shames the Glock. The P7m8 features a unique gas-delayed blowback system, which uses gas from the cartridge to retard the rearward motion of the slide. This works via a barrel port and a piston inside a cylinder under the barrel. The signature feature of the P7 series is the “squeeze cocker” on the front of the grip. Squeezing the cocking lever cocks the firing pin. When the front of the grip is released, the weapon is fully de-cocked, making it safe with a round in the chamber.
Browning Hi-Power
The Browning Hi-Power is a single-action, semi-automatic handgun with a legendary heritage. This handsome all-metal pistol was based on a design by American John Moses Browning, and completed by Dieudonné Saive at Fabrique Nationale (FN) of Herstal, Belgium. J.M. Browning died in 1926, several years before the design was finalized. FN Herstal initially named the design the “High Power”, which alludes to the 13-round magazine capacity, almost twice that of other designs such as the Luger or Colt M1911. The name was later shorted to “Hi-Power”. The Browning Hi-Power has served military forces and police in many countries throughout the world. It is a very well-balanced pistol, with a nice, crisp trigger. After 82 years of continuous production, FN Herstal announced that the Hi-Power would be discontinued in 2018. However, in 2022 FN resumed Hi-Power production, so this classic lives on.
CZ 75
The CZ 75 is the flagship pistol of CZ-USA and has been a staple among 9x19mm fans for over 45 years. Originally introduced in 1975, hence the name, the CZ 75 remains viable as a defensive pistol. CZ claims the CZ 75 is “used by more governments, militaries, police, and security agencies than any other pistol in the world”. The CZ 75 is very reliable and works well for both defense and IDPA competitions. The ergonomics are good, controls are intuitive, and the trigger is very nice. Over the years, CZ has made numerous variations of the CZ 75 pistol, but the original is still an excellent handgun.
Beretta 92FS and Military M9
For Americans, the Beretta 92 series of pistols is best known as the official sidearm of the American military for 30+ years. The United States military replaced the .45 ACP M1911A1 pistol in 1985 with the Beretta 92FS, designated as the “M9″. The M9 and the civilian models 92/92FS have a distinctive, recognizable feature — the cut-away slide which exposes most of the 9mm barrel. The metal frame also has an attractive grip design. The 92FS pistols we’ve shot were accurate and reliability was good. There have been various modifications and upgrades over the years. However the M9 was replaced in 2017 by the new polymer-framed SIG Sauer P320, adopted as the military’s M17/M18 modular pistols.
This Hickok 45 video review of the Beretta 92FS has over 3.1 million views:
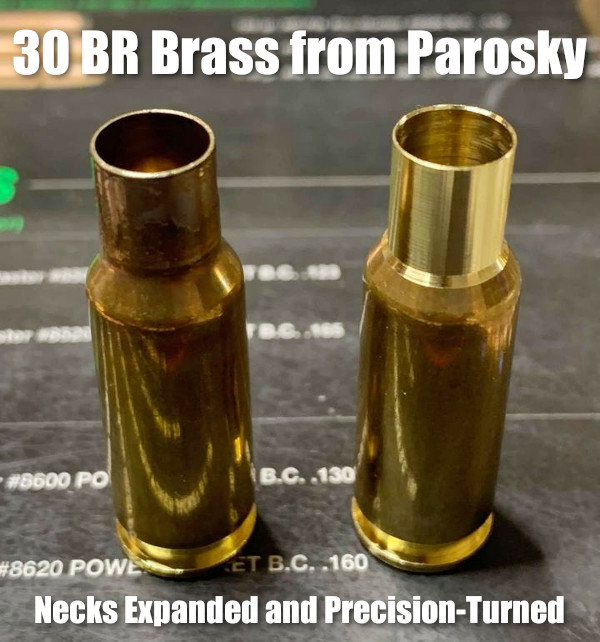
Here’s good news for 30 BR shooters. Paul Parosky, maker of the excellent PRP Custom Bullets, is now offering 30 BR neck-turned brass. This can save you considerable time and effort forming 30 BR cases from Lapua 6mmBR brass. And the neck-turning is superb, again representing time savings (and no tools to buy). You can order this 30 BR brass from PRPbullets.com. If you communicate with the PRP team, Paul may be able to neck-turn to your specific thickness. Paul notes: “Here are necks turned for a 0.330 neck. I’ll try my best to accommodate anyone’s neck dimensions as they wish. Just contact us through our website PRPBullets.com.”
About this Neck-Turning set-up — Paul Parosky notes: “For neck-turning I’m using an old drill press that has been re-worked. The cutter and spindle are all indicated before neck turning to ensure no runout. The RPM is around 520. The lube I use is a mixture of royal and mystery oil.”
Why the 30 BR Dominates 100/200 Benchrest for Score Competition
The 30BR, along with some wildcat variants, remains the dominant cartridge in short-range (100/200) benchrest-for-score competition. The 30BR’s .308″-diameter bullets are larger than the 6mm bullets used by the 6PPC (which rules group BR competition). The bigger 30-Cal diameter has an advantage in touching scoring rings. In addition, the 30 BR is also relatively easy to tune, and barrel life is considerably better than with smaller-caliber benchrest cartridges. For more information, see our AccurateShooter 30 BR Cartridge Guide.
Cases are Expanded, Then Neck-Turned
To produce his 30 BR brass, Parosky first uses a series of expander mandrels. Then he neck-turns with power using a converted drill press. Paul tells us: “This is done the old school way, I use three different tapered expander mandrels, then neck-turn it to the proper neck chamber, then run them up through a FL expander mandrel to ensure necks are straight. Then I clean all the cases.”
Paul Parosky Can Also Neck-Turn 6PPC Brass
Paul Parosky also expands and neck-turns 6PPC cases that are made from parent Lapua .220 Russian cartridge brass. Here, illustrating his 6PPC neck-turning operation, is a Paul Parosky post on the USA Benchrest & Extreme Precision Shooters Facebook page.
You can spend thousands on a rifle, but that expensive hardware won’t perform at its best if you have poor trigger technique. One key element of precision shooting is trigger control. Our friend Kirsten Joy Weiss has produced a good video that shows how to refine your trigger technique for better accuracy. In this video, Kirsten talks about the actual placement of a shooter’s index finger on the trigger. It is important to have the finger positioned optimally. Otherwise you can pull the shot slightly left or slightly right.
Kirsten tells us: “Finger placement on the trigger might not seem like a big deal, but it actually is. The reason for this is because, depending on where your index finger is placed on the trigger, [this] translates to different muscle interactions with the gun.” Watch this video to see Kirsten demonstrate proper finger placement (and explain problems caused by improper finger positioning).
When you pull the trigger, you only want to engage the last section of your finger, in order to avoid unwanted muscle engagement and to achieve a smooth shot. Remember there is a “sweet spot” between the crease (first joint) and the tip of the finger. If you position the trigger in that “sweet spot”, you should see an increase in your accuracy. Don’t make the mistake of putting the trigger in the crease of your finger, as shown below.
Effects of Incorrect Finger Placements
You want to place the trigger shoe between the end of your finger and the first joint. If you place the trigger on the very tip of you finger you’ll tend to push the rear of the rifle to the left when engaging the trigger, causing shots to go right (for a right-handed shooter). On the other hand, if you put the trigger in the crease (first joint), you’ll tend to bring the rear of the rifle to the right, causing shots to fall left. This is illustrated below for a right-handed shooter.
For hunters in a tree stand, SFC McPhail recommends a position with your weakside leg pulled up and firmly braced on the front rail of the treestand. You can then rest your support arm on your leg. This provides a rock-solid position when shooting from a stand.
Team USA Olympian and ISSF World Cup Winner SFC Michael McPhail is one of the world’s best smallbore rifle shooters. He is also an avid hunter, who enjoys harvesting game with centerfire rifles. In a USAMU video, McPhail shows how competition shooting positions can be adapted for hunters. McPhail shows how well-established positions can provide a more stable platform for hunters in the field. That can help ensure a successful hunt. McPhail demonstrates three positions: kneeling, supported prone, and sitting in a tree-stand.
Watch SFC McPhail Demonstrate Positions for Hunters (Good Video):
McPhail first demonstrates the kneeling position. Michael notes: “I like kneeling. It’s a little bit of an under-utilized position, but it’s almost as stable as prone. It allows you get up off the ground a little bit higher to [compensate for] vegetation. For kneeling start by taking your non-dominant foot and put that towards the target, while at the same time dropping down to a knee on the dominant leg. At the same time … wrap the sling around wrist and fore-arm, lean slightly into the target and take the shot.”
McPhail shows a nice “field expedient” use of your backpack. He shows how the basic prone position can be adapted, using the pack as a front rifle support. McPhail recommends pulling your dominant (strongside) leg forward, bent at the knee. According to Michael, this takes pressure off the abdomen, helps minimizes heart beat effects, and helps with breathing.
Hunting season has started in many parts of the country. And today, Saturday, September 27, 2025, is National Hunting and Fishing Day. Every year, this event is held on the 4th Saturday of September. First recognized by President Nixon in 1972, this is now the 52nd year the event has been celebrated across the USA. To help mark this day, we are offering six informative videos for hunters. These cover planning your hunt, selecting good optics, and optimizing your rifle.
This video and related article offer good basic advice for sighting-in a hunting rifle. There are a series of six points covered. Here’s Tip #1: “Find a safe place to shoot your rifle with a backstop. If possible, use a bench and a rock-solid shooting rest. Sighting-in is all about consistency, so the less human error you have, the better. For safety, be sure to also bring ear and eye protection.” READ FULL ARTICLE on NRAWomen.com.
Prepare For Your Hunt — Get Fit and Practice Positions
As part of the NRA’s Tips & Tactics video series, Kristy Titus explains how to prepare for a hunt. Titus, co-host of the Team Elk TV show has hunted around the globe. She grew up in the outdoors, running pack mules in Oregon with her father. In this video, Kristy discusses fitness training and demonstrates field positions that can be employed during a hunt.
Kristy explains: “Hunting can lead you into some steep, rough country. It’s really important that you train both your body and your mind to handle the elements and the rigors of hunting So, if you plan on going on a mountain hunt, get out and train your body. Train with your firearm. Get off the bench and have some fun with this. Do some positional shooting or, if you want to add a stress dynamic… have someone put you under a time parameter.”
Elk Hunting — Great North American Adventures
A North American elk hunt represents the adventure of a lifetime for many. Before heading out on an elk hunt, you want to maximize your chances of success by having the right equipment, and by doing your homework before the hunt. This National Shooting Sport Foundation (NSSF) video offers good advice on planning your first elk hunt.
Success! Elk hunt photo from West Canyon Ranch, a private hunting ranch in Utah.
Photo courtesy Rocky Mountain Elk Foundation (RMEF).
Deer Hunting in Norway’s Fjord Mountains
Here’s a video with some truly stunning scenery. Watching this video is like taking a virtual vacation to Norway, where you can explore the scenic mountains in the Fjord region. Forum member Kenneth Skorpen (aka “Sal”) has created a cool video of a deer-hunting trip he took in Norway. He didn’t bag a buck on this trip, but the walk in the Fjordland mountains took Kenneth through some spectacular scenery. (At the 11:25 time mark you’ll see an amazing sunset over the Fjord.)
Kenneth did encounter a doe that had fallen down the mountain, and apparently broken its neck (14:35 time mark). The terrain is very steep, and Kenneth observed that: “I feel fortunate to be able to do this, but I also feel very tired in my legs. Did you know that the hares around here have shorter left legs due to the steep hills?”
Load Development for .308 Win Hunting Rifle
In this video, F-Class ace Keith Glasscock shows load development with a .308 Winchester hunting rifle. Here Keith uses a large X-type sandbag for a front support. He is shooting a Remington 700 bolt-action rifle, with Barnes TSX solid copper bullets, PPU Brass, Federal 210m primers, and AR Comp powder. Keith said the Barnes bullets were excellent — he commented that these bullets were “match quality in terms of precision”. Keith achieved some very small three-shot groups with AR Comp and the TSX projectiles. Keith did note that point-of-impact shifted up significantly with increases in charge weight (see 6:20-7:10). With thinner-contour hunting barrels, this is not unexpected. But POI change should be observed carefully during load development, as you may need to adjust your zero after completing testing.
Tomorrow, September 27, 2025, is National Hunting and Fishing Day. Hunting season is here — and we know many of our readers will soon head to the woods in pursuit of deer, elk, or other game. To make a good shot, it’s wise to rest your rifle when possible. In this video, methods for stabilizing a rifle in the field are demonstrated by Forum member Thomas Haugland, who hails from Norway. Thomas focuses on practical field shooting skills for hunters. Thomas (aka ‘Roe’ on Forum and Sierra645 on YouTube) shows how to verify his zeros from bipod and then he demonstrates improvised field rests from the prone, kneeling, and sitting positions.
Thomas explains: “In this video I focus on basic marksmanship techniques and making ready for this year’s hunt. As a last check before my hunting season, I got to verify everything for one last time. My trajectory is verified again, the practical precision of the rifle is verified. I also practice making do with the best [improvised] rest possible when an opportunity presents itself. After getting knocked in the face by a .338 Lapua Magnum rifle during a previous filming session, I had to go back to basics to stop [flinching]. I include some details from bipod shooting that hopefully some hunters will find useful. Fingers crossed for this years season, good luck!”
How to Stalk Game — Tips from Thomas
If you liked that video, here is another valuable video from Thomas. In this “How to Approach Deer” video, Thomas explains the basics of a successful stalk. If you are headed into deer country this fall, definitely watch this video.
Resting a Hunting Rifle on Backpack
Here’s a great practical tip that can help you make that perfect shot. Thomas shows the best way to use a conventional backpack to provide a steady support for your hunting rifle. He also explains how to correctly deal with parallax in your scope.
How is a modern, metal-chassis rifle built? This very cool video from Masterpiece Arms answers that question. The nicely-edited video shows the creation of a Masterpiece Arms tactical rifle from start to finish. All aspects of the manufacturing process are illustrated: 3D CAD modeling, CNC milling of the chassis, barrel threading/contouring, chamber-reaming, barrel lapping, laser engraving, and stock coating. If you love to see machines at work, you will enjoy this video…
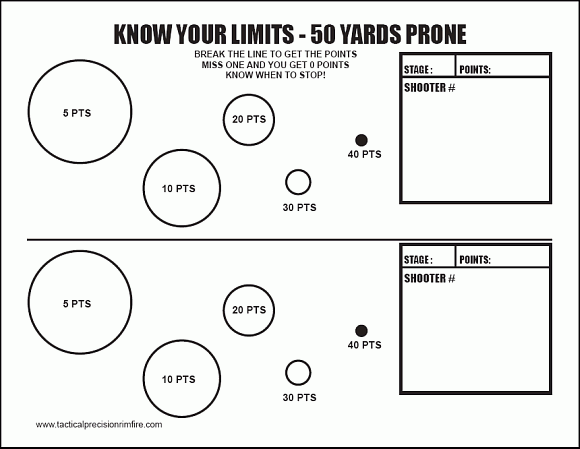
AIM SMALL, MISS SMALL: At 25 yards, this is a fun rimfire plinking target. At longer distances it can be a great training target for precision centerfire shooters.
NRL22 and PRS rimfire competition is hugely popular. And we’re seeing great interest in .22 LR rimfire tactical cross-training. With a rimfire rig, you can practice regularly for a fraction of the cost of centerfire shooting. That way you can build your skill set without breaking the bank. Decent rimfire ammo can be had for 10 to 20 cents a round. Compare that to $1.20 (or more) for centerfire handloads and as much as $2.00 per round for factory ammo such as Hornady 6.5 Creedmoor.
To help with rimfire cross-training, here are some of our favorite rimfire tactical targets, all in easy-to-print PDF format. Click each target image to download the FREE target. You’ll find more free targets for load development, precision practice, and fun shooting on our AccurateShooter FREE Targets Page.
Modern Rimfire Tactical Rifle with MPA BA Comp Chassis and Vudoo V-22 action.
Targets for Rimfire Training and Fun Matches
Here’s a rimfire training target with “big to small” target circles. Start with the largest circles, then move to the smaller ones in sequence. This systematic drill provides increasing challenge shot-by-shot. Novices often are quite surprised to see their accuracy improve as they move from bigger to smaller aiming points. That provides positive feedback — always a good thing.
Right Click and “Save as” to download printable PDF versions of target.
This Vortex Nation video features an 80-minute interview with Travis Ishida, one of the original founders of the NRL22 and NRL22-X disciplines. Travis told us that the NRL now runs 7-8 times as many rimfire matches as centerfire matches.
Rimfire Practice Targets
SPECIAL BONUS–Rimfire Tactical Precision Targets
These FREE targets by DesertFrog are offered in Adobe Acrobat format for easy printing. CLICK HERE to download all six targets as a .ZIP archive.
A modern F-Class or Benchrest competition rifle can cost $4000.00 or more. Add $2500 for a top-tier scope and you can easily have $6500.00 or more invested in your rig. With that kind of money involved, you should transport that valuable rifle in a very high-quality case — one that is strong, durable, and secure. In addition, the case should have quality, customizable internal foam that cushions the barreled action, stock, scope, and key accessories.
These video reviews look at quality, durability, features, price, and other factors.
TSA-Approved Rifle Cases — Performance Tested
This very informative Warrior Poet Society video covers the key features you need with a rifle case used for airline travel. The reviewer explains the important TSA rules you need to consider when flying with firearms. The reviewer has used all kinds of cases to travel with his firearms on planes, over seas, across continents. In this video he reviews a range of cases — from basic affordable cases to high-end cases costing many hundreds of dollars.
Five Hard Shell Rifle Cases Showcased
This review looks at five (5) of the best rifle transport cases. The video considers key features including hinges, locks, padding, and wheels. The five cases reviewed are:
This 6.5-minute video covers five affordable hard shell cases ranging in price from $50 to $177. The video provides a good look at the external and internal features of these five cases, using mostly manufacturer-supplied video, including some field tests.
This video covers a unique large, long-gun case that holds multiple rifles in a vertical arrangement. The Case Club 4 Rifle/Shotgun Case holds up to 4 long guns, along with 3 pistols in a tough wheeled, waterproof case with a lifetime warranty. The case fits any rifle or shotgun under 41″ long, with room for for optics, foregrips, under-barrel attachments, pistol grips, and more.
The case itself is crushproof, waterproof, stackable, and TSA-approved. Dual purge valves keep moisture out while allowing the case to be opened in high or low altitude. The foam is long-lasting, oil-proof military grade polyethylene that won’t tear. This case is not cheap — it retails for $632.45.
Plano All-Weather Rifle Case — Great Protection for the Price
Plano cases offer excellent value for the money. Priced at $109.99 on Amazon (for 42″ model), the Plano All-Weather Tactical Gun Case offers a strong shell, tough hinges, and secure weather-proofing. The case has pre-perforated, pluck-to-fit foam for easy customization. This airline-approved case boasts a Dri-Loc seal providing a watertight, dust-proof shield that protects your firearms from water damage. For $30 more Plano offers the new All Weather Rustrictor Case with VCI-infused resin and foam emitter blocks that fight rust and corrosion.
Harbor Freight Apache 9800 Weatherproof Rifle Case
This video features the Harbor Freight APACHE 9800 Weatherproof Rifle Case. The reviewer states this very affordable $149.99 case has proven rugged, durable, and secure. This Apache 9800 case is offered in black, tan, and OD green. On sale for $149.99, this 53″-long case is $190.00 less than an equivalent-size Pelican case. Constructed from durable polypropylene, this quality hard case can protect long guns from from impact, moisture, and dust. The built-in purge valve equalizes pressure so you can open the case after changing elevations. NOTE: Case interior dimensions are 50⅜” by 13⅝”.
BONUS Videos — How to Cut Foam for your Gun Cases
For the best fit of your firearms and accessories in a foam-interior hard case, you should customize the foam to fit. Some cases have “pluckable” foam. With these you remove small squares one an a time until the stored items fit. With other cases with dense foam interiors, you’ll need to cut the foam to fit. Here are two videos that show the process of tailoring foam to a rifle using an electric cutting tool. Watch these videos carefully — they can really help create the best custom-fit for your firearms.
Kirsten Weiss knows a thing about accuracy. She won the 2012 NRA Three-Position Women’s Smallbore Championship, while finishing as the National Overall Woman Champion. She used to shoot with the American team in top-level World Cup competition. Kirsten started shooting fairly late — at age 16. Despite her relatively late start, she earned a place on the University of Nebraska shooting team. That literally opened up a new world for Kirsten: “During the course of my career, I’ve had a lot of success. I’ve gone to World Cups… in Zagreb, Croatia, in Munich, Germany. I’ve won National Championships, and got on to the U.S. Olympic short list, so it’s been a good career.”
In these three videos, Kirsten offers key tips on accurate shooting. In the first video she explains how to get and maintain the proper cheek weld on your rifle. In the second, Kirsten talks about canting error — how having inconsistent side-to-side tilt on your rifle. In the third video, Kirsten explains the importance of proper trigger placement.
Proper Cheek Weld
No matter what your discipline — smallbore, silhouette, High Power, F-Class, or even PRS — it’s vital to have a consistent cheek weld for every shot. You want your head to be in the same position on the stock each time.
In this video, Kirsten explains how to find the best position for your head on the stock, which may require adjusting the cheekpiece. Then Kirsten demonstrates how to maintain consistent cheek weld shot after shot.
Consistent Rifle Cant (Tilt from Centerline)
Kirsten says most training manuals don’t explain rifle cant: “You won’t find this shooting technique just anywhere. Most shooters don’t even think about it — and they’re missing out. Proper Rifle Cant or Gun Cant (also known as cant error or even scope cant) is a complicated topic, but I’ll explain it simply — and how to simply avoid cant error.”
Want to know how to actually aim a gun right? This accuracy tip covers a crucial aspect of marksmanship. If you cant your rifle inconsistently from shot to shot, the point of impact will change, even with “perfect aim”. This is another episode in Kirsten’s How to Shoot Awesomely video series.
Proper Trigger Finger Technique
Kirsten tells us: “Finger placement on the trigger might not seem like a big deal, but it actually is. The reason for this is because, depending on where your index finger is placed on the trigger, [this] translates to different muscle interactions with the gun.” Watch this video to see Kirsten demonstrate proper finger placement (and explain problems caused by improper finger positioning).
When you pull the trigger, you only want to engage the last section of your finger, in order to avoid unwanted muscle engagement and to achieve a smooth shot. Remember there is a “sweet spot” between the crease (first joint) and the tip of the finger. If you position the trigger in that “sweet spot”, you should see an increase in your accuracy. Don’t make the mistake of putting the trigger in the crease of your finger, as shown below.




 Team USA Olympian and


 Here’s a video with some truly stunning scenery. Watching this video is like taking a virtual vacation to Norway, where you can explore the scenic mountains in the Fjord region. Forum member Kenneth Skorpen (aka “Sal”) has created a cool video of a deer-hunting trip he took in Norway. He didn’t bag a buck on this trip, but the walk in the Fjordland mountains took Kenneth through some spectacular scenery. (At the 11:25 time mark you’ll see an amazing sunset over the Fjord.)

 Tomorrow, September 27, 2025, is National Hunting and Fishing Day. Hunting season is here — and we know many of our readers will soon head to the woods in pursuit of deer, elk, or other game. To make a good shot, it’s wise to rest your rifle when possible. In this video, methods for stabilizing a rifle in the field are demonstrated by Forum member Thomas Haugland, who hails from Norway. Thomas focuses on practical field shooting skills for hunters. Thomas (aka ‘Roe’ on Forum and