At the request of our readers, we are starting a Monday “Deals of the Week” feature. If this proves popular, we’ll try to run this every week. Here are some of the best deals on hardware, reloading components, and shooting accessories. Be aware that sale prices are subject to change. If you snooze, you lose.
1. Grafs.com — CCI Primers on Sale
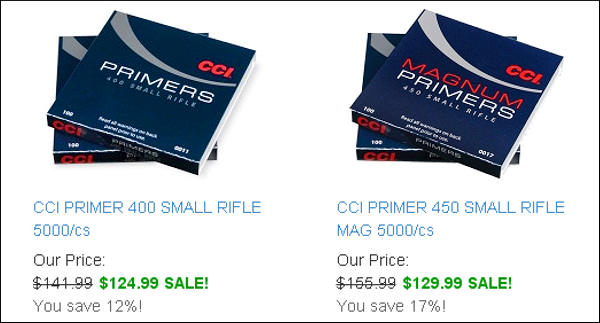
Here’s a very good deal on CCI 400 (small rifle) and CCI 450 (small rifle magnum) primers. These primers have strong cups so they work well with stout loads. The CCI 450s are a favorite for 6mmBR and Dasher shooters. (The prices include shipping, with a $7.95 flat fee, but not hazmat charges).
2. Midsouth Shooters Supply — Norma .22 LR Ammo on Sale
This is good ammo for the price — plenty good enough for practice and tactical rimfire competitions. We’ve used this ammo in a variety of rimfire rifles and it worked well. SEE Video Ammo Review. Midsouth also has the Norma .22LR Match-22 ammo at $7.95 per box.
3. Bullets.com — Bags and Rifle Cases on Sale
Bullets.com has slashed prices on its Bald Eagle Brand shooting bags and soft rifle cases. The shooting bags, now 50% off, are very well made and hold a lot of gear. The Long Rifle Cases, also 50% off, are designed for match rifle with barrels up to 32″ long. This Editor uses a Bald Eagle bag to carry his spotting scope and compact tripod. SEE Video Bag Review.
4. Bruno Shooters Supply — FREE Shipping on 500+ Bullets
Bruno Shooters Supply offers competitive pricing on Berger and Sierra bullets. And now you can save even more with FREE Shipping on orders of 500 or more Berger or Sierra Bullets. This FREE Shipping offer is limited to one order per customer per day.
5. Natchez Shooters Supply — Nikon Scope Close-Out Sale
Natchez is running a big sale on Nikon optics. Prices have been reduced as much as 43%. If you’re looking for an inexpensive, name-brand optic for your hunting or varmint rifle, check out these Nikon bargains. The M-223 3-12x42mm has nice turrets and constant eye relief. It’s a steal at $279.95.
Our friend Grant Guess recently had a “close encounter” with a bad primer. An apparently defective primer caused part of the casehead on one of his rounds to blow out. This, in turn, allowed high pressure gas to vent through the damaged primer pocket. Take a good look, boys and girls. This is yet another very good reason to wear safety glasses. The cartridge was a 6.5-06, handloaded in necked-down Winchester-headstamp .270 Win brass. Grant reports:
“I had a blow through between the primer and the primer pocket today. The action was really smoking and I got a face full of gas. This was a reasonably light charge. Thank God for safety glasses.
I should also mention that it appears there is a 3/64 hole that is halfway between the primer and the primer pocket. Like it burned a small jet hole through both of them.”
Could this happen to you? It just might. On seeing this damaged case, one of Grant’s Facebook friends, Chris D., observed: “Search the internet, you will see a lot of these pin hole ‘in the corner’ failures. Obviously Winchester has some issues with the LR primers.”
Careful Examination Reveals Apparent Primer Defect
After this incident, Grant examined the damaged case: “I pinned the flash hole and it is not over-sized or under-sized. The primer clearly has an area where it had a defect. At [50,000 CUP], it doesn’t take much of a defect to cause issues. There was a slight bit of pucker-factor on the next shot….”
If you have a rifle chambered in .260 Remington, you may be wondering if the Lapua .260 Brass is worth the money compared to domestic-made brass. Well, the answer is “yes” if you demand consistent weight and dimensional uniformity (including neckwall thickness).
Mike Harpster of Dead Center Sports took the time to weigh and measure Lapua .260 Rem brass. His test show this brass to be extremely uniform. Weight variance was less than one (1) grain in a 20-case sample. And case neckwall thickness was very consistent.
Report by Mike Harpster: Lapua .260 Rem Brass Test Results (with Comparisons)
I pulled twenty (20) pieces randomly from one Lapua box to do some measurements. I weighed them on my Mettler-Toledo digital lab scale and here are the individual weights of each case. Remarkably, the Lapua brass had less than one grain total weight variance among all 20 cases!
While checking the Lapua brass I remembered I had just received some Winchester brand .308 brass, so I thought it would be interesting to do a comparison between the two brands. I again pulled 20 cases at random from a bag of 50 and repeated the same measurements. The results are shown in the right half of the table below.
Weight Variance Lapua .260 Rem Brass vs. Winchester-Brand .308 Win Brass
LAPUA .260 Rem Brass
Winchester .308 Win Brass
Average: 172.20 grains
ES: 0.94 grains
SD: 0.259
Average: 158.49 grains
ES: 2.64 grains
SD: 0.678
Winchester Brass Further Inspection
The flash holes on the majority of the Winchester brass were not round or centered and they had large burrs inside. The neck wall thickness was pretty consistent, varying only .0015″ (.0125″ – .014″). As you can see in the photo (right) many of the Winchester cases were badly dented while the Lapua brass showed very few minor dents. The annealing on the necks of the Lapua brass was clearly evident while the Winchester showed no signs of being annealed. [Editor’s note: Winchester tumble-polishes its brass before shipping — so you would not notice annealing coloration if annealing had been done.]
Lapua Brass Further Inspection
With sample Lapua .260 Rem cases, I also measured the neck wall thickness in four places with calipers, not the most accurate method but I feel confident that the thickness did not vary more than .001″ over the 20 cases (.0145-.0155). The inside diameter of the neck measured .260 which would give .004 of neck tension out of the box. I visually checked the flash holes and I did not find any flakes of brass or burrs inside, the holes were round and centered.
Summary — This Lapua Brass is Impressive
I have never done these measurements on any other brass so I don’t know how they compare, but I am very impressed with the overall quality of the Lapua .260 brass. If they prove to hold up to the repeated firings I get from my Lapua 6BR brass I believe .260 shooters will be very happy.
Mike Harpster — Dead Center Sports
105 Sunrise Drive
Spring Mills, PA 16875
phone: 814-571-4655 www.deadcentersports.com
The better, up-to-date ballistics programs let you select either G1 or G7 Ballistic Coefficient (BC) values when calculating a trajectory. The ballistic coefficient (BC) of a body is a measure of its ability to overcome air resistance in flight. You’ve probably seen that G7 values are numerically lower than G1 values for the same bullet (typically). But that doesn’t mean you should select a G1 value simply because it is higher.
Some readers are not quite sure about the difference between G1 and G7 models. One forum member wrote us: “I went on the JBM Ballistics website to use the web-based Trajectory Calculator and when I got to the part that gives you a choice to choose between G1 and G7 BC, I was stumped. What determines how, or which one to use?”
The simple answer to that is the G1 value normally works better for shorter flat-based bullets, while the G7 value should work better for longer, boat-tailed bullets.
G1 vs. G7 Ballistic Coefficients — Which Is Right for You?
G1 and G7 refer both refer to aerodynamic drag models based on particular “standard projectile” shapes. The G1 shape looks like a flat-based bullet. The G7 shape is quite different, and better approximates the geometry of a modern long-range bullet. So, when choosing your drag model, G1 is preferrable for flat-based bullets, while G7 is ordinarily a “better fit” for longer, boat-tailed bullets.
Drag Models — G7 is better than G1 for Long-Range Bullets
Many ballistics programs still offer only the default G1 drag model. Bryan Litz, author of Applied Ballistics for Long Range Shooting, believes the G7 standard is preferrable for long-range, low-drag bullets: “Part of the reason there is so much ‘slop’ in advertised BCs is because they’re referenced to the G1 standard which is very speed sensitive. The G7 standard is more appropriate for long range bullets. Here’s the results of my testing on two low-drag, long-range boat-tail bullets, so you can see how the G1 and G7 Ballistic coefficients compare:
G1 BCs, averaged between 1500 fps and 3000 fps:
Berger 180 VLD: 0.659 lb/in²
JLK 180: 0.645 lb/in²
The reason the BC for the JLK is less is mostly because the meplat was significantly larger on the particular lot that I tested (0.075″ vs 0.059″; see attached drawings).
For bullets like these, it’s much better to use the G7 standard. The following BCs are referenced to the G7 standard, and are constant for all speeds.
Many modern ballistics programs, including the free online JBM Ballistics Program, are able to use BCs referenced to G7 standards. When available, these BCs are more appropriate for long range bullets, according to Bryan.
[Editor’s NOTE: BCs are normally reported simply as an 0.XXX number. The lb/in² tag applies to all BCs, but is commonly left off for simplicity.]
On our main AccurateShooter.com site, you’ll find a good article by G. Salazar on the Basics of Neck Turning. If you’re new to the neck-turning game, or are just looking for good tips on improving your neck-turning procedures, you should read German’s article. Below we offer some highlights and photos from the article, but you’ll need to read the whole story to view all the illustrations and follow all the procedures step by step.
Why Should You Consider Neck Turning?
Let’s assume that your rifle doesn’t have a tight neck chamber that requires neck turning; if you have a tight neck chamber, of course, the answer to the question is “because you have to”. For the rest of us, and that includes the vast majority of Highpower shooters, neck turning isn’t a requirement, but it can be a useful way to bring your ammunition a small but meaningful step closer to that pot of gold at the end of the rainbow: perfection. I’m not talking about a theoretical improvement, but a real one, an improvement that lies in equalizing and optimizing the neck tension of your loaded rounds. Inconsistent neck tension is a real contributor to increased muzzle velocity variance which itself is a significant factor in increased elevation dispersion at long range. So there’s our basic reason for neck turning: to equalize and optimize neck tension in order to reduce elevation dispersion.
The Tools of the Trade
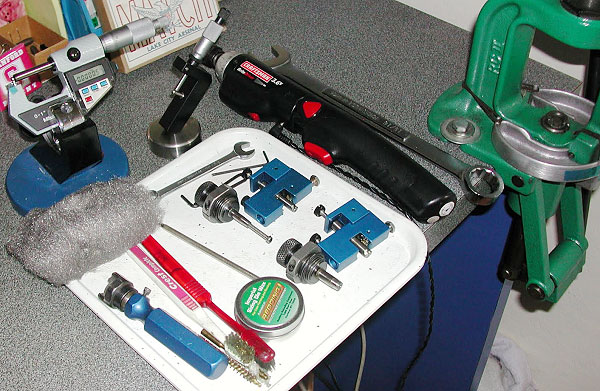
Here you see everything I use and a bit more. The press, a cordless screwdriver (always plugged in, turning is tough on the old battery), a couple of K&M neck turners (one set up for 6mm, the other for .30 caliber) an expander for each size, some Imperial lube, an old toothbrush or two to keep the cutter clean, a handle with a caseholder (for those emergencies when the screwdriver dies and there’s just one more case to go!), steel wool and a tubing micrometer finish the list of tools. Hey, I left the dial calipers out of the picture! They’re always handy, keep them around, but they are useless for measuring neck thickness, so don’t try. I usually use an Optivisor magnifier while I turn necks, very handy for a clear view of what’s happening on the neck.
Expanding the Neck
Put some lube on the inside of the case neck and run it into the expander. Really, this isn’t hard. I prefer to expand each case immediately before turning it as opposed to expanding all the cases and then turning them. Brass is somewhat springy and will tend to go back toward its original size; therefore, by expanding and turning immediately, you are more likely to have all cases fit the mandrel with the same degree of tightness and to get a more consistent depth of cut.
Cutter Adjustment for Cut Depth and Length
All the tools I’ve seen have pretty good adjustment instructions. The only thing they don’t tell you is that you should have five to ten spare cases to get it right initially. Anything of the right diameter will do while you learn, for instance, just use that cheap surplus .308 brass to do initial setup and save the precious .30-06 for when you know what you’re doing. Be patient and make your adjustments slowly; you’ll need to set the cutter for thickness as well as length of cut (just into the shoulder). The depth of cut (brass thickness) takes a bit of fiddling, the length of the cut is generally easy to set.
The Finished Product — A Perfectly Uniform Neck
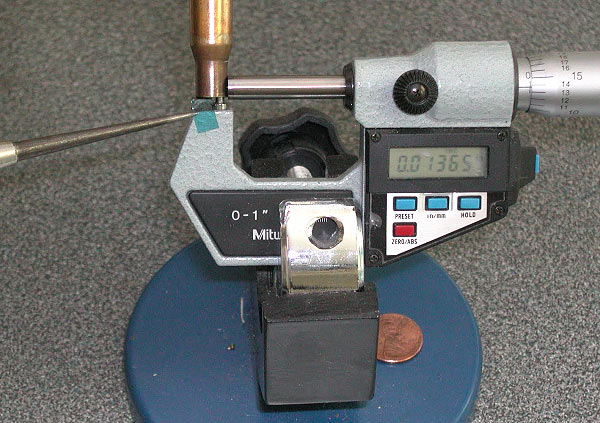
If you read the whole article, and follow the procedures using quality tools, you should get very good results — with a little practice. To demonstrate, here’s an example of my finished, neck-turned brass. You’ll see there is a perfect, 0.0125″ thick neck. It’s very uniform around the circumference, usually I only see 1 or 2 ten-thousandths variance. Now, with the necks uniformed like this, we can select the bushing size that will give us our preferred neck tension and experiment with various levels of tension, secure in the knowledge that all of the cases will actually have the desired neck tension.
“Once-fired, lot-number-traceable Lake City 7.62×51. This has been de-primed, pocket-swaged, small base body die’d, full-length sized, trimmed with a Gracey Trimmer, and tumbled. Now it’s shiny again. It’s like gourmet macaroni for shooters!” — Dennis Santiago
Our friend Dennis Santiago shoots a variety of disciplines, including Vintage Military Rifle. He burns through a lot of brass, some of it run through gas guns, so he often saves money by acquiring once-fired Lake City Arsenal brass. But that stuff is often pretty ugly when it arrives. For his “previously-owned” Lake City Brass, Dennis does a complete case prep operation and a thorough cleaning/tumbling operation. Special attention is paid to the primer pockets — they are swaged to remove the military crimp. The cases are trimmed and chamfered in one operation using a Gracey Powered Case Trimmer.
Dennis likes once-fired Lake City brass for some applications. The price is right, and with proper attention to detail during case prep, Lake City brass can shoot exceptionally well indeed. You may want to sort Lake City brass by weight. To remove the military crimp you have a variety of options — you can swage it out with a special tool like Dennis does, or you can ream out the crimp. For Wilson trimmer owners, Wilson makes a special Primer Pocket Reamer to remove military crimps. It works very well, as shown below:
Case Processing with the Gracey Trimmer
Designed by Doyle Gracey 30 years ago, the Gracey machine trims, deburs and chamfers in one operation, indexing off the case shoulder. The manufacturer claims the Gracey will process 20 cases per minute while holding .002″ tolerances on trim length. Two steel cutters are employed — one cutter trims the case to length and puts a chamfer on the inside of the case mouth. The second cutter removes the burr from the outside of the case-mouth. A 1/15 hp motor turns 1550 rpm. Interestingly, a clamped rubber hose serves as the “drive shaft” to turn the cutting head.
“This model may have a piece of wood for a base, no on-off swith and a piece of bent sheet metial to contain brass shavings — but it does trim, debur and chamfer with great speed and accuracy at a nice price. The [Gracey] two-bladed cutter requires a little more patience to adjust than the one-piece cutter on the Giraud, but it gets the job done superbly. [The Gracey] does the job for less money, if you’re willing to tinker with the cutter blade adjustment.” Gracey machines are still available new from MatchPrep.com for $335.00 (or $235.00 without motor).
Bryan Litz has produced an informative new video on the subject of bullet stability. The video explains how stability is related to spin rate (or RPM), and how RPM, in turn, is determined by barrel twist rate and velocity. For long-range shooting, it is important that a barrel have a fast-enough twist rate to stabilize the bullet over its entire trajectory.
Detailed Bullet Stability Article
To complement the above video, Bryan has authored a detailed article that explains the key concepts involved in bullet stabilization. Bryan explains: “Bullet stability can be quantified by the gyroscopic stability factor, SG. A bullet that is fired with inadequate spin will have an SG less than 1.0 and will tumble right out of the barrel. If you spin the bullet fast enough to achieve an SG of 1.5 or higher, it will fly point forward with accuracy and minimal drag.”
There is a “gray zone” of marginal stability. Bryan notes: “Bullets flying with SGs between 1.0 and 1.5 are marginally stabilized and will fly with some amount of pitching and yawing. This induces extra drag, and reduces the bullets’ effective BC. Bullets in this marginal stability condition can fly with good accuracy and precision, even though the BC is reduced. For short range applications, marginal stability isn’t really an issue. However, shooters who are interested in maximizing performance at long range will need to select a twist rate that will fully stabilize the bullet, and produce an SG of 1.5 or higher.”
Berger Twist-Rate Stability Calculator
On the updated Berger Bullets website you’ll find a handy Twist-Rate Stability Calculator that predicts your gyroscopic stability factor (SG) based on mulitiple variables: velocity, bullet length, bullet weight, barrel twist rate, ambient temperature, and altitude. This very cool tool tells you if your chosen bullet will really stabilize in your barrel.
LIVE DEMO BELOW — Just enter values in the data boxes and click “Calculate SG”.
Top photo with bullet by Werner Mehl, www.kurzzeit.com, all rights reserved.
People are still complaining that affordable .22 LR rimfire ammo can’t be found. Well folks, we found some. Just call Bullets.com or Midsouth Shooter’s Supply and get yourself some Norma Tac-22 or Match-22. This is good stuff, at reasonable prices. Check out this review of Tac-22 by rimfire specialist .22 Plinkster. This Norma ammo won’t win rimfire benchrest matches, but it is plenty good enough for fun shooting, offhand practice, and tactical rimfire games.
.22 Plinkster Review of Norma Tac-22 Ammunition
Summary by .22 Plinkster (see 4:30 time mark): “I’m pretty impressed with it … I think it’s a really good deal. For six dollars and fifty cents [per box] you can’t go wrong with a box of this ammo. Out of a good bolt gun, this ammo will drive tacks.”
While Varget and Reloder 15 remain in short supply, you can often find IMR 4320 powder back in the shelves of local gun stores. IMR describes IMR 4320 as follows: “Short granulation, easy metering, and perfect for the 223 Remington, 22-250 Remington, 250 Savage and other medium burn rate cartridges.” This older-generation powder is more temp sensitive than the Hodgdon Extreme propellants, but in the right application, it looks to be a viable alternative for folks who can’t source Varget, Reloder 15, and even H4895.
IMR 4320 Shoots Well in the .308 Winchester
A while back, GS Arizona wrote an excellent Riflemans Journal article, IMR 4320 — the Forgotten Powder. GS developed IMR 4320 loads for his .308 Win Palma rifle and competed with IMR 4320-powered ammo at long range matches. He concluded that: “[IMR 4320] appears to be a very useful alternative to some of the harder-to-get powders. The load is working extremely well at 1000 yards. In the [2009] Arizona Palma State Championship, several high placing competitors were using the 4320 load. We got sub X-Ring elevation at 1000 yards from several rifles, and that’s all I’m looking for in a Palma load.”
IMR 4320 Works for Dasher Shooter
Forum member FalconPilot shoots a 6mm Dasher with Berger 105gr Hybrids. Looking for an alternative to Varget, he decided to give IMR 4320 a try. The results were good. FalconPilot reports: “I’ve been looking for other options (besides Reloder 15, which I love, but it’s really dirty). While at a gun shop in Ohio, I ran across 8 pounds of IMR 4320. I had never even heard of it, much less tried it. Getting ready for upcoming mid-range shoots, I loaded five rounds with IMR 4320 to the exact same specs as my winning Varget loads for the 6mm Dasher. This recipe was 32.7 grains of powder, Wolf SMR primer, Berger Hybrid 105 jumped fifty thousandths.” Falcon pilot tested his IMR 4320 load at 600 yards:
As you can see from the photo at the top of this article, FalconPilot had good results — a 1.5″ group at 600 yards. He reports: “This group was shoot during the middle of the day, mirage bad, scope set to 25X. It looks like IMR 4320 is a [very close] replacement for Varget… with a tad bit slower burn rate.” FalconPilot tell us the accuracy with IMR 4320 rivals the best he has gotten with Varget: “This gun has always shot under 2 inches [for 5 shots] at 600 yards, and most of time shoots 1.5 to 1.7 inches.”
For comparison purposes, here are Heat of Explosion and Burn Rate values from QuickLOAD for IMR 4320, and for the popular Reloder 15 and Varget powders. You can see that these powders have similar characteristics “by the numbers”:
Manufacturer
Powder Brand
Heat of Explosion
Burning Rate Factor
IMR
4320
3890
0.5920
Alliant
Reloder 15
3990
0.5200
Hodgdon (ADI)
Varget
4050
0.6150
WARNING — When changing from one powder to another, always start with manufacturer’s stated load data. Start low and work up incrementally. Never assume that loads will be equivalent from one powder to another, even powders with similar burn rates.
What Other Forum Members Say:
I was using IMR 4320 in the mid 70s in my .222 Rem. Darned great powder and I never had a load that was not accurate from the .222 to .30-06 with that powder. — 5Spd
A fine powder overshadowed by the nouveau wave of “gotta have the newest — make me a better shot” powders. Try 4320 in a 22-250 — what a well-kept secret! IMR 4320 meters very well and is a flexible alternative to many of the hard-to-find powders so much in demand. — AreaOne
IMR 4320 was my “go to” powder in my .223 for many many years. This powder and Winchester 55gr soft point bulk bullets (the cheapest bullet I could buy at the time) accounted for thousands of prairie dogs, coyotes, and anything else that needed shooting. I still use IMR 4320 in some .223 loads and am very happy with it still. — pdog2062
I’ve been using it in a .308 Win for several years. I think it is very sensitive to temperature and always waited till the last minute to load my ammo with a close eye on the weekend forecast at the range. IMR 4320 Works pretty good for 155gr Palma and 168gr Hybrid [bullets] in my .308. — JayC
You’ve heard the rumors of a new ultra-high BC 7mm bullet from Berger. Well the rumors are true. Berger is now shipping test samples of its new 195-grain 7mm Elite Hunter Bullet, part # 28550. This bullet boasts jaw-droping 0.755 G1 and 0.387 G7 Ballistic Coefficients. Those are stunningly high numbers. Compare that to 0.674 G1 and 0.345 G7 BCs for the previous BC king amoung 7mm projectiles, Berger’s own 180 gr Match Hybrid Target.
We’re certain the “orange box” 195gr Elite Hunter will soon see use by F-Open competitors. This ultra-high BC projectile could be a “game-changer” in long-range shooting when used in cartridges such as the 7mm RSAUM, 7mm WSM and even bigger 7mm magnums. Recommended barrel twist rate is 1:8.3″, with a stated “minimum” twist of 1:9″.
We ran some numbers through the JBM Ballistics program*, comparing the new 195-grainer with Berger’s popular 180gr Hybrid. The results were eye-opening. The projected drop is significantly less. Most importantly, this new 195gr bullet moves a LOT less in the wind at 1000 yards. This should translate into higher scores for F-Class shooters — that wide ‘9’ shot may stay in the ’10’ ring. In fact, based on the JBM trajectory calculation, with a 10 mph 90° crosswind, the 195gr bullet will have over SEVEN INCHES less wind drift at 1000 yards than the 180-grainer (46.0″ vs. 53.1″). That’s a big deal, a very big deal…
Drop at 800 yards: 135.5″
Windage at 800 yards: 28.0″
Drop at 800 yards: 140.9″
Windage at 800 yards: 32.2″
Drop at 1000 yards: 237.9″ Windage at 1000 yards: 46.0″
Drop at 1000 yards: 250.0″ Windage at 1000 yards: 53.1″
Drop at 1200 yards: 380.1″
Windage at 1200 yards: 69.6″
Drop at 1200 yards: 404.2″
Windage at 1200 yards: 81.2″
* Variables were set to 55.4° F, 1000′ elevation, standard Atmosphere at Altitude, 2950 fps muzzle velocity. You can use JBM Ballistics to compare at different MVs.
UPDATE from Berger
After we broke this story, Berger Bullets wanted to clarify some points. Berger explained:
“This bullet is in the testing phase and has not been officially launched. We sent this bullet out for some public testing to make sure that we had positive feedback before we moved forward with an official launch.
We want to see how it performs in multiple rifles and different chamberings.
This bullet was made for hunting purposes, we realize there are shooters who would like to take these out for target shooting, like F-Class. However, we are not certain how they will perform. If things are successful we would like to eventually launch a target version.”
The information on the label you have pictured on your article has been updated.
Twist Rates
Minimum: 1:9″
Optimum: 1:8.3″
Ballistic Coefficients
G7 BC: .387
G1 BC: .754
How to Get Berger’s 195gr Elite Hunter Bullets
These bullets are so new you won’t find them on the Berger Bullets website yet. As Berger explained above, these bullets are still in a final testing phase. Most of the early production runs have been sent out for testing purposes. If you have specific questions, you can send an email to Berger via this CONTACT PAGE. Otherwise you can phone Berger, Mon-Fri, at 714-441-7200. Please try the email option first.




 If you have a rifle chambered in .260 Remington, you may be wondering if the Lapua .260 Brass is worth the money compared to domestic-made brass. Well, the answer is “yes” if you demand consistent weight and dimensional uniformity (including neckwall thickness).

 Winchester Brass Further Inspection
 The better, up-to-date ballistics programs let you select either G1 or G7 Ballistic Coefficient (BC) values when calculating a trajectory. The ballistic coefficient (BC) of a body is a measure of its ability to overcome air resistance in flight. You’ve probably seen that G7 values are numerically lower than G1 values for the same bullet (typically). But that doesn’t mean you should select a G1 value simply because it is higher.
 Drag Models — G7 is better than G1 for Long-Range Bullets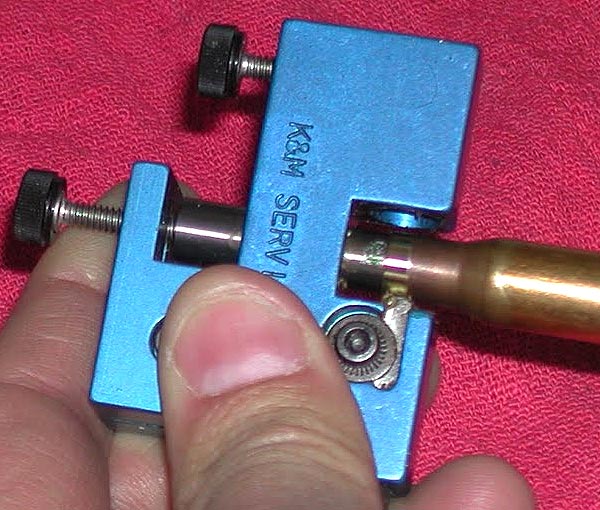



 While Varget and Reloder 15 remain in short supply, you can often find IMR 4320 powder back in the shelves of local gun stores. IMR describes IMR 4320 as follows: “Short granulation, easy metering, and perfect for the 223 Remington, 22-250 Remington, 250 Savage and other medium burn rate cartridges.” This older-generation powder is more temp sensitive than the Hodgdon Extreme propellants, but in the right application, it looks to be a viable alternative for folks who can’t source Varget, Reloder 15, and even H4895.


