Hunting season is coming soon around the country. If you want to get hunting tips from experts, here is a great audio “infotainment” resource. Leupold offers podcasts, 40-75 minutes in length, on a variety of topics of interest to hunters and precision shooters. A podcast is like a radio show that is available 24/7, at your convenience. When you want to “tune in”, via your home computer or mobile devices, just visit the Leupold Podcast Page.
Oregon-based optics-maker Leupold & Stevens (“Leupold) offers the “Core Insider” podcast series. These podcasts deliver hunting advice and recount successful hunting trips — such as Caribou hunting in Alaska. Other Leupold podcasts provide optics info, industry intel, and tech tips. Leupold’s Core Insider podcasts can also be accessed directly from Leupold.com. From the Leupold Podcast Home Page, you can stream the podcasts live or download for later listening.
You can also stream these podcasts via iTunes, and Spotify.
The Leupold Core Insider Podcasts cover a wide variety of shooting and hunting topics. Recent Episode 90 provides useful tips for novice hunters. The informative Episode 55 explains how Binoculars and Rangefinders function. Episode 36 explains how to prepare game meat from a successful hunt. There are now 96 Leupold Podcasts available online for FREE.
Episode 90: Randy Newberg’s Tips for New Hunters. Click to launch Leupold Ep. 90 Podcast Page:
Episode 55, How Binoculars and Rangefinders Work. Click to launch Leupold Ep. 55 Podcast Page:
Episode 36, The Art of Wild Game Cooking. Click to launch Leupold Ep. 36 Podcast Page:
There are now ninety-six (96) Leupold Core Insider Podcasts. Here are ten of our favorite episodes. Click links below to access:
The 2025 European F-Class Championships took place September 1-8, 2025 at the famed NRA Bisley Shooting Centre in the United Kingdom. Hundreds of talented competitors attended the match, with shooters from the USA finishing at the top in both F-Open and F-TR class.
Here’s a report from the NRA UK Facebook Page: “That’s a wrap on the F-Class European Championship. As the biggest F-Class event in the world, it brought together the finest shooters to test their skills at our very own National Shooting Centre, Bisley. It was a true testament to the skill and dedication of every competitor, with Bisley’s Stickledown Range living up to its reputation as a challenging and dynamic range. The wind and conditions were relentless, but so were the competitors.
A huge well done to all the competitors who travelled from across the world to participate. And thank you to the incredible NRA staff and volunteers who made the event possible. We are so proud to have hosted this prestigious event at the National Shooting Centre and we are already looking forward to hosting the World Championships in 2026.”
Stunning rainbow on the Stickledown range at Bisley, England, UK.
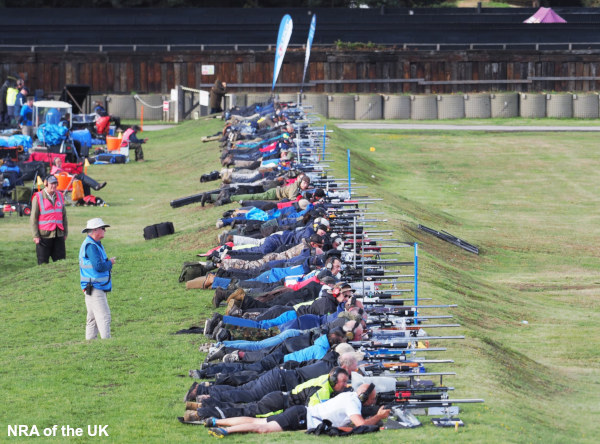
F-Class competitors on the firing line. CLICK HERE for more information about the famed Stickledown range at the NRA UK Bisley Centre.
The 2025 European F-Class Championships drew hundreds of shooters from around the globe, many from outside Europe. Top competitors from the USA wanted to gain experience at the challenging Stickledown range because the 2025 WORLD Championships will be held at the same venue. It was a demanding match, with very tough weather conditions during some sessions. CLICK HERE for full Individual and Team Results at 2025 Euro F-Class Championships.
Top 20 Finishers at 2025 European F-Class Championships
Congrats to F-Open Champion Peter Johns, who surpassed runner-up John Murphy of Ireland by 4 points. American shooters took three of the top five places in the F-Open competition.
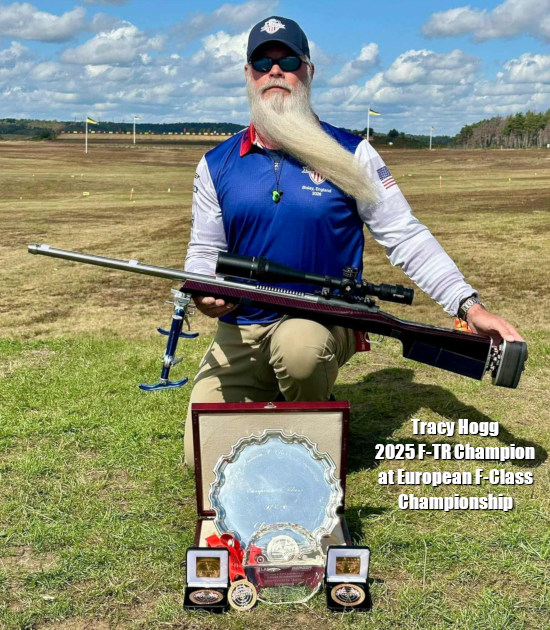
Praise to F-TR winner Tracy Hogg, who edged second-place Dale Lucy by 3 points. Americans took four of the top five place in the F-TR championships.
American Tracy Hogg Wins 2025 European F-TR Title
SEB Lambang, creator of SEB Rests and Joypod-X joystick bipods, posted: “Congratulations to Tracy Hogg for winning the 2025 F-TR European Championship!” Tracy, shown below with his awards, posted: “I’ll have to be honest I should have started years ago (using the Joypod-X). It really helped being able to move across the target so quickly in those tricky winds in Bisley”.
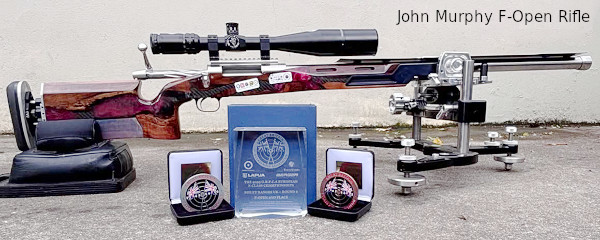
Report from John Murphy (2nd Place, F-Open)
American F-Open competitor John Murphy posted this report: “Finally back home and unpacked after an incredible week at the European F-Class Championship in Bisley. I’m thrilled to have finished 2nd overall [in F-Open], shooting through some of the toughest conditions I’ve ever faced and competing against many of the best in the world. Congratulations to Peter Johns on taking 1st place — he’s not only a world-class shooter but also a true gentleman.
A big thank you to Richie, the GBFCA, and the entire crew for organizing such a fantastic event. And of course, to my teammates, who made me proud in both the Team Matches and the America’s Cup. Already looking forward to seeing everyone again next August for the World Championships!”
Here’s a video report from Erik Cortina, who finished 7th overall in F-Open:
Rifle Images from the 2025 European F-Class Championships
F-TR competitor with alloy stock. Note the extremely low-profile bipod mounted close to bore axis. That helps minimize twist/roll on recoil.
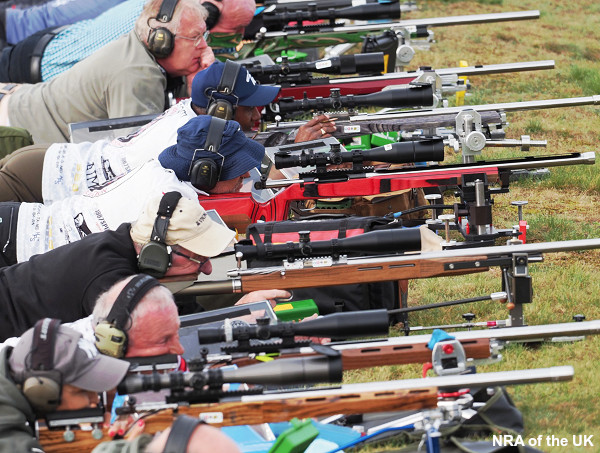
F-Class competitors on the firing line. All shooters shown here had laminated wood stocks.
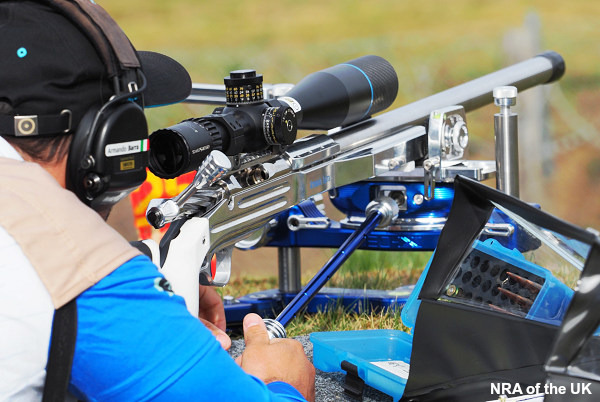
F-Open shooter with SEB NEO-X Front Rest. This rest folds compactly for transport yet is extremely stable during shooting, with superb joystick control.
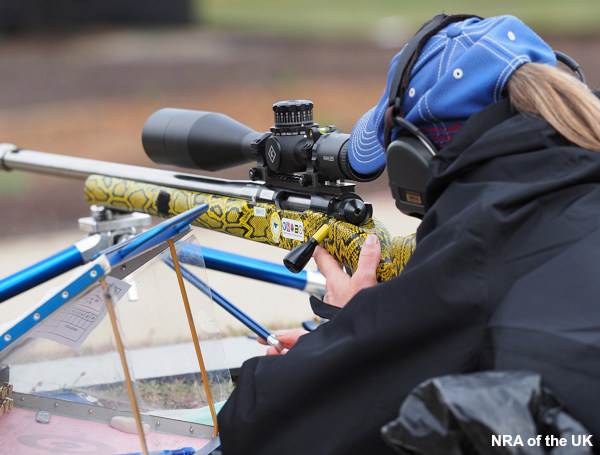
Lady F-TR competitor with a handsome gold snakeskin pattern on her stock, with matching gold bolt shaft.
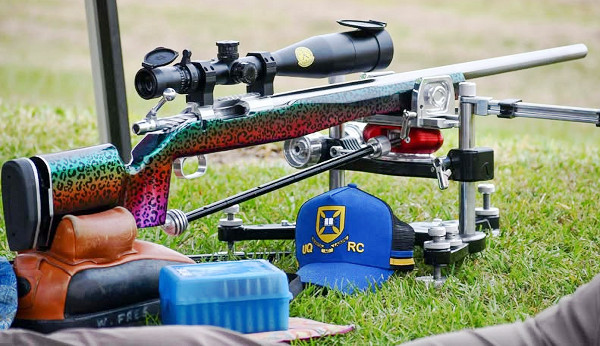
This rifle called “Sindy” features a leopard print on multicolour metallic. Very handsome. SEB Lambang posted: “Thank you Wendy LFree for sharing this lovely pix and for using my products!”
Heavy Rain and High Winds at Stickledown — Challenging Conditions
There were significant rainstorms during the 2025 F-Class Championship. Competitors needed tough wet-weather gear, and rainguards over their ammo and scoresheets. It was also wise to protect your scopes from moisture so that raindrops did not obscure the lens views.
Vertical stringing is a common problem that all precision shooters will face sooner or later. In addition to ammo inconsistencies, many other factors can cause vertical stringing. Accordingly, it’s important that you analyze your gun handling and bench set-up systematically.
EDITOR: Folks, READ THIS ARTICLE! You WILL benefit. There are some VERY important insights here. You’ll learn ways to set up your gun better, and check for various technical issues. That can save you time at the range and save you money spent on expensive bullets and powder.
In this article, Hall of Fame benchrest Shooter Speedy Gonzalez explains how to eliminate mechanical and gun-handling problems that cause vertical spread in your groups. Speedy’s article addresses the many human and the hardware factors that can cause vertical.
Speedy Gonzalez, noted shooter, gunsmith and member of the Benchrest Hall of Fame, offers these pearls of wisdom to help you eliminate vertical in your shot strings. Remember that vertical can result from myriad gear issues and gun-handling mistakes. Try to isolate one item at a time as you work to improve your groups.
BAGS and REST–VERY IMPORTANT
• Front Rest Wobble — You will get vertical if the top section of the front rest is loose. Unfortunately, a lot of rests have movement even when you tighten them as much as you can. This can cause unexplained shots.
• Rifle Angle — If the gun is not level, but rather angles down at muzzle end, the rifle will recoil up at butt-end, causing vertical. You may need to try different rear bags to get the set-up right.
• Front Bag Tension–Vertical can happen if the front sand bag grips the fore-arm too tightly. If, when you pull the rifle back by hand, the fore-arm feels like it is stuck in the bag, then the front bag’s grip is too tight. Your rifle should move in evenly and smoothly in the sand bags, not jerk or chatter when you pull the gun back by hand.
• Sandbag Fill — A front sandbag that is too hard can induce vertical. Personally, I’ve have never had a rifle that will shoot consistently with a rock-hard front sandbag. It always causes vertical or other unexplained shots.
• Bag Ears — If the channel between the Rear Bag’s ears is not in line with the barrel, but is twisted left or right, this can affect recoil and vertical consistency. And take note — if the bag is off-axis quite a bit, you can also get horizontal stringing.
• Reliability — ALL your bench equipment must work flawlessly. If it doesn’t, get it fixed or get rid of it. We need all our attention on wind flags.
GUN HANDLING and BENCH TECHNIQUE
• Be Consistent — You can get vertical if your bench technique is not the same every shot. One common problem is putting your shoulder against the stock for one shot and not the next.
• Free Recoil — Free recoil shooters should be sure their rifle hits their shoulder squarely on recoil, not on the edge of their shoulder or the side of their arm.
• Head Position — Learn to keep your head down and follow-through after each shot. Stay relaxed and hold your position after breaking the shot.
• Eyes — Learn to shoot with both eyes open so you can see more of the conditions.
• Last Shot Laziness — If the 5th shot is a regular problem, you may be guilty of what I call “wishing the last shot in”. This is a very common mistake. We just aim, pull the trigger, and do not worry about the wind flags. Note that in the photo above, the 5th shot was the highest in the group–probably because of fatigue or lack of concentration.
• Last Shot Low — I hear a lot of discussion about low shots in a group and apparently this occurs a lot on the 5th shot. If your 5th shot that goes out most of the time, you can bet you are doing something at the bench.
• Seating — When possible, bring your own stool so that you can sit comfortably, at a consistent height, every time you shoot.
LOAD TUNING
• Find the Sweet Spot — A load that is too light or too heavy can cause vertical problems. When you’ve tuned the load right, you should see a reduction in vertical. Even 0.1 grain may make a difference, as will small changes in seating depth.
• Primers — If you’re getting vertical, and everything else looks fine, try another brand of primers. And remove the carbon from the primer pockets so the primers seat uniformly every time.
• Case Prep — When you chamfer the inside of your case necks make sure they are smooth enough that they don’t peel jacket material off when you seat the bullet. Bullets with J4 Jackets (like Bergers) and Lapua Scenar bullets seem more prone to jacket scratching or tearing than Sierra bullets.
• Shell Holders — Keep shell holders clean, in both your press and priming tool. I have seen so much dirt/crud in shell holders that the cases end up get sized crooked because the rim is not square to the die.
• Water in Cases — I see people walking around with case necks turned up in the loading block. A lot of the time there is condensation dropping from the roof of your loading area. If one drop of water gets in a case you are in trouble. How many times have you had a bad low shot when it has been raining and you have been walking around with your cases turned up in your block?
MECHANICAL and HARDWARE ISSUES
• Barrel Weight — A lot of rifles are muzzle-heavy. Some rifles have too heavy a barrel and this causes vertical, especially when shooting free recoil. Basically the gun wants to tip forward. The remedy is to trim or flute the barrel, or add weight in the rear (if you can stay within weight limits).
• Unbalanced Rifle — If the rifle is not balanced, it does not recoil straight, and it will jump in the bags. If the rifle is built properly this will not happen. Clay Spencer calls this “recoil balancing”, and he uses dual scales (front and rear) to ensure the rifle recoils properly.
• Firing Pin — A number of firing-pin issues can cause vertical. First, a firing pin spring that is either too weak or too strong will induce vertical problems. If you think this is the problem change springs and see what happens. Second, a firing pin that is not seated correctly in the bolt (in the cocked position) will cause poor ignition. Take the bolt out of rifle and look in the firing pin hole. If you cannot see the entire end of firing pin it has come out of the hole. Lastly, a firing pin dragging in bolt or shroud can cause vertical. Listen to the sound when you dry fire. If you don’t hear the same sound each shot, something is wrong.
• Trigger — A trigger sear with excessive spring load can cause problems. To diagnose, with an UNLOADED gun, hold the trigger in firing position and push down on sear with your thumb. If it is hard to push down, this will cause vertical problems.
• Stock Flex — Some stocks are very flexible. This can cause vertical. There are ways to stiffen stocks, but sometimes replacement is the best answer.
SCOPE ISSUES
• Lock Rings — This year alone I have seen nine lock rings on scopes that are not tight. Guess what that does to your group? Make sure yours are tight.
• Big Tubes Need Tension — We’ve observed that some 30mm scope rings are not getting tight enough, and scopes are slipping in the rings under recoil. This will cause point of aim movement.
• Windage Bases — If you’re using a conventional-style single dovetail with rear windage adjustment, make sure both sides of the windage screws are tight. This can induce both windage AND vertical issues since the rear ring is held down by the windage tension.
AWARENESS of CONDITIONS and READING WIND
• Basic Wind-Reading Rule–If you do not know how to read wind flags or are very inexperienced, try to shoot your group with the flags all going in one direction.
• Rate of Fire — The longer you wait between shots when a condition is changing, the more the condition change will affect your shots.
• Look Far and Wide — Learn to look at the whole field of flags, not just the row in front of you. Many times a change quite a ways out will cause shot to go out of your group well before that change shows up in front of your bench.
• Don’t Fear the Wind — When you realize that the wind is your friend you will become a much better benchrest shooter. By this I mean that wind skills can separate you from other shooters who have equally good equipment. To learn how to read the wind, you must practice in challenging winds, not only in good conditions.
• Watch Wind Direction AND Velocity — Pay attention to angle changes on flags. Even though you see the same windspeed indicators, angle changes make a big difference in your groups.
• Watch While You Wait — Between courses of fire, whenever possible, watch conditions on the range. That way you will be aware of any changes in conditions since your last group and you will be mentally prepared for the new condition.
SPECIAL ADVICE for HUNTING RIFLES
• Clean That Barrel — Most hunting rifle barrels do not get cleaned enough. If you keep barrel clean it will shoot better for you. You should clean your barrel well after every 10 to 12 shots. If you’re lazy, just use Wipe-Out.
• First Shot Inconsistency — Most hunting rifles will not put the first shot (after cleaning) with the subsequent shots. So, after cleaning, if you have a rifle that tosses that first shot high or wide, then shoot one fouling shot before going hunting or before you shoot for group.
• Barrel Heat — Thin-contour “sporter” barrels WILL change point of impact as they heat up. When testing loads for your hunting rifle, take your time and don’t let the barrel get hot on you.
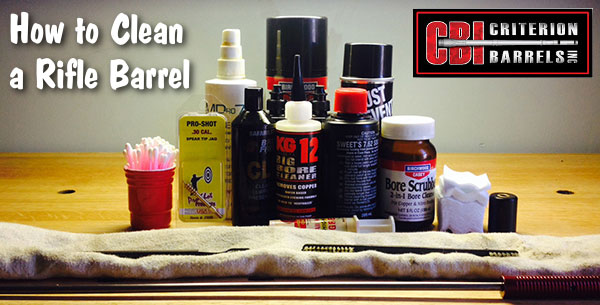
This article comes from the Criterion Barrels website. It provides good, conservative advice about barrel cleaning. Understand that cleaning methods may need to be adapted to fit the amount and type of fouling (and the particular barrel). In general, we do try to minimize brushing, and we follow the procedures Criterion recommends respecting the crown/muzzle. We have also had very good success using wet patches followed by Wipe-Out bore foam. Along with the practices outlined by Criterion below, you may want to try Wipe-Out foam. Just be sure to use a fitted cleaning rod bore guide, to keep foam out of the action recesses and trigger assembly.
The above video shows how to apply Wipe-Out or other bore-cleaning foam. We use a slightly different method. First, we use 3-4 wet patches to remove loose carbon fouling. Then we apply the foam as shown, but usually from the muzzle end (with bore guide in chamber). Here’s the important point — after 20-30 minutes, once the bubbles have dissipated, we apply the foam a second time, getting more of the active ingredients into the barrel. We then patch out, as shown, after 3-4 hours.
What is the Best Way to Clean a Rifle Barrel?
We are asked this question quite frequently alongside requests for recommended break-in procedures. Improper barrel cleaning methods can damage or destroy a barrel, leading to diminished accuracy or even cause a catastrophic failure. When it comes to barrel maintenance, there are a number of useful techniques that we have not listed. Some techniques may work better with different barrel types. This series of recommendations is designed to incorporate a number of methods that the Criterion Barrels staff has used successfully both in the shop and on their personal rifles. Please feel free to to list your own recommendations in the below comments section.
We recommend the use of the following components during rifle cleaning:
• Cloth patches (sized for the appropriate caliber)
• Brass jag sized properly for your bore
• One-piece coated cleaning rod
• General bore cleaner/solvent (Example: Hoppes #9)
• Copper solvent of your choosing (Example: Sweets/KG 12)
• Fitted cleaning rod bore guide
• Plastic AP brush or toothbrush
• Q-Tips
• Plastic dental picks
• CLP or rust preventative type cleaner
There are a number of schools of thought relating to the frequency in which a barrel should be cleaned. At minimum we recommend cleaning a barrel after each shooting session to remove condensation, copper, and carbon build-up. Condensation is the greatest immediate threat, as it can cause the barrel to rust while the rifle sits in storage. Copper and carbon build-up may negatively impact future barrel performance, increasing the possibility of a failure in feed or function. Fouling should be removed whenever possible.
The below tips will help limit the wear of different parts of your barrel during routine maintenance, helping extend the life of the barrel and improving its performance.
The Lands and Grooves
This portion of the barrel may experience reduced efficiency due to copper fouling and cleaning rod damage. If copper fouling takes place during the initial break-in of the rifle, make sure to check our barrel break-in article.
For regular maintenance we suggest using a single piece coated cleaning rod rather than the traditional segmented rod or bore snake. While segmented rods and bore snakes may be convenient for field use, the corners between the segments may bow out and catch on the lands, scraping along the length of the rifling. Residual grit and particles from expended cartridges may also get caught between segments, resulting in an abrasive surface working its way down the length of the barrel. Most bore snakes will remove significant amounts of carbon fouling, but may fall short in the removal residual carbon buildup and copper fouling during deep cleaning. Good rods can be sourced from multiple manufacturers, but we have found good results using both Pro-Shot and Dewey brand products.
General cleaning requires the use of patches rather than nylon or brass bore brushes. Brass brushes may be required when aggressive cleaning is required, but can lead to unnecessary wear on the barrel if used frequently. This is not due to the nature of the soft brushes themselves, but from the abrasive particles of grit that become embedded in the material that is being run repeatedly through the bore. We recommend the use of bore guides when cleaning from both the muzzle and breech. These bore guides will help serve to protect the crown and throat from cleaning rod damage.
If significant resistance develops while running the cleaning rod through the bore, no attempt should be made to force it in further. Back the rod out and inspect the barrel to determine the cause of the resistance. The jag may be pushing between a bore obstruction and the rifling, digging a divot into the barrel before pushing the obstruction back through the muzzle. One way to minimize the risk of a stuck rod is by utilizing a slightly smaller patch during the initial push.
The process of cleaning the length of the rifling is relatively straightforward:
1. Check to make sure the rifle is safely unloaded.
2. Carry out any necessary disassembly procedures prior to cleaning.
3. Remove bolt (if possible) and insert fitted cleaning rod bore guide in action.
4. Soak a patch in bore solvent (similar to Hoppes #9).
5. Center and affix the patch on the brass jag, inserting it into the chamber end of the barrel. A misaligned patch may cause the jag to damage the lands of the rifling, so make sure the patch is centered on the jag.
6. Run the patch the full length of the barrel, retracting it upon reaching the end of the muzzle.
7. Let the solvent sit for a minute.
8. Continue to run patches through the bore until carbon residue is minimized.
9. Run a dry patch through the bore to ensure carbon residue has been removed.
10. Soak a patch in copper solvent (Sweet’s or KG-12).
11. Run the patch through the bore, leaving it to sit for 3-5 minutes (do not let solvent sit for more than 15 minutes.*)
12. Repeat this process until no blue residue remains on the patches.
13. Run a patch of Hoppes #9 and a dry patch through the bore to neutralize the copper solvent.
14. Inspect the barrel prior to reassembling the rifle, verifying that no bore obstructions remain.
*Please note that some ammonia-based copper solvents may prove to be corrosive if left sitting in the barrel for an extended period of time. It is essential that these solvents be removed within 15 minutes to avoid ruining the bore.
The Crown
The crown is the portion of the barrel where the bullet loses contact with the lands and grooves and proceeds to exit the firearm. The area most critical to accuracy potential is the angle where the bullet last touches the bore of the barrel.
Avoid damage to this area by using a plastic toothbrush and CLP type cleaner to scrub the crown from the exterior of the barrel. Even the most minimal variation in wear to the crown will negatively impact barrel performance, so be careful to avoid nicking or wearing away this part of the barrel.
Over 22 million carry permits have been issued in the United States according to a recent study. Overall 8.5% of American adults now have carry permits. Along with CCW permit holders, millions of other gun owners may carry defensive pistols in “open carry” states. Carrying a defensive pistol is a big responsibility. That’s why all those who carry handguns for self-protection should definitely practice regularly. For many, pistol practice is an indoor experience. Indoor ranges are most convenient for those who live near urban centers, where the biggest threats to public safety currently exist. This article covers indoor firearms training and the proper procedures you should follow at indoor ranges.
This Video Covers Basic Gun Range Safety Rules and Etiquette
FIVE IMPORTANT SAFETY PROCEDURES for Indoor Ranges
1. Follow the Three Fundamental Rules for Safe Gun Handling
ALWAYS keep the gun pointed in a safe direction. ALWAYS keep your finger off the trigger until ready to shoot. ALWAYS keep the gun unloaded until ready to use.
2. Follow ALL Range Officer Instructions
ROs are the first and final authority on any range and their decisions are generally final. Arguing with a Range Officer may just get you thrown out.
3. Don’t Bother Others or Touch Their Guns
Respect other shooters’ privacy unless a safety issue arises. Do NOT engage other shooters to correct a perceived safety violation unless absolutely necessary – inform the RO instead. NEVER handle or touch another shooter’s firearm without their permission!
4. Know Your Range’s Rules
Review and understand any and all range rules and requirements/expectations. For example, what is the range’s maximum rate of fire? Are you allowed to collect your brass?
5. Know What To Do During a Cease Fire
IMMEDIATELY set down your firearm, pointed downrange, and STEP AWAY from the shooting booth (or bench). Range Officers do not want shooters trying to “secure/unload” their firearms in a cease fire situation — they want the shooters separated from their guns instantly.
Double-Up on Hearing Protection When Shooting Indoors
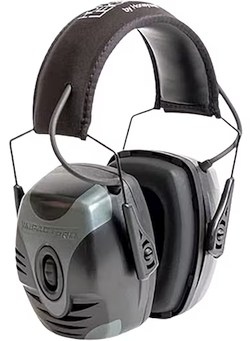
Howard Leight states that Impact Pro muffs are “designed for handgun and pistol shooters looking for high NRR … for indoor ranges, covered ranges or other extremely loud shooting environments.”
When shooting indoors we recommend quality muffs with earplugs underneath, offering double protection. When inside an enclosed range, with other shooters blasting away right next to you, you really need effective hearing protection. But you also need to hear range commands and be able to communicate. That’s why we recommend electronic muffs with quality plugs underneath. We recommend the NRR 33 Howard Leight Max-1 Plugs. These tapered plugs are comfortable, easy to insert, and have a flared end for better sound seal.
On top of those plugs, run high-quality muffs. For indoor ranges where sound levels can be extremely high, we recommend Howard Leight Impact Pro Muffs. These offer an impressive 30 dB Noise Reduction Rating (NRR) and the effective noise reduction can be improved by 4 decibels or more by running plugs as well.* These muffs are pretty comfortable and offer Headphone Functionality so you can connect to your phone, MP3 player, or audio device. These muffs are $90.55 on Amazon and $90.55 at MidwayUSA.
* Four decibels may not sound like much, but remember the decibel measurement system is logarithmic, so four decibels is VERY significant. We have discussed the merits of “doubling up” hearing protection with Ph.D. sound engineers. They told us that a combination of muffs and plugs could reduce effective noise levels by up to five decibels compared to plugs alone. In addition, good muffs will block bone conduction sound energy better than plugs alone.
Kirsten Weiss knows a thing about accuracy. She won the 2012 NRA Three-Position Women’s Smallbore Championship, while finishing as the National Overall Woman Champion. She used to shoot with the American team in top-level World Cup competition. Kirsten started shooting fairly late — at age 16. Despite her relatively late start, she earned a place on the University of Nebraska shooting team. That literally opened up a new world for Kirsten: “During the course of my career, I’ve had a lot of success. I’ve gone to World Cups… in Zagreb, Croatia, in Munich, Germany. I’ve won National Championships, and got on to the U.S. Olympic short list, so it’s been a good career.”
In these three videos, Kirsten offers key tips on accurate shooting. In the first video she explains how to get and maintain the proper cheek weld on your rifle. In the second, Kirsten talks about canting error — how having inconsistent side-to-side tilt on your rifle. In the third video, Kirsten explains the importance of proper trigger placement.
Proper Cheek Weld
No matter what your discipline — smallbore, silhouette, High Power, F-Class, or even PRS — it’s vital to have a consistent cheek weld for every shot. You want your head to be in the same position on the stock each time.
In this video, Kirsten explains how to find the best position for your head on the stock, which may require adjusting the cheekpiece. Then Kirsten demonstrates how to maintain consistent cheek weld shot after shot.
Consistent Rifle Cant (Tilt from Centerline)
Kirsten says most training manuals don’t explain rifle cant: “You won’t find this shooting technique just anywhere. Most shooters don’t even think about it — and they’re missing out. Proper Rifle Cant or Gun Cant (also known as cant error or even scope cant) is a complicated topic, but I’ll explain it simply — and how to simply avoid cant error.”
Want to know how to actually aim a gun right? This accuracy tip covers a crucial aspect of marksmanship. If you cant your rifle inconsistently from shot to shot, the point of impact will change, even with “perfect aim”. This is another episode in Kirsten’s How to Shoot Awesomely video series.
Proper Trigger Finger Technique
Kirsten tells us: “Finger placement on the trigger might not seem like a big deal, but it actually is. The reason for this is because, depending on where your index finger is placed on the trigger, [this] translates to different muscle interactions with the gun.” Watch this video to see Kirsten demonstrate proper finger placement (and explain problems caused by improper finger positioning).
When you pull the trigger, you only want to engage the last section of your finger, in order to avoid unwanted muscle engagement and to achieve a smooth shot. Remember there is a “sweet spot” between the crease (first joint) and the tip of the finger. If you position the trigger in that “sweet spot”, you should see an increase in your accuracy. Don’t make the mistake of putting the trigger in the crease of your finger, as shown below.
2025 CMP Top Four Winners of Recurring $5000 Grants
Since 2005, the CMP has annually offered one-year scholarships to current high school seniors based on academic merit, humanitarian efforts, extracurricular activities, and marksmanship participation. Continuing this tradition, this year the CMP presented four, $5,000 annual scholarships ($20,000 over four years) to this year’s top four applicants, as determined by members of the CMP Scholarship Committee.
Each of the four recurring $20,000 scholarships are named in honor of past CMP Board members Harry Sieben, Carolyn Hines, Jon Bengston and former Chair Judith Legerski.
This year’s Four Top Scholarship recipients are…
Elisa Boozer, Oklahoma City, OK (Judith Legerski Scholarship)
A former member of the Oklahoma Sharpshooters junior team, Elisa is a multi-time Oklahoma State Champion for both smallbore and air rifle and qualified for the Junior Olympics five times for air rifle and four times for smallbore. She also found international success, earning silver in the 10-meter women’s air rifle junior competition at the Leppa Grand Prix in Finland. Elisa went on to earn her Junior Distinguished Badge from the CMP in 2023 and is an honorary life member of the Oklahoma Rifle Association.
She credits marksmanship for teaching her focus, hard work and community. Academically, Elisa was a straight-A student, taking AP Honors and dual credit classes. She joined the University of Kentucky rifle team this fall. She is a business major.
Hanna Goin, Walla Walla, WA (Jon Bengston Scholarship)
Hanna is a former member of the Walla Walla High School JROTC program’s rifle team, where her competitive marksmanship career began. While there, she competed multiple times at the Army JROTC and CMP National Championships and at the Junior Olympics in 2025. She also took first overall at the Idaho State Junior Olympics in air and smallbore rifle and was part of the Washington State Champion Precision Air Rifle Team.
Hanna has said that marksmanship has taught her that there is nothing desirable about staying within a comfort zone, helping her to stay mentally strong through adversity. Academically, she took Honors, AP and dual enrollment courses during high school. Hanna joined the Morehead State rifle team this fall. She is a pre-med major.
Katlyn Sullivan, Statesboro, GA (Carolyn Hines Scholarship)
Among several accolades, including multiple medals at the state and national level, Katlyn was a Georgia High School Association (GHSA) Individual State Champion in 2024 and 2025 and was a member of the All-Star State Team from 2023-2025. She was also a four-time qualifier for the National Junior Olympics in air rifle and was a two-time qualifier for smallbore. In 2023, she earned her Junior Distinguished Badge.
Katlyn has said marksmanship has taught her leadership, a growth mindset and how to achieve her goals – changing how she handles setbacks. Academically, Katlyn finished second out of 392 other students, mastering multiple AP classes, and she earned a place in the National Honor Society. Katlyn joined the Nebraska Cornhuskers rifle team this fall. She is a mechanical engineering major.
Dominic DeBenedetto, Prairieville, LA (Harry Sieben Scholarship)
Domonic began marksmanship through his local 4-H program at just nine years old. He’s a six-time Nationals qualifier and placed fifth overall at the 4-H Nationals in air rifle (his team placing first in both air rifle and smallbore). He is also an accomplished rifle silhouette competitor who has competed in local, regional and national championships in the discipline, and he takes part in pistol/air pistol shooting.
He credits marksmanship for leading him to a role as an ambassador within his community – hoping to make a difference in the lives of other youth. Domonic finished in the top 3% of his 500-student class. He has enrolled at Louisiana Tech as an engineering major.
Other Scholarship Winners for Fall 2025
In addition to the 4-year recurring $5K scholarships, the CMP offers $1000, $3000, and $5000 one-time grants to qualified junior marksmen. These $1000, $3000, and $5000 scholarships can fund any accredited education, technical/trade school, or vocational program. Shown below are the eleven $5000 one-time scholarship winners for 2025. There were also 32 $3000 grant recipients, and 80 $1000 grant recipients.
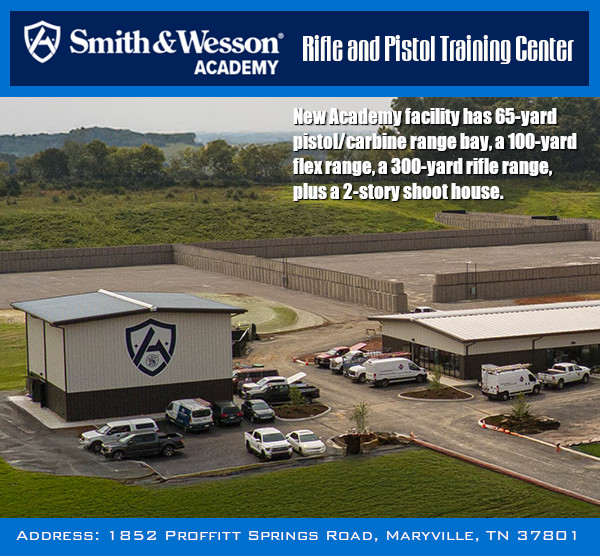
Smith & Wesson Brands, Inc. (NASDAQ: SWBI) has opened a state-of-the-art training center in Tennessee. This new Smith & Wesson Academy replaces the former Smith & Wesson Academy and Shooting Sports Center which operated in Massachusetts between 1969 to 2017.
The newly established Academy will provide training in firearm proficiency, self-defense, and firearm safety. Situated on the 236-acre headquarters campus in Maryville, Tennessee, this state-of-the-art facility features pistol and carbine ranges, a multi-purpose flex range, a 300-yard rifle range, and a two-story immersive shoot house for simunition training.
The Academy also has classrooms, a fitness center, and offices that will house world-class training instructors. Starting this weekend, a registration portal will be available on the Smith & Wesson Academy website for a variety of training courses focused on pistol, carbine, and rifle platforms. These courses will range from introductory skills and safety to advanced techniques.
Outdoor Wire/Shooting Wire EIC Jim Shepherd attended the opening ceremonies at the new Smith & Wesson Academy. Jim noted: “One thing made obvious during the ceremonies was that Maryville, Tennessee definitely isn’t Springfield, Massachusetts. Having taken part in numerous media and training events in the former Shooting Sports Center in Springfield until its closure in 2017, the depth and breadth of the new facilities was testimony to the expansiveness of the Tennessee campus. This new facility not only includes enclosed ranges with acreage, but classrooms, a fitness center, and offices to house what the company says will be ‘world-class experts leading the training programs’.”
The Smith & Wesson Academy team will be led by renowned instructor Mark “Coch” Cochiolo. Mark is a retired U.S. Navy Chief Warrant Officer with over three decades of service in Naval Special Warfare. Mark completed four SEAL deployments to the Western Pacific and served eight years with the Navy’s premier counterterrorism unit. Following his retirement from active duty, Mark transitioned to instruction, training the next generations of Navy SEALs. As a contract instructor, he developed curriculum and trained more than 4,000 SEAL candidates in marksmanship and tactical weapons handling. Mark is recognized for his precision, discipline, and leadership in the special operations community.
Mark Cochiolo stated: “I have worked with a variety of firearm platforms, and I am grateful for the opportunity to leverage that experience in developing effective curriculum at the Academy, helping as many individuals become proficient with their firearms as possible. Smith & Wesson produces dependable, quality firearms – at the Academy, we’ll teach you how to use them”.
September 27, 2025 is National Hunting & Fishing Day. The annual celebration takes place on the the fourth Saturday of September every year. National, regional, state and local organizations will run thousands of “open house” hunting- and fishing-related events around the country. Events will include Fishing Derbys, Hunting Expos, Wing-shooting tournaments, and much more.
Hunting Safety Checklist
A good hunt begins with preparation. And during the hunt, safety is a key priority. To help hunters, the National Shooting Sports Foundation (NSSF) has created a Safety Checklist for hunters. This Hunting Safety Checklist, produced as part of the NSSF’s “Hunt S.A.F.E.” campaign, helps hunters follow good, safe practices in the field and at home.
This can be very important — even life-saving. For example, with a hang fire, i.e. a round that does not fire immediately, it is vital to keep the gun pointed DOWN-RANGE. And with a squib load, which may have left a round inside the barrel, it is vital to UNLOAD and NOT take another shot! If you did, the gun could blow up in your hand when the second, full-charge bullet hits the trapped bullet.
The Five Topics Covered Are:
Misfeed (aka Tip-Up)
Double Feed
Stovepipe (Failure to Extract)
Misfire / Hangfire
Squib Load
1. Misfeed or Tip-Up: With any misfeed you should stop firing. With the muzzle pointed safely down-range, remove the magazine, then pull the slide back and remove the round that did not feed. Check the slide for dirt, debris, and check the round that did not feed. After re-inserting the magazine, make sure the mag is seated properly.
2. Double-Feed: This is a fairly common issue with some gun types with worn springs or cheap magazines. Again you want to remove the magazine. CTD states: “Remove the magazine and cycle the action until your double-fed rounds fall out — always keeping the muzzle pointed in a safe direction[.]”
3. Stove-Pipe: This occurs when the case of a fired round does not eject fully. There can be many causes — damaged extractor, low-pressure powder charge, dirty chamber, or greasy cartridge brass. In addition the issue is common with old, worn-out recoil springs. To avoid Stove-Pipes, replace the recoil spring every 4000 rounds, and make sure your chamber is clean and the extractor is not chipped or damaged.
4. Misfires and Hang-Fires: There are multiple causes for misfires (“click no bang”) and hang-fires (slow ignition). There can be a defective primer, the firing pin could be damaged, the powder many have been bad, or the case not filled properly. With a misfire, keep the gun pointed down-range at least one minute. If the case does not fire, eject it but leave it on the ground. With a hang-fire (delayed ignition after firing pin strike), keep the gun pointed down-range, then drop the magazine and eject the (new) unfired cartridge in the chamber and inspect the gun when completely empty.
5. Squib Load: A squib load is when the gun fires, but the actual case ignition is very light with little noise, smoke, or recoil. This can be because the case had a primer but no powder. Or it can be because the powder did not ignite. Squib loads can be very dangerous in rapid-fire situations. If you EVER get a squib load STOP immediately! Do NOT fire another round! This is because the squib may have left a bullet inside the barrel.


 Episode 83: Rifle Hunting Mistakes and How to Fix Them








 In this article, Hall of Fame benchrest Shooter Speedy Gonzalez explains how to eliminate mechanical and gun-handling problems that cause vertical spread in your groups. Speedy’s article addresses the many human and the hardware factors that can cause vertical.
  • Front Bag Tension–Vertical can happen if the front sand bag grips the fore-arm too tightly. If, when you pull the rifle back by hand, the fore-arm feels like it is stuck in the bag, then the front bag’s grip is too tight. Your rifle should move in evenly and smoothly in the sand bags, not jerk or chatter when you pull the gun back by hand.