This USAMU article explores three different “Philosophies” of precision reloading. Some handloaders seek to produce ammo that yields the very tightest groups (without factoring in the wind). Other shooters load their ammo to deliver the highest safe velocity. That’s because a projectile launched at higher velocity will drift less in the wind. The theory is that even if fast ammo doesn’t produce the tightest groups in zero wind conditions, it will yield higher scores in a the real world (where the wind blows). Lastly, some handloaders favor ammo that is ultra-consistent across a wide temperature range. This last philosophy dictates selection of a powder that is temp-insensitive, even if it may not produce the very best raw accuracy (or speed).
What’s Your Handloading Philosophy?
Objectives of Reloading — Accuracy, Velocity, Temp Stability What do you, the reader, primarily value in your handloads?
Viewpoint ONE: Accuracy Trumps Everything
Some shooters prize consistent, excellent medium/long range accuracy enough that they’re willing to give up some extra velocity (and reduced wind deflection) to obtain that. Their underlying philosophy could be stated: “Superior accuracy is present for every shot, but the wind isn’t”. One’s ability to hold well, aim well and read the wind are all factors in making this type decision. The photo below shows stellar raw accuracy. This is an 0.67″, 10-shot group at 300-yards fired from a text fixture. The group measures just 0.67″. (This shows the USAMU’s 600-yard load with 75gr bullets).
Viewpoint TWO: Load to Highest Safe Velocity for Less Wind Drift
Some shooters value obtaining the highest safe velocity, even if one’s pure, consistent mechanical accuracy at medium/long range isn’t quite as brilliant. The theory here seems to be that a really good hold extracts as much mechanical accuracy from the rifle/ammo as possible, and faster bullets equal occasional “bonus” points snatched from the jaws of wind.
[For example] one of the USAMU’s many Service Rifle National Champions revealed his philosophy. It can be stated thus: a super-accurate, but [relatively] “slow” load “required him to have a Ph.D. in wind reading for every shot, while a faster, but less accurate load netted him more points.”
Note — this was not mere speculation; his score book data backed up his claims, due to less wind effects. Remember, however, this fellow has a consistent, National Championship-level hold, and other Champions on the same team would have opted differently.
Viewpoint THREE: Temperature Stability Is Key
Still another approach is to place heavy emphasis on fine accuracy with absolute stability in changing temperatures. When this writer was actively earning his Distinguished Rifleman badge, that was his goal. The reason? Sighting shots are not allowed in EIC (“Leg”) matches. The first shot out of the barrel was for score. It had to be 100% consistent, with very reliable, predictable elevation and wind deflection regardless of the ambient temperature — even if it wasn’t the lowest wind deflection possible.
Naturally, selecting a powder that is insensitive to temperature changes is a key element here. Elevation zeros and wind effects HAD to be consistent every time. Hunters and military snipers might be among those who fall into this camp, as well as those in pursuit of their Distinguished Rifleman badges.
Contrast that with a traditional High Power shooter who gets two sighter shots before each event (offhand, sitting rapid, prone rapid, prone slow fire.) If there is a zero change on any given day, he/she can correct during sighters. This writer well remembers talking with another very high-level Service Rifle competitor who was happy to have high temperatures boost the velocities of his ammunition above their usual level… As far as this SR competitor was concerned, 60-80 fps more velocity -– even if only due to high ambient temperatures -– meant less wind deflection, and he was mighty happy to have it.
Particularly in the summer, with hot daily conditions, you need to be concerned about temperature stability. Loads worked up in winter may not work in the summer time.
This article has been confined to NRA High Power Rifle competition, which has relatively generous 10-ring dimensions in relation to the accuracy of well-built competition rifles. Hopefully, it will provide food for thought. For some, this might be an opportunity to ensure that one’s load development approach helps them attain their desired results.
We created the above target a decade ago. Since then it has been used by tens of thousands of shooters. It has proven very popular as a load development target, since all your load data fits neatly in the boxes under each target. In fact this target is being employed by both rifle-makers and barrel-makers (including Criterion) to test their products. The target was designed for aiming efficiency. The diamonds have 1/2″ sides and you can align your cross-hairs on the horizontal and vertical lines. It is a clean design that is easy to see even at 200 yards with a 20X scope. When we test, we usually crank in a little elevation, setting the point-of-impact higher, so that our shots fall in the gray circles. That way you leave the squares intact for precise aiming.
We also use these two targets for load development and precision practice. The circle dot target can also be used for informal rimfire competition at 50 yards.
Right-Click Each Target to Download Printable PDFs.
How to Print Your Targets
Most of us have access to a printer at home or at work. That means you can print your own targets. You’ll find hundreds of free target designs online, including dozens of downloadable targets on our AccurateShooter.com Target Page. If you’re feeling creative, you can design your own target with a computer drawing program such as MS Paint.
Paper Stock Is Important
If you want your self-printed targets to show shots cleanly (and not rip when it gets windy), you should use quality paper stock. We recommend card stock — the kind of thick paper used for business cards. Card stock is available in both 65-lb and 110-lb weights in a variety of colors. We generally print black on white. But you might experiment with bright orange or yellow sheets. Forum Member ShootDots report: “They sell cardstock at Fed-Ex Kinko! I use either Orange or Yellow. That makes it easy to see the bullet holes clearly.” On some printers, with the heavier 110-lb card stock, you will need to have the paper exit through the rear for a straighter run.
Here are some Target-Printing Tips from our Forum members:
“Staples sells a 67-lb heavy stock that I have settled on. I use the light grey or light blue, either of these are easy on the eyes on bright days. I have used the 110-lb card stock as well and it works fine. It’s just a little easier to print the lighter stuff.” (JBarnwell)
“Cardstock, as mentioned, works great for showing bullet holes as it doesn’t tear or rip like the thin, lightweight 20-lb paper. I’ve never had a problem with cardstock feeding in the printer, just don’t stick too many sheets in there. If I need three targets, I load only three card stock sheets”. (MEMilanuk)
“20-lb bond works pretty well for me if I use a spray adhesive and stick the entire back of the paper’s surface to the backer board.” (Lapua40X)
This USAMU article explores three different “Philosophies” of precision reloading. Some handloaders seek to produce ammo that yields the very tightest groups (without factoring in the wind). Other shooters load their ammo to deliver the highest safe velocity. That’s because a projectile launched at higher velocity will drift less in the wind. The theory is that even if fast ammo doesn’t produce the tightest groups in zero wind conditions, it will yield higher scores in a the real world (where the wind blows). Lastly, some handloaders favor ammo that is ultra-consistent across a wide temperature range. This last philosophy dictates selection of a powder that is temp-insensitive, even if it may not produce the very best raw accuracy (or speed).
What’s Your Handloading Philosophy?
Objectives of Reloading — Accuracy, Velocity, Temp Stability What do you, the reader, primarily value in your handloads?
Viewpoint ONE: Accuracy Trumps Everything
Some shooters prize consistent, excellent medium/long range accuracy enough that they’re willing to give up some extra velocity (and reduced wind deflection) to obtain that. Their underlying philosophy could be stated: “Superior accuracy is present for every shot, but the wind isn’t”. One’s ability to hold well, aim well and read the wind are all factors in making this type decision. The photo below shows stellar raw accuracy. This is an 0.67″, 10-shot group at 300-yards fired from a text fixture. The group measures just 0.67″. (This shows the USAMU’s 600-yard load with 75gr bullets).
Viewpoint TWO: Load to Highest Safe Velocity for Less Wind Drift
Some shooters value obtaining the highest safe velocity, even if one’s pure, consistent mechanical accuracy at medium/long range isn’t quite as brilliant. The theory here seems to be that a really good hold extracts as much mechanical accuracy from the rifle/ammo as possible, and faster bullets equal occasional “bonus” points snatched from the jaws of wind.
[For example] one of the USAMU’s many Service Rifle National Champions revealed his philosophy. It can be stated thus: a super-accurate, but [relatively] “slow” load “required him to have a Ph.D. in wind reading for every shot, while a faster, but less accurate load netted him more points.”
Note — this was not mere speculation; his score book data backed up his claims, due to less wind effects. Remember, however, this fellow has a consistent, National Championship-level hold, and other Champions on the same team would have opted differently.
Viewpoint THREE: Temperature Stability Is Key
Still another approach is to place heavy emphasis on fine accuracy with absolute stability in changing temperatures. When this writer was actively earning his Distinguished Rifleman badge, that was his goal. The reason? Sighting shots are not allowed in EIC (“Leg”) matches. The first shot out of the barrel was for score. It had to be 100% consistent, with very reliable, predictable elevation and wind deflection regardless of the ambient temperature — even if it wasn’t the lowest wind deflection possible.
Naturally, selecting a powder that is insensitive to temperature changes is a key element here. Elevation zeros and wind effects HAD to be consistent every time. Hunters and military snipers might be among those who fall into this camp, as well as those in pursuit of their Distinguished Rifleman badges.
Contrast that with a traditional High Power shooter who gets two sighter shots before each event (offhand, sitting rapid, prone rapid, prone slow fire.) If there is a zero change on any given day, he/she can correct during sighters. This writer well remembers talking with another very high-level Service Rifle competitor who was happy to have high temperatures boost the velocities of his ammunition above their usual level… As far as this SR competitor was concerned, 60-80 fps more velocity -– even if only due to high ambient temperatures -– meant less wind deflection, and he was mighty happy to have it.
Particularly in the summer, with hot daily conditions, you need to be concerned about temperature stability. Loads worked up in winter may not work in the summer time.
This article has been confined to NRA High Power Rifle competition, which has relatively generous 10-ring dimensions in relation to the accuracy of well-built competition rifles. Hopefully, it will provide food for thought. For some, this might be an opportunity to ensure that one’s load development approach helps them attain their desired results.
Box to Bench Precision (B2B) has developed an oversize (23.5″ x 30″) precisely-scaled target designed for Load Development and Scope Testing. This waterproof target is very innovative. On the target you’ll find clusters of aim points for various tasks. Upper left are orange aiming spots for testing various powder charges. In the upper right quadrant are more red aim points to be used when testing bullet seating depth. Running down the center of the target is a vertical line with horizontal marks showing precise MOA and Mil heights at 100 yards — use this feature to verify your click values. ORDER HERE.
And there’s more. In the lower right quadrant (far right) are three black targets to be used for chrono work. With these you can record cold velocity, hot barrel velocity and a “Final Velocity”. Over in the lower left quadrant, in the left-most column, are three dot targets for zeroing and recording group size with load data. Finally, four more black/white targets can be used for a scope box test (aka “shooting the square”). With a box test, you move from target to target, clicking in sequence to each corner of the square in sequence, eventually returning to your original aim point. If your scope tracks correctly, the last box test shot should end up right on top of the first shot.
Record the Entire Load Development Process on One Target
For those used to shooting at conventional bulleyes or benchrest targets, this target may seem confusing, but it can really help organize and simplify the process of load development. We like the idea of having a single, durable target that performs double-duty — serving for load development as well as scope checking. And we like the fact that the target is pretty strong — the maker says: “The target is Tear-Resistant and Water-Proof”. We’d expect a maker based in the Pacific NW to design a target that can handle wet weather.
Previous version of target shown. Current version has some minor enhancements.
How to Order
So how much does all this target technology cost? A pack of three 23.5″ x 30″ targets costs $25.00, a five-target pack is $37.50, a seven-target pack is $46.00, while a ten-target pack runs $53.00. These targets ship FREE in a durable cardboard tube. To order these targets, visit the Box To Box Precision Online Store.
We created the above target a decade ago. Since then it has been used by tens of thousands of shooters. It has proven very popular as a load development target, since all your load data fits neatly in the boxes under each target. In fact this target is being employed by both rifle-makers and barrel-makers (including Criterion) to test their products. The target was designed for aiming efficiency. The diamonds have 1/2″ sides and you can align your cross-hairs on the horizontal and vertical lines. It is a clean design that is easy to see even at 200 yards with a 20X scope. When we test, we usually crank in a little elevation, setting the point-of-impact higher, so that our shots fall in the gray circles. That way you leave the squares intact for precise aiming.
We also use these two targets for load development and precision practice. The circle dot target can also be used for informal rimfire competition at 50 yards.
Right-Click Each Target to Download Printable PDFs.
How to Print Your Targets
Most of us have access to a printer at home or at work. That means you can print your own targets. You’ll find hundreds of free target designs online, including dozens of downloadable targets on our AccurateShooter.com Target Page. If you’re feeling creative, you can design your own target with a computer drawing program such as MS Paint.
Paper Stock Is Important
If you want your self-printed targets to show shots cleanly (and not rip when it gets windy), you should use quality paper stock. We recommend card stock — the kind of thick paper used for business cards. Card stock is available in both 65-lb and 110-lb weights in a variety of colors. We generally print black on white. But you might experiment with bright orange or yellow sheets. Forum Member ShootDots report: “They sell cardstock at Fed-Ex Kinko! I use either Orange or Yellow. That makes it easy to see the bullet holes clearly.” On some printers, with the heavier 110-lb card stock, you will need to have the paper exit through the rear for a straighter run.
Here are some Target-Printing Tips from our Forum members:
“Staples sells a 67-lb heavy stock that I have settled on. I use the light grey or light blue, either of these are easy on the eyes on bright days. I have used the 110-lb card stock as well and it works fine. It’s just a little easier to print the lighter stuff.” (JBarnwell)
“Cardstock, as mentioned, works great for showing bullet holes as it doesn’t tear or rip like the thin, lightweight 20-lb paper. I’ve never had a problem with cardstock feeding in the printer, just don’t stick too many sheets in there. If I need three targets, I load only three card stock sheets”. (MEMilanuk)
“20-lb bond works pretty well for me if I use a spray adhesive and stick the entire back of the paper’s surface to the backer board.” (Lapua40X)
The 2023 NRA F-Class National Championships are underway right now at the Ben Avery Range outside Phoenix, Arizona. There are two divisions: F-Open and F-TR. The F-Class Championships have two segments, Mid-Range and Long Range. The Mid-Range Championships ran from October 29 through November 1st, while the Long Range Championships commenced on November 2, and conclude on Sunday, November 5. See details of the 2023 F-Class Championships, including the course of fire, on the Desert Sharpshooters 2023 F-Class Nationals Program page.
For this Saturday Video Showcase, we feature five F-Class videos. These segments cover F-Class equipment, reloading, load testing, marksmanship, wind-reading and competition.
F-Class Competition — On the Firing Line at 2020 Nationals
This 12-minute video by F-Open ace Erik Cortina shows the action at the 2020 F-Class Nationals held at the Ben Avery Range outside Phoenix. Erik, who shoots with F-0pen Team Lapua, explains how team competition differs from the individual matches. Wind calls are made by the team’s wind coach. The shooter focuses on the trigger pulling.
Reloading for F-Class — Tools and Techniques
In this video, Erik Cortina, the 2023 SW Nationals F-Open Champion, and member of Team Lapua, provides a break down of the process he goes through to reload his match ammo for competition. Eric covers all phases of reloading: bullet sorting, case prep, priming, powder measuring, and bullet seating.
Load Development Procedures for F-Class — Seating Depth
In this video, 2023 NRA Mid-Range National Champion John Masek (aka “F-Class John”) explains how he does load development in an efficient and reliable manner. He specifically focuses on testing for optimal seating depth. With 229,000 views, this is the most-watched video on F-Class John’s popular YouTube channel. Viewers have praised this video: “This was a great video, really appreciate the explanation about how you bracketed the jump and why you chose the closest.”
F-Class Competition at Bisley Range in the UK
Every wondered what F-Class competition is like in England? There are different staging rules and different targets with “V” for a center hit vs. “X” at USA F-Class matches. This video covers the 2015 F-Class Championship held at the famed Bisley Range in England, UK. To learn more about F-Class in the UK, For more on F-Class, visit NRA.org.uk.
Wind-Reading for Long-Range Competition
In this excellent video Keith Glasscock explains how to read the wind and even predict wind changes in cycling conditions. Keith notes that you should look at environmental features and mirage, not just wind flags. Keith is one of America’s best wind gurus — he was a team wind coach and he has finished second three times in F-Open division at the F-Class National Championships.
Here is the sleek, carbon-stocked .308 Win rifle Bryan Litz used to win both the 2015 Mid-Range AND
Long-Range F-TR Championship at the Ben Avery Range in Phoenix, Arizona.
by Sierra Bullets Ballistic Technician Gary Prisendorf
Occasionally someone will ask, “Why did I get a flyer that didn’t go in with the rest of my group?” If I had an answer that would stop flyers from happening, I would be rich.
There are many reasons why this can happen. Everything from gripping a forearm differently to variations in the brass casing, the list goes on and on. Most of the time the flyer is usually shooter induced and sometimes what you may think is a flyer, is just part of your group. There are a lot of shooters, that go out and test a load and they may shoot a 3/8” group at 100 yards and think that load is good. But I have seen far too many times that you can shoot another group, same load, same rifle and the next time you may get a 1 ¼” group.
The total opposite can also occur. You may shoot a 1 ¼” group and turn around and follow it with a 1/2″ group without changing anything. If you only shot the one group, you might decide that load wasn’t any good and move on to something else without really knowing what that load was capable of.
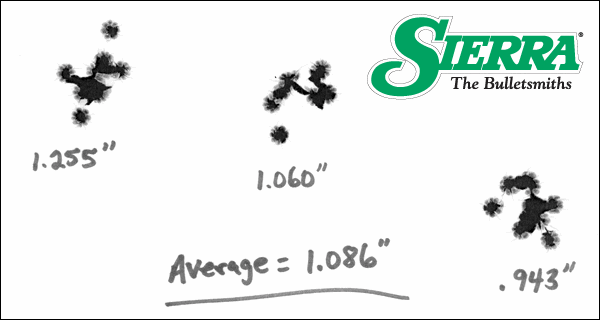
To really determine how a particular load is performing we need to shoot multiple groups and take an average of the group sizes to really see what that rifle/load combination is really capable of.
I suggest shooting a minimum of three 5-shot groups and averaging the group sizes before deciding if the load is acceptable or not. Obviously the more rounds you shoot for a group and the more groups that you shoot, you will get a much better representation of what that particular combination can do.
Now I’m not saying to go out and shoot 30 groups with 50 rounds in each group to determine how well your load is shooting. That would be a bit pointless, in some cases it would be time to re-barrel your rifle before your load development was finished.
In most cases, I feel that three to five, 5-shot groups will give you a pretty good representation of how a load will perform in that specific firearm.
Just last week hundreds of F-Class shooters competed at the Southwest Nationals in Phoenix, Arizona. The vast majority of F-TR shooters had rifles chambered for the .308 Winchester cartridge (7.62×51), but F-TR rules also allow the .223 Rem (5.56×45). There are some advantages to the smaller .223 Rem round — there’s notably less recoil, bullets and brass are significantly cheaper, and a lot less powder is required. For those who are considering campaigning a .223 Rem F-TR rifle, this story explains how an accurate .223 Rem load was developed. This load development was done by a father for his daughter who was getting started in F-Class competition.
Dad builds an F-TR Rifle for his Daughter and Develops Load
Jeremy Rowland decided to put together an F-TR rifle for his eldest daughter, who enjoys competitive shooting. For his daughter, Rowland chose the .223 Rem option because it has less recoil and components are less costly than the .308 Win. Here is Rowland’s account of how he developed a .223 Rem load. For more details (with data charts), read Jeremy’s FULL STORY on Sierra Bullets Blog.
Journey to Find a .223 Rem F-Class Load
by Jeremy Rowland, Reloading Podcast
My oldest daughter has been to several matches with me, and has even competed in several, using her .243. [A few seasons back] I decided, she would compete with a .223 Rem in F-TR. Looking for a good starter rifle, I settled on the Savage Axis Heavy Barrel since it has a 1:9″ twist. This would be a great little rifle for her to learn on. The rifle was shot unmodified, as it came from the factory. A Sinclair F-Class Bipod w/micro elevation adjustment was fitted to the front.
Next came finding the components I wanted to use for her match loads. After spending hours and hours running numbers on JBM stability calculator as well as in my iPhone Ballistic AE app, the 69 gr Sierra Tipped MatchKing® (TMK) looked really good. So that’s what I decided to go with. I jumped in head first and ordered a bulk pack of the Sierra 69 gr TMKs. I had settled on Hodgdon CFE 223 powder since it shows good velocity. I decided to go with once-fired Lake City brass with CCI BR4 primers.
Next came the testing. I decided to run a ladder test (one shot per charge from min to max looking for the accuracy node). The ladder test ranged from 23.5 grains to 25.6 grains, in 0.3 grain increments.
Bullet: 69 gr Sierra Tipped MatchKing®
Case: Lake City (mixed years, sorted by case capacity)
Primer:CCI BR4
Powder: Hodgdon CFE 223 (one round each from 23.5 to 25.6 grains)
Cartridge OAL: 2.378″
Base to Ogive: 1.933″ (.020″ off lands)
After his ladder test, Rowland settled on a load of 25.2 grains of Hodgdon CFE 223. He then fine-tuned his load with different seating depths: “I loaded up 5 rounds each at .020″ off lands, .015″ off lands, .010″ off lands, and .005″ off the lands. Here are the results from the best group for OAL/Ogive fine tuning. As you can see, I think I’ve found a winner in these 69 gr Sierra Tipped MatchKings.”
When a rifle isn’t shooting up to it’s potential, we need to ask: “Is it the gun or the shooter?” Having multiple shooters test the same rifle in the same conditions with the same load can be very revealing…
When developing a load for a new rifle, one can easily get consumed by all the potential variables — charge weight, seating depth, neck tension, primer options, neck lube, and so on. When you’re fully focused on loading variables, and the results on the target are disappointing, you may quickly assume you need to change your load. But we learned that sometimes the load is just fine — the problem is the trigger puller, or the set-up on the bench.
Here’s an example. A while back we tested two new Savage F-Class rifles, both chambered in 6mmBR. Initial results were promising, but not great — one gun’s owner was getting round groups with shots distributed at 10 o’clock, 2 o’clock, 5 o’clock, 8 o’clock, and none were touching. We could have concluded that the load was no good. But then another shooter sat down behind the rifle and put the next two shots, identical load, through the same hole. Shooter #2 eventually produced a 6-shot group that was a vertical line, with 2 shots in each hole but at three different points of impact. OK, now we can conclude the load needs to be tuned to get rid of the vertical. Right? Wrong. Shooter #3 sat down behind the gun and produced a group that strung horizontally but had almost no vertical.
Hmmm… what gives?
>
Shooting Styles Created Vertical or Horizontal Dispersion
What was the problem? Well, each of the three shooters had a different way of holding the gun and adjusting the rear bag. Shooter #1, the gun’s owner, used a wrap-around hold with hand and cheek pressure, and he was squeezing the bag. All that contact was moving the shot up, down, left and right. The wrap-around hold produced erratic results.
Shooter #2 was using no cheek pressure, and very slight thumb pressure behind the tang, but he was experimenting with different amounts of bag “squeeze”. His hold eliminated the side push, but variances in squeeze technique and down pressure caused the vertical string. When he kept things constant, the gun put successive shots through the same hole.
Shooter #3 was using heavy cheek pressure. This settled the gun down vertically, but it also side-loaded the rifle. The result was almost no vertical, but this shooting style produced too much horizontal.
A “Second Opinion” Is Always Useful
Conclusion? Before you spend all day fiddling with a load, you might want to adjust your shooting style and see if that affects the group size and shape on the target. Additionally, it is nearly always useful to have another experienced shooter try your rifle. In our test session, each time we changed “drivers”, the way the shots grouped on the target changed significantly. We went from a big round group, to vertical string, to horizontal string.
Interestingly, all three shooters were able to diagnose problems in their shooting styles, and then refine their gun-handling. As a result, in a second session, we all shot that gun better, and the average group size dropped from 0.5-0.6 inches into the threes — with NO changes to the load.
That’s right, we cut group size in half, and we didn’t alter the load one bit. Switching shooters demonstrated that the load was good and the gun was good. The skill of the trigger-puller(s) proved to be the limiting factor in terms of group size.
Yes, the type of targets you use can make a difference during load development and training — helping you align your crosshairs, estimate group size visually, and also record load data/gun type. Here we provide selection of FREE printable precision and training targets. This selection includes popular load development targets AccurateShooter created as well as other useful grid targets. You can download ALL these targets as PDF files and then print them out on 8.5×11″ heavy paper.
AccurateShooter.com offers a cool page with over 50 FREE downloadable targets. You’ll find all types or FREE targets — sight-in targets, varmint targets, rimfire targets, bullseye targets, tactical targets, load development targets and more. CLICK HERE for all our free targets, including our LOAD DEV target.
We created the above target a decade ago. Since then it has been used by tens of thousands of shooters. It has proven very popular as a load development target, since all your load data fits neatly in the boxes under each target. In fact this target is being employed by both rifle-makers and barrel-makers (including Criterion) to test their products. The target was designed for aiming efficiency. The diamonds have 1/2″ sides and you can align your cross-hairs on the horizontal and vertical lines. It is a clean design that is easy to see even at 200 yards with a 20X scope. When we test, we usually crank in a little elevation, setting the point-of-impact higher, so that our shots fall in the gray circles. That way you leave the squares intact for precise aiming.
Versatile Targets with Multiple Aiming Points
We use the two targets below for load development and precision practice. For the left target, use the corners of the diamonds to align your cross-hairs precisely. The circle dot target (on the right) can also be used for informal rimfire competition at 50 yards. Right-Click Each Target to Download Printable PDFs.
Know-Your-Limits Target for Rimfire Training & Fun Matches
Here’s a rimfire training target with “big to small” target circles. Start with the largest circles, then move to the smaller ones in sequence. This systematic drill provides increasing challenge shot-by-shot. Novices often are quite surprised to see their accuracy improve as they move from bigger to smaller aiming points. That provides positive feedback — always a good thing.
Right Click and “Save as” to download printable PDF versions of target.
RED Center Pistol Target
Here’s a NRA-type target for pistol shooting. The bright red center helps when shooting indoors because well-placed bullet holes are much more visible. This target includes data entry boxes to record gun type, score, and load data. This is one of many good free targets available at Targets4free.com.


 How to Print Your Targets


 >
>