Many novice hand-loaders believe that neck bushing Inside Diameter (ID) size is the only important factor in neck tension. In fact, many different things will influence the grip on your bullet and its ability to release from the case neck. To learn more about neck tension and “case grip”, take the time to read this article carefully. We bet you’ll gain knowledge that will let you load more accurate ammo, with better ES/SD.
Editor: Guys, this is a VERY important article. You really should read it over carefully, twice. Variations in the force required to release a bullet can significantly affect accuracy and ES/SD. You really need to know how the grip on bullet can be altered by many different factors.
Neck Tension (i.e. Grip on Bullets) Is a Complex Phenomenon
While we certainly have considerable control over neck tension by using tighter or looser bushings (with smaller or bigger Inside Diameters), bushing size is only one factor at work. It’s important to understand the multiple factors that can increase or decrease the resistance to bullet release. Think in terms of overall brass-on-bullet “grip” instead of just bushing size (or the internal neck diameter in non-bushing full-length sizing dies).
Bullet grip is affected by many things, such as:
1. Neck-wall thickness.
2. Amount of bullet bearing surface (shank) in the neck.
3. Surface condition inside of neck (residual carbon can act as a lubricant; ultrasonic cleaning makes necks “grabby”).
4. Length of neck (e.g. 6mmBR neck vs. 6mm Dasher).
5. Whether or not the bullets have an anti-friction coating.
6. The springiness of the brass (which is related to degree of work-hardening; number of firings etc.)
7. The bullet jacket material.
8. The outside diameter of the bullet and whether it has a pressure ridge.
9. Time duration between bullet seating and firing (necks can stiffen with time).
10. How often the brass is annealed.
11. Amount (length) of neck sized (e.g. you can size only half the neck).
12. Interior diameter of bushing, or neck section of non-bushing die. – and there are others…
One needs to understand that bushing size isn’t the beginning and end of neck tension questions, because, even if bushing size is held constant, the amount of bullet “grip” can change dramatically as the condition of your brass changes. Bullet “grip” can also change if you alter your seating depth, and it can even change if you ultrasonically clean your cases.
6-time U.S. National Long-Range Champion John Whidden adds: “Our tests show us that the condition of the necks in regards to lubed or not, carbon inside or not, squeaky clean or not, etc., matter even more than the size of the bushing used. An ultrasonically cleaned or brand new dry case neck make for some quite high seating force.”
In our Shooters’ Forum a reader asked: “How much neck tension should I use?” This prompted a lengthy Forum discussion in which other Forum members recommended a specific number based on their experience, such as .001″, .002″, or .003″. These numbers, as commonly used, correspond to the difference between case-neck OD after sizing and the neck OD of a loaded round, with bullet in place. In other words, the numbers refer to the nominal amount of interference fit (after sizing).
While these commonly-used “tension numbers” (of .001″, .002″ etc.) can be useful as starting points, neck tension is actually a fairly complex subject. The actual amount of “grip” on the bullet is a function of many factors, of which neck-OD reduction during sizing is just one. Understanding these many factors will help you maintain consistent neck tension as your brass “evolves” over the course of multiple reloadings.
Seating Depth Changes Can Increase or Decrease Grip on Bullet
You can do this simple experiment. Seat a boat-tail bullet in your sized neck with .150″ of bearing surface (shank) in the neck. Now remove the bullet with an impact hammer. Next, take another identical bullet and seat it with .300″ of bearing surface in another sized case (same bushing size/same nominal tension). You’ll find the deeper-seated bullet is gripped much harder.
Neck-Wall Thickness is Important Too
I have also found that thinner necks, particularly the very thin necks used by many 6mm PPC benchrest shooters, require more sizing to give equivalent “grip”. Again, do your own experiment. Seat a bullet in a case turned to .008″ neckwall thickness and sized down .003″. Now compare that to a case with .014″ neckwall thickness and sized down .0015″. You may find that the bullet in the thin necks actually pulls out easier, though it supposedly has more “neck tension”, if one were to consider bushing size alone.
In practical terms, because thick necks are less elastic than very thin necks, when you turn necks you may need to run tighter bushings to maintain the same amount of actual grip on the bullets (as compared to no-turn brass). Consequently, I suspect the guys using .0015″ “tension” on no-turn brass may be a lot closer to the guys using .003″ “tension” on turned necks than either group may realize.
Toward a Better Definition of Neck Tension
As a convenient short-cut, we tend to describe neck tension by bushing size alone. When a guy says, “I run .002 neck tension”, that normally means he is using a die/bushing that sizes the necks .002″ smaller than a loaded round. Well we know something about his post-sizing neck OD, but do we really have a reliable idea about how much force is required to release his bullets? Maybe not… This use of the term “neck tension” when we are really only describing the amount of neck diameter reduction with a die/bushing is really kind of incomplete.
My point here is that it is overly simplistic to ask, “should I load with .001 tension or .003?” In reality, an .001″ reduction (after springback) on a thick neck might provide MORE “grip” on a deep-seated bullet than an .003″ reduction on a very thin-walled neck holding a bullet with minimal bearing surface in the neck. Bushing ID is something we can easily measure and verify. We use bushing size as a descriptor of neck tension because it is convenient and because the other important factors are hard to quantify. But those factors shouldn’t be ignored if you want to maintain consistent neck tension for optimal accuracy.
Consistency and accuracy — that’s really what this all about isn’t it? We want to find the best neck tension for accuracy, and then maintain that amount of grip-on-bullet over time. To do that you need to look not only at your bushing size, but also at how your brass has changed (work-hardened) with time, and whether other variables (such as the amount of carbon in the neck) have changed. Ultimately, optimal neck tension must be ascertained experimentally. You have to go out and test empirically to see what works, in YOUR rifle, with YOUR bullets and YOUR brass. And you may have to change the nominal tension setting (i.e. bushing size) as your brass work-hardens or IF YOU CHANGE SEATING DEPTHS.
Remember that bushing size alone does not tell us all we need to know about the neck’s true “holding power” on a bullet, or the energy required for bullet release. True bullet grip is a more complicated phenomenon, one that is affected by numerous factors, some of which are very hard to quantify.
The Shooting Sports USA website includes two excellent articles about the basics of metallic cartridge reloading. These two articles provide an excellent summary of the key procedures. If you are new to reloading, we recommend you read both articles:
Part II is particularly helpful because it explains the entire reloading process step-by-step, with 14 listed steps. The author notes: “In this, the second installment on metallic cartridge reloading, we’ll follow the sequence of steps involved in reloading a rifle cartridge and refining a metallic cartridge load. These steps are based on the use of a single-stage reloading press and a separate priming tool.”
Much important advice is provided as this article runs through the 14 Steps of Reloading. For example, when explaining Step 13, Bullet Seating, the article states:
“Proper seating depth is critical. Too much bullet protrusion and the cartridge may not work through the gun’s magazine, or it may fail to chamber. Too little and the bullet intrudes excessively into the powder chamber, decreasing volume and raising pressure. Neck tension is also important; any bullet that fails to seat with some resistance may be held only loosely by the neck and may be driven back into the case when the round is chambered, especially in semi-automatic arms.”
Important Guide to Detecting Over-Pressure Signs in Brass
As an example of the invaluable advice provided in these two articles, here’s a sample from Part II that explains how to determine if your load is over-pressure. We recommend that EVERY reader read this twice. There are more things to consider than a stiff bolt lift. You need to inspect cartridges very carefully:
We are re-publishing this article at the request of Forum members who found the information very valuable. If you haven’t read this Safety Tip before, take a moment to learn how you can inspect your fired brass to determine if there may be a potential for case separation. A case separation can be dangerous, potentially causing serious injury.
On the highly-respected Riflemans’ Journal blog, created by our late, dear friend German Salazar*, there was an excellent article about Cartridge Case-Head Separation. In this important article, Salazar (aka GS Arizona) examined the causes of this serious problem and explained the ways you can inspect your brass to minimize the risk of a case-head separation. As cases get fired multiple times and then resized during reloading, the cases can stretch. Typically, there is a point in the lower section of the case where the case-walls thin out. This is your “danger zone” and you need to watch for tell-tale signs of weakening.
The photo below shows a case sectioned so that you can see where the case wall becomes thinner near the web. You can see a little arrow into the soot inside the case pointing to the thinned area. This case hadn’t split yet, but it most likely would do so after one or two more firings.
Paper Clip Hack for Detecting Problems
The article provided a great, easy tip for detecting potential problems. You can use a bent paper clip to detect potential case wall problems. Slide the paper clip inside your case to check for thin spots. GS Arizona explains: “This simple little tool (bent paper clip) will let you check the inside of cases before you reload them. The thin spot will be immediately apparent as you run the clip up the inside of the case. If you’re seeing a shiny line on the outside and the clip is really hitting a thin spot inside, it’s time to retire the case. If you do this every time you reload, on at least 15% of your cases, you’ll develop a good feel for what the thin spot feels like and how it gets worse as the case is reloaded more times. And if you’re loading the night before a match and feel pressured for time — don’t skip this step!”
* Sadly, German Salazar passed away unexpectedly on June 21, 2022 at age 62. German was a great inspiration to this site who helped guide the creation of the AccurateShooter Forum. A brilliant man, expert attorney, and top-tier marksman, German will be sorely missed in the shooting sports world.
Bryan Litz and The Science of Accuracy Academy delivered a notable Podcast with vital information for all handloaders. This Podcast examines the effects of humidity variances on powder. Bryan notes: “If you want to know how much this can matter, we’re talking up to 200 fps difference for the same load of H4350 in 6.5 Creedmoor” at opposite extremes of humidity.
Bryan adds that “Most shooters don’t realize what a big deal this can be — it overshadows many of our efforts to make consistent velocity and hit targets. This can happen in loaded rounds not just for hand loading where you expose powder to ambient humidity. This is especially important for hunters considering the range of environments hunting ammo goes through.”
CLICK the above graphic to access first half of Podcast for free.
BONUS — Four More Science of Accuracy Podcasts
Here are four more of our favorite Podcasts from Bryan Litz’s Science of Accuracy Academy. Click on each item to hear the first half of each podcast for free.
Want More? Subscribe to The Science of Accuracy Academy
If you’d like to benefit from hearing ALL the full-length Science of Accuracy Academy Podcasts you can get a subscription to the Academy for just $9.95 per month. This grants you access to all Podcasts, exclusive videos, learning resources, and bullet data sheets.
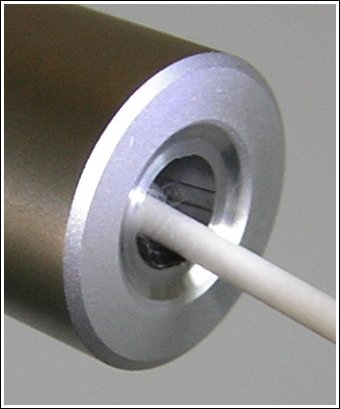
The last half-inch or so of your barrel is absolutely critical. Any damage (or abnormal wear) near the crown will cause a significant drop-off in accuracy. Here are ways you can check the end of your barrel, using a common Q-Tip.
Use Q-Tip for Barrel Inspection To find out if you have a burr or damage to your crown, you can use an ordinary Q-tip cotton swab. Check the edges of the crown by pulling the Q-tip gently out past the edge of the crown. If you have a burr, it will “grab” the cotton and leave strands behind.
Larry Willis has another way to use a Q-Tip: “Here’s a neat trick that will surprise you with how well it works.” Just insert a Q-Tip into your barrel (like the picture below), and it will reflect enough light so that you can get a real good look at the last half inch of rifling and the crown of your barrel. In most cases you’ll find that this works much better than a flashlight. Larry tells us: “I’ve used this method about a jillion times. Q-Tips are handy to keep in your cleaning supplies anyway. This is a good way to judge approximately how well you are cleaning your barrel when you’re at the range. It’s also the best way to examine your barrel when you’re in the field.”
He who dies with the most toys wins — right? Well Sinclair has another interesting gadget you can add to your reloading bench. The Sinclair Case Neck Sorting Tool lets you quickly sort brass by neck-wall thickness. For those who shoot “no-turn” brass, this can improve neck-tension consistency. Large variances in neck-wall thickness can cause inconsistent neck “grip” on the bullet. Generally, we’ve found that more consistent neck tension will lower ES and (usually) improve accuracy. We know some guys who shoot no-turn 6mmBR brass in competition with considerable success — but their secret is pre-sorting their brass by neck-wall thickness. Cases that are out-of-spec are set aside for sighters (or are later skim-turned).
Watch Case Neck Sorting Tool Operation in Video
How the Case Neck Sorting Tool Works
Here’s how the Sinclair tool works. Cases are rotated under an indicator tip while they are supported on a case-neck pilot and a support pin through the flash hole. The unit has a nice, wide base and low profile so it is stable in use. The tool works for .22 through .45 caliber cases and can be used on .17- and .20-caliber cases with the optional carbide alignment rod. The MIC-4 pin fits both .060 (PPC size) and .080 (standard size) flash holes. Sinclair’s Case Neck Sorting Tool can be ordered with or without a dial indicator. The basic unit without dial indicator (item item 749006612) is priced at $59.99. With this standard tool you can use your own dial indicator with standard specifications. You can also buy the tool complete with dial indicator (item 749007129) for $89.99 (but not currently in stock). IMPORTANT: This sorting tool requires caliber-specific Case Neck Pilots which must be ordered separately.
Editor’s Comment: The purpose of this Sinclair tool is rapid, high-quantity sorting of cartridge brass to ascertain significant case-neck-wall thickness variations. Consider this a rapid culling/sorting tool. If you are turning your necks, you will still need a quality ball micrometer tool to measure neck-wall thickness (to .0005) before and after neck-turning operations.
Make Your Own Length-to-Lands Gauge to Check Bullet Position
Here’s a tip we feature every year or so, because it is something that costs nothing, yet can be very useful in the reloading process. With a simple, easy modification to a fired case, you can determine the length to lands in your rifle barrel. As long as you set the tension right, the measurements should be repeatable, and you’ve just saved yourself $47.98 — the combined cost of a Hornady C-1000 commercial OAL gauge ($41.99) and Modified Case ($5.99).
To achieve best accuracy with a rifle, you must control bullet seating depth very precisely, so all bullets end up in the same place relative to the entrance of the lands, every time. There may be multiple cartridge OALs which prove accurate. However, with each, you first need to determine a “zero” point — a reliable, and repeatable OAL where the bullet is “just touching” the lands.
There are tools, such as the Hornady (formerly Stoney Point) OAL Gauge, that will help you find a seating OAL just touching the lands. However, the tool requires that you use a special modified case for each cartridge you shoot. And, while we find that the Hornady OAL Gauge is repeatable, it does take some practice to get in right.
Make Your Own Length-to-Lands Gauge with a Dremel
Here’s an inexpensive alternative to the Hornady OAL tool — a slotted case. Forum member Andris Silins explais how to create a slotted case to measure length to the lands in your rifle:
“Here’s what I did to find length to lands for seating my bullets. I made four cuts into the neck of fire-formed brass. Then I pressed the bullet in lightly and chambered the entire gauge. As the cartridge chambers, the bullet slides back into the case to give you length to lands. It took less than five minutes to get it cut and working. A little light oil in the barrel just past the chamber helps ensure the bullet does not get stuck in the lands. It works great and is very accurate.
How to Adjust Tension — Length and Number of Neck Cuts
I made the cuts using a Dremel with a cut-off wheel. You can adjust tension two ways. First, you can make the cuts longer or shorter. Longer cuts = less tension. If you used only three cuts instead of four you would get more tension. The trick is to be gentle when you open and close the bolt. If you ram the bolt closed you may wedge the bullet into the lands. When you open the bolt it helps to keep a finger or two near by to guide the case out straight because the ejector wants to push it sideways.”
A while back, Shooting Times released an article entitled “Ten Most Common Reloading Mistakes”. Listed below are the Top Ten mistakes hand-loaders can make, at least according to Shooting Times. What do you think of this list — does it overlook some important items?
Top Ten Reloading Mistakes According to Shooting Times:
1. Cracked Cases — Reloaders need to inspect brass and cull cases with cracks.
2. Dented Cases — Dents or divets can be caused by excess case lube.
3. Excessive Powder Charge — Overcharges (even with the correct powder) can be very dangerous.
4. Primers Not Seated Deep Enough — “High” primers can cause functioning issues.
5. Crushed Primers — Some priming devices can deform primers when seating.
6. Excess Brass Length — Over time, cases stretch. Cases need to be trimmed and sized.
7. Bullets Seated Too Far Out — If the bullet is seated too long you may not even be able to chamber the round. Also, with hunting rounds, bullets should not engage the rifling.
8. Burrs on Case Mouths — Ragged edges on case mouths can actually shave bullet jackets.
9. Excess Crimp — This is a common problem with pistol rounds loaded on progressives. If case lengths are not uniform some cases will get too much crimp, others too little.
10. Inadequate Crimp — This can be an issue with magnum pistol cartridges in revolvers.
Do you agree with this list? We think some important things are missing, such as not adjusting full-length sizing dies properly. This can cause the shoulder to be pushed back too far (or not far enough). Another common mistake is using brass that is worn out, i.e. stretched in the case-head area from multiple cycles of hot loads. We also think the #1 error a reloader can make is using the wrong powder altogether. That can be a fatal mistake. See what happens when you load pistol powder in a rifle.
Product Review by F-Class John
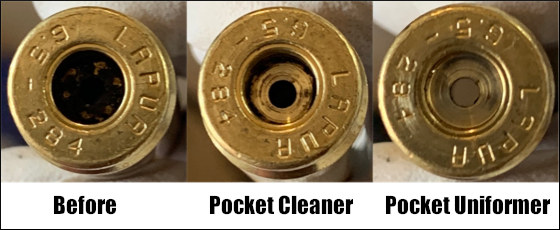
Case preparation is critical for precision reloading. One must trim cases, debur/chamfer case mouths, clean necks, spruce up primer pockets and do other important tasks. Complete case prep can involve many separate processes, each requiring its own tools. With each of those tools comes additional cost as well as the need for more storage and bench space. To make case prep easier, faster, and more convenient Lyman created the Case Prep Xpress (#ad). The Case Prep Xpress, introduced a few years back, combines up to five prep stages into one well-built, stable, versatile unit. Watch this video to see the machine in action:
The Case Prep Xpress features five (5) independently-turning spindles all with the common 8/32 thread. This allows you to attach multiple tools supplied with the unit PLUS many other screw-on prep tools. For our testing we started out using a variety of the 12 included tools and found they cover the majority of case prep tasks. Lyman supplies deburr and chamfer tools, pocket uniformers, reamers and cleaners, as well as an assortment of neck brushes.
The deburr and chamfer tools worked really well, creating beautiful bevels all while leaving a nice flat edge across the top of the neck which is critical for accuracy and brass life. We found the primer pocket cleaning tool did a good job, but for truly clean pockets we recommend using the primer pocket uniforming tool, which very efficiently removes even hard residues.
The benefit of having interchangeable heads is that you can add your own accessories. We like to use a bore brush with bronze wool wrapped around it for use inside our necks. This worked perfectly once we screwed it in. In fact, we couldn’t think of any 8/32-threaded accessory that wouldn’t work well on this machine. Another great design feature is how all the accessories are oriented straight up. This allows for perfect visual alignment of your cases onto the tools which is critical — especially when performing cutting operations such as primer pocket uniforming.
Along with the five power stations there are six female-threaded storage spots on the sides where tools can be placed to ensure they don’t get lost. We like this feature since there will be more than five accessories you want to use and having them easily available is a great feature. You can keep 11 tools right on the machine (5 on top, 6 on the sides). That way you don’t have to dig through storage bins.
The Case Prep Xpress has a removable front bin to hold brass shavings, and there are two circular trays on either side of the bin. In front is a long tray that holds the provided brush. This makes it relatively easy to clean off brass shavings and other debris from case prep processes.
SUMMARY — Versatile Case Prep Xpress Is A Good Value
For the money, Lyman’s Case Prep Xpress is tough to beat. It performs multiple tasks well while being stable and easy-to-use. Yes there are some multi-spindle prep centers that offer variable or fast/slow RPM spindles while the Lyman’s spindles are all fixed RPM. (See, e.g. the RCBS Brass Boss). However those other systems don’t include all the convenient on-board storage of the Case Prep Xpress, and are typically more expensive. The Lyman Case Prep Xpress sells for about $180-$199 “street price”. It’s currently on sale for $185.85 on Amazon (#ad). This makes the Lyman Case Prep Xpress a good value — it offers great versatility while saving space and saving money compared to buying five or more separate, powered tools.
As an Amazon affiliate, this site can earn revenues through sales commissions.
Coating bullets with a friction-reducing compound such as Molybdenum Disulfide (Moly) offers potential benefits, including reduced barrel heat, and being able to shoot longer strings of fire between bore cleanings. One of the effects of reduced friction can be the lessening of internal barrel pressures. This, in turn, means that coated bullets MAY run slower than naked bullets (with charges held equal).
To restore velocities, shooters running coated bullets are inclined to “bump up” the load — but you need to be cautious.
Be Careful When Increasing Loads for Coated Bullets
We caution shooters that when your start out with coated bullets in a “fresh barrel” you should NOT immediately raise the charge weight. It may take a couple dozen coated rounds before the anti-friction coating is distributed through the bore, and you really start to see the reduced pressures. Some guys will automatically add a grain or so to recommended “naked” bullet charge weights when they shoot coated bullets. That’s a risky undertaking.
We recommend that you use “naked” bullet loads for the first dozen coated rounds through a new barrel. Use a chronograph and monitor velocities. It may take up to 30 rounds before you see a reduction in velocity of 30-50 fps that indicates that your anti-friction coating is fully effective.
We have a friend who was recently testing moly-coated 6mm bullets in a 6-6.5×47. Moly had not been used in the barrel before. Our friend had added a grain to his “naked” bullet load, thinking that would compensate for the predicted lower pressures. What he found instead was that his loads were WAY too hot initially. It took 30+ moly-coated rounds through the bore before he saw his velocities drop — a sign that the pressure had lowered due to the moly. For the rounds fired before that point his pressures were too high, and he ended up tossing some expensive Lapua brass into the trash because the primer pockets had expanded excessively.
LESSON: Start low, even with coated bullets. Don’t increase your charge weights (over naked bullet loads) until you have clear evidence of lower pressure and reduced velocity.
Procedure After Barrel Cleaning
If you shoot Moly, and clean the barrel aggressively after a match, you may want to shoot a dozen coated “foulers” before starting your record string. Robert Whitley, who has used Moly in some of his rifles, tells us he liked to have 10-15 coated rounds through the bore before commencing record fire. In a “squeaky-clean” bore, you won’t get the full “benefits” of moly immediately.
To learn more about the properties of dry lubricants for bullets, read our Guide to Coating Bullets. This covers the three most popular bullet coatings: Molybdenum Disulfide (Moly), Tungsten Disulfide (WS2 or ‘Danzac’), and Hexagonal Boron Nitride (HBN). The article discusses the pros and cons of the different bullet coatings and offers step-by-step, illustrated instructions on how to coat your bullets using a tumbler.


 In our Shooters’ Forum a reader asked: “How much neck tension should I use?” This prompted a lengthy Forum discussion in which other Forum members recommended a specific number based on their experience, such as .001″, .002″, or .003″. These numbers, as commonly used, correspond to the difference between case-neck OD after sizing and the neck OD of a loaded round, with bullet in place. In other words, the numbers refer to the nominal amount of interference fit (after sizing).
 Neck-Wall Thickness is Important Too


 On the highly-respected Riflemans’ Journal blog, created by our late, dear friend German Salazar*, there was an excellent article about Cartridge Case-Head Separation. In this important article, Salazar (aka GS Arizona) examined the causes of this serious problem and explained the ways you can inspect your brass to minimize the risk of a case-head separation. As cases get fired multiple times and then resized during reloading, the cases can stretch. Typically, there is a point in the lower section of the case where the case-walls thin out. This is your “danger zone” and you need to watch for tell-tale signs of weakening.


 To find out if you have a burr or damage to your crown, you can use an ordinary Q-tip cotton swab. Check the edges of the crown by pulling the Q-tip gently out past the edge of the crown. If you have a burr, it will “grab” the cotton and leave strands behind.
 He who dies with the most toys wins — right? Well Sinclair has another interesting gadget you can add to your reloading bench. The Sinclair