This photograph and all images for this story are by Bill White, aka “CT10Ring” in our Forum.
AccurateShooter Forum member Bill White (aka “CT10Ring”) is not your typical member. For 37 years, Bill worked in NYC as a studio photographer specializing in still lifes and products. A neighbor visiting Bill’s home in Connecticut with a .270 Sako inspired Bill to revive his interest (obsession?) with shooting after a 25-year drought. And he owns a few Sakos now! With his gun hobby renewed, for many years Bill drove to the Western USA to shoot long range steel and a LOT of prairie dogs in season. He loved the life of the varminter, so it made sense for him to move West after retiring. He choose Idaho as his new home.
From his Idaho base, Bill enjoys long-range target shooting. But his favorite gun pastime has been varmint hunting in nearby states — the Dakotas, Montana, and Wyoming. Bill found prairie dog shooting rewarding and mapped out a western circuit route of ranches and National Grasslands in SD, ND, MT, and WY. Every year he loads up his truck and hits the road, often doing a grand circle route, visiting prairie dog havens in multiple states. In this article we feature photos from Bill’s annual “grand circle” varmint safari.
For his many cartridge types, Bill learned about reloading methods, loads, and vendors (and more) primarily from AccurateShooter.com. We start today’s story with the biggest caliber rifle he shoots regularly, his 6.5-284 Winchester. Bill favors this rig for his long-range steel shooting. He also uses it for prairie dog shooting, but only “sparingly”, because he wants to preserve barrel life, and he has many other dedicated varmint rigs.
6.5-284 for Long Range Steel Targets (and Sometimes Varmints)
In his home state of Idaho, Bill likes to shoot steel at long range. For distance work, Bill favors his McMillan-stocked 6.5-284 Win. This rifle was crafted in 2012 by Bob Green of York, PA, using a 1:8″-twist 28″ Krieger HV barrel (.298″ neck). The trued Rem 700 action was purchased from Long Rifles in Sturgis, SD. Bill did the Cerakote and bedded the action. For his 6.5-284, Bill loads 139gr Lapua Scenars, H4831sc powder and BR2 primers. He shoots both steel and varmints with this rifle, but the varmint work is limited because the 6.5-284 cartridge tends to be a barrel burner. The photo below from an Idaho range was taken near a 500-yard target, looking back at the firing line.
In the Varmint Fields — Traveling Light
Once situated, Bill (shown above) prefers to walk to Prairie Dog towns with a shooting mat, two bipod-equipped rifles slung up, rear bag, water, and his trusty Leica 10X42 GeoVid binoculars. While he has used a portable bench, he prefers to shoot from bipod, firing down from a mound if possible. This allows him to set up a line-of-fire that minimizes cross-wind effects. Bill notes: “While I often start early, end-of-day shooting has worked worked well for me. A setting sun shows targets better, the wind is usually down, and it’s not so hot. Often you can spot the bullet trace and that’s fun.”
Eight Great Varmint Cartridge Types — .204, .224, .243 Calibers
Here is one of Bill Reid’s 6mmBR (6BR) rigs. Like his Sako 6 PPC, this is exceptionally accurate.
Bill has a large rifle collection, most of which see duty in the varmint fields of Montana, North Dakota, South Dakota, and Wyoming. Here are his key “take-aways” for his eight favorite varmint chamberings: .204 Ruger, .223 Rem, .22-250, .22 BR, .22-243, 6 PPC, 6mmBR, and 6-6.5×47 Lapua (aka 6×47).
.204 Ruger — This delivers great velocity with the little .20-caliber bullets, with mild recoil. The .204 Ruger easily reaches out to 400 yards, but heavier winds do move the tiny bullet around. Tremendous splat factor under 250 yards. I use Sierra 39gr bullets with IMR 8208 XBR in a Sako 75. Even now, .204 Ruger ammo is relatively easy to find.
.223 Remington — Probably the most popular centerfire rifle round in the USA, the .223 Rem offers inexpensive brass, and is a great choice for AR-15 owners. If you run short on ammo, you can find it nearly everywhere. I often bring one AR-15 and one .223 Rem bolt gun on varmint safaris. My Rem 700 5R 1:9″-twist barrel likes 53gr V-Max bullets.
.22 BR — My .22 BR is my first choice for most prairie dog missions. Accuracy is superb with necked-down 6mmBR Lapua brass — quarter-MOA and blazing fast. With the right twist rate, this chambering can shoot anything from 40gr FB bullets to 80gr VLDs. Load development is easy. Below is my .22 BR ammo for another varmint trip. I use 55gr Sierra BlitzKings with Varget in my 1:12″-twist Shilen-barreled rifle. 60gr Bergers are very accurate with a fairly flat trajectory for useful distances.
.22-250 Rem — A classic varmint cartridge, the .22-250 with 50gr V-Maxs delivers spectacular hits. If three P-Dogs happen to be lined up, I’ve witnessed one .22-250 shot take ‘em all out with a triple hit. I currently have five .22-250-chambered rifles: 3 Sako 75s, one Rem 700, and a single shot Nesika that shoots tiny groups. I favor the very deadly Berger 52gr Varmint HP. Making a custom .22-250? With a 1:8″-twist barrel you can use the full weight range of .22-cal bullets, while spinning the lighter bullets fast for “red mist” effect. Remember this cartridge can be a barrel burner. Don’t shoot too many rounds too quickly.
.22-243 Win — This wildcat is even more potent than the .22-250, delivering devastating results on P-Dogs. Run a .243 Win case slowly through a full-length .22-243 die, with plenty of lube to form the brass. I start with Lapua .243 Win brass. There can be some issues necking-down the brass. Watch for donuts forming at the neck-shoulder junction. I bought my .22-243 rifle not sure how it would perform. But now I love shooting it. My .22-243 delivers half-MOA groups with 41.0 grains RL-22 and Hornady 75gr Amax bullets. With those 75-grainers, it’s great in the wind and good to 600 yards easily.
6 PPC — You may consider the 6 PPC a benchrest competition cartridge only, requiring fire-forming. However I have an original Sako 75 single-shot 6 PPC rifle that I load with Sako-headstamp 6 PPC brass (see below) so no fire-forming is required. This Sako 75 came with a test target that measured 0.113″! With my 6 PPC Sako, I found that 58gr V-Maxs, pushed by Vihtavuori N133, are potent out to 300 yards.
6mmBR — The 6mmBR Norma (6BR) offers a nearly unbeatable combination of accuracy, efficiency, and tunability. With the 6BR and a fast twist barrel, you can shoot everything from 40gr flat-base bullets to the latest 105-110gr match bullets. I load Lapua brass, Vihtavuori N135, and Hornady 58, 65, and 75gr bullets for my Krieger 1:14″-twist HV barrel. While this cartridge is capable of long-range accuracy, I usually limit my 6BR shots to 350-400 yards.
6-6.5×47 Lapua — In this story’s lead photo is my 6-6.5×47 Lapua varmint rifle, with Surgeon action and Manners stock. I Cerakoted the barreled action and then bedded the action. Shown below is 6-6.5×47 ammo I loaded for recent testing. Note how I separated different bullets and powder loads into multiple, labeled bags. Hodgdon H4350 is a great choice for this cartridge — 39 grains H4350 with 105gr Amax was the winner here, but 88gr Bergers also shot well. This cartridge has tremendous “critter dismantling” abilities out to 600-700 yards.
Six Tips for Novice Long Range Varmint Hunters
1. Take twice as much ammo you think you may need. The fields could be particularly rich, or, because of wind or other variables, you may have far more misses than expected.
2. When possible, set up with the wind at your back (or, alternatively, directly ahead). This will minimize the effect of cross-winds. Set up a stake with a ribbon to show wind direction.
3. Bring at least two rifles. Ideally one would be a low-recoil rifle with cheaper components for the closer shots. Then bring a rifle with higher-BC bullets for longer shots where wind is a bigger factor.
4. Check the weather before you head out. Prairie dogs like sunshine and calm conditions. If a cloudy, very blustery day is predicted, considering staying in town and cleaning the rifles.
5. Bring plenty of water on a trip. An adult male should be drinking at least 64 ounces of water (or other liquid) every day — more if it’s very hot or you are sweating a lot.
6. Preferably always hunt with a companion. If you do go out solo, have a Garmin inReach SatComm/GPS for emergencies if there is no cell coverage in your location.
Veteran Varmint Hunter Shares his Secrets
Where to Find Abundant Prairie Dogs — Generally, black-tailed P-Dogs are found in the Western high desert, in the same states/areas where cattle are raised. You’ll find good hunting in Montana, North and South Dakota, Colorado, and Wyoming. There are good hunting grounds on private ranches, BLM tracts, and U.S. National Grasslands. To find specific locations, I’d suggest calling the USFS, BLM, and State Fish & Game. Some have lists of ranches that allow P-Dog shooting. Give the agencies a call before your trip and then check in with ranchers. IMPORTANT: You need a current hunting license in some states.
How to Connect with Ranch Owners– A good varmint adventure can begin with a local connection. Stop into the local Ag/feed store and the town breakfast spot. I bet you’ll find some retired ranchers having coffee together who may direct you to a place that needs rodents thinned out. Let’s say you’re in Roundup, Montana. Stop by a local store and ask what ranchers allow PD shooting. Keep in mind that ranchers may be wary of allowing a total stranger to sling lead on their place. Show respect and if you had a good experience, send a thank-you note. A guided shoot is worth considering — the outfitter will know where the P-Dogs are and he has arrangements with landowners. He may even supply benches. I’ve taken two guided trips, with excellent results, one near Sturgis, SD, and the other on Sioux tribal land near Rosebud, SD.
Getting Set Up — I start early in the a.m. to mitigate mirage. Plus there is usually less wind at that hour. I prefer to drive to within half mile or so of a PD town, then walk and shoot prone. Most shooters like to set up a rotating bench on a knoll. This is a tried-and-true way to shoot long distances accurately, especially if you are on top of a hill and can shoot 360 degrees. I once shot from a rotating bench, but I prefer walking now. Some country is quite stunning and that’s half the fun — being out in nature. But yes there are negatives to shooting prone — ground hazards and tall grass can impede your vision.
Equipment for a Serious P-Dog Safari — In the field, I normally carry two rifles with Harris 9-13″ bipods, backpack, a rolled-up shooting mat, at least two liters of water, food, ammo, two rear bags, and binoculars. A good laser rangefinder comes in handy. If you prefer shooting from a bench you may want to have a front rest and a spotting scope. Many guys will shoot prone from the bed of a truck. That gets you off the ground without the need to haul around a heavy bench. But some locations restrict vehicles. Before a P-Dog trip, I make a detailed pack list and check off as I load my truck and camper. I would suggest bringing waterproof rubber or muck boots. June in South Dakota can be cold and wet, and the mud there is not to be believed. Don’t attempt to drive off road in it!
It’s good insurance to bring an extra 5 gallons of fuel for your vehicle in a jerry can and 2 gallons of H20. There may be NO shade for miles and dehydration is a real possibility. Having a couple heavy duty tarps will provide a sun shade and cover your gear in a rainstorm. I bring a 16″ X 20″ plywood target backer, a stand, and paper targets. This allows me to check zero on each rifle before I head out to the Dog Town.
Western Varmint Country Vistas
Taking Photos on Shooting Adventures
Bill knows a thing or two about taking pictures, having been a professional photographer in NYC for many decades. He uses modern digital cameras for both his outdoor and indoor work. Most photos in this story were taken with a Canon EOS 5DSR MKIV. We asked Bill for some tips on taking good photos. Here are his FIVE Top Tips for Photography:
1. Take photos in the early a.m. and later p.m. when the light has definition. Mid-day results will not be so nice.
2. Use the highest-resolution camera available that fits your budget. Yes lens quality, focus, and exposure controls make a big difference.
3. When feasible, shoot using a manual setting with the lens wide open (for shallow focus). Set the focus on the most important object/subject in the frame.
4. Photoshop is useful, especially when RAW images need to be corrected to show the scene more faithfully, or enhance it.
5. After you take a picture, before you post it on social media, learn to crop the image, straighten the horizon, and do other basic fixes. This can make a big difference.
This custom war wagon hauls varmint hunters around the Longmeadow Game Resort in Colorado.
May Day, May 1st, is just five days away, so we are well into springtime (spring officially started on March 20, 2026, the Vernal Equinox). For many shooters, Spring is a great season to head out to the varmint fields. Here are six items that can help ensure successful spring varmint adventures.
Six Great Products for Varmint Shooters
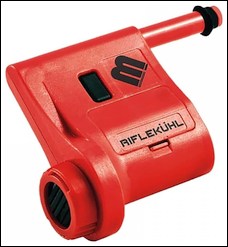
1. Riflekühl In-Action Fan Barrel Cooler
In the past, folks have tried various methods to cool barrels: water flushed through the bore, CO2 tanks, even battery-operated fish pumps. The Riflekühl by Magnetospeed is a simpler, less costly, and much handier solution. Busy varmint shooters may expend hundreds of rounds in a day. That’s tough on barrels. One way to extend your round count is to use the MagnetoSpeed Riflekühl barrel cooler.
This barrel cooler is designed to get barrel temperatures down to intended operating levels quickly. The turbocharger-inspired impeller is engineered to produce great airflow in a small package. Powered by a single CR123A Lithium battery (included), ambient air is forced through the extendable nozzle down the bore of the rifle. This is pretty efficient and can typically cool a barrel in under 8 minutes. The Riflekühl doubles as a chamber flag and features an exclusive built-in air filter to prevent dust and dirt from being blown into your rifle.
2. Uncle Bud’s Bulls Bag Sandbag
On most varmint hunts we spend most of the time shooting from a portable bench with a pedestal-type rest (we like the SEB Mini). But it’s nice having a big, heavy X-Type sandbag rig also. These four-chamber designs, such as the Uncle Bud’s Bulls Bag, allow shooting from a truck hood or any flat surface. Some rifles with narrow fore-ends really benefit from the firm “hug” provided by these “butterfly” style sandbags. We like the 15″ Uncle Bud’s Bulls Bag, currently $80.00 at BullsBag.com (khaki/suede). Durable and well-made, it will provide years of service. There is also a 10″ version that is easier to carry, starting at $62.00. Forum member Stoner24mkiv likes a Bulls Bag for shooting from a vehicle. He also suggests: “[take] an adjustable bipod if you are going to do any walking. Have a fanny pack or backpack for extra ammo, water, bore-snake, etc. when you go on your walkabouts. Bring a Boonie hat for blocking the sun, sun glasses, sunscreen. High leather boots.”
3. Burris Scope with Built-In Laser Rangefinder
The Burris Eliminator is an impressive piece of electro-optical technology. With a push of a button, a built-in laser rangefinder senses the distance to your target and the Eliminator’s microprocessor instantly calculates the required hold-over based on your load’s ballistics. The calculated aiming point is then displayed in the reticle with an illuminated red dot on the vertical cross-hair. Just put the red dot on the target and make the shot. Easy as that. If you are working a large prairie dog field and constantly moving near to far and back again, this scope is really handy. We’ve used the Eliminator III out to 500 yards on small steel targets and it worked flawlessly.
Right now you can get the 5-20x50mm Burris Eliminator 5 model for $999.99 on Amazon (#ad). Or you can still get the older 4-16x50mm Burris Eliminator 3 model at some dealers. Note: the Eliminator 3 and 5 have been replaced by the compact 4-20x52mm Eliminator 6, but that newer model has a $2999.99 MSRP ($1874.99 at MidwayUSA on sale). The Eliminator 5 is way less expensive than the newer Model 6 (even with the sale discount).
4. Hornady 17 HMR V-Max Loaded Ammo
For those distant prairie dog shots, you’ll want a centerfire round such as a 22 BR or 22-250. However, for closer work, or for smaller varmints such as ground squirrels, the 17 HMR is hard to beat. There are many good factory rifles chambered for the 17 HMR, such as the Savage A17 (shown below). Right now Hornady 17 HMR ammo is on sale at FastAmmo.com for $10.90/50 ($0.22 per round). That’s a good deal. This same ammo sells elsewhere for up to $18.00 per 50-round box. NOTE: Hornady also offers 17 HMR ammo with 20gr XTP hollow-point bullets ($12.25/50 at FastAmmo.com). Both types work well.
5. Stick-On Temp Strips Monitor Barrel Heat
You never want your barrel to get too hot. Accuracy suffers when barrels over-heat, and excessive heat is not good for barrel life. So how do you monitor your barrel’s temperature? You can check if the barrel is “warm to the touch” — but that method is not particularly precise. There is a better way — using temperature-sensitive strips. McMaster.com (an industrial supply house) offers stick-on temp strips with values from 86° F to 140° F. A pack of ten (10) of these strips (item 59535K13) costs $12.11 — so figure it’ll cost you about $1.21 per barrel for strips. That’s cheap insurance for your precious barrels. For best barrel life, try to stay under 120 degrees F.
6. Low-Fouling Power for High-Volume Varmint Loads
For high-shot-count varmint safaris, you want a clean-burning powder that minimizes barrel fouling. While there are many great powders for the .223 Rem, we like Hodgdon CFE 223 for high-volume varmint loads. This powder really seems to keep barrels cleaner. Originally developed for U.S. rapid-fire military systems, CFE 223 incorporates a proprietary chemistry named “Copper Fouling Eraser”. Based on tests with extended shot strings, Hodgdon claims that, by using CFE™223 varmint hunters, match shooters, and AR shooters can maintain accuracy for longer periods, with less barrel-cleaning time.
For this Saturday Showcase, we feature some top-tier products that have set new standards for quality and effectiveness. First off is the impressive new NEXUS single-stage press from Short Action Customs. Then we feature Bix’N Andy triggers, which have found favor with competitors in many disciplines from short range Benchrest to ELR competition. Now that Jewell triggers are becoming harder to source, Bix’N Andy units will be seen on more rifles than ever. For those who turn case-necks, we feature the remarkable IDOD machine from F-Class Products — simply the best automated neck-turner ever created.
As a bonus we offer two very informative interviews from SHOT Show 2024. The first covers the product line at Bullet Central, while the second reviews the latest and greatest rifle actions from BAT Machine.
Short Action Customs NEXUS Press
Short Action Customs (SAC) has crafted a very impressive and innovative single-stage press. The innovative $875 NEXUS press has impressive design features. The NEXUS Press boasts dual cam-over pucks, which precisely stop the movement of the floating die block. SAC explains: “We wanted to have the Nexus press cam-over independently of the shell holder. Every single cycle of the press, your hard cam-over pucks limits the travel, which gives you the same amount of cam over every single cycle.” The press can adapt to various diameter dies with floating inserts in the top section (see video). The NEXUS also has a floating shell holder system, which is quick change and tool-less. SAC states that this shell holder system “allows .010″ more sizing than all other shell holders on the market”.
Bix’N Andy Triggers
German-made Bix’N Andy triggers, available from BulletCentral.com, are among the very best you can buy. Available in both single-stage and two-stage designs, Bix’N Andy triggers are extremely precise, repeatable, and smooth. The unique internal, friction-reducing roller ball system allows for extremely low reset force, yielding an ultra-crisp let-off. Bix’N Andy triggers can be fitted with a variety of trigger shoes according to shooter preference. Bullet Central is currently the exclusive official USA importer for Bix’N Andy triggers.
Bryan Blake, a very clever machinist and gunsmith, has created an ultra-precise and speedy neck-turning machine. Bryan, who runs Blake Machine, Blake Barrel, and F-Class Products has created a system that uses twin precision cutter tips to turn case necks inside and out quickly and efficiently, with superior precision. This advanced IDOD Neck Turning Machine holds cases securely in a precision-machined spindle attached to an electric motor. Twin blades move precisely during the cutting process, milling the necks inside and out. The turned necks come out perfect every time, with the shoulders trimmed exactly (with doughnut removed) as well.
If you turn hundreds of cases during a shooting season, you may want to buy an IDOD from F-Class Products. The secret to the efficiency of the Blake IDOD is a vibration-free motor, high-mass case-holder, precision OD/ID-adjustable cutter, along with an advanced tracking system that moves the cutter heads towards the case neck (and back again) with absolute, 100% repeatable precision.
Bullet Central — Major Product Lines
This F-Class John video features a lengthy interview with Bullet Central representative Zachery, covering the many products Bullet Central offers. Products featured include Bix’N Andy triggers (0:55 time-mark), Micron Dies (5:20); Dual-Ram Press (8:08); Custom Barrels (12:00); BAT Actions (14:57). During this video Zachery also explains the wide range of rimfire ammo Bullet Central carries.
BAT Machine Actions — Showcasing Different Sizes and Features
This video features the impressive, latest generation BAT Machine actions. The video covers the full range of actions from the smaller SV/DS actions, to Model B, then Model M with integral lug and Picatinny Rail. The BAT representative then explains the features of BAT’s Nuevo actions (2:28 time-mark), which BAT builds for Bullet Central. For ELR and large Magnums BAT makes the model L and Model EXS. You can see all the current BAT actions at BatMachine.com/bat-actions. NOTE: From that page, scroll down and then select your particular discipline, such as Short-Range Benchrest, F-Class, Long-range Benchrest. You can also select repeater actions for hunting and/or PRS/NRL.
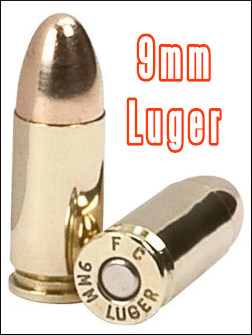
Ruger Super GP100 Revolver in 9mm Luger (9x19mm)
Wouldn’t it be cool if you could shoot your 9mm semi-auto pistol ammo in an ultra-accurate revolver? Well you can. Ruger adapted its existing Super Redhawk frame to create the Super GP100 9mm Luger (9x19mm) revolver. As you can see, the Super GP100 9mm features a stubby 8-round PVD-coated cylinder to better fit the 9x19mm round. According to Guns.com the 9mm GP100 “uses a cylinder and extractor cut for moon clips to speed up reloading [and] sports a 6-inch half-lug sleeved and shrouded barrel with an 11-degree target crown[.]”
Out of the box the Super GP100 9mm has a 9.5-lb double-action pull and a 4.5-lb single action trigger pull. Reviewers say the trigger pull is a little uneven initially but smooths out over time. A Gunblast tester, Boge Quinn, also observed that if you do NOT use the supplied moon-clips it is awkward to remove the spent cartridges: “You don’t have to use a moon clip, but I don’t know why you wouldn’t… it just works great that way.”
The 9×19mm Parabellum (aka 9mm Luger) cartridge was introduced in 1902 by German weapons manufacturer Deutsche Waffen und Munitionsfabriken (DWM) for the Luger semi-auto pistol. Now 120 years later, Ruger brings us a sturdy, 6″-barrel revolver for this popular cartridge. Ruger adapted its existing Super Redhawk frame for this Super GP100 9mm revolver. In the YouTube video posted below, Ruger engineer Mark Gurney explains the features of the Super GP100 9mm revolver:
Super GP100 9x19mm Features
Triple-locking cylinder locked into the frame at front, rear and bottom for more positive alignment and dependable operation.
High-strength stainless steel cylinder is fluted and shortened to reduce overall mass and increase rotational speed. Cylinder has PVD finish for durability and ease of extraction.
Polished and optimized internals, a centering boss on the trigger, and centering shims on hammer deliver a smooth double-action trigger pull with crisp/consistent let-off.
Cylinder and extractor are cut for moon clips to speed reloading during intense competition. Ships with three full moon clips and moon clip tool. The ejector and chamber mouths have a light chamfer to aid loading with moon clips.
Hogue hardwood grip is hand-finished for a smooth, polished feel. Grip frame accommodates a wide variety of custom grips.
Transfer bar mechanism provides security against accidental discharge.
Cold hammer-forged barrel has precise rifling for accuracy and longevity.
Barrel features 11° target crown for competitive-level accuracy.
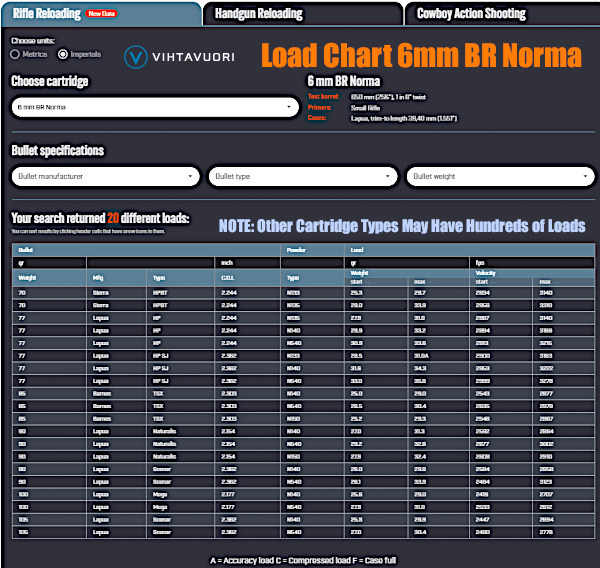
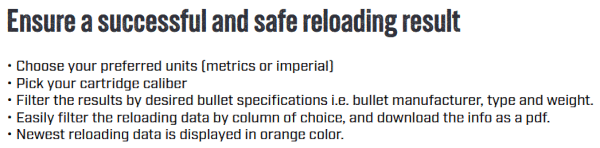
Vihtavuori offers an updated, user-friendly reloading data center on its website. This data page works well with all formats — smartphones, tablets, and desktop computers. On this page you can find recommended loads for 80+ cartridge types all in one place. You don’t have to click through multiple web pages.
In addition, the Vihtavuori reloading website has a very handy Burn Rate Chart (see below). While you can get all the load info you need through the website, Vihtavuori also offers a very good FREE reloading Mobile App. Vihtavuori’s online Reloading Center has links to the handy Vihtavuori Reloading App for both Apple and Android devices.
Burn Rate Chart is Online
CLICK HERE to view full-screen Vihtavuori Burn Rate Table.
Vihtavuori offers a comprehensive burn rate chart that lists all Vihtavuori powders for rifles and pistols. This includes Vihtavuori powders in the left column and ranks them with powders from other brands: Norma, RWS, VECTAN, Reload Swiss, IMR, Hodgdon, Accurate, W-W Alliant, and Ramshot. CLICK HERE to see the full-size chart, which can be downloaded in PDF format.
NOTE: The listed powders are displayed in order of approximate burning rate. Vihtavuori cautions: “This list is for reference only and NOT to be used for developing loads.”
Find Optimal Loads with Reloading Data Tool
Example of Vihtavuori Load Data for Popular Cartridge
Here are the load results for the 6mm BR Norma (aka “6BR”) cartridge. Vihtavuori has full PDF tables like this for over 80 cartridge types. With the most popular cartridge types, such as .223 Rem, 6.5 Creedmoor, and .308 Winchester, the PDF tables have over 350 entries. In fact the .308 Win table has 641 loads!
Vihtavuori Procedures and Methods for Generating Load Data
Vihtavuori generates hundreds of new reloading data entries every year. But how is the load data actually produced? This video provides insight into how Vihtavuori professionals work with advanced equipment to provide reliable load data for handloaders.
The NRABlog has interviewed seven prominent lady shooters, asking them for tips for other lady shooting sports enthusiasts, particularly new shooters. Top female competitors such as 2016 Bianchi Cup Winner Tiffany Piper and Team S&W Co-Captain Julie Golob offer good advice on competitive shooting as well as using firearms for self-defense. Read the full article here.
Here Are Some of the Top Tips from Leading Ladies:
Theresa Vail, Hunter and Host of NRA All Access “If you’re new to shooting or wanting to start, find some girlfriends that are interested in trying it with you. Having female friends go to the range with you takes the pressure off and makes a typically male-dominant arena much less intimidating. There is such thing as strength in numbers!”
Tiffany Piper (Action Pistol): The best piece of advice I would give is practice makes perfect. In New Zealand, we barely get enough range time with our noise restrictions so muscle memory and technique are key. Study up on shooting techniques, watch YouTube videos of other professional women shooters, and try out what you see. Don’t get intimidated thinking it’s a male’s sport[.]”
Julie Golob (Team S&W, 3-Gun and Pistol): “If something isn’t clear, just ask about it! Shooters are some of the best people you’ll ever meet, but we can be confusing and use a lot of shooter slang and lingo. When in doubt, ask!”
Tori Nonaka (Team Glock): “I always recommend to new shooters to first concentrate on the basics of gun safety. That way they will be more comfortable when they next learn about the particular gun…. Their confidence will grow as they familiarize themselves with their specific weapon. Then, it’s all about practice at the range.”
Corey Cogdell (Olympic Trap Shooter): “It’s empowering for women to know how to use a firearm in a sporting atmosphere as well as for self-defense. So if you are new to firearms, check out your local gun club and take a lesson! There you’ll find instructors and other shooting sports enthusiasts who will be more than willing to help you.”
How about a game of “Cartridge Chess”, with chess pieces sourced from your own ammunition collection? We think the concept of a Cartridge Chess Set is pretty clever, and it’s bound to be a conversation-starter at home or at the hunting lodge. With a little creativity, our readers could make their own Chess Sets like this, using a variety of cartridge types.
Create Your Own Cartridge Chess Set
This is a 3-D rendering originally found on the Cheaper Than Dirt Facebook page. We’d like to see a chess set with actual cartridges (assembled without powder or primers), perhaps with .32 ACP pawns and the 50 BMG and .338 LM as King and Queen.
Challenge: How many cartridge and shotshell types can you identify? The Pawns look like 9mm or 40sw pistol cartridges, while the Rooks (Castles) are obviously 12ga shotgun shells.
What’s Wrong with This Picture?: How many of you sharp-eyed chessmasters noticed a mistake in the placement of the “Royals” in the Cheaper Than Dirt 3-D rendering. Hint — look at the grid layout (top left) for the correct placement of Kings and Queens.
Many shooters prefer to deprime their brass before resizing. That way they can tumble cases or keep primer debris off their main press. To deprime cases before sizing or cleaning you can use a Decapping Die. This pushes out the spent primer without changing the neck or body of a case. Such decapping dies work fine, but they do require the use of a press. Here is a handy alternative — a cool tool that allows you to deprime brass anywhere — no press needed.
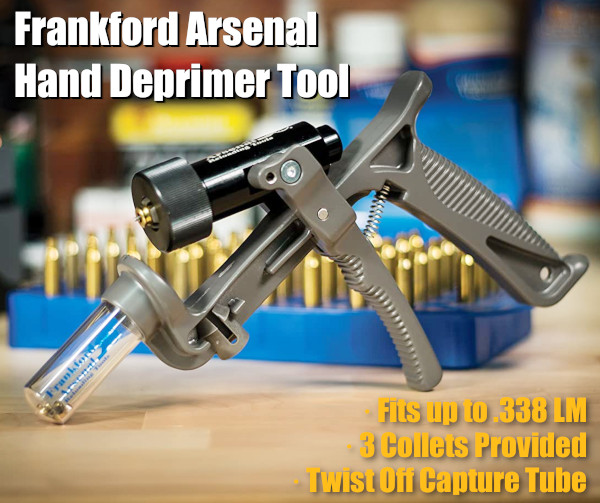
Handheld Primer Removal Tool From Frankford Arsenal
This cleverly-designed Hand Deprimer Tool allows you to deprime cartridge cases without a press. This hand-tool from Frankford Arsenal will deprime brass and capture primers conveniently. You can deprime your cases while watching TV or relaxing in your favorite chair.
This device lets you remove spent primers anywhere — no press needed and all the mess (cups/anvils/residue) stays in the capture chamber. This tool comes works with nearly all common case types up to .338 Lapua Magnum. With good leverage, this tool does the job quickly and efficiently. Forum members have praised this handy tool, but recommend wearing a thick glove if doing more than 100 cases in a session.
How to Adapt Tool for Small Flash Hole Brass
The Frankford Arsenal Deprimer Tool was designed for LARGE flash-hole brass. To deprime brass with small (1.5mm/0.59″) small flash-holes, as found on Lapua .220 Russian and 6mmBR cases, you will need to reduce the pin diameter. Frankford Arsenal currently recommends purchasing a replacement pin and “sanding it down” to the smaller diameter. NOTE: This is NOT difficult — simply spin the stock pin in some sandpaper.
This handy depriming tool is very versatile. With a universal, cylinder-style cartridge-holder, the tool can deprime a wide variety of cartridge types from .20 caliber up to .338 caliber. Three different plastic collets are provided to handle for different diameter cases. Spent primers are captured in a removable spent primer catch tube. Simply twist off the clear catch tube to dump the spent primers. With die-cast metal construction, this tool should last through many thousands of depriming cycles. MSRP is $65.99. Right now it is $47.99 on Amazon with 82% 5-star ratings.
Long-term User Review
One owner of this depriming tool has posted: “I have owned one of these for about eight years and deprimed over 10,000 cases with this tool. I have never had to replace a single part on it. You will have to adjust the return spring every so often, but that is a very easy task. If you are depriming a LOT of brass, the handle can tear up your hand a bit. Solution: Wear a Mechanics Glove. Easy Peasy! You will NOT regret this purchase.”
User Modifications — Grip Padding and High-Volume Capture
Many users recommended putting some kind of padding on the grip and front lever to reduce pressure on the fingers. This can be done with a wrap or a rubber covering. In addition, users have adapted the unit with an attached hose and large primer capture jug. If you depriming hundreds of cases at a time, this hose conversion may make sense.
Most of us own a .223 Rem rifle. Now, thanks to our friends at Rifleshooter.com we can assess exactly how velocity changes with barrel length for this popular cartridge.
Rifleshooter.com performed an interesting test, cutting the barrel of a .223 Rem rifle from 26″ all the way down to 16.5″. The cuts were made in one-inch intervals with a rotary saw. At each cut length, velocity was measured with a Magnetospeed chronograph. To make the test even more interesting, four different types of .223 Rem/5.56 ammo were chron’d at each barrel length. The Rifleshooter.com team that conducts these tests has a full-service gun shop, 782 Custom Gunworks — visit 782guns.com.
Test Barrel Lost 25.34 FPS Per Inch (.223 Rem Chambering)
How much velocity do you think was lost, on average, for each 1″ reduction in barrel length? The answer may surprise you. The average speed loss of the four types of .223/5.56 ammo, with a 9.5″ shortening of barrel length, was 240.75 fps total (from start to finish). That works out to an average loss of 25.34 fps per inch.
5.56/.223 Barrel Cut-Down Speed Test 26″ to 16.5″
Start FPS at 26″
End FPS at 16.5″
Total Loss
Average Loss Per Inch
UMC .223 55gr
3182*
2968
214
22.5 FPS
Federal M193 55gr
3431
3187
244
25.7 FPS
Win m855 62gr
3280
2992
288
30.3 FPS
Blk Hills .223 68gr
2849
2632
217
22.8 FPS
*There may have been an error. The 25″ velocity was higher at 3221 fps.
Rifleshooter.com observed: “Cutting the barrel from 26″ to 16.5″ resulted in a velocity reduction of 214 ft/sec with the UMC 223 55-grain cartridge, 244 ft/sec with the Federal M-193 cartridge, 288 ft/sec with the Winchester M855 cartridge and 217 ft/sec with the Back Hills 223 68-grain match cartridge.”
How the Test Was Done
The testers described their procedure as follows: “Ballistic data was gathered using a Magnetospeed barrel-mounted ballistic chronograph. At each barrel length, the rifle was fired from a front rest with rear bags, with five rounds of each type of ammunition. Average velocity and standard deviation were logged for each round. Once data was gathered for each cartridge at a given barrel length, the rifle was cleared and the bolt was removed. The barrel was cut off using a cold saw. The test protocol was repeated for the next length. Temperature was 45.7° F.”
See More Barrel Cut-Down Tests on Rifleshooter.com
Rifleshooter.com has performed barrel cut-down tests for many other calibers/chamberings including 6mm Creedmoor, .308 Winchester, and .338 Lapua Magnum. See these test results at Rifleshooter.com.
Much Different Results with 6mmBR and a Longer Barrel
The results from Rifleshooter.com’s .223/5.56 test are quite different than the results we recorded some years ago with a barrel chambered for the 6mmBR cartridge. When we cut our 6mmBR barrel down from 33″ to 28″ we only lost about 8 FPS per inch. Obviously this is a different cartridge type, but also our 6mmBR barrel end length was longer than Rifleshooter.com’s .223 Rem start length. Velocity loss may be more extreme with shorter barrel lengths. And, of course, different cartridge types and powder/bullet combinations will yield different results.
Women are becoming an increasing percentage of firearms owners. Gun ownership is no longer male-dominated. One study suggests that, in recent years, nearly half of all new gun sales have been to women. In addition, it is estimated that women now represent 42% of American gun owners, and that number increases with every passing year.
Gun journalist Dan Wos of The Loaded Mic podcast channel has made interesting observations about the increase in gun ownership by ladies. Citing a series of studies, Wos observed that women in the USA are now buying nearly half of all new firearms. Many of these ladies are first-time gun owners who are motivated by a desire for self-protection.
On Ammoland.com, Dan Wos has an article “Don’t Believe the Spin: Women are Empowering the 2nd Amendment”. Here are highlights:
Let’s look at the actual numbers. In 2021 a Harvard University study found that nearly half of all gun purchases between 2019 and 2021 were by women. 42% of gun owners in America are women (a 14% rise over the previous five years.) The total number of women who became gun owners during that two-year period is almost 3.5 million.
In an article by Harvard T.H. Chan School of Public Health, it was said that “women accounted for about half of all gun purchases between 2019 and 2021, and that new gun owners are more likely to be female.” This [indicates] the trends in firearm purchases moving forward.
Not surprisingly, the largest spike in gun sales occurred during and shortly after the violent left-wing riots in several cities across America in 2020. According to a survey conducted by Professor Matt Miller at Northeastern University, between January 2020 and April 2021, gun purchases rose from 13.8 million to 16.6 million. Almost 50% being women and approximately 5.4 million brought [firearms] into homes that had not previously had them.
About Dan Wos and The Loaded Mic
The Loaded Mic is a one-hour, weekly web show hosted by Second Amendment Advocate, author and commentator Dan Wos. Dan became a popular and respected voice in the gun rights community after the release of his book Good Gun Bad Guy, now a three-book series. You can access full episodes in video format on The Loaded Mic’s Rumble Video Channel.


 AccurateShooter Forum member Bill White (aka “CT10Ring”) is not your typical member. For 37 years, Bill worked in NYC as a studio photographer specializing in still lifes and products. A neighbor visiting Bill’s home in Connecticut with a .270 Sako inspired Bill to revive his interest (obsession?) with shooting after a 25-year drought. And he owns a few Sakos now! With his gun hobby renewed, for many years Bill drove to the Western USA to shoot long range steel and a LOT of prairie dogs in season. He loved the life of the varminter, so it made sense for him to move West after retiring. He choose Idaho as his new home.


Bill knows a thing or two about taking pictures, having been a professional photographer in NYC for many decades. He uses modern digital cameras for both his outdoor and indoor work. Most photos in this story were taken with a Canon EOS 5DSR MKIV. We asked Bill for some tips on taking good photos. Here are his FIVE Top Tips for Photography:


 Out of the box the Super GP100 9mm has a 9.5-lb double-action pull and a 4.5-lb single action trigger pull. Reviewers say the trigger pull is a little uneven initially but smooths out over time. A Gunblast tester, Boge Quinn, also observed that if you do NOT use the supplied moon-clips it is awkward to remove the spent cartridges: “You don’t have to use a moon clip, but I don’t know why you wouldn’t… it just works great that way.”


 How about a game of “Cartridge Chess”, with chess pieces sourced from your own ammunition collection? We think the concept of a Cartridge Chess Set is pretty clever, and it’s bound to be a conversation-starter at home or at the hunting lodge. With a little creativity, our readers could make their own Chess Sets like this, using a variety of cartridge types.