Eurooptic vortex burris nightforce sale


teslong borescope digital camera barrel monitor


As an Amazon Associate, this site earns a commission from Amazon sales.


January 29th, 2015

Reloading 101: Seven Fundamental Safety Guidelines

seven reloading safety tips powder primers brownells manual

You can never be too safe when hand-loading your own ammunition. This helpful Brownells video outlines the Seven Fundamental Reloading Safety Tips. This is important information for novice hand-loaders and a good refresher for those with reloading experience!

Summary of the Seven Safety Tips:

1. Store your reloading supplies in a safe and dry location, away from children and away from any possible source of ignition. This includes keeping your powder and primers separate.

2. Get and use respected reloading manuals, especially for new cartridges. Start low and work up slowly while watching for warning signs of pressure and/or case fatigue.

3. Locate your reloading activity where you will not be distracted. If you get interrupted, stop. (Distractions will eventually lead to mistakes.)

4. Do NOT mix powders. Keep your powders clearly marked and dated. You can use masking tape to write the date on the container.

5. If you load the same cartridge type for different firearms, make sure your ammo headspaces properly in each gun.

6. Check cases frequently. Look for split necks, case head separation or other signs of fatigue and excessive pressure.

7. If reloading military brass, be aware that case capacity is usually reduced, and initial loads should be at least 10-15% lower than published data.


Here are some other tips that will help your avoid making costly mistakes (such as using the wrong powder, or undercharging a case):

  • Powder Type — Always double-check the label on your powder containers. After placing powder in the powder measure, put a piece of tape on the measure with the powder type written on it. Some guys write the powder type on a card and place that right in the hopper.
  • Scale Drift — Electronic balances can drift. If you are using a digital powder scale, calibrate the scale with a test weight every 50 rounds or so.
  • Case Fill — If you throw more than one charge at a time, look INSIDE every case before seating a bullet. Squib charges can be dangerous if you don’t notice them before firing the next round.
  • Progressive Presses — When using a progressive press, consider using an RCBS Lock-Out Die. This will detect a low charge and stop the machine. These dies will work with RCBS, Hornady, and Dillon progressives.
Permalink Reloading No Comments »
January 29th, 2015

NEW “Loaded M1A” with Precision Adjustable Stock

Springfield Armory M1A M14 Camp Perry Loaded adjustable stock

Springfield Armory has taken the M1A into the 21st Century with an adjustable modular stock that makes this classic semi-auto rifle more versatile than ever. The adjustable stock on this Loaded M1A (MP9826, MSRP $2,021) offers many cool features. You can raise/lower the cheek-piece with a handy rotary knob. Likewise the buttplate can be moved in and out with a quick-adjusting knob, allowing length-of-pull adjustment up to 1.3 inches. The toe of the stock features a bag-rider section, making the gun more stable on a sandbag. Up front you’ll find an accessory rail plus a forward-angled swivel stud allowing easy bipod mounting. The included iron sights feature half-minute adjustments for windage and 1-MOA adjustments for elevation. The 22″ stainless steel barrel has a 1:11″ twist. Rifle weight with an empty magazine is 11.25 lbs.


At the 2015 SHOT Show, Rob Leatham runs through Springfield Armory’s new Loaded M1A Series rifle with an adjustable stock (MP9826, MSRP $2,021).

Click Image to See Full-Size Photo
Springfield Armory M1A M14 Camp Perry Loaded adjustable stock

Springfield Armory M1A M14 Camp Perry Loaded adjustable stock

MIA Match at Camp Perry is Popular
In 1974, Springfield Armory began offering a civilian-legal, semi-automatic version of the M14 known as the M1A™. M1As have enjoyed some success in Service Rifle and High Power Competition but today most Service Rifle shooters use the lighter-recoiling AR-platform black rifles. Nonetheless the M1A remains popular with American shooters and the annual M1A Match at Camp Perry offers serious, big-time prize money, thanks to Springfield Armory. In 2014 over $25,000 worth of cash and gear was awarded to Camp Perry M1A competitors, making the M1A Match the richest single rifle event at the NRA National Championships.

Springfield M1A match Camp Perry
Nick Till in 2009 M1A Match. Nick was the 2007 Service Rifle Nat’l Champion. Photo courtesy NRA Blog.

Permalink Competition, New Product 2 Comments »
January 29th, 2015

USAMU Reloading Tip — Prepping GI 5.56 Brass for Match Use

Each Wednesday, the U.S. Army Marksmanship Unit publishes a reloading “how-to” article on the USAMU Facebook page. Yesterday’s “Handloading Hump Day” post covered preparation of once-fired 5.56x45mm brass. This article, the first in a 3-part series, has many useful tips. If you shoot a rifle chambered in .223 Rem or 5.56x45mm, this article is worth reading. And visit the USAMU Facebook page next Wednesday for the next installment.

This week, Handloading Hump-Day will answer a special request from several competitive shooters in Alaska. They asked about procedures for morphing once-fired GI 5.56mm brass into accurate match brass for NRA High Power Rifle use. The USAMU has used virgin Lake City (LC) 5.56 brass to win National Championships and set National Records for many years. In this 3-part series, we’ll share techniques proven to wring match-winning accuracy from combat-grade brass.

Preparing Once-Fired GI 5.56 Brass for Reloading (Part 1 of 3)
Assuming our readers will be getting brass once-fired as received from surplus dealers, the following steps can help process the low-cost raw material into reliably accurate components.

1. Clean the Brass
First, clean the brass of any dirt/mud/debris, if applicable. Depending on the brass’s condition, washing it in a soap solution followed by a thorough rinsing may help. [This step also extends the life of the tumbling media.] Approaches range from low-tech, using gallon jugs 1/2 full of water/dish soap plus brass and shaking vigorously, to more high-tech, expensive and time-consuming methods.

2. Wet-Tumbling Options (Be Sure to Dry the Brass)
When applying the final cleaning/polish, some use tumblers with liquid cleaning media and stainless steel pins for a brilliant shine inside and out, while others take the traditional vibratory tumbler/ground media approach. Degree of case shine is purely personal preference, but the key issue is simple cleanliness to avoid scratching ones’ dies.

If a liquid cleaner is used, be SURE to dry the cases thoroughly to preclude corrosion inside. One method is to dump the wet brass into an old pillow case, then tilt it left/right so the cases re-orient themselves while shifting from corner to corner. Several repetitions, pausing at each corner until water stops draining, will remove most water. They can then be left to air-dry on a towel, or can be dried in a warm (150° F-200° F max) oven for a few minutes to speed evaporation.

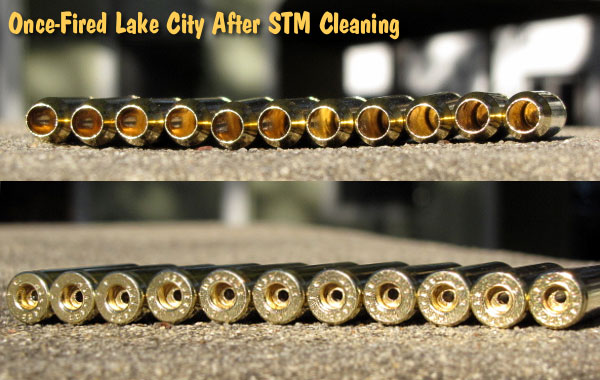
Shown below are Lake City cases after cleaning with Stainless Media (STM). Note: STM Case cleaning was done by a third party, not the USAMU, which does not endorse any particular cleaning method.

3. Inspect Every Case
Once dry, inspect each case for significant deformation (i.e., someone stepped on it), damaged mouths/necks and case head/rim damage. Some rifles’ ejectors actually dig small chunks of brass out of the case head — obviously, not ideal for precision shooting. Similarly, some extractors can bend the case rims so badly that distortion is visible when spinning them in one’s fingers. These can be used for plinking, but our match brass should have straight, undamaged rims.

Dented case mouths are common, and these can easily be rounded using a conical, tapered tool, [such as a .223 expander mandrel. A dummy 7.62 or .30-06 cartridge with a FMJ spitzer can also work.] If most of your brass is of one headstamp, this is a good time to cull out any odd cases.

4. Check the Primers Before Decapping
Your clean, dry and inspected brass is now ready for full-length sizing, decapping and re-priming. Historically, primer crimps on GI brass have caused some head-scratching (and vile language) among handloaders. Our next installment will detail efficient, easy and practical methods to remove primer crimp, plus other useful handloading tips. Until next week, Good Shooting!

NOTE: The USAMU Handloading (HL) Shop does not RE-load fired 5.56 brass. We use virgin LC brass with our chosen primer already staked in place. However, our staff has extensive personal experience reloading GI brass for competition, which will supplement the Shop’s customary steps. In handloading, as in life, there are many ways to accomplish any given task. Our suggestions are note presented as the “only way,” by any means. Time for loading/practicing is always at a premium. Readers who have more efficient, alternative methods that maintain top accuracy are invited to share them here.

Permalink Reloading 3 Comments »