Ever wondered what caused a particular bulge or marking on a case? And more importantly, does the issue make the case unsafe for further use? Sierra Bullets Ballistic Technician Duane Siercks offers some insight into various issues and their causes in two Case Diagnostic articles from the Sierra Blog.
Incipient Case-Head Separation
This is a Winchester .308 Win case that has a real issue. This case has a very obvious incipient case head separation in the process of becoming a complete failure.
This is most commonly caused by over-sizing the case causing there to be excess headspace on the case. After a few firings and subsequent re-sizing, this case is just about ready to come completely apart. Proper die adjustment is certainly a requirement here. Of course this case is not safe to reuse.
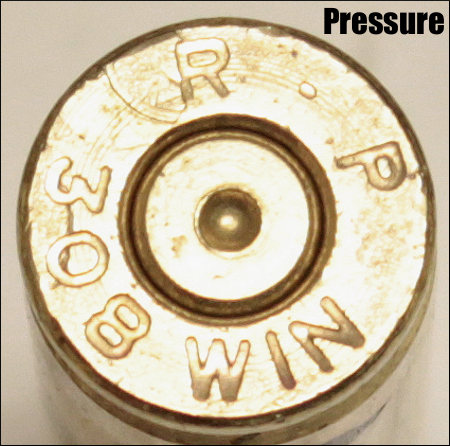
Excessive Pressure (Load Too Hot)
If you will notice in the picture of the case rim, there are two pressure signs to notice. First, look at the primer. It is basically flattened to about the max of what could be considered safe. If this was the only pressure sign noted, I would probably be fine with this load, but would constantly keep an eye on it especially if I was going to use this load in warmer temperatures. This load could easily cross into the “excess pressure” realm very quickly.
There is another sign of pressure that we cannot ignore. If you’ll notice, there is an ejector mark apparent that is located over the “R” of the R-P headstamp. This absolutely tells us that this load would not have been in the safe pressure range. If there were any of these rounds loaded, they should not be fired and should be dis-assembled. This case should not be reloaded.
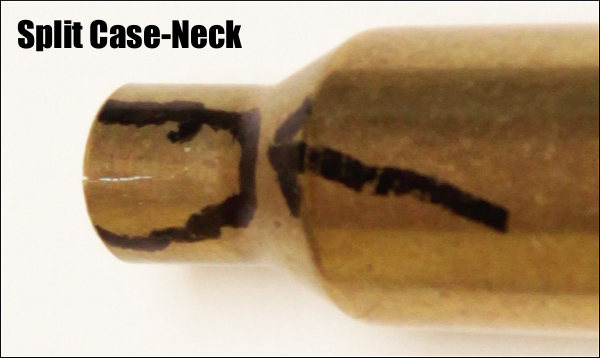
Split Case-Neck
Here we have an R-P .22-250 case that has died the death. Everything looks fine with this case except the neck is split. This case must be tossed.
A split neck is a normal occurrence that you must watch for. It is caused by work-hardening of the brass. Brass cases get harder with age and use. Brand new cases that are stored for a period of time can become hard enough that they will split like this case within one to two firings. I have had new factory loads do the same thing. Then as we resize and fire these cases repeatedly, they tend to get harder and harder. Eventually they will split. The life of the case can be extended by careful annealing practices. This is an issue that would need to be addressed in an article by itself. Of course this case is no longer usable.
In the classes that I teach, I try to use examples like this to let the students see what they should be looking for. As always, if we can assist you, whether you are new to reloading or very experienced, contact us here at Sierra Bullets by phone at 1-800-223-8799 or by email at sierra@sierrabullets.com.
Dented Case Body
Here we have a Lake City 7.62×51 (.308 Win.) case with two heavy marks/dents in the case body.
This one may be a bit of a mystery. It appears as if this case may have been caught in the action of a semi-auto rifle when the firearm jammed or the case failed to clear during the cycling process. I probably would not reload this case just to prevent any feeding problems. This also appeared to be a factory loaded round and I don’t really see any pressure issues or damage to the case.
Multiple Problems — Lake City 5.56×45 unknown year.
This case has suffered multiple failures and cannot be re-used. First its has have a very rounded shoulder that is split. Upon first look it was obvious that this round had been a victim of excess pressure. The firearm (perhaps an AR?) was apparently not in full battery, or there was possibly a headspace issue also. While taking a closer look, the primer was very flat and the outside radius of the primer cup had been lost. High pressure! Then I also noticed that there was an ejector mark on the case rim. This is most certainly an incident of excessive pressure. This case is ruined and should be discarded.
It is very important to observe and inspect your cases before each reloading. After awhile it becomes second nature to notice the little things. Never get complacent as you become more familiar with the reloading process. If ever in doubt, call Sierra’s Techs at 1-800-223-8799.
One of our Forum members complained that he wasn’t able to set his primers flush to the rim. He tried a variety of primer tools, yet no matter what he used, the primers still didn’t seat deep enough. He measured his primers, and they were the right thickness, but it seemed like his primer pockets just weren’t deep enough. He was mystified as to the cause of the problem.
Well, our friend Boyd Allen diagnosed the problem. It was the decapping rod. If the rod is adjusted too low (screwed in too far), the base of the full-diameter rod shaft (just above the pin) will contact the inside of the case. That shaft is steel whereas your case is brass, a softer, weaker metal. So, when you run the case up into the die, the shaft can actually stretch the base of the primer pocket outward. Most presses have enough leverage to do this. If you bell the base of the primer pocket outwards, you’ve essentially ruined your case, and there is no way a primer can seat correctly.
The fix is simple. Just make sure to adjust the decapping rod so that the base of the rod shaft does NOT bottom out on the inside of the case. The pin only needs to extend through the flash hole far enough to knock the primer out. The photo shows a Lyman Universal decapping die. But the same thing can happen with any die that has a decapping rod, such as bushing neck-sizing dies, and full-length sizing dies.
Whenever you use a die with a decapping pin for the first time, OR when you move the die to a different press, make sure to check the decapping rod length. And it’s a good idea, with full-length sizing dies, to always re-check the height setting when changing presses.
There are a variety of decapping dies currently on the market, with models available from LEE, Lyman, Hornady, RCBS, Redding, and Area 419 (at Brownells).
LEE Universal Decapping Die Costs Just $11.99
Speaking of decapping tools, Midsouth Shooters Supply sells the LEE Universal Decapping Die for just $11.99 (item 006-90292), a very good deal. There are many situations when you may want to remove primers from fired brass as a separate operation (prior to case sizing). For example, if your rifle brass is dirty, you may want to de-cap before sizing. Or, if you load on a progressive press, things will run much more smoothly if you decap your brass first, in a separate operation.
Decapping Dies for Cases with Smaller Flashholes
TAKE NOTE: Some Euro Small Flash Holes are spec’d at 1.5mm or 0.059″, and max out at about .062″, so these need a smaller die pin.
The low-cost LEE Universal Decapping Die will work with cartridges from 17 Fireball all the way up to big Magnums. However, NOTE that the decapping pin supplied with this Lee die is TOO LARGE for LAPUA 220 Russian, 6mmBR, 6.5×47, 6.5 Creedmoor, .308 Win (Palma) and Norma 6 PPC flash holes. Because the pin diameter is too large for these brass types, you must either turn down the pin, or decap with a different tool for cases with .059-.062″ flash-holes.
Brownells sells the impressive Area 419 Zero Universal Decapping Die. This features a spring-loaded decapping pin, with replaceable heads. The $50.00 die works with cases up to and including .338 Lapua length/diameter with no need for different inserts.
Redding makes a Universal Decapping Die with an optional smaller-diameter decapping rod for the smaller .059-.062″ flash holes found on the BR and PPC cases. The use of this die is explained in the video below:
When he measures his loads or sorts bullets by weight, Forum Member Boyd Allen often employs his trusty RCBS 10-10 balance beam scale (although he does have handy digital scales as well). He finds that the balance beam scale works predictably, time after time, and it doesn’t suffer from the drift and calibration issues that plague some of the less expensive electronic scales on the market.
To make it easier to see the balance point, Boyd has adapted a magnifying glass with a mirror. This makes the end of his balance beam easier to view from his normal position on the bench. Boyd explains: “This set-up uses a cheap magnifier with positioning arms that was probably designed to hold and magnify small objects while soldering them. I think that it came from Harbor Freight many years ago. The mirror lets you look at the scale as if is was at eye level, and of course the magnifier makes the image easier to see.”
If you have a balance beam scale, we suggest you try this simple enhancement. We predict you’ll find the magnifier speeds up the process with enhanced assurance of your load weight.
Are you planning to purchase or sell a gun? Or perhaps you want to give one to a family member. Maybe you want to transfer a gun to a friend out of state. These are all situations that demand you understand the law before you buy, sell, or transfer a gun. Thankfully the NRA Blog has a series of helpful articles that can guide you through firearms transfers and transactions.
Do note that laws on private transfers vary from state to state. Also, some of these articles are a few years old. Laws do change, typically becoming more restrictive. You should carefully review current laws in your state before buying/selling any firearm. For a summary of state gun laws, we recommend Legal Heat’s 50 State Guide to Firearms Laws and Regulations reference book. Even this reference was released in 2023, so you should still check for recent changes in state laws.
Here are five articles providing key facts you need to know.
Click each title to read the specific article.
IMPORTANT: All five of these articles reference general rules that apply nationally and in MOST states. However, some states, such as California, New Jersey, and New York (and others) have very special rules and regulations on gun transfers. If you have ANY questions about gun transfers in your state/region, you should consult an attorney familiar the laws of YOUR state and municipality.
The Where To Shoot Mobile App quickly locates shooting ranges near you, drawing on North America’s most comprehensive directory of shooting ranges. Users can search by current location, state, or zip code. Once you locate a range, you can view activities offered along with a summary of range facilities. You can even get driving directions. If you don’t want to install an App, you can also access the NSSF shooting range database and maps via the NSSF WheretoShoot webpage.
The app is modeled after NSSF’s popular WhereToShoot.org® website and is updated frequently with range information for every U.S. state and Canadian province. Once you’ve located a place to shoot, the App can provide directions to the range. The App also includes video tips for shooters, news, and firearm-safety information.
The National Shooting Sports Foundation (NSSF) has prepared tips for gun owners transporting firearms in their vehicles. Whenever you are driving with guns (of any kind), the firearms should be transported securely. In some states, the firearms must be in locked cases inside the vehicle. And, with the rise of break-ins on parked vehicles, it’s important to keep gun cases out of sight if possible. This article has tips on safe and secure gun transport.
HERE Are Key Guidelines for Safe, Secure Handling of Firearms in Vehicles:
• Take note of and safely control the muzzle direction of firearms in vehicles. This is one of the main rules of gun safety and applies to the inside of vehicles as well as any other location.
• When finished using your firearm outside your vehicle, unload it before you re-enter your vehicle.
• Even after a long hunt or a day in the sun at the range, always check, and then double check, that guns are unloaded before placing them in a car or truck.
• Be very careful if you must unload a firearm in the confined space of a vehicle so as not to have an accidental discharge. If your location allows, it is safer and easier to unload the firearm outside the vehicle.
• Never leave firearms in parts of the vehicle accessible to children or pets.
• Keep firearms and ammunition out of sight to avoid tempting thieves.
• Use secure temporary storage for firearms in vehicles.
• A lockable gun case or a lock box may be the most practical choice to securely store a gun in a vehicle. These come in a range of prices and models.
• If you’re concerned about quick access to your firearm, many types of lockable safes allow for extremely fast access of your gun while at the same time helping to prevent unauthorized access.
• Secure the lock box to the vehicle, if possible. Some companies make custom concealed compartments for specific model vehicles.
Storing Firearms in Vehicles to Prevent Theft and Misuse
Unfortunately, thefts of firearms from vehicles are on the rise. Thieves commonly steal cars and trucks even when they don’t obviously contain firearms — a reminder that vehicle door locks are not totally secure. And there are major issues now with the electronic key fobs — criminals have ways to detect and copy the key fob signal, allowing them to open your vehicle, start the motor, and then drive away.
When you are not in your vehicle, all firearms should be placed in locked storage and out of sight. Locking the doors on your vehicle does not constitute secure firearm storage. As one writer put it: “Cars and trucks aren’t safes. And they’re not holsters. They’re not storage containers.”
Useful reloading gear does not have to be costly. Here are ten handy (and very inexpensive) items that belong on your loading bench or in your range kit.
• Magnifying Glass – We use a flat, 2″x2″ pocket 4x-8x magnifier. This folds up on itself. Very handy, we use it to inspect bullets and brass. Use this to check your flash holes for burrs, and check the meplats of your bullets before loading.
• Clear 35mm Film Cannister – Use this to transfer the thrown powder charge to the little measuring cup that sits on your scale. That way you don’t get any kernel splash. Also if the charge weight is obviously off, it’s easy to dump back in the measure. A film canister works pretty well as a trickler too.
• Compressed Air in a Can -- Get these at office supply stores. Use the can (with tube attached) to blow crud out of cases after cleaning the neck with a brush, and blast loose debris out of primer pockets.
• Pin Vise – A simple pin vise with a #53 bit is perfect for deburring small PPC and BR flash holes without reaming the flash-holes any larger. The Lapua PPC/BR flash-hole diameter is 1.5 mm, or 0.059″. Amazon.com sells a handy $8.29 pin vise kit with 10 bits, including the ideal 1.5mm bit. Other vendors offer a #53 pin vise bit that measures .0595″ or .060″ (depending or source). You can find pin vises and bits at hobby stores — here’s an example below with ten bits including 1.5mm. Pin vise sets can be found from $7 to $15.
• Bounce Dryer Sheets – The common dryer sheets eliminate “static cling” on your plastic reloading parts such as powder measure cylinders, powder funnels, and reloading press plastic bins. Thanks to Doc76251 for this tip.
• Ballistol Aerosol – Try using this versatile lubricant/solvent for full-length sizing. Spray some on a patch and you can wipe the carbon off your case necks. Then, continue to apply a very small amount of Ballistol on the case bodies — just thin sheen is all you need. Ballistol is super slippery, and easy to remove. For general full-length sizing (on small cases) it works great and doesn’t leave a gooey, waxy, or chalky residue. For heavier case-forming jobs, we recommend Imperial Die Wax.
• Shotgun Mop – Stick this in the chamber when using Wipe-Out foaming bore cleaner. This will seal off the chamber so the foam doesn’t flow into your action. For long chambers screw on one section of cleaning rod to aid extraction.
• Colored Sharpie Marking Pens – Mark your bullets ahead of the bearing surface, and the color transfers to the target. This way you can shoot multiple loads at the same point of aim and discern which load shoots the tightest. (Recommended for 300 yards and beyond). With colored bullet tips you can test multiple loads “round robin” to equalize wind effects. When testing seating depths for example, you can mark the longer-seated set of bullets red and the shorter-seated set green and shoot them during the same sequence. Just look at the colored marks on the target to see which grouped better.
• Thin Latex Gloves – You should keep a box of inexpensive, disposable latex gloves (the kind doctors use) in your loading room. These will prevent contamination of primers or powder kernels that you handle directly. Also, use the gloves when handling fine blued tools or firearms to prevent transfering body oils and salts that promote rust.
• Plastic Washers for Neck Mic – If you use a Sinclair Neck-wall Micrometer Gauge with integral stand, you can use thin plastic washers to adjust the height of the case on the mandrel. This makes it much easier to measure the same point on the case neck every time. Thanks to MikeCR for this tip (and photo).
For many riflemen, reading the wind is the toughest challenge in long-range shooting. Wind speeds and directions can change rapidly, mirage can be misleading, and terrain features can cause hard-to-predict effects. To become a competent wind reader, you need range-time and expert mentoring. In the latter department, Frank Galli, founder of Sniper’s Hide, offers a detailed digital resource: Wind Reading Basics for the Tactical Shooter.
Wind Reading Basics is much more than a 47-page eBook — it has charts, instructions for ballistic calculators, and even embedded videos. Galli explains: “We break down the formulas, walk you through using a ballistic computer, and give you all the information in one place. From videos, to useful charts, we make it simple to get started. It’s all about having a plan, and we give you that plan.”
Galli’s Wind Reading Basics, priced at $7.99, can be downloaded from iTunes for iPads, iPhones and iOS compatible devices. Here are sample sections from the eBook (which includes videos):
NOTE: If you prefer drying your brass in an oven we recommend a temp setting no higher than 200° F. Better yet, use a dedicated case dryer that cannot possibly over-cook your cases.
Tech Tip by Craig Arnzen of Area419.com
As wet-tumbling brass has become more popular in recent years, guys have tried a LOT of ways to get their brass dry — towels, hair dryers, and even food dehydrators. (See Top Ten Brass Drying Methods). Another common method — albeit with some potential issues — is putting your wet brass in the oven to dry. Provided you monitor TEMP and TIME, this method is fast, effective, and easy (as long don’t use the wife’s favorite cooking pans — that’ll get you in trouble.)
With oven-drying, however, unexpected issues can arise, as illustrated by this worrisome story: “I put my brass in for an hour at 200° F and turned it off. Next thing I know I realize my wife has the oven pre-heating to 350° F. Is my brass ruined?”
If you search the AccurateShooter.com Shooters’ Forum, you’ll find at least three threads with stories like that (i.e. higher-than-expected oven temps when drying brass), and answers on both sides of the line. I know this, because it happened to me — I had some 6XC brass drying and the wife pre-heated the oven. Concerned about my cases, I consulted a genuine annealing expert, Andrew Rixon.
Andrew is the Director of Engineering and Manufacturing at Alpha Munitions, makers of premium-grade rifle brass. I had baked a batch of Alpha 6XC brass, which is exceptionally consistent and well-made. (This 6XC brass is currently out of production, but Alpha produces many other good 6mm cases including 6 PPC, 6mm ARC, 6mm BR, 6 Dasher, 6BRA, 6 GT, and 6mm Creedmoor).
Before Andrew would answer my question though, he gave me a little lesson on what really happens during annealing:
“Annealing is performed by heating the brass to specific temperatures. There are three phases of annealing: recovery, recrystallization, and grain growth. All of which have specific temperatures and or exposure times related to them. It is key for cartridge brass annealing processes to hit the recrystallization phase which allows for strain-free grains to grow. The growth of strain-free grains eliminate dislocations, drastically decreasing hardness and increasing ductility. For recrystallization to occur the material temperature must be within 600-1000 degrees Fahrenheit (F).”
He then got into really answering the question, and was (fortunately) definitive in his answer: “If the temps do not exceed 450 degrees F then there is nothing to worry about as it did not exceed the critical temperature for annealing to occur.” Editor: Caution — do NOT assume that the temperature marked on the oven knob is the actual temperature INSIDE the oven, particularly near the back. Some older ovens can be off as much as 75 degrees F. Be conservative!
Well, there you have it. If you’ve baked your brass, you’re probably OK. If you got it hotter than 450° F then there can start to be some changes to the metal.
The NSSF 2026 SHOT Show kicks off in one week. SHOT Show (aka “Shooting, Hunting, and Outdoor Trade Show”) is the largest event in the world for the shooting/hunting/firearms industry. This year’s event runs January 20-23 at the Caesars Forum and Venetian Expo in Las Vegas, Nevada, with range day on 1/19/26. The 2026 SHOT Show will feature over 2,700 exhibitors. This massive event covers more than 830,000 square feet, with attendees and exhibitors coming from over 100 countries. Over 52,000 industry professionals and 2200+ media representatives are expected to attend.
This annual event is the largest trade show on the planet for professionals in the firearms, ammunition, hunting, and law enforcement industries. A vast collection of firearms, optics, reloading tools, training gear and other products are on display. If you plan to attend SHOT Show 2026, you can organize your days with the Event Planner linked below:
SHOT Show, the major gun industry trade show, runs this month in Las Vegas at the Venetian Expo and Caesars Forum. The event starts off with the Industry Day at the Range on Monday, January 19, 2026, and the Supplier Showcase also opens on Monday. Then the main show begins Tuesday, January 20, and runs through Friday, January 23, 2024. VIEW Event Schedule.
SHOT Show Tracker
The SHOT Show Tracker website has a wide variety of special pages that help you plan events and identify exhibitors. Tracker features are listed in the Table of Contents.







 • Magnifying Glass – We use a flat, 2″x2″ pocket 4x-8x magnifier. This folds up on itself. Very handy, we use it to inspect bullets and brass. Use this to check your flash holes for burrs, and check the meplats of your bullets before loading.
 • Ballistol Aerosol – Try using this versatile lubricant/solvent for full-length sizing. Spray some on a patch and you can wipe the carbon off your case necks. Then, continue to apply a very small amount of Ballistol on the case bodies — just thin sheen is all you need. Ballistol is super slippery, and easy to remove. For general full-length sizing (on small cases) it works great and doesn’t leave a gooey, waxy, or chalky residue. For heavier case-forming jobs, we recommend Imperial Die Wax.


 If you search the AccurateShooter.com