Ever wanted to see how firearms operate — viewing INSIDE the actions, barrels, and magazines? Well today we feature some great “see-through” animations for rifles, shotguns, and pistols. Using modern 3D graphics technologies, these cutaway videos show the movement of cartridges during firing, plus the operation of the bolt, trigger, and extraction systems.
These videos are found on two locations. First, there is the MasongGun YouTube site, which has 636 videos and an astonishing 3.45 MILLION subscribers. In addition, on Facebook, the GunMechanism Page has over 200 animated “Reels”, some of which have been viewed over 500,000 times. Obviously gun afficianados like these 3D X-Ray effect see-though videos. Here are 10 very good videos featuring notable lever-action, bolt-action, and semi-auto rifles, plus semi-auto pistols, a revolver, and a pair of modern shotguns.
You may have heard the phrase “blueprinting an action”, but do you know what that really means? Do you know what operations are done to an action during the blueprinting process? To help you understand, gunsmith Bill Marr of RifleShooter.com has created a helpful article showing a Rem 700 blueprinting job start to finish. This article spotlights how the procedures can be done with manual tools. Bill, who runs 782 Custom Gunworks Ltd., can also perform many of these operations with modern automated machinery. In fact, Bill has written a follow-up article on Truing a Rem 700 receiver with a Lathe.
Bill explains: “Blue-printing, or truing a rifle action, ensures the receiver face, threads, lugs, bolt lugs, and bolt face are square to the center line of the receiver.” In Bill’s informative article, Bill shows how he blueprints a Remington 700 short action receiver with .308 Win bolt face. He covers the following procedures step by step:
Action Disassembly
Ream Minor Diameter of Receiver Threads
Square the Receiver Lugs
Square the Face of the Receiver
Lap the Bolt Lugs
Square the Bolt Face
Bill employed a variety of tools from Brownells to complete the blueprinting job, including: Remington 700 Armorer’s Kit; Manson Receiver Accurizing Kit; Bolt Lapping Kit; Bolt Face Truing Tool; Manson Receiver Ring Facing Cutter; Multi-Vise with Jaw Pads; Silicone Carbide Abrasive; and Do-Drill Cutting Oil.
Highlights from the Rifleshooter.com article:
1. Chasing the Threads
We use the bushings to guide the receiver tap. This chases the threads and ensures they are square.
2. Truing the Receiver Face
Using the receiver facing tool, the front of the receiver is trued. The tool is placed over the tap and turned by hand. We used Do Drill to lubricate it.
3. Lapping the Lugs
The bolt lapping tool screws into the front of the action and applies rearward pressure on the bolt face. A little bit of lapping compound is placed on the front of the receiver lugs. The bolt handle is then raised and lowered repeatedly. Note — it is critical that we do not get any lapping compound on any other surfaces.
4. Truing the Bolt Face
On this bolt, the central part of the bolt face was low. After the truing operation, this Rem 700 bolt face is now completely square to the action.
IMPORTANT: Rifleshooter.com states: “This article highlights our project and is presented for information purposes only. This provides an overview of the process and should not be attempted without the guidance and supervision of an experienced gunsmith“.
Here is Ernie Bishop’s pride and joy, a specialty pistol nicknamed “Batman” because the black carbon-fiber stock looks like the Batmobile. This is one sophisticated handgun. Complete with scope, the Batman pistol weighs under 7.5 pounds, thanks to the ultra-light stock. The carbon stock is 6 inches wide at the fore-end, yet weighs just one pound. Ernie tells us: “This gun shoots amazing and is easy to shoot especially with my SEB MAX Rest.” After these photos were taken, Ernie added a “field-usable rear-grip stock so [he could] shoot it prone from a bipod as well.”
The Batman pistol is chambered for the 6mm “Long Dasher”, a 6mm 40°-shouldered variant of the 6.5×47 Lapua. Ernie loads Berger 105gr Hybrid bullets pushed by Hodgdon H4350 powder.
Gun Specifications The gun, crafted by Eric Wallance of Nawaka Firearms, features an XP-100 action, Jewell trigger, and 15″-long, Brux 1:8″-twist barrel with aluminum muzzle brake. Interestingly, this gun does not have a traditional recoil lug. Instead, gunsmith Wallace milled out a lug from the bottom of the XP-100 action to save weight. On top of the action, the rig carries a Sightron Inc S-III 6-24X56mm scope in Kelbly rings on a custom +20 MOA rail.
Long Dasher Wildcat
Shown at right is a “Long Dasher” 40° wildcat created by Forum member Sunbuilder. This is very similar to Ernie Bishop’s chambering, though there may be small variations related to reamer design (such as freebore). Sunbuilder’s 6-6.5×47 Improved (aka “Long Dasher”) reamer was made by Dave Kiff of Pacific, Tool & Gauge. This wildcat cartridge adds about 2.0 grains capacity to the 6.5×47 necked down to 6mm. The case certainly is impressive with that 40° shoulder. We’re just waiting for the tactical guys to starting run this improved cartridge with its original 6.5mm bore.
Here are three FIVE-shot groups at 500 yards, shot by Ernie’s Batman pistol. The first 5-shot group is marked with pink dots, the second with green dots, and the third is measured with the calipers:
Brian, a gunsmith at GA Precision, built this rimfire rig with GAP colleague Anthony Soukup.
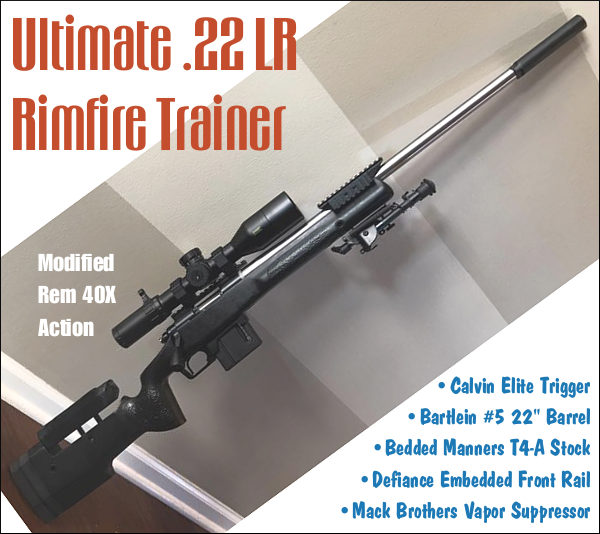
On his Facebook page, Tactical competitor Bryan Sikes posted a photo of a rimfire rig we really liked. Brian works at GA Precision. He and fellow GAP gunsmith Anthony Soukup built this rifle. With a modified Rem 40X action, Manners stock, Bartlein barrel, and Mack Brothers suppressor, this rig has top-quality components stem to stern. And Bryan tells us this rifle performs as good as it looks: “This is the baddest little .22 LR trainer ever. I’m stoked about it. With the barrel length and can, it’s the exact length of my regular comp rigs.” With length, balance, and ergonomics near identical to Bryan’s centerfire competition rifles, this 40X is a superb training tool.
Many readers wanted to know about the bottom metal and the detachable box magazine. Bryan Sike reveals: “The magazine setup is designed specifically to replicate my actual competition rifles. The bottom metal is for use with AI magazines and uses a standard M5 type inlet just like any centerfire completion rifle. In this case with the .22LR, Mike Bush designed a high reliability rimfire magazine using the same outside dimensions as an AI magazine. This rifle was built no different from any other. The action was modified and trued, barreled, fully bedded, etc. using ALL components common to centerfire match rifles.” The Rem 40X action was modified by Modacam Custom Rifles to work as a repeater with box mags.
Bryan adds that a new rimfire action is in the works: “My preference is modified Remington 40X actions and the soon-to-be available, V-22 action from Mike Bush. Both of which are TRUE repeaters and don’t feed from a Savage magazine. This rifle feels nothing like a .22 LR and that was the whole point.”
Why You Need a .22 LR Tactical Cross-Trainer
Many guys who shoot long-range tactical matches practice with .22 LR rifles of similar configuration. Rimfire ammo is way more affordable than centerfire, you do not need a big range facility, and shooting rimfire saves wear and tear on your centerfire rifle. Further, for learning how to read the wind, there really is no better training tool than a .22 LR, even as close as 50 yards.
Our Friend “DesertFrog”, who shoots tactical matches in Southern California, explains: “I used to shoot an average of 200 rounds of .308 Match ammo a month for training (50 per weekend). These days I shoot maybe an average of 50 rounds of .308 Win per month and probably around 600 rounds of .22 LR. Using mainly the .22 LR for practice did NOT hurt my standings in actual competitions. I shot my .308 just as well in matches, but saved the cost of hundreds of rounds of .308. If I didn’t reload and was still buying boxes of Federal Gold Medal Match .308 Win [at $1.90/round], this would be a savings of [$350 per month on the centerfire ammo.]” Money saved is money earned.
Targets for Rimfire Cross-Training
SPECIAL BONUS–Rimfire Tactical Precision Targets
These FREE targets by DesertFrog are offered in Adobe Acrobat format for easy printing. CLICK HERE to download all six targets as a .ZIP archive.
This article was originally written by noted rimfire gunsmith Bill Myers. Sadly, Bill passed away in May 2010, but his legacy lives on. He pioneered many advancements in rimfire gunsmithing and Myers-built guns still win matches in benchrest competition.
Crafting competitive rimfire benchrest rifles is considered an art as much as a science. The smith must understand subtle, yet critical aspects of vibration control, barrel tuning, and rifle balance. In the United States, only a handful of gunsmiths consistently turn out rimfire BR rifles that consistently run at the front of the pack at major matches. Bill Myers was one of those master craftsmen. In this article Bill discussed the process of building a winning rimfire BR rig. He reveals some interesting secrets, including his procedures for testing bedding performance and his barrel indexing system. Bill’s methods obviously work, as the Suhl-actioned rifle featured here won a truckload of trophies in its very first match.
Building a Match-Winning Rimfire Benchrest Rig
by Bill Myers
In my opinion, a winning rimfire benchrest rifle is probably twice as difficult to build as a competitive centerfire rifle. The relatively slow .22 LR bullets stay in the barrel much longer than centerfire bullets. This means that vibration control is critical. Likewise bedding is critical. Bore finish and lapping are very important. The amount of bore taper or “choke” can have a huge effect on accuracy. Ignition is also very important and above all, rimfire BR rifles need a very stable stock that tracks perfectly. A rimfire that shoots great is a marriage of all components and the shooter’s need to be aware of everything possible.
Click Photo to Zoom
The rifle featured in this article was built from scratch with attention to all the details that go into accuracy. The goal was to build a gun that could win from the get-go. This would be a “Spec Gun”, meaning a rifle that was personally tested and tuned by me for optimum performance before it went out to the customer.
The Suhl trigger is as good as it gets so no change was needed. It easily adjusts down to about 2 ounces.
Baer Stock in Bubinga Wood
There are many choices when you start to build a complete rifle. It has to shoot well and it has to catch ones eye, or it’s just another rifle on the line. I prefer wood stocks on rimfires for two reasons: they are very stable if the right wood is used and they have a certain traditional appeal to many shooters. I chose Bubinga wood for this particular gun because it is very stable and heavy, it has a very dense grain and a very pronounced figure with a natural red color. The Bubinga is a very forgiving wood to work with.
Gerry and Bruce Baer in Pennsylvania do all my stock blanks. I do all my own inletting and bedding. The blank weighed 4.5 pounds when it came off of Bruce Baer’s duplicator. This Bubinga wood is so hard that it did not need pillars, but I put them in anyway. I bed all my stocks with Loctite Steel Bed liquid and add filler to desired thickness. The final bedding is done with an aircraft tooling epoxy that does not deteriorate over time. The stock has an ebony butt plate and 6 coats of automotive clear, polished to a high finish.
Suhl 150-1 Action Accurized and BN-Nickel Plated
I used a new, unfired Suhl 150-1 action. As explained in the sidebar below, the Suhl 150 actions were originally crafted in East Germany for position rifles. They have a very fast lock-time and come with an outstanding trigger. However, they need some work when adapted to a modern BR gun. The action needed to be accurized and threaded. I have a special tool that I use to accurize actions. It uses two sets of spiders for dialing-in the bolt raceway. After the bolt raceway is running true, one can thread and true up all bearing surfaces so that everything is in perfect alignment with the action raceway bore.
BN-Nitride Plating on Action
I decided to plate the action and all bolt parts with Boron Nitride nickel plating. I bough the BN Electroless Nickel Kit from Caswell Plating and did the job myself. I started by bead-blasting the action so that it would end up with a “satin” finish. The plating material is then applied in a tank. The Boron Nitride goes directly into the plating solution, but you need to use a pump to keep the solution agitated so the BN distributes evenly.
Once the action is completely ready (the metal must be perfectly prepped, with no contaminants), the process goes easily and can be completed in about half an hour. The end result is a very slick, low-friction finish, that is .0002″ (two ten-thousandths) thick and hard as glass. The Boron Nitride makes everything very smooth. After the plating job, the action was noticeably slicker than before.
The cone breech (photo below) permits the barrel to be INDEXED (rotated around bore axis) to any position on the clockface. You then test various rotation settings to find the best accuracy. The system does work. Some barrels shoot best in a particular rotational setting. E.g. with index mark at 3 O’clock vs. 12 O’clock.
Fitting and Chambering the Barrel
As for a barrel, I had two good choices: one Shilen 1:16″-twist, 4-groove ratchet and one Benchmark 1:16″-twist, 3-groove. Both barrels were very accurate and at the end, I decided to leave the Shilen on the rifle because I wanted to put the Benchmark on another Suhl I’ve set aside for myself. I chambered the barrel for Eley flat nose EPS. We’ve found the gun also shoots the new Lapua X-ACT ammo very well.
The barrel finished at 25″ long and features a tuner by the Harrell brothers of Salem, Virginia. I use a flat 90° crown–it’s the most accurate and its gives a good seal against the tuner. I also use a 45°, 12-flute cutter that leaves no burr when cutting the crown. This chamfer protects the crown when cleaning the barrel. There is no sharp edge for the brush or jag to hit on the return stroke. The barrel was headspaced at .043″ and I use a tapered reamer ground by Dave Kiff of Pacific Tool & Gauge in Oregon. The chamber leade area is lightly polished to remove reamer burrs. The breech end of the barrel is machined with a 1/2″ ball end mill to produce what I call a “Myers cone breech.” Technically, it has a sloping radius as you can see, rather than a straight-sided cone. Finishing the breech in this fashion facilitates indexing the barrel, as the barrel can be rotated to any position (on the clockface), without requiring new extractor cuts.
Barrel Indexing — Finding the “Sweet Spot”
When indexing a barrel, one rotates it to different clockface positions relative to the action. Imagine marking a barrel at TDC or 12 o’clock, and then rotating it so the mark is at 3 O’clock, 6 )’clock, 9 O’clock and so on. At each position one shoots groups to determine at which index setting best accuracy is achieved.*
I know that barrel indexing is controversial. I don’t want to get into a lengthy debate other than to say that I believe that careful and thorough testing can reveal a “preferred” index position for a good barrel. With the barrel set in that particular position relative to the action I believe the barrel can yield optimal performance.
I perform the indexing tests indoors at 50 yards. I use a rail-gun with floating action. The barrel is held in place with a clamping fixture similar to an Anschutz 2000-series action. Basically, two vertically-stacked metal blocks clamp around the barrel. I can index the barrel this way simply by unclamping the barrel blocks, rotating the barrel and then re-clamping the system. I have a special system so the action can stay in the same position, even as the barrel is rotated.
It takes time and effort to get solid indexing results. Normally I shoot at least 400 rounds of ammo in 3-4 indexing sessions. Shooting a handful of groups is not enough. You may think you’ve identified the best index position, but you need to shoot many more rounds to verify that. Also, in a very good barrel, the effects of indexing may be subtle, so it will take many groups to confirm the optimal position. In my experience, really good “hummer” barrels do not benefit as much from indexing as an “average” barrel.
Accuracy Testing with Both Barrels
I tested the rifle indoors at 50 yards at the Piney Hill Benchrest Club range. There was no finish on the stock, but it shot well in my one-piece rest with the Benchmark 16-twist, 3-groove barrel and no added weight on the tuner. I shot 30 rounds of Eley Match EPS Black Box (1064 fps) and had 25 Xs and five 10s on the IR 50/50 style target. Not too shabby for a new barrel with no special break-in.
When the Shilen barrel arrived, I installed it on the rifle. By this time the stock had been clear-coated and finished, and the action had been polished and plated. I shot the Shilen barrel outside since it was too hot in the building. The first target was a 250-19X with a new lot of Eley Match EPS Black Box (1054 fps). The gun shot well. My friend Tony Blosser asked to shoot the gun, and he drilled a 250-20X in a steady wind using the same Eley ammo. See target at right.
Advanced Procedures — Vibration Control and Tuner Position
Barrel Tuning Using 2-Way Electronic Indicators
Before competing with this rifle, I put it in a firing fixture I use to tune the barrel. I employ a pair of very expensive Swiss 2-way electronic min/max hold indicators. These measure both up movement and down movement of the barrel as the gun is fired. I can measure the actual vertical travel of the barrel at any position from the front of the receiver to the tuner. I can also tell how long the barrel vibrates, time-wise. Using this fixture I found that the Shilen barrel was very consistent in readings and seemed to work well with no additional weight on the tuner. No barrel ever stops vibrating completely — but this was close, showing less than .002″ of total movement.
Bedding and Vibration Control
I have found that measuring the actual movement of the barrel during firing tells me a lot about the quality of the bedding. I have learned that if I see very big movements (e.g. .010″ up and .005″ down), then there may be a problem with the bedding. I saw this kind of big swing on a rifle with bedding that had not cured properly.
Another pattern I watch for is uneven vertical movement. For example, if the barrel vibrates .008″ up but only .002″ down, that tells me the bedding has issues. As noted above, I look for minimal vibration travel (after the tuner is fitted and optimized), and I also want that travel to be relatively equal both up and down. Good rimfire gunsmiths agree that proper bedding has an important influence on vibration control and tuning. By measuring actual barrel movement during firing, we can, to an extent, quantify how well the bedding is working. At a minimum, we can see if there’s a serious bedding problem.
Trial by Fire — Shooting the Gun in Competition
After semi-gluing in the action, the rifle was shooting great. So, I decided to take it to the Maryland State Unlimited Championship to see if it was truly competitive — whether it could “run with the big dogs”. As it turns out, the Bubinga Suhl was more than just competitive. The rifle won three of the six cards and won the meters championship. In the photo below you can see all the trophies the gun won in its very first match. One of the other competitors in Maryland, dazzled (and perhaps a bit daunted) by the Bubinga Suhl’s stellar performance, told me: “Sell that gun Bill. Whatever you do, just get that darn rifle out of here.” Confident that this was a rifle capable of winning major matches, I packed up the rifle and shipped it to Dan Killough in Texas. Killough has shot some impressive scores with the gun.
Suhl Target Rifles — East Germany’s Legacy
Suhl 150 rifles were manufactured in former East Germany (GDR) by the Haenel firearms factory in the town of Suhl. This region has a long history in arms production. In 1751, Sauer & Sohn founded the first German arms factory in Suhl. Following WWII, Suhl 150s were produced for Communist Bloc marksmen, including East German Olympic shooters. Prior to German unification, the East German national shooting arena was located at Suhl and hosted many top-level competitions including the 1986 ISSF World Championships.
Superb Rifles with Amazing Triggers
As a product of East Germany, the “mission” of the Suhl 150 was to rival the accuracy of the Anschütz, Walther and other premium match rifles built in the West. East German shooting teams wanted to finish on top of the podium, so they needed a rifle with superb inherent accuracy. The Suhl 150s have an outstanding trigger that can be adjusted down to about two ounces. The Suhl 150 action, like the Anschütz 54, boasts an extremely fast lock-time — an important factor in a position rifle. And Suhl barrels were legendary for accuracy.
Suhl 150 Benchrest Conversions
Many of the first used Suhl 150s that made it to America were converted to Benchrest rifles because the action/trigger/barrel combination was unbeatable for the price. Some of the barrels on these “surplus” Suhls were phenomenal — as good as any custom barrels available today. It was not unknown for a Suhl 150 barreled action, transplanted into a benchrest-style stock, to win BR matches with the original barrel. Today, however, most of the Suhl benchrest conversions end up with modern, American-made barrels. While some older Suhl barrels can “shoot with the best of ‘em”, new barrel designs optimized for use with tuners have an edge, at least in benchrest circles. That’s why builders such as Bill Myers swapped out the Suhl barrel with something like a Benchmark reverse-taper two-groove.
Today Suhl 150 rifles are very hard to find in North America. In 2006, a used Suhl 150, even without sights, might fetch $1200.00 or more. Then, in 2007 through early 2008, hundreds of Suhl match rifles were imported. This drove prices down, and those “in the know” snapped up complete Suhl 150s at prices ranging from $450 to $850 (see 2007 advert at right), depending on condition.
Many of these rifles were left “as built” and used successfully in prone competition. Others were converted into benchrest and silhouette rifles, “parted out” for the actions and triggers. If you were able to grab one of those imports at a good price–consider yourself lucky.
* Bill Myers actually created his own clamping rimfire action to facilitate barrel indexing. CLICK HERE to view Myers Rimfire Action. To index the barrel, Myers simply loosened three clamping-bolts and rotated the barrel in the action. Because there is no thread to pull the barrel in or out, the headspace stays the same no matter how much the barrel is rotated. With a threaded action, you might have to use shims to test different rotational positions, or otherwise re-set the shoulder with each change.
For today’s Sunday GunDay story, we look at the legendary Remington 700, perhaps the most popular American bolt-action rifle of all time. After covering the history of the Rem 700 rifle, we provide an inside look at the Rem 700 through a series of cutaway animations. Then we explain how gunsmiths can enhance a Remington 700 action through “blueprinting” procedures.
Remington 700 Origins and History
After World War II, Remington Arms engineer Mike Walker began designing lower-cost alternatives to the Model 30, which resulted in the Model 721. These used a cylindrical receiver produced from cylindrical bar stock that could be turned on a lathe, rather than machined in a series of milling operations, which significantly reduced the cost of production. Further developments of the basic 721 action under the direction of Walker produced the Model 722 and Model 725, and ultimately in 1962, the Model 700.
Walker sought to increase the accuracy of the rifles, by utilizing tight tolerances in the chamber and bore, a short leade, and a very fast lock time. Like the earlier 721, the Remington 700 action was designed for mass production. Remington initially produced two variants of the Model 700, the ADL and BDL, in both long- and short-action versions. In 1969, Remington introduced upgrades for the rifle, including a longer rear bolt shroud, a jeweled bolt, and improved stock finishing. Four years later, production of left-handed Rem 700s began, to compete with the Savage Model 110, at that time the only major American-made left-bolt rifle.
Other Rem 700 versions include the titanium receiver 700ti, the 700 SPS (which replaced the ADL in 2005), and the CDL model. In addition to its development as a hunting rifle, the Model 700 also provided the basis for military and police sniper rifles, starting with the M40 rifle in 1966, which was initially ordered by the U.S. Marine Corps. The U.S. Army adopted the M24 Sniper Weapon System in 1986.
The Remington 700 is sold in both short action and long action variants. This photo is from the Big ED YouTube video comparing the two action lengths.
The Remington 700 is a manually-operated bolt action with two forward dual-opposed lugs. The bolt face is recessed, fully enclosing the base of the cartridge, The extractor is a C-clip sitting within the bolt face. The ejector is a plunger on the bolt face actuated by a coil spring. The bolt is of 3-piece construction, brazed together (head, body and bolt handle). The receiver is milled from round cross-section steel.
Chassis Systems for Remington 700s
With the popularity of the Remington 700 series rifles, and the availability of Rem 700 barreled actions by themselves, many companies have created after-market chassis systems. This Brownells Video reviews modern Accuracy Int’l chassis systems configured for Remington 700 barreled actions. Modular chassis systems have become particularly popular with PRS/NRL competitors.
Rem 700 Cutaway Video Shows Components + Operation
Ever wish you could look inside your rifle, to see how the trigger and fire-control system work? Well now that is possible with the magic of 3D computer graphics. Modern software allows detailed “cutaway” side-views (see below), as well as 3D views with 360° rotation. The software can also provide X-Ray-type views into the gun’s internals — as you can see above. And computer animation can show the complete firing process from trigger pull to chambering of the next round.
READERS — Do take the time to watch the video! This Rem 700 animation is really outstanding! EVERY bolt-action shooter should watch this video all the way through.
The Model 700 series of bolt-action rifles have been manufactured by Remington Arms since 1962. All are based on basically the same centerfire bolt action. They are typically sold with an internal magazine depending on caliber, some of which have a floor-plate for quick-unloading, and some of which are “blind” (no floor-plate). The Model 700 is a development of the Remington 721 and 722 series of rifles, which were introduced in 1948.
The Remington 700 is a manually-operated bolt action with forward, dual opposed lugs. It features “Cock On Opening”, meaning the upward rotation of the bolt when the rifle is opened cocks the firing pin. A cam mechanism pushes the firing pin’s cocking piece backward. The bolt face is recessed, fully enclosing the base of the cartridge. The extractor is a C-clip sitting within the bolt face. The ejector is a plunger on the bolt face actuated by a coil spring. The bolt is of 3-piece construction, brazed together (head, body. and bolt handle). The receiver is milled from round cross-section steel.
Blueprinting Rem 700 Action — Making a Good Action Better
You may have heard the phrase “blueprinting an action”, but do you know what that really means? Do you know what operations are done to an action during the blueprinting process? To help you understand, gunsmith Bill Marr of RifleShooter.com has created a helpful article showing a Rem 700 blueprinting job start to finish. This article spotlights how the procedures can be done with manual tools. Bill, who runs 782 Custom Gunworks Ltd., can also perform many of these operations with modern automated machinery. In fact, Bill has written a follow-up article on Truing a Rem 700 receiver with a Lathe.
Bill explains: “Blue-printing, or truing a rifle action, ensures the receiver face, threads, lugs, bolt lugs, and bolt face are square to the center line of the receiver.” In Bill’s informative article, Bill shows how he blueprints a Remington 700 short action receiver with .308 Win bolt face. He covers the following procedures step by step:
Action Disassembly
Ream Minor Diameter of Receiver Threads
Square the Receiver Lugs
Square the Face of the Receiver
Lap the Bolt Lugs
Square the Bolt Face
Bill employed a variety of tools from Brownells to complete the blueprinting job, including: Remington 700 Armorer’s Kit; Manson Receiver Accurizing Kit; Bolt Lapping Kit; Bolt Face Truing Tool; Manson Receiver Ring Facing Cutter; Multi-Vise with Jaw Pads; Silicone Carbide Abrasive; and Do-Drill Cutting Oil.
1. Truing the Receiver Face
Using the receiver facing tool, the front of the receiver is trued. The tool is placed over the tap and turned by hand. We used Do Drill to lubricate it.
2. Lapping the Lugs
The bolt lapping tool screws into the front of the action and applies rearward pressure on the bolt face. A little bit of lapping compound is placed on the front of the receiver lugs. The bolt handle is then raised and lowered repeatedly. Note — it is critical that we do not get any lapping compound on any other surfaces.
3. Truing the Bolt Face
On this bolt, the central part of the bolt face was low. After the truing operation, this Rem 700 bolt face is now completely square to the action.
IMPORTANT: Rifleshooter.com states: “This article highlights our project and is presented for information purposes only. This provides an overview of the process and should not be attempted without the guidance and supervision of an experienced gunsmith“.
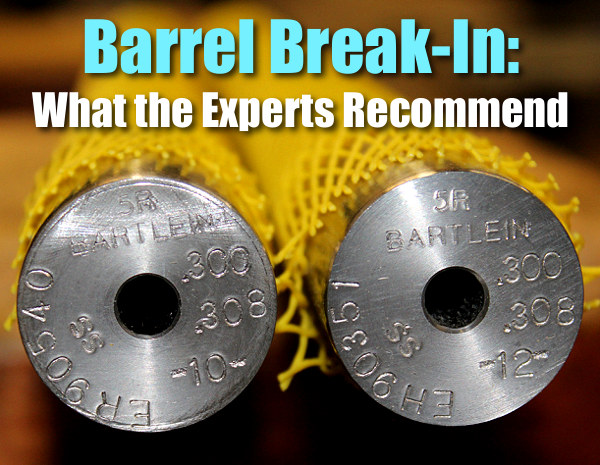
The question of barrel break-in is controversial. Some folks advocate an elaborate, lengthy cycle of shooting and brushing, repeated many times — one shot and clean, two shots and clean and so on. This, it is argued, helps barrels foul less and shoot more accurately. Others say minimal break-in, with patching and brushing after 10-15 rounds, is all you need. Still others contend that break-in procedures are a total waste of time and ammo — you should just load and shoot, and clean as you would normally.
We doubt if there will ever be real agreement among shooters concerning barrel break-in procedures. And one must remember that the appropriate break-in procedure might be quite different for a factory barrel vs. a custom hand-lapped barrel. This Editor has found that his very best custom barrels shot great right from the start, with no special break-in, other than wet patches at 5, 10, and 15 rounds. That said, I’ve seen some factory barrels that seemed to benefit from more elaborate break-in rituals.
What’s the best barrel break-in procedure? Well our friend Eric Mayer of Varminter.com decided to ask the experts. A while back Eric interviewed representatives of three leading barrel manufacturers: Krieger, Lothar-Walther, and Shilen. He recorded their responses on video. In order of appearance in the video, the three experts are:
Do I Need to Break-In a New Rifle Barrel?
Eric Mayer of Varminter.com says: “That is a simple question, [but it] does not necessarily have a simple answer. Instead of me repeating my own beliefs, and practices, on breaking-in a new rifle barrel, I decided to answer this one a bit differently. While we were at the 2016 SHOT Show, we tracked down three of the biggest, and most popular, custom barrel makers in the world, and asked them what they recommend to anyone buying their barrels, and why they recommend those procedures. We asked the question, and let the camera run!” Launch the video above to hear the answers — some of which may surprise you.
Long-Term Barrel Care — More Experts Offer Opinions
Apart from the debate about barrel break-in, there is the bigger question of how should you clean and maintain a barrel during its useful life. Some folks like aggressive brushing, other shooters have had success with less invasive methods, using bore foam and wet patches for the most part. Different strokes for different folks, as they say. In reality, there may not be one solution for every barrel. Different fouling problems demand different solutions. For example, solvents that work well for copper may not be the best for hard carbon (and vice-versa).
“Why worry about a little barrel fouling when the throat is subjected to a brutal 5,600° F volcano at 55,000 PSI? To investigate these and other questions about taking care of a match barrel, we spoke with a dozen experts and share their knowledge in this first of a series of articles.
After listening to folks who shoot, build barrels or manufacture cleaning solvents for a living, we concluded that even the experts each have their own unique recommendations on how to care for a match barrel. But they all agree on one thing — the gun will tell you what it likes best. Because the life expectancy of a match barrel is about 1,500 to 2,500 rounds, the objectives of cleaning one should include: preserve accuracy, slow the erosion, and remove fouling — all without damaging the gun. This article doesn’t claim that one cleaning method is better than the next. Rather, we set out to interject a little science into the discussion and to share some lessons learned from experts in the field.” — Chip Lohman
Some custom barrel makers are now honing barrels (after drilling) to improve bore diameter uniformity, smooth the interior finish, and reduce barrel lapping times. For years, large-scale manufacturers of hammer-forged barrels have employed honing. Now the process is being used by smaller, “boutique” barrel-makers. This article explains how and why barrel honing is done. Take the time to watch the video. For anyone with an interest in barrel-making, this video from Sunnen Products Co. is an eye-opener.
Barrel Honing Process Demonstrated (Worth Watching!):
For custom barrel makers, honing is a time-saver and cost cutter. A few minutes on a honing machine can cut lapping times in half, leaving a cross-hatched surface finish in single or low double-digit Ra. Honing is the same process used to make diesel fuel injectors with bore roundness and straightness controlled to fractions of a micron (<0.000040"), with surface finish Ra ≤0.15 µm (6 µin).
A key manufacturing process used for hammer-forged barrels is now getting attention from the makers of custom button-rifled barrels. This process is precision bore-honing. Honing produces a high-quality bore surface fast, which is critical to hammer forging. (Why is honing so important with hammer forging? Surface finish is the one feature of the barrel that cannot be controlled in hammer forging. Surface imperfections in a barrel blank tend to be amplified as the blank is formed on the rifling mandrel. And if the bore is chromed afterwards, imperfections in the surface finish become even more obvious.)
Honing dramatically improves bore diameter size uniformity and accuracy, surface finish and roundness throughout the length of the barrel. It can certainly be used in place of a pre-rifling lap. The chief difference between a lapped and honed bore is the direction of the finish lines in the bore. Honing leaves fine spiraling crosshatch lines, while a lap leaves lines going longitudinally in the bore. After rifling the manufacturer can remove the crosshatch finish with a quick lap if desired. Honing is fast, accurate, and can be automated. Its surface quality and geometry can duplicate lapping, except for the longitudinal lines of the lapped finish.
In 2015 Frank Green of Bartlein Barrels told us: “We worked with Sunnen and we did all the initial testing on the prototype machine for them. The machine works great! We ordered and received … a new manufactured machine with the changes we wanted on it and [subsequently] ordered a second one.”
The Sunnen hone secures the barrel blank in a 3-jaw chuck, with honing oil pumped into one end while the tool works from the opposite end. Sunnen’s specialized Long Bore Tool uses metal-bond diamond or CBN superabrasives to quickly remove reamer marks, waviness, tight spots and other imperfections left by upstream processes.
Sunnen states that: “Honing is an ideal replacement for hand-lapping barrel blanks before rifling. It quickly removes reamer scratches and surface waviness without labor-intensive hand lapping. By producing a consistent bore diameter (±0.0001″ or less), parallelism, roundness and surface finish end to end, honing yields more consistent performance from rifling buttons and cutters, resulting in a constant groove depth. The ideal bore geometry reduces distortion of the bullet shape.”
Computer-Controlled Bore-Honing
Honing can be done with great precision through the use of advanced, computer-controlled honing machines. Sunnen Products Company offers an advanced machine for .17 to .50-caliber barrels (see control panel below). The spindles on this machine can correct bore size imperfections so small only an air gauge can measure them. The consistency this allows improves bore uniformity, which, in turn, produces more accurate barrels for the precision market.
Sunnen Products Company is the world’s largest vertically-integrated manufacturer of honing systems, tooling, abrasives, coolants, and gauging for precision bore-sizing and finishing. Sunnen’s customers include manufacturers of diesel and gas engines, aerospace components, hydraulic components, oil field equipment, and gun/cannon barrels. Sunnen employs more than 600 people worldwide.
Editor: Many new barrels will deliver higher velocities with the same load after 100-150 rounds through the bore. The exact reasons for this speed-up are not 100% certain, and velocity increases (if any) will vary from one barrel to the next. But this “speeding up” phenomenon is common, so be prepared if this happens with your next barrel. If you do experience a significant velocity increase you should probably re-tune your load AFTER the velocity stabilizes at the higher level.
From the Sierra Bullets Blog Article by Mark Walker, Sierra New Product Development Director
In a previous post, I discussed a couple of methods to tune a load to your barrel to help achieve the best accuracy possible. People most often work on load tuning if they get a new rifle or have a different barrel installed. In both instances, the barrel is new and has not been fired very much. According to most competitive shooters, this is the most accurate your barrel will ever be, so getting it tuned and shooting accurately is a priority.
The Speed Up Phenomenon After 100-150 Rounds
Even though after you work up a load and your new barrel is shooting great, a lot of shooters notice that at around 100 to 150 rounds their rifle may stop shooting as accurately. I had this happen to a rifle and I was confused as to why something that worked so well to begin with would all of a sudden quit shooting. I decided to break out the chronograph to do another load work up to see what was going on. To my surprise, the velocity had increased around 80 fps over the original velocity! After performing another ladder test and adjusting the seating depth, the rifle was once again shooting well.
There are several thoughts on why this may happen, however, you can rest assured that it does happen. One thought is that as the barrel breaks in, the tooling marks in the throat of the chamber smooth out and allow less resistance to the bullet as it exits the bore thereby increasing speed. Another idea is that the throat area starts to get a little rough which in turn causes more resistance which increases pressure and therefore more velocity. I’m sure there are some out there who have a better understanding as to why this happens, but it can definitely affect the accuracy of your rifle. So be aware and never be afraid to rework a load to keep your rifle in tune.
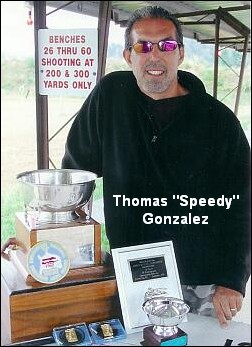
Experts Confirm That Barrel Speed-Up Is Common Two respected shooters have observed an increase in velocity with new barrels, typically after 100 rounds. Gunsmith and Hall-of-Fame benchrest shooter Thomas “Speedy” Gonzalez has documented barrel speed-up with testing. Moreover, Speedy’s bore-scope barrel inspections revealed a smoothing of the barrel lands. Jim See, a top PRS competitor, has encountered barrel speed-up many times. Accordingly, he re-tunes his load at 150 rounds.
“Alex Lipworth and I documented this phenomenon about four years ago and I have told all my customers about this. My son Mikee would shoot 100 rounds through all new barrels we planned on shooting before we would begin to do load development. We had a shooting snail that caught all the bullets set up in front of an indoor bench. We called it a wear-in process because upon careful examination of the bore when the ‘Speed Up’ takes place the cut-rifled bore resembles that more of a button-rifled barrels with the lands taking on more the softer look of a buttoned bore.” — Speedy Gonzalez
“Seen it [barrel velocity increase] too many times to count. All my match barrels get a ‘generic round’ loaded for them, which has worked well in barrels historically. After I hit 150 rounds I fine-tune the load and never look back, until the tube starts to slow down at it’s life end.” — Jim See
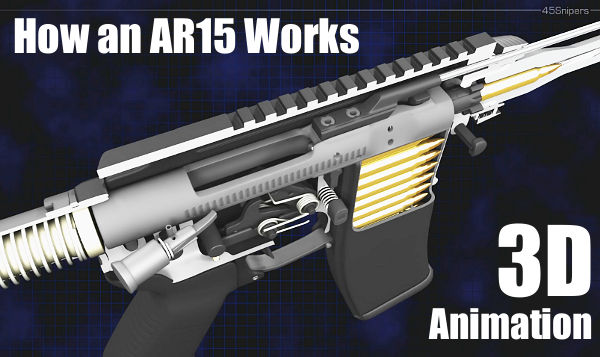
Ever wondered how the parts inside an AR15 work together? Just exactly how does the reciprocating bolt carrier feed rounds from the magazine? How do the elements in the trigger group work and reset after each shot? How does the gas system bleed gas from the barrel and operate the bolt carrier? These and other questions are answered in this eye-opening video from 45Snipers. Using “cutaway” 3D computer animation, this 5-minute video shows all features of an AR15 inside and out. This fascinating firearms animation allows the viewer to look inside the upper and lower receivers, into the bolt carrier, chamber, barrel, and magazine.
This video starts off slow and has annoying background music, but it is well worth watching if you own or shoot any AR-platform rifle. It illustrates all the key operations during the charging, loading, firing, and ejection processes. The cutaway animation shows how rounds are stripped from the magazine and then chambered. It then shows how every part of the trigger group works, and how the firing pin strikes the primer. You can even watch the bullet move down the barrel before the empty shell casing is removed from the chamber and tossed out the ejection port. Here are sample frames from the video:
Video find by Grant Ubl. We welcome reader submissions.


 The gun, crafted by Eric Wallance of Nawaka Firearms, features an XP-100 action, Jewell trigger, and 15″-long, Brux 1:8″-twist barrel with aluminum muzzle brake. Interestingly, this gun does not have a traditional recoil lug. Instead, gunsmith Wallace milled out a lug from the bottom of the XP-100 action to save weight. On top of the action, the rig carries a Sightron Inc S-III 6-24X56mm scope in Kelbly rings on a custom +20 MOA rail.
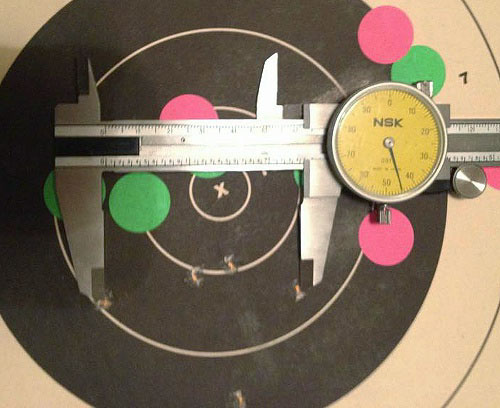


 Accurized and BN-Nickel Plated
 BN-Nitride Plating on Action
 Fitting and Chambering the Barrel
 Accuracy Testing with Both Barrels


 Today Suhl 150 rifles are very hard to find in North America. In 2006, a used Suhl 150, even without sights, might fetch $1200.00 or more. Then, in 2007 through early 2008, hundreds of Suhl match rifles were imported. This drove prices down, and those “in the know” snapped up complete Suhl 150s at prices ranging from $450 to $850 (see 2007 advert at right), depending on condition.


 Do I Need to Break-In a New Rifle Barrel?


 Two respected shooters have observed an increase in velocity with new barrels, typically after 100 rounds. Gunsmith and Hall-of-Fame benchrest shooter Thomas “Speedy” Gonzalez has documented barrel speed-up with testing. Moreover, Speedy’s bore-scope barrel inspections revealed a smoothing of the barrel lands. Jim See, a top PRS competitor, has encountered barrel speed-up many times. Accordingly, he re-tunes his load at 150 rounds.