We’re in the middle of summer now, with the 4th of July holiday just last Friday. Most public ranges and private shooting facilities are now open for business — so there are plenty of places to have fun shooting. Now’s a great opportunity to get out of the house, enjoy some fresh air, and dust off those skills. To help you have fun on your range trips, here are 12 FREE printable targets.
FREE FUN Targets from NSSF
The Billiards Table Target above offers 15 brightly-colored numbered balls with the cue ball at the bottom. Aim for the numbers, shooting 1-15 in sequence, or alternate between stripes and solids. You can also draw an “X” on the white cue ball (or attach a paster), and use that to set your zero. This target is fun for shooting outdoors with rifles at 50 or 100 yards or indoors with pistols. This billiards target is part of a set of 12 Fun Targets from the NSSF. These were issued a couple seasons back for National Shooting Sports Month, held in August of each year.
FREE NSSF Fun Targets — Dartboard, Golf, Billiards, Bowling, Baseball and More…
HERE are a dozen FREE Targets. Along with Bullseye targets, there are some very cool specialty targets here, including a Golf Course Target, Baseball Diamond Target, Billiards Target, Light Bulb Target, Bowling Pin Target, and even a Windmill Target. Enjoy the myriad possibilities with these 12 fun targets.
This impressive 15-round group was shot by Jim See of Elite Accuracy.
Different Shooting Disciplines Demand Different Levels of Precision/Accuracy
In the rapid-fire 3-Gun game, you could probably “clean” most stages with a 2-MOA rifle. By contrast, in the short-range group benchrest game, to compete with the best, you’ll need a rifle that shoots in the “ones” (i.e. 0.1-0.19 MOA) in perfect conditions. In 1000-yard F-Class competition, the top shooters want a rifle that will hold one-third-MOA of vertical at that distance.
What is your standard of accuracy? How good is “good enough”. Jim See, a skilled gunsmith and successful PRS competitor, recently answered that question for his tactical discipline. For the kind of matches Jim shoots, he likes to have a rifle that will hold half-MOA for five (5) shots, 3/4-MOA for 15 shots, and 1 MOA for twenty shots. Remarkably, Jim’s rifle can do that with factory ammo. Above is an impressive 15-shot group shot with .260 Remington Federal Premium Ammo.
“I say it all the time, my loads need to print 5 under 1/2″, 10 under 3/4″, and 20 under 1″. It’s simple, if a hot barrel will keep 20 rounds fired in succession under my standard it will be a good barrel and load for Precision Match Shooting. Federal Premium Gold Metal Match .260 with Sierra bullets made the cut for me today. 15 consecutive shots under 3/4 MOA.” –Jim See
It’s said that you “can never have too much accuracy”, but there are acceptable standards for each discipline, and they’re not the same. A 100/200 yard Benchrest shooter will be sorely disappointed with a rifle/ammo set-up that can only deliver half-MOA. On the other hand, a PRS competitor like Jim See can achieve great success with a lesser degree of precision. This means you can save time and money. You can run your barrels longer between cleanings, and you don’t have to go “full OCD” when loading your ammo. The PRS shooter does not need to weigh-sort primers, or load powder to single-kernel standards. Proof is the performance. Jim See has been a podium finisher at many PRS and tactical events. Learn more about Jim’s gunsmithing and training operations at Jim’s Facebook Page.
Download This Load Development Target
Jim’s target seemed a bit familiar. AccurateShooter.com created this Diamond and Dot Target a few years back. On each aiming point, there are high-contrast black horizontal and vertical lines for aligning your cross-hairs. The gray circle lets you see the bullet impacts above, without obliterating the red diamond, which is quite useful for precise aiming (we put fine cross-hairs on the points of the diamond). This target sheet includes data entry tables below each of the three aim points. There are many other free targets out there, but this format is very popular. We’re pleased to see Jim using it. You can download this and dozens of other FREE Targets from the AccurateShooter.com Target Page.
Photo by Forum member GAT. Chambered in 6-6.5×47 Lapua, this rifle features a Stiller TAC30 action, Krieger barrel, Harrells brake, Konohawk Stock, and Sightron SIII 6-24x50mm scope.
Ryan Cleckner has created many good shooting videos for the NSSF, such as his excellent Understanding MOA Video. Ryan is noted for his ability to explain complex topics in an easy-to-comprehend manner. This video, covering the fundamentals of shooting, has been viewed over 1.6 million times. It’s worth watching, particularly for guys getting started in PRS/practical competitions.
In this video, Ryan Cleckner reviews proper technique for rifle shooters. A stable platform, sight alignment, sight picture, and trigger control are key fundamentals to shooting properly. This is basic stuff, but Cleckner presents it in a clear, logical fashion. This is a good video for novice shooters.
Tip on Viewing Your Reticle:
Cleckner: “Sometimes it can be difficult to focus between the target and the reticle, even with the parallax adjusted properly. I recommend you focus only on the reticle. Just like the front sight on a rifle or a handgun, that reticle is what you can control, and it’s what matters. Focus on a crisp, clear reticle, in a stable platform, and all that’s left is trigger control.”
Tip on Trigger Control:
Cleckner: “Trigger control is pretty straightforward, as long as you think about it as a continuous process, and not just one thing that happens. I like to think about it as drawing a line in the dirt. I like to think about this constant pressure that I’m adding as I draw this line straight back, and then… continuing to draw that line even as the rifle goes off. That’s the good follow-through you’ll need.”
Long Range Shooting Handbook — A Good Resource
Cleckner has authored a book, the Long Range Shooting Handbook, which expands on the topics covered in the above video. You can view Sample Chapters from Ryan’s Book on Amazon.com.
Ryan Cleckner’s LR Shooting Handbook is designed as an intro to important fundamental concepts such as MOA vs. Mils, External Ballistics, and Environmental Effects. Included are personal tips and advice based on Cleckner’s years of experience as a sniper instructor and special operations sniper.
The Long Range Shooting Handbook is divided into three main categories: What It Is/How It Works, Fundamentals, and How to Use It. “What It Is/How It Works” covers equipment, terminology, and basic principles. “Fundamentals” covers the theory of long range shooting. “How to Use It” gives practical advice on implementing what you’ve learned, so you can progress as a skilled, long range shooter.
As a long-range shooting expert, Ryan Cleckner has impressive credentials. Cleckner was a special operations sniper (1/75 RGR) with multiple combat deployments, and he has served a U.S. Army sniper instructor. Currently he works as a firearms industry executive and attorney.
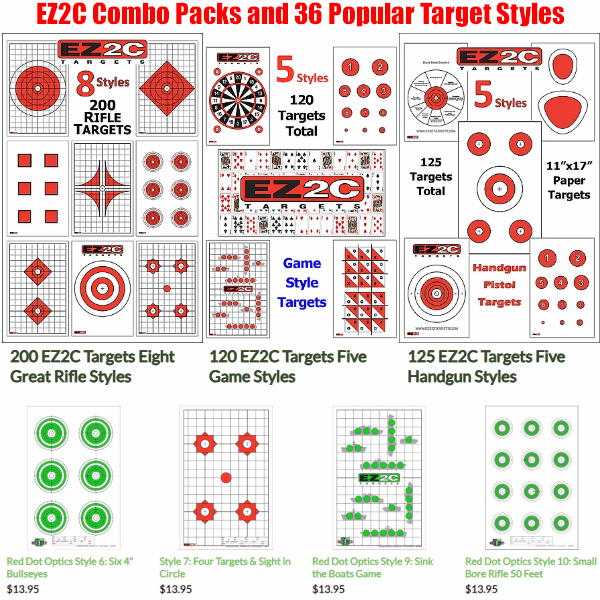
High-contrast targets make aiming (and seeing your bullet impacts) easier. EZ2C Targets, a family business in Pennsylvania, has developed a series of very bright, high-contrast targets printed with eye-popping fluorescent red/orange and Deep Black Inks. These are available from the EZ2C online store. A set of 11″x17″ Hi-Viz targets printed on quality white paper costs $13.95 for 25 or 40 sheets per pad. A wide variety of designs are available — Bulleyes, Grids, Silhouettes, and Diamonds as well as many specialty targets. There are also 20 types of 3.5″ x 3.5″ Mini stick-on targets. These are printed with deep Black Ink on Fluorescent Red Self-Adhesive Label Stock.
EZ2C Combo Pack of Targets
EZ2C currently offers 36 varieties of high-contrast targets. There are conventional bullseye and grid targets, plus a large variety of special fun targets. Choose among 36 different target styles, with special designs for pistols and rifles. If you want a variety of targets, EZ2C offers nine great combination packages. Get 200 11″x17″ targets for just $44.95 or 125 targets for $36.95. Choose Rifle Targets, Pistol Targets, or Game-Style targets with 5 or 8 different target formats in each combo pack. Here are three popular multi-target combo packs, with 4 examples of the 36 individual targets below:
Training Targets to Improve your Shooting Skills
Here are other EZ2C Targets that help build shooting skills. The pistol diagnosis target (second from left) shows how to correct your aim and hold, based on where your errant shots fall. The decreasing dots target is a fun challenge for rimfire cross-training. Set it at 200 yards for centerfire.
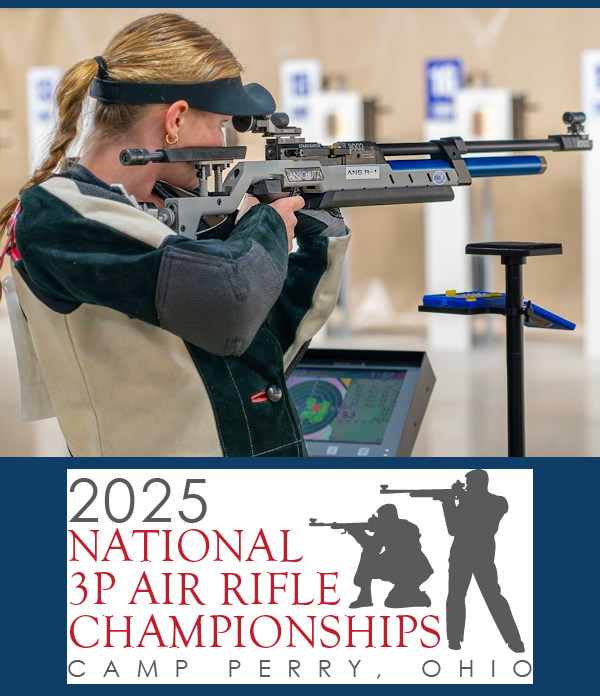
This coming week, July 7-9, 2025, the National 3PAR (Three-Position Air Rifle) Precision Championships take place at Camp Perry, Ohio. This 3-day event for junior shooters is the culmination of a series of shooting competitions organized by the Civilian Marksmanship Program (CMP). The annual CMP 3PAR competition begins with postal matches, followed by regional championships (in multiple states), and culminates in a national championship held at Camp Perry, Ohio. There will be both individual and team competition. All matches will be fired on electronic targets. CLICK HERE for Match Program PDF.
Prizes and Scholarship Awards for Top Competitors
This 3PAR Championship is an event for young shooters — qualifying juniors and high school seniors who have just graduated are eligible. There will be monetary awards for both individual and team winners. In addition, the top three competitors who just graduated from high school will each receive a $1000 CMP Scholarship award. In addition, USA Shooting will present a National Futures Team slot to the top male and female shooters in the precision class.
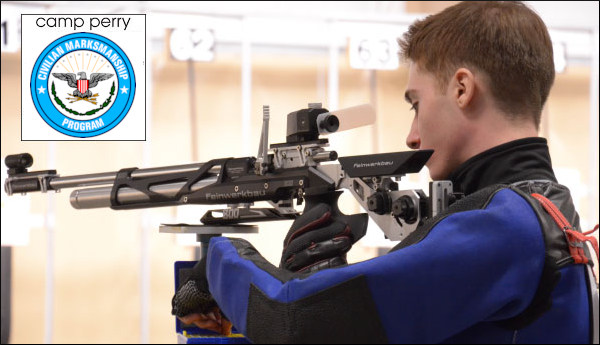
Precision Air Rifle is modeled after Olympic-style shooting and allows the use of very high-tech (and pricey) target rifles and equipment. By contrast, Sporter Air Rifle employ simple, much less expensive rifles. In both types of shooting, competitors fire at targets at a distance of 10 meters in three different positions, prone, standing and kneeling. The Sporter match took place June 21-25, 2025. The Precision match, with the high-tech, ultra-accurate rifles (like the Feinwerkbau shown below), kicks off tomorrow, July 7, 2025.
Location and Facilities: The championships will take place at the Gary Anderson CMP Competition Center, located at Camp Perry Training Site, 1000 N. Lawrence Road Bldg. #5042, Port Clinton, OH 43452.
Course of Fire: The course of fire will be one 3×20 three-position air rifle event on each competition day, with all events fired at 10 meters. Teams will be comprised of four members selected before the competition begins. A final will be fired for the top 8 individuals.
The modern Gary Anderson Competition Center boasts a long row of indoor electronic targets, which can provide multiple target distances from fixed firing points.
Electronic Targets with Results Streamed Online
The Gary Anderson Center boasts state-of-the-art electronic targets that record scores the instant each shot is fired. Shot-by-shot feeds (and scores) are then displayed on large screens. For some matches, live target images are uploaded to the web for display on mobile devices.
About the National 3PAR Championships — Key INFO
Phase 1 Postal Matches: Competitors shoot on their home ranges and submit scores to CMP.
Phase 2 Regional Championships: Top postal match shooters advance to regional competitions.
National Championship Finals: The final event, held at Camp Perry, features both precision air rifle competitions (July 7-9, 2025) and sporter competition (June 19-21, 2025).
3PAR Competition Classes: There are separate competitions for sporter (designed for new competitors) and precision (modeled after Olympic-style shooting) classes.
National Matches: 2025 3PAR competitions at Camp Perry are held in conjunction with the larger National Matches, offering opportunities for additional shooting events.
National Championship Dates: The Sporter Championship was held June 19-21, 2025. The 3PAR Precision Championship takes place July 7-9, 2025 at Camp Perry.
Championship Rules: The 3PAR Championships are conducted under the 2024-2026 15th Edition National Standard Three-Position Air Rifle Rules (NS3PC). CLICK HERE to download the rules from the CMP website.
About the Gary Anderson CMP Competition Center
The Gary Anderson CMP Competition Center in Ohio, is open to the public, year-round. This modern facility features an 80-point range equipped with the CMP’s own electronic targets. The facility also includes a retail center for equipment and memorabilia sales.
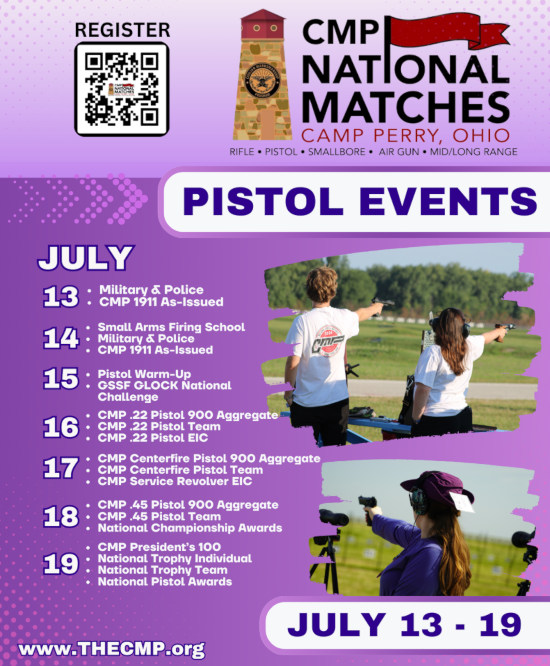
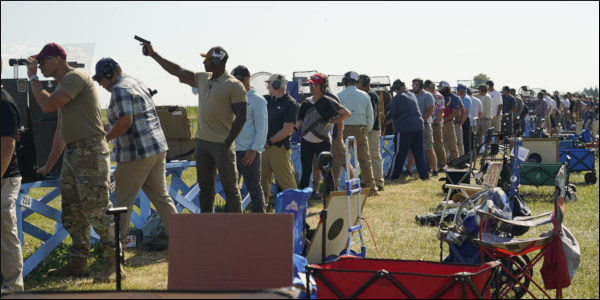
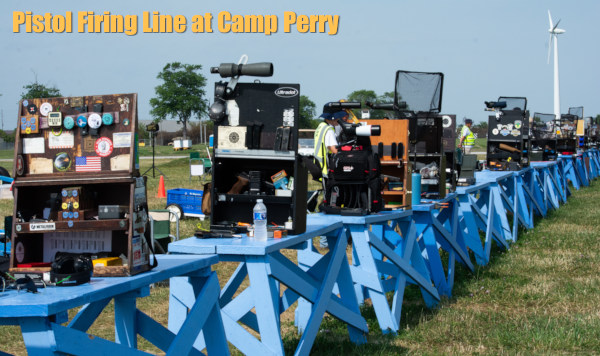
There will be major rimfire and centerfire pistol competitions at the 2025 CMP National Matches at Camp Perry, Ohio. Hundreds of shooters will participate in these popular individual and team events, which commence in mid-July.
The pistol competitions begin on July 13, 2025 with Military & Police and CMP 1911 pistol matches. These continue through the 14th, when the CMP will also conduct a Small Arms Firing School (SAFS) led by USAMU, Military Team, and CMP instructors. Following classroom instruction and practice on the range, SAFS participants will fire an M17 EIC Match.
On July 15 the GSSF Glock Challenge match will be held. On the 16th the .22 Rimfire 900 Aggregate, Team Matches, and Rimfire EIC matches will be held. In the past, these matches have been hugely popular — with 480+ Rimfire competitors from novices to experts.
Following the rimfire pistol matches, there will be centerfire Pistol Aggregate and Team Matches on July 17, followed by .45 Pistol Aggregate and Team matches on July 18. Then, on the 19th, the big President’s 100 Pistol Match, National Trophy Individual Match, and National Trophy Pistol Team Matches will be held. There will be plenty of talent on the firing line. In recent years, over 90% of the top 50 Service Pistol shooters were Distinguished. The Pistol Games conclude on Saturday the 19th, with Pistol Games Awards at the end of the day.
This video shows .45 ACP centerfire pistol competitors at Camp Perry
Interested in competing in the Camp Perry Pistol Matches this summer with either a .22 LR Rimfire pistol or centerfire pistol? It’s not too late to register. CLICK HERE for Pistol Match Online Registration.
Looking downrange at the 600-yard targets. All Camp Perry photos courtesy Dennis Santiago.
The National President’s 100 Match is a famous competition held at Camp Perry every summer. This year’s President’s 100 will take place on July 28, 2025, three weeks away. SEE 2025 Camp Perry NM Calendar.
This is a huge event. in recent years, there have been over 1000 ranked competitors from throughout the nation, making this one of the biggest rifle events of the year. Credit our friend Dennis Santiago for this report. Dennis has competed in the President’s 100 in recent years.
The President’s 100 Rifle Match is richly steeped in history. This unique match was first held in 1878. Above is the view from the line at 600 yards. The top 100 competitors overall in the President’s Rifle Match are designated as the President’s 100. They receive President’s 100 medallions and certificates.
President’s 100 Shoot Off — The Top 20 shooters compete in the Shoot-Off.
President’s 100 Course of Fire
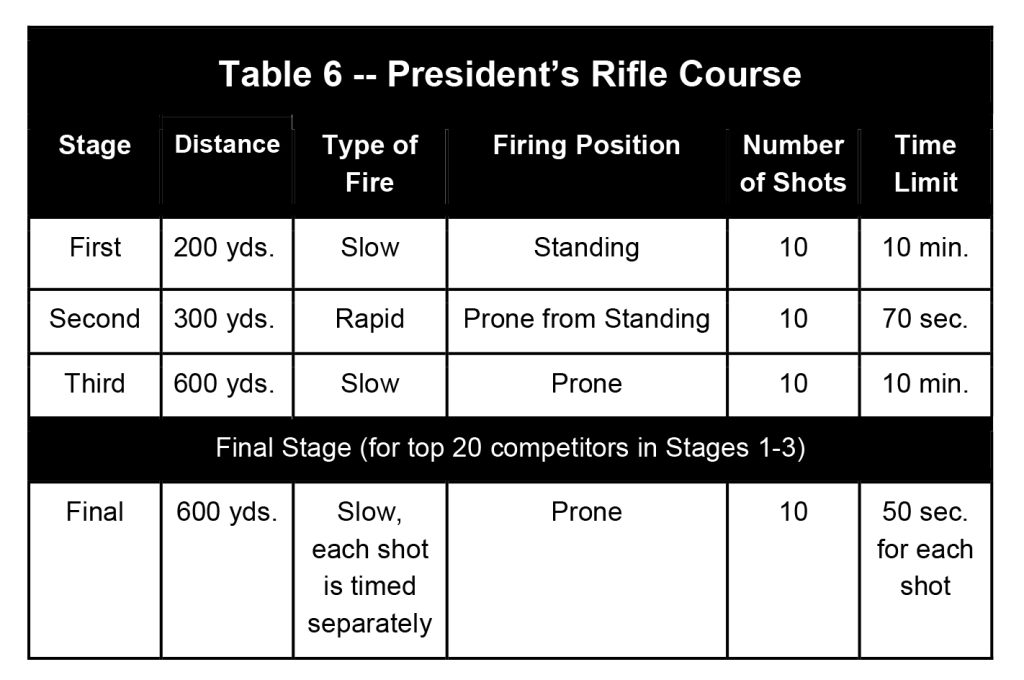
There is a three-yardage, four-stage Course of Fire for the President’s Rifle Match Course of Fire. Firing is done on the SR target at 200 and 300 yards and the MR target at 600 yards. Scores in stages 1-3 determine the President’s 100 and the final rankings of competitors in 21st place and below. Scores in stages 1-4 determine the match winner and the final rankings in places 1-20. If there is a tie for first place (equal total and X-count), the tied shooters will continue to fire one-shot-at-a-time until the tie is broken. No sighters are permitted in National Trophy Rifle Matches.
Origins of the President’s Match The National Rifle Association’s President’s Match was instituted in 1878, as the American Military Rifle Championship Match. In 1884, the name was changed to the President’s Match for the Military Rifle Championship of the United States. It was fired at Creedmoor, New York until 1891. In 1895, it was reintroduced at Sea Girt, New Jersey. Today, the match is held at Camp Perry, Ohio.
The President’s Match was patterned after the Queen’s Match for British Volunteers. That British competition was started in 1860 by Queen Victoria and the NRA of Great Britain to increase the ability of Britain’s marksmen following the Crimean War.
The tradition of making a letter from the President of the United States the first prize began in 1904 when President Theodore Roosevelt personally wrote a letter of congratulations to the winner, Private Howard Gensch of the New Jersey National Guard.
After a hiatus in the 1930s and 1940s, The President’s Match was reinstated in 1957 at the National Matches as “The President’s Hundred.” The 100 top-scoring competitors in the President’s Match were singled out for special recognition.
E-Targets at 2025 National Matches — Rimfire and Centerfire
After years of testing, the Civilian Marksmanship Program (CMP) will make full use of eTargets at the 2025 National Rifle Matches at Camp Perry, which run July 20 through August 9, 2025. The advanced Kongsberg eTargets will be used at all Highpower rifle matches, National Trophy Rifle competitions, and Rifle Games events. In addition the eTargets will be used for the Rimfire Sporter Match on July 20 and the National Mid/Long Range Matches in August. The use of eTargets eliminates the need for pit duty, drastically cutting down the duration of each match. CLICK HERE to learn more about Camp Perry eTargets.
These matches are conducted by the CMP and Ohio National Guard. Since their inception, the National Matches have become a huge, national shooting sports event with over 4,500 annual participants.
Most gun guys know that the NRA publishes a monthly magazine called American Rifleman. What you may not know is that NRA also offers a series of American Rifleman videos on YouTube, with recent American Rifleman TV episodes on the Outdoor Channel. For today’s Saturday Showcase we offer seven noteworthy NRA-produced gun videos currently hosted on YouTube.
Highlights from American Rifleman TV Episodes
Currently on YouTube you can access dozens of past episodes of the American Rifle television series, along with many recent gun/gear reviews. Here are seven NRA videos featuring important or interesting rifle types plus a Remington ammunition factory tour.
Remington Model 700 ADL and BDL
After Winchester came out with the Model 70, Remington Arms answered with the Model 700, one of the most recognized bolt-action designs of all time. The design emerged in 1962, as Remington sought to improve on its previous Models 721 and 722. Two versions of the Remington Model 700 existed at launch: ADL and BDL models. “You know, you could have it two ways. You had the ADL and the BDL,” said NRA Publications Editorial Director Mark Keefe. “You had the plainer ADL at a better price point, then you had the BDL and that had fleur-de-lis checkering and white spacers and a gloss finish and, you know, it was shinier.” The commercial market wasn’t the only area where the Model 700 was successful, as it was also adapted into the U.S. Army as the M24 sniper rifle. To this day, the Model 700 continues to be a popular bolt-action rifle platform for both commercial and military use.
CMP M1 Garand Matches
The Civilian Marksmanship Program (CMP) runs matches throughout the country, including the major summertime Camp Perry matches. This American Rifleman video covers the CMP’s M1 Garand Match, one of the most popular matches at Camp Perry every year. The Garand shoots the .30-06 Springfield cartridge. It is a surprisingly accurate semi-auto rifle, when fitted with an aftermarket barrel. The CMP recently started a program where the CMP is producing M1 Garands with completely new actions and barrels.
Model 1903-A3 Springfield — History of Wartime Rifle
While the U.S. Army’s Model 1903 Springfield rifle is one of the most well-recognized small arms of the 20th century, a lesser-known variant served as an important stop-gap rifle in the early years of World War II. Thanks to the efforts of engineers and arms designers at Remington, the U.S. Army eventually adopted an official pattern of the Springfield termed the “Model of 1903A3.” This NRA video covers the interesting history of the Springfield model 1903-A3.
Revival of Remington Ammunition Production by Vista Outdoor
Remington Ammunition filed for bankruptcy in July 2020. Vista Outdoor, owner of Federal, CCI, and Speer, purchased the assets of Remington Ammunition. This video explains how Vista Outdoor revived Remington’s Lonoke, Arkansas plant. “This is one of the largest ammunition manufacturing plants in the world. It was set up in 1969 by DuPont, who owned Remington at the time” notes Mark Keefe, NRA Publications editorial director. Over the first 18 months of Vista’s ownership of Remington Ammunition, the facility added more than 1500 employees and increased centerfire-handgun ammunition production more than 40 percent, while shotshell production increased 15 percent.
Henry U.S. AR-7 Survival Rifle
This is an interesting video of a compact rimfire rifle originally issued to U.S. Air Force crews. In the event a crew was downed in a wilderness area, the rifle could be assembled and used to shoot game for food. Civilian versions of this ultra-lightweight 3.5-lb rifle are also available. In this video, American Rifleman contributor Jeremiah Knupp puts the Henry U.S. AR-7 Survival Rifle to the water test. The civilian version is sold by Henry as the Henry U.S. Survival Rifle. With the action, barrel, and magazines housed INSIDE the stock assembly, this rifle can easily be carried in a pack or stowed in a vehicle.
Springfield M1A — Popular .308 Win (7.62×51) Semi-Auto Rifle
The M1A is one of the most popular rifles sold today by Springfield Armory. The M1A is a semi-auto version of the select-fire military M14 rifle developed in the 1950s. Designers adapted the action of the M1 Garand with a different gas system and dropped the 8-round internal magazine for 20-round detachable box magazines. Chambered for the 7.62×51 NATO cartridge, the M14 was adopted by the military in 1959, replacing the M1 Garand. However, its term as the official U.S. service rifle was short-lived, as Armalite was developing the M16, which evolved into the semi-auto AR15 for civilian use. Despite the M14 having a short-lived career as a service rifle, the semi-auto M1A remains quite popular for CMP rifle matches.
Can a human, with a sling, shoot as well as a mechanical rest? The answer is “yes” (at least once in a great while) IF that sling shooter can deliver a record-breaking performance. Here’s an interesting tale of man vs. machine from our archives…
The USAMU posed an interesting challenge — could one of their shooters match the performance of a mechanical rest? Who would win in this battle between man and machine? You might just be surprised. At 600 yards, with an AR-platform rifle, the results can be remarkably close, based on targets provided by the USAMU. When clamped in a test rig, a USAMU M16A2 produced a 200-18X group with handloads. The USAMU says this was “one of our better 20-shot groups at 600 yards, testing ammo from a machine rest”. Can a human do better?
Remarkably, a human soldier came very close to matching the group shot from the machine rest. The photo below shows a 20-shot group shot by a USAMU marksman with sling and iron sights, using USAMU-loaded ammunition. The score, 200-16X, was nearly the same. As you can see, the USAMU rifleman didn’t give up much to the machine rest, even at 600 yards!
In fairness, this was no ordinary human performance. The 200-16X score represented a new National Record set in December, 1994. This was fired by PFC Coleman in an Interservice Match at Okeechobee, Florida. Brilliant Performance.
The Vihtavuori and Applied Ballistics-sponsored duo of Chad Heckler and Francis Colon topped the Precision Marksman field at the 2025 Rocky Mountain Airgun Challenge. Held June 18-22, 2025, this 5-day event at the Garth Killpack Shooting Range drew a big crowd, with competitors from over 19 countries. Heckler with a score of 930 and Colon with a score of 900 placed 1st and 2nd respectively in the Precision Marksman Challenge event. Heckler’s victory earned him a $20,000 prize while Colon took home $10,000. Those are some of the biggest cash prizes in any rifle event.
Precision Marksman match winner Chad Heckler was elated: “Team CHANCIS secures the top two spots at the 2025 Rocky Mountain Airgun Challenge! Winning this event last weekend wasn’t easy, Justin and his Utah Airguns family and friends have created something special with this event. The attention to detail and love that was poured into this match was second to none”, said Heckler. “I feel honored to become the 2025 champ alongside [team-mate] Francis Colon. Congrats buddy.”
“There aren’t many times that I’m happy after taking second place, but earning the top two spots with my best friend is epic…” stated Colon. “Massive thank you to Justin Jacobson and the crew at Utah Airguns! This is not just a match… it is an experience! With 5 days of shooting over four disciplines and custom themes, props, music and food, it makes me excited for 2026!”
Tech Tip: If these rifles don’t look like conventional airguns it is because they employ a new design with a slim diameter air tank wrapped around the barrel. These FX DRS Pro MDT 700 Airguns are “designed with the air tank wrapped around the barrel … lowering the profile of the overall rifle, resulting in a very slim front end and an overall more balanced rifle.”
The Rocky Mountain Airgun Challenge
The Rocky Mountain Airgun Challenge (RMAC) is a challenging, multi-class tactical-style airgun competition. The RMAC event, hosted by Utah Airguns, is one of the biggest outdoor air rifle matches in the country. It combines the low-cost of air rifle shooting with the fun of PRS/NRL-type multi-stage shooting.
RMAC features four distinct events designed to test diverse shooting skills. The 100-Yard Benchrest event focuses on precision and wind-reading — most other airgun BR matches are at 50 yards or 50m max, so this is tough by comparison.
The Precision Marksman Challenge is a physically demanding event that requires shooters to engage reactive steel targets from various positions and obstacles under time pressure, utilizing both slugs and pellets. The Speed Challenge is a high-energy, head-to-head competition where shooters race through diverse courses of fire. Finally, the Big Bore Slug Challenge showcases the power and accuracy of slug-shooting airguns, with competitors engaging steel targets at distances from 100 to 450 yards.
Modern Tactical-Style Air Rifles
Here are two state-of-the-art tactical air rifles, the BinTac MCAR ($2790.00 from Airgun Tactical) and the FX IMPACT M4 ($2099.99 from Utah Airguns). The BinTac MCAR almost looks like a centerfire rifle at first glance but the air chambers on the buttstock tell the real story.


 FREE FUN Targets from NSSF













 The National Rifle Association’s President’s Match was instituted in 1878, as the American Military Rifle Championship Match. In 1884, the name was changed to the President’s Match for the Military Rifle Championship of the United States. It was fired at Creedmoor, New York until 1891. In 1895, it was reintroduced at Sea Girt, New Jersey. Today, the match is held at Camp Perry, Ohio.


 RMAC features four distinct events designed to test diverse shooting skills. The 100-Yard Benchrest event focuses on precision and wind-reading — most other airgun BR matches are at 50 yards or 50m max, so this is tough by comparison.


