|
|
August 23rd, 2013
Here’s a remarkable feat of accuracy. But this “trick shot” is not made with a rifle — it’s performed with a Tomahawk. Top Shot Season 3 Champion Dustin Ellermann shows off his “Tomahawk Sniper” skills by hitting a target at 60 feet. Flying over that distance, the Cold Steel Norse Hawk makes five full rotations before hitting the wood target. Dustin’s first throw planted solidly in the wood. That was impressive enough. But Dustin’s second throw hits dead-center, bursting the blue balloon. Ellermann’s tomahawk-tossing skills are impressive, but we do wonder what the Ballistic Coefficient (BC) of that spinning long-handled ‘hawk would be. Watch the video — we bet you’ll enjoy this.

August 22nd, 2013
 Want a FREE Remington Catalog? Well here you go. The latest editions of Remington’s product catalogs are now available online. You can view a digital version of the 2013 Remington Catalog in an ezine-style format, with tabs and flippable pages. Alternately you can download the 2013 catalog as a PDF file, either section by section, or as one big, humongous file. (Warning — the complete 2013 digital catalog PDF is a 187.5 mb file). You can also download a free PDF version of the Remington Model 700 Owner’s Manual (link below). Want a FREE Remington Catalog? Well here you go. The latest editions of Remington’s product catalogs are now available online. You can view a digital version of the 2013 Remington Catalog in an ezine-style format, with tabs and flippable pages. Alternately you can download the 2013 catalog as a PDF file, either section by section, or as one big, humongous file. (Warning — the complete 2013 digital catalog PDF is a 187.5 mb file). You can also download a free PDF version of the Remington Model 700 Owner’s Manual (link below).
The Rifle Catalog features all the latest Remington rifles, including the Model 700 ‘Target Tactical’ model. This 11.75-lb gun boasts a Bell & Carlson composite stock with ergonomic grip and adjustable LOP and cheekpiece. The .308 Win Target Tactical retails for $2117.
Launch Remington 2013 Digital Catalog | Download Remington 700 Owners Manual (PDF)


Ballistics Data for Dozens of Factory Loads
Remington also has a comprehensive Ballistics Data Sheet with ballistics information for all Remington loaded ammo — from 17 Fireball all the way up to the 45/70 Government. Even if you don’t use factory-loaded ammo, this is a very useful resource that allows you to quickly compare velocities, energy, wind drift, and drop among a wide variety of cartridges. Which shoots flatter… a .204 Ruger or a 22-250? Remington’s Ballistics Data Sheet provides a quick, reliable answer. Info is laid out in tables, with color coding for different bullet types.
CLICK HERE to download Ballistics INFO

August 22nd, 2013
Wednesday was Team Day at the U.S. F-Class Championships. There were 27 four-member F-Open Teams plus 19 four-member F-TR teams. Many teams were composed of foreign shooters who are tuning up for the upcoming F-Class World Championships which kicks off at Raton on Friday. Team competition was fierce, but when the dust settled, two squads emerged victorious, USA F-Open Team 4, and the U.S. F-TR Team 3.
CLICK HERE for Complete List of Team Results

USA F-Open Team 4: Robert Bock, Trudie Fay (Coach), Larry Bartholome (front row); Shiraz Balolia (Captain), Emil Kovan (back row).
F-Open Team USA #4 Captain Shiraz Balolia reports: “We won the first match, lost the second to Australia and won the overall Aggregate Championship (total of both matches). We were knocking on the door of a new National record on the first relay, having the same score, but a few less Xs. One more point would have set a record. We took the Gold Medal in the first match, and Bronze in the second match.” Team USA #4 finished with a 1570-62X total, four points ahead of second-place F-Open Team USA #3 (1566-66X). Shiraz praised team #4 coach Trudie Fay and his fellow team shooters Larry Bartholome, Robert Bock, and Emil Kovan. Shiraz joked: “Maybe it was Trudie’s glow-in-the-dark Crocs that gave us the winning edge.”
USA Team 3 Wins F-TR Championship, Aussie Team Second
The USA F-TR Team 3, under Captain Mid Tompkins and coach Steve Cunico, powered out an impressive victory, finishing with 1536-44X, six points ahead of the runner-up Team Australia Gold squad. USA F-TR Team 3 shooters Lane Buxton, John Chilton, Laura Perry, and Paul Phillips all turned in great performances lead by Lane Buxton’s 388-6X total.

| F-Open Team Championship
1. USA F-Open Team 4, Total 1570-62X
2. USA F-Open Team 3, Total 1566-66X
3. Team Australia #1 F-Open Gold, Total 1566-52X
4. Team Spindle Shooters, Total 1561-47X
5. USA F-Open Team 1, Total 1560-55X |
F-TR Team Championship
1. U.S. F-TR Team 3, Total 1536-44X
2. Team Australia G-TR Gold, Total 1530-40X
3. U.S. F-TR Team 4, Total 1525-51X
4. Michigan F-TR Team, Total 1521-30X
5. Canada F-TR ‘White’ Team, Total 1518-39X |
August 22nd, 2013
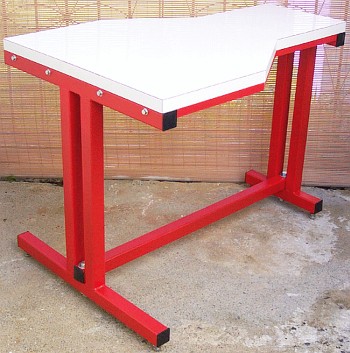
 Building your own portable shooting bench is a great do-it-yourself project. You can build a sturdy bench for well under $100 in materials. Compare that to some deluxe factory-built benches which may cost $500.00 or more. Building your own portable shooting bench is a great do-it-yourself project. You can build a sturdy bench for well under $100 in materials. Compare that to some deluxe factory-built benches which may cost $500.00 or more.
FREE Bench Plans on the Web
You’ll find a wide assortment of home-built shooting bench designs (both portable and fixed) on the internet. Renovation Headquarters has links to FREE Plans and building instructions for fourteen (14) different shooting benches. There are all-wood shooting bench designs as well as benches that combine a wood top with a metal sub-frame or legs.
CLICK HERE for Shooting Bench FREE Plans Webpage
Among Renovation HQ’s fourteen featured shooting benches, here are five designs we liked:
Reader Jim Jewell has used the eHow bench design shown above. He recommends it highly. Jim reports: “A colleague and I built two of the eHow permanent wood, sturdy benches for our Pt. Phillips Rod and Gun Club in PA, which had outdated benches. I want to tell you that these benches are very stable and a real bargain. The benches cost precisely $100.00 each using the bill of materials and pressure treated wood. The bill of materials, with careful cutting, using a Chop saw, resulted in almost no scrap wood if carefully measured and cut. The plans are terrific and the benches are great platforms for bench-rest shooting. I made only one modification — I left a 6″ wing on both sides of the table to mount a spotting scope. Further we added a base of dry QuickCrete or similar fast setting concrete mix material. Add it dry, make sure the table is level and fill in the 6″ hole. The hole and QuickCrete add maximum stability. The QuickCrete sucks moisture from the ground, hardens in situ, and adds stability to the bench.
I can’t recommend this design highly enough. It is dirt cheap for clubs on a budget, goes together quickly, the table is very stable and there is no waste if you make precise measurements and cuts. A bag of QuickCrete is enough for two tables adding about $2.00 to the cost of each table. We plan on building new tables for the whole club for under $1000. After about a year, with a completely water-free wood in the bench I recommend a coat of Thompson’s Water Seal and these benches should last a long time.”
Heavy Wood Bench That Converts to Three Sections for Transport
In addition to the fourteen benches mentioned above, here is an interesting break-down bench design. Call it a “semi-portable” bench. The legs and frame are made from stout 4×4 post segments so the bench is fairly heavy. However, this bench can break down into three (3) sections for easier transport to and from the range. Dado-cut channels assure proper top alignment. This might be a good choice if you plan a multi-day excursion to a location without fixed benches. This three-leg bench design can be made from easy-to-locate materials. Note: The dimensions of this bench are are larger than typical fixed benches to accommodate 50 BMGs and other big rifles. CLICK HERE for more details.

Do you like the bench in the illustration at the beginning of this story (top right)? This is a prototype design by Chris Byrne of the Anarchangel Blog. For more details, CLICK HERE.
August 21st, 2013
Just a “heads-up” for our AR shooters out there. Check this out. For a limited time, Brownells is selling
Magpul 30-Round Polymer AR mags for just $10.79 each. That’s right — high-quality Magpul PMAG 30s for under eleven bucks. Hard to beat that deal if you are looking for name-brand 30-rounders for your .223/5.56 AR-platform rifle. Click image below to see product info on the Brownells webstore.

August 21st, 2013
The U.S. F-Class Nationals, now underway in Raton, NM, are a big success. This event has drawn huge numbers of talented shooters from across America (and around the world). There are roughly 180 F-TR shooters plus over 170 F-Open Shooters. That’s a record turn-out we’re told. The Nationals got off to an impressive start — the best shooters were center-punching the 1000-yard targets right out of the gate. Chris Ford shot a 150-11X in the first F-0pen match of Day 1, when many other 150s were shot, including a 150-9X by Larry Bartholome. Many 150s were also shot on Day 2 during the first match. On both days, conditions got tougher over the course of the day.

In F-Open, after two days of shooting, William Wittman (894-39X) enjoys a two-point lead over Larry Batholome (892-42X). In F-TR class, Lige Harris (885-34X) has been the class of the field so far, posting the top scores on both Day 1 (445-18X) and Day 2 (440-18X). The level of competition is extraordinarily high this year — so high that some past National Champions are well down the pack. Overall, if you look at the complete score sheets linked below, you’ll see that competition has been very tight, with many shooters clustered with near-identical scores.
Download DAY ONE F-Open and F-TR Results | Download DAY TWO F-Open and F-TR Results

F-Open Results Day 1 (Top 10)
William WITTMAN 148-7 150-10 150-4 448-21X
Martin LOBERT 149-8 150-6 148-9 447-23X
Gordon OGG 148-9 148-7 150-8 446-24X
Larry BARTHOLOME 150-9 148-6 148-6 446-21X
Speedy GONZALEZ 149-8 149-4 148-8 446-20X
Marce BEEN 148-6 149-3 149-8 446-17X
Bob SEBOLD 149-7 148-3 149-6 446-16X
Kenny ADAMS 150-7 145-7 150-8 445-22X
Mike MCGILL 146-4 150-10 149-8 445 22X
Freddy HALTOM 149-6 148-7 148-5 445-18X |
F-Open Results Day 2 (Top 10)
Larry BARTHOLOME 150-10 148-6 148-6 446-22X
William WITTMAN 150-7 147-7 149-4 446-18X
Freddy HALTOM 149-10 149-8 147-4 445-22X
Kenneth PADILLA 150-8 148-8 147-4 445-20X
Steven BLAIR 150-11 147-7 147-3 444-21X
Charles BALLARD 149-11 149-4 146-2 444-17X
Bob SEBOLD 150-9 148-1 146-5 444-15X
Emil KOVAN 150-6 147-4 147-3 444-13X
Jeff TRAYLOR 149-6 148-1 146-3 443-10X
Speedy GONZALEZ 149-8 146-7 147-6 442-21X
Pete PETROS 148-5 147-8 147-8 442-21X |
F-TR Results Day 1 (Top 10)
Lige HARRIS 149-5 146-6 150-7 445-18X
John CHILTON 150-7 146-3 146-4 442-14X
James CROFTS 149-6 143-3 149-7 441-16X
Paul KENT 147-4 147-6 147-3 441-13X
Philip KELLEY 146-6 144-5 150-9 440-20X
Derek RODGERS 148-10 143-3 149-6 440-19X
Michael SMITH 148-4 145-3 147-3 440-10X
Ian KLEMM 147-5 146-4 146-2 439-11X
Daniel POHLABEL 148-8 142-7 148-4 438-19X
Radoslaw CZUPRYNA 147-6 141-1 150-9 438-16X |
F-TR Result Day 2 (Top 10)
Lige HARRIS 147-7 148-5 145-4 440-16X
Derek RODGERS 147-3 147-4 146-4 440-11X
Gerry WIENS 148-4 145-2 145-6 438-12X
Trudie FAY 146-3 146-4 146-3 438-10X
Ian KLEMM 149-6 145-7 142-5 436-18X
Alan BARNHART 148-9 144-2 144-1 436-12X
William LITZ 148-5 143-4 144-4 435-13X
Laura PERRY 146-5 146-4 143-2 435-11X
Allen TAMPKE 147-4 141-4 146-3 434-11X
Stephen SIRCAUSA 148-7 143-8 142-4 433-19X
| |

August 21st, 2013
Jerry Stiller of Stiller Precision Firearms has revealed the final pre-production versions of his new 2500X rear lock-up rimfire action. Jerry reports: “I have eight of them as prototypes that have been sent to our best smiths to build on and test. As soon as we hear back (in a month or so?), we will start the next run of 100. There will be plenty to go around and should be available this fall for next year’s builds. Cost will be competitive, estimated $1249.00 retail”. Notably, this new action features a convertible 6 o’clock or 12 o’clock firing pin, giving the owner the choice of his preferred configuration. The trigger hanger can also be reversed for a 0.030 change in pin fall.

Jerry provided these photos of the first 2500X action off the production line. Jerry notes that: “The only difference with the final production version is that the body will be melonited on the inside for super-slick operation and the outside will still be polished for great looks”.

Stiller 2500X Rimfire Action Features
- Dual rear locking lugs symmetric about the horizontal centerline.
- Super tight tolerances on all fitted parts.
- Firing pin design easily unscrews.
- 6 o’clock or 12 o’clock firing pin. The other pin acts as a guide to eliminate any off-axis canting that can impair ignition and cause flyers.
- Cocking piece controlled by a shroud so it is always centered in the trigger and cannot rub.
- Easy loading ramp design similar to the Anschutz.
- Entrance cams in the body.
- Beveled loading port
- Four #8 screw holes for scope mounts, plus two #6 screwholes (in between) also reamed for .125 pins. That way a long one-piece mount or just front-only will both be accommodated.
- Threaded bolt handle so that any available knob will work. Stiller offers three knob types.

State-of-the-Art Machining Technologies Used to Make 2500X Actions
A multi-step process is employed to deliver precision tolerances on every 2500X action. The process begins with a drilled, undersize hole. Then the body is cut and heat-treated/stress-relieved with oversize outside diameter (OD). The Inside diameter hole is wire-EDM finished after heat-treating for optimal sizing and straightness. Next the OD is ground to size and the action face and threads are machined. The action is finally engraved, hand-finished, and melonited on the inside (unless the customer specifies a non-melonited version). Individual parts receive special attention — the extractors are wire-EDM cut, and the bolt lugs are factory-lapped with special devices to load the lugs as they would be when fired.

August 21st, 2013
If you have a match, hunting, or tactical rifle that needs a little more “stiction” in the grip or fore-arm areas, particularly in wet or humid conditions, consider adding a non-slip coating to the stock. This is easily done with inexpensive materials. R+D Precision has a simple do-it-yourself procedure for adding texture to your stock. Be forewarned — this is basically a permanent addition to your stock, so you might want to practice first. Also the application of the bedding compound will change the color of the stock, so you may want to re-finish the stock.

Marking the Area to Texture with Steel-Bed or Similar Material
Tape off the area you want to put the texture. Spread a very thin coat of the Steel-Bed on the stock, just enough to cover the area. This can be done using Marine-Tex or Steel-Bed. Other products could be used but Steel-Bed is proven, and it’s what R+D prefers for the job.

Best Method for Applying Texture
Here is the secret to adding texture: Using the tongue depressor that is in the kit or something similar, BOUNCE the flat part of the stick on the still-wet bedding to get the textured effect. Once the bedding has dried for about an hour, and still kind of tacky, remove the tape, pulling at a sharp angle to leave a nice sharp edge. If the bedding has a sharp raised area where the tape was, wet your finger and rub along the edge and it will knock off the edge but still give that nice sharp transition.


Click HERE for more photos.
August 20th, 2013
The Tactical and Target T3 Tubeguns are here at last! Gary Eliseo of Competition Machine has announced that his new tubegun chassis for Tikka T3 actions “is now available in Target and Tactical versions”. The T3 kit will initially be right-hand only, set up for AICS short action magazines. This is a “no gunsmithing” installation — no modifications to the action are required and the chassis kit works with the factory T3 trigger and safety. Along with the new Target and Tactical versions, a lower-cost Light-Weight Hunter T3 Chassis is also offered (this will accept AR buttstocks).


 Tikka’s T3 action is rigid and robust. It cycles smoothly and has a short 75° bolt lift. The T3 features a Sako-style extractor, with angled-leading-edge bolt lugs for smooth lock-up. The T3 action can be installed in Gary’s Chassis Kit with either a recoil disc (and bolts) or glue-in action mounting. The Chassis Kit is designed to accept AR15 buttstocks. Tikka’s T3 action is rigid and robust. It cycles smoothly and has a short 75° bolt lift. The T3 features a Sako-style extractor, with angled-leading-edge bolt lugs for smooth lock-up. The T3 action can be installed in Gary’s Chassis Kit with either a recoil disc (and bolts) or glue-in action mounting. The Chassis Kit is designed to accept AR15 buttstocks.
Eliseo’s current T3 Chassis Kit is for right-hand short actions. However, Gary told us today that left-hand models will be included in the next production run this fall. He is also prototyping a long-action version.
Price for the Tactical model is $1020.00, with a rugged Cerakote finish. Price for the Target version is $925.00 with a powdercoat finish or $1000.00 with a Cerakote finish. The Light-Weight Hunter chassis (that accepts owner-installed AR-type buttstocks) is $685.00. Tikka T3 action and AICS 5-round or 10-round magazines sold separately. For more info, visit GotXRing.com, call 714-630-5734, or send email to: spraynandprayn [at] gmail.com . CLICK HERE for order page.

August 20th, 2013
Burris Signature Rings with polymer inserts are an excellent product. The inserts allow you to clamp your scope securely without ring marks. Moreover, using the matched offset inserts you can “pre-load” your scope to add additional elevation. This helps keep the scope centered in its elevation range while shooting at long range. Additionally, with a -20 insert set in the front and a +20 insert set in the rear, you may be able to zero at very long ranges without using an angled scope base — and that can save money. (To move your point of impact upwards, you lower the front of the scope relative to the bore axis, while raising the rear of the scope.)

Insert Elevation Values and Ring Spacing
People are sometimes confused when they employ the Burris inserts. The inset numbers (-10, +10, -20, +20 etc.) refer to hundredths of inch shim values, rather than to MOA. And you need the correct, matched top/bottom pair of inserts to give you the marked thousandth value. Importantly, the actual amount of elevation you get with Burris inserts will depend BOTH on the insert value AND the spacing between ring centers.
Forum member Gunamonth has explained this in our Shooters’ Forum:
Burris inserts are [marked] in thousandths of an inch, not MOA. To know how many MOA you gain you also need to know the ring spacing. For example, with a -20 thou insert set in the front and a +20 thou insert set in the rear, if the ring spacing is 6″, the elevation change will be approximately +24 MOA upwards.

Here’s how we calculate that. If you have a 2 X 0.020″ “lift” over a distance of 6 inches (i.e. 0.040″ total offset at 0.5 feet) that’s equivalent to 0.080″ “lift” over 12 inches (one foot). There are 300 feet in 100 yards so we multiply 0.080″ X 300 and get 24″ for the total elevation increase at 100 yard. (Note: One inch at 100 yards isn’t exactly a MOA but it’s fairly close.)
Here’s a formula, with all units in inches:
Total Ring Offset
——————– X 3600 = Change @ 100 yards
Ring Spacing
(.020 + .020)
—————– X 3600 = 24 inches at 100 yards
6
NOTE: Using the above formula, the only time the marked insert offset will equal the actual MOA shift is when the center to center ring spacing is 3.60″. Of course, you are not required to use 3.60″ spacing, but if you have a different spacing your elevation “lift” will be more or less than the values on the inserts.
|